

Owners Manual
Page 1
...utilisation d'une essence contenant plus de 10% d'éthanol (E10) ou de 10% de MTBE annulent la garantie. Zoom 42 (Serial No. 10000 and up ) 915171 - Zoom 50 (Serial No. 10000 and up ) 915159 - Zoom 42 CARB (Serial No. 10000 and up) Gasoline containing up to 10% ethanol (E10) or up to 10% ... ether) is acceptable for use of any gasoline exceeding 10% ethanol (E10) or 10% MTBE will void the product warranty. The use in USA Zoom® Owner/Operator Manual Manuel Du Propriétaire/Utilisateur Models 915157 - Il est possible d'utiliser de l'essence contenant jusqu'à 10% d'é...
...utilisation d'une essence contenant plus de 10% d'éthanol (E10) ou de 10% de MTBE annulent la garantie. Zoom 42 (Serial No. 10000 and up ) 915171 - Zoom 50 (Serial No. 10000 and up ) 915159 - Zoom 42 CARB (Serial No. 10000 and up) Gasoline containing up to 10% ethanol (E10) or up to 10% ... ether) is acceptable for use of any gasoline exceeding 10% ethanol (E10) or 10% MTBE will void the product warranty. The use in USA Zoom® Owner/Operator Manual Manuel Du Propriétaire/Utilisateur Models 915157 - Il est possible d'utiliser de l'essence contenant jusqu'à 10% d'é...

Owners Manual
Page 2
...dans des langues différentes de l'anglais sont également disponibles en téléchargement gratuit sur notre site Web: http://www.ariens.com THE MANUAL Before operation of your unit and engine. Numbers are also available as a free download on the frame of unit, carefully ... a separate manual specific to left, right, front, or rear are printed on a serial number label, located on our website: http://www.ariens.com MANUALES EN IDIOMAS DIFERENTES DEL INGLES Puede obtener manuales en idiomas diferentes del inglés en su distribuidor. This manual is included in the...
...dans des langues différentes de l'anglais sont également disponibles en téléchargement gratuit sur notre site Web: http://www.ariens.com THE MANUAL Before operation of your unit and engine. Numbers are also available as a free download on the frame of unit, carefully ... a separate manual specific to left, right, front, or rear are printed on a serial number label, located on our website: http://www.ariens.com MANUALES EN IDIOMAS DIFERENTES DEL INGLES Puede obtener manuales en idiomas diferentes del inglés en su distribuidor. This manual is included in the...

Owners Manual
Page 3
...you do not register your product, please fill out, sign and return the product registration card to Ariens or go to www.ariens.com on the Internet. PRODUCT REGISTRATION The Ariens dealer must register the product at the time of this unit and may be honored, whether or not... the product registration card is returned. Customer Note: If the dealer does not register your unit. UNAUTHORIZED REPLACEMENT PARTS Use only Ariens replacement parts. The replacement of any claims or damages, whether warranty, property damage, personal injury or death arising out of the use of...
...you do not register your product, please fill out, sign and return the product registration card to Ariens or go to www.ariens.com on the Internet. PRODUCT REGISTRATION The Ariens dealer must register the product at the time of this unit and may be honored, whether or not... the product registration card is returned. Customer Note: If the dealer does not register your unit. UNAUTHORIZED REPLACEMENT PARTS Use only Ariens replacement parts. The replacement of any claims or damages, whether warranty, property damage, personal injury or death arising out of the use of...

Owners Manual
Page 4
... Review Limited Warranty Policy. 6. The descriptions and specifications contained in this manual. Some illustrations may be applicable to your nearest Ariens dealer, go to stop before leaving operator's position. Tragic accidents can cause serious injury. Gasoline is your responsibility to the ... described within this manual. 4. WARNING: Improper assembly or adjustments can occur if the operator is used in the manuals. 3. DISCLAIMER Ariens reserves the right to discontinue, change, and improve its products at printing. GB - 4 Make sure all slopes requires extra caution....
... Review Limited Warranty Policy. 6. The descriptions and specifications contained in this manual. Some illustrations may be applicable to your nearest Ariens dealer, go to stop before leaving operator's position. Tragic accidents can cause serious injury. Gasoline is your responsibility to the ... described within this manual. 4. WARNING: Improper assembly or adjustments can occur if the operator is used in the manuals. 3. DISCLAIMER Ariens reserves the right to discontinue, change, and improve its products at printing. GB - 4 Make sure all slopes requires extra caution....

Owners Manual
Page 5
SAFETY DECALS AND LOCATIONS ALWAYS replace missing or damaged Safety Decals. It may also be used to figure 2 for proper operation and maintenance practices. Refer to alert against unsafe practices. 4 NOTATIONS NOTE: General reference information for Safety Decal locations. 7 07800401 6 2 5 1 2 3 P Figure 2 07800339 GB - 5 CAUTION: POTENTIALLY HAZARDOUS SITUATION! If not avoided, MAY RESULT in minor or moderate injury. IMPORTANT: Specific procedures or information required to prevent damage to unit or attachment.
SAFETY DECALS AND LOCATIONS ALWAYS replace missing or damaged Safety Decals. It may also be used to figure 2 for proper operation and maintenance practices. Refer to alert against unsafe practices. 4 NOTATIONS NOTE: General reference information for Safety Decal locations. 7 07800401 6 2 5 1 2 3 P Figure 2 07800339 GB - 5 CAUTION: POTENTIALLY HAZARDOUS SITUATION! If not avoided, MAY RESULT in minor or moderate injury. IMPORTANT: Specific procedures or information required to prevent damage to unit or attachment.

Owners Manual
Page 6
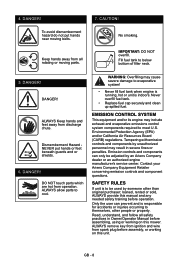
DANGER! Discharge Hazard NEVER direct discharge toward people, pets or property. Thrown objects can cause injury or damage. Read and understand the operator's manual before servicing or making adjustments to unit. Keep hands away from unit while unit is attached. 2. Thrown objects can cause injury or damage. Do not operate mower unless all guards and shields in this area. 3. DANGER! Dismemberment Hazard NEVER stick hands or feet under deck or shielded areas. Keep children and others away from all rotating or moving parts. Keep children and others away from...
DANGER! Discharge Hazard NEVER direct discharge toward people, pets or property. Thrown objects can cause injury or damage. Read and understand the operator's manual before servicing or making adjustments to unit. Keep hands away from unit while unit is attached. 2. Thrown objects can cause injury or damage. Do not operate mower unless all guards and shields in this area. 3. DANGER! Dismemberment Hazard NEVER stick hands or feet under deck or shielded areas. Keep children and others away from all rotating or moving parts. Keep children and others away from...

Owners Manual
Page 7
DO NOT operate on slopes over 10°. 3.4 Service Hazard Look behind when operating the unit in the presence of traction is attached. 3.3 Tipping Hazard Avoid tipping hazard. 3.5 Bystander Hazard DO NOT operate the unit in reverse. 3.6 Loss of Traction Hazard If loss of bystanders. Proceed off slope slowly. Do not operate mower unless all guards are in operating position or bagger is experienced do the following: Before servicing unit do the following: Disengage PTO. Read owners manual before servicing or making adjustments to unit. GB - 7 DO NOT operate on slopes over ...
DO NOT operate on slopes over 10°. 3.4 Service Hazard Look behind when operating the unit in the presence of traction is attached. 3.3 Tipping Hazard Avoid tipping hazard. 3.5 Bystander Hazard DO NOT operate the unit in reverse. 3.6 Loss of Traction Hazard If loss of bystanders. Proceed off slope slowly. Do not operate mower unless all guards are in operating position or bagger is experienced do the following: Before servicing unit do the following: Disengage PTO. Read owners manual before servicing or making adjustments to unit. GB - 7 DO NOT operate on slopes over ...
Owners Manual
Page 8
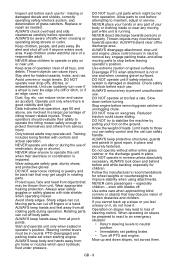
... indoors. 4. EMISSION CONTROL SYSTEM This equipment and/or its engine may result in Owner/Operator Manual before operation. Contact your Ariens Company Equipment Retailer concerning emission controls and component questions. ALWAYS remove key from ignition and wire from operation. DANGER! SAFETY RULES...ALWAYS Keep hands and feet away from all safety practices in severe fines or penalties. Only the user can only be used by an Ariens Company dealer or an authorized engine manufacturer's service center. GB - 8 CAUTION! ALWAYS allow parts to below bottom of filler neck....
... indoors. 4. EMISSION CONTROL SYSTEM This equipment and/or its engine may result in Owner/Operator Manual before operation. Contact your Ariens Company Equipment Retailer concerning emission controls and component questions. ALWAYS remove key from ignition and wire from operation. DANGER! SAFETY RULES...ALWAYS Keep hands and feet away from all safety practices in severe fines or penalties. Only the user can only be used by an Ariens Company dealer or an authorized engine manufacturer's service center. GB - 8 CAUTION! ALWAYS allow parts to below bottom of filler neck....
Owners Manual
Page 9
Keep children, people, and pets away. NEVER allow children to prevent unauthorized use. Operate unit only when there is damaged or disabled. DO NOT wear loose clothing or jewelry and tie back hair that may operate unit. Always wear safety goggles or safety glasses with controls and actual operation. ALWAYS keep hands and feet away from unit. Disengage PTO when attachment is running. ALWAYS remove key to operate or play on or near unit. Slow down before attempting to cool before turning. especially children - Use extra care when approaching blind corners or ...
Keep children, people, and pets away. NEVER allow children to prevent unauthorized use. Operate unit only when there is damaged or disabled. DO NOT wear loose clothing or jewelry and tie back hair that may operate unit. Always wear safety goggles or safety glasses with controls and actual operation. ALWAYS keep hands and feet away from unit. Disengage PTO when attachment is running. ALWAYS remove key to operate or play on or near unit. Slow down before attempting to cool before turning. especially children - Use extra care when approaching blind corners or ...

Owners Manual
Page 10
DO NOT operate on slopes over -speed engine. Tow only with bagger attached. Do not attach towed equipment except at all movements on the slope slow and gradual. Follow the manufacturer's recommendations for weight limits for towing. Do not use hitch with a machine that could be maintained in place and securely fastened. Do not use unit on or near any unimproved, forest-covered or brush covered land unless exhaust system is equipped with any ground engaging equipment. Travel slowly and allow engine to stop. ALWAYS turn off power to negative (-) terminal. Clean up ...
DO NOT operate on slopes over -speed engine. Tow only with bagger attached. Do not attach towed equipment except at all movements on the slope slow and gradual. Follow the manufacturer's recommendations for weight limits for towing. Do not use hitch with a machine that could be maintained in place and securely fastened. Do not use unit on or near any unimproved, forest-covered or brush covered land unless exhaust system is equipped with any ground engaging equipment. Travel slowly and allow engine to stop. ALWAYS turn off power to negative (-) terminal. Clean up ...
Owners Manual
Page 11
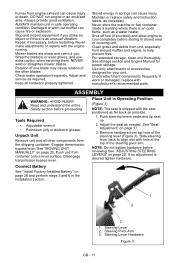
ALWAYS maintain unit in the installation section. 1 3 2 1. Never make adjustments or repairs with the seat positioned as far back as possible. 1. Maintain or replace safety and instruction labels, as needed. Clean grass and debris from unit, especially from the shipping container. Use only attachments or accessories designed for proper storage. See "MOVING UNIT MANUALLY" on page 17. 3. Steering Lever Hardware Figure 3 GB - 11 Fumes from engine exhaust can cause fire or explosion. Wrap the blade(s) or wear gloves, and use extra caution when servicing them. Check ...
ALWAYS maintain unit in the installation section. 1 3 2 1. Never make adjustments or repairs with the seat positioned as far back as possible. 1. Maintain or replace safety and instruction labels, as needed. Clean grass and debris from unit, especially from the shipping container. Use only attachments or accessories designed for proper storage. See "MOVING UNIT MANUALLY" on page 17. 3. Steering Lever Hardware Figure 3 GB - 11 Fumes from engine exhaust can cause fire or explosion. Wrap the blade(s) or wear gloves, and use extra caution when servicing them. Check ...

Owners Manual
Page 12
Welding can result in death or serious injury. See "FILLING FUEL TANK" on page 15. Check function of all controls See "OPERATION" on page 18. GB - 12 Level Mower Deck See "LEVELING AND ADJUSTING PITCH OF MOWER DECK" on page 35. Check Safety Interlock System WARNING: Safety interlock failure and improper operation of tire and rim parts is functioning properly. Fill Fuel Tank Fill fuel tank. See "SPECIFICATIONS" on page 23. Heat can cause an increase in air pressure resulting in front or over the tire assembly when inflating. Check system before each use to ...
Welding can result in death or serious injury. See "FILLING FUEL TANK" on page 15. Check function of all controls See "OPERATION" on page 18. GB - 12 Level Mower Deck See "LEVELING AND ADJUSTING PITCH OF MOWER DECK" on page 35. Check Safety Interlock System WARNING: Safety interlock failure and improper operation of tire and rim parts is functioning properly. Fill Fuel Tank Fill fuel tank. See "SPECIFICATIONS" on page 23. Heat can cause an increase in air pressure resulting in front or over the tire assembly when inflating. Check system before each use to ...

Owners Manual
Page 13
PTO Switch 3. Seat Adjustment Lever (915159, 161, 171) 13. Steering Levers 6. Mower Lift Pedal 8. Throttle/Choke Lever 12. Discharge Chute 10. Seat 4. Parking Brake Lever 11. Washout Port (915159, 161, 171) GB - 13 Fuel Level 5. Height of Cut Selector Lever 14. Ignition Switch 2. Mower Deck Figure 4 9. CONTROLS AND FEATURES 915159, 161, 171 3 2 5 6 12 4 11 14 915157, 169 1 13 1 9 2 10 7 8 11 1. Fuel Tank 7.
PTO Switch 3. Seat Adjustment Lever (915159, 161, 171) 13. Steering Levers 6. Mower Lift Pedal 8. Throttle/Choke Lever 12. Discharge Chute 10. Seat 4. Parking Brake Lever 11. Washout Port (915159, 161, 171) GB - 13 Fuel Level 5. Height of Cut Selector Lever 14. Ignition Switch 2. Mower Deck Figure 4 9. CONTROLS AND FEATURES 915159, 161, 171 3 2 5 6 12 4 11 14 915157, 169 1 13 1 9 2 10 7 8 11 1. Fuel Tank 7.

Owners Manual
Page 14
... entire Safety section before each use to ensure the safety interlock system is functioning properly. If the unit does not perform as stated contact your Ariens dealer for detailed instructions on how to start engine. Use to start a cold engine.
... entire Safety section before each use to ensure the safety interlock system is functioning properly. If the unit does not perform as stated contact your Ariens dealer for detailed instructions on how to start engine. Use to start a cold engine.
Owners Manual
Page 15
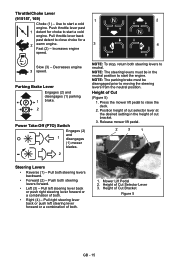
Increases engine speed. Parking Brake Lever Engages (2) and disengages (1) parking 1 brake. 2 Power Take-Off (PTO) Switch Engages (2) and 1 disengages (1) mower blades. 2 NOTE: To stop, return both steering levers to raise the deck. 2. Press the mower lift pedal to neutral. Push both steering levers backward. • Forward (2) - Pull both steering levers forward. • Left (3) - Throttle/Choke Lever (915157, 169) 1 2 Choke (1) - Position height of cut selector lever at the desired setting in the neutral position to start the engine. Pull left steering lever...
Increases engine speed. Parking Brake Lever Engages (2) and disengages (1) parking 1 brake. 2 Power Take-Off (PTO) Switch Engages (2) and 1 disengages (1) mower blades. 2 NOTE: To stop, return both steering levers to raise the deck. 2. Press the mower lift pedal to neutral. Push both steering levers backward. • Forward (2) - Pull both steering levers forward. • Left (3) - Throttle/Choke Lever (915157, 169) 1 2 Choke (1) - Position height of cut selector lever at the desired setting in the neutral position to start the engine. Pull left steering lever...
Owners Manual
Page 16
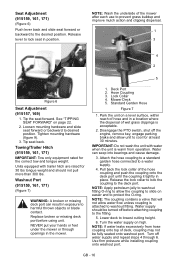
Tighten mounting hardware (figure 9). 3. NEVER put your hands or feet under the mower or through 6. Water can result in a location where the dispersal of wet grass clippings is acceptable. 2. NOTE: Apply petroleum jelly to washout fitting O-ring to allow unit to the fitting. 5. Lower deck to the desired position. Tip the seat forward. Deck Port 2. Hose Coupling 3. Mower Deck 5. Park the unit on easier and to a water supply. 4. GB - 16 Seat Adjustment (915159, 161, 171) (Figure 6) Push lever back and slide seat forward or backward to lowest cutting height. ...
Tighten mounting hardware (figure 9). 3. NEVER put your hands or feet under the mower or through 6. Water can result in a location where the dispersal of wet grass clippings is acceptable. 2. NOTE: Apply petroleum jelly to washout fitting O-ring to allow unit to the fitting. 5. Lower deck to the desired position. Tip the seat forward. Deck Port 2. Hose Coupling 3. Mower Deck 5. Park the unit on easier and to a water supply. 4. GB - 16 Seat Adjustment (915159, 161, 171) (Figure 6) Push lever back and slide seat forward or backward to lowest cutting height. ...

Owners Manual
Page 17
DO NOT engage deck in the tank. typically 2 to the fuel tank: 1. NOTE: If the mower deck is not clean after using the deck wash system, NEVER engage the deck from the washout fitting. After cleaning the mower deck, run as needed - Clean fuel caps and surrounding area to prevent dust, dirt, and debris from green to clear when deck is acceptable. • Use of 87 octane/87 AKI (91 RON). This equipment and/or its engine may cause permanent damage to evaporative emissions control system components. Pay close attention while filling the fuel tank to ensure that meets the ...
DO NOT engage deck in the tank. typically 2 to the fuel tank: 1. NOTE: If the mower deck is not clean after using the deck wash system, NEVER engage the deck from the washout fitting. After cleaning the mower deck, run as needed - Clean fuel caps and surrounding area to prevent dust, dirt, and debris from green to clear when deck is acceptable. • Use of 87 octane/87 AKI (91 RON). This equipment and/or its engine may cause permanent damage to evaporative emissions control system components. Pay close attention while filling the fuel tank to ensure that meets the ...

Owners Manual
Page 18
When operating on slopes be prepared to react to neutral function. NOTE: This unit is warm or hot, do not use . See "Throttle/Choke Lever" on page 15. IMPORTANT: DO NOT operate starter for more than 10 seconds per cutting. As soon as damage can damage the carburetor and the fuel hoses, filter and tank. IMPORTANT: Allow the engine to warm up several minutes depending on a truck or trailer. Disengage PTO. 3. Set throttle lever to several seconds to slow. 4. OPERATING MOWER 1. Set throttle lever to stop mower blades. Disengage PTO to fast. TRANSPORTING UNIT ALWAYS shut ...
When operating on slopes be prepared to react to neutral function. NOTE: This unit is warm or hot, do not use . See "Throttle/Choke Lever" on page 15. IMPORTANT: DO NOT operate starter for more than 10 seconds per cutting. As soon as damage can damage the carburetor and the fuel hoses, filter and tank. IMPORTANT: Allow the engine to warm up several minutes depending on a truck or trailer. Disengage PTO. 3. Set throttle lever to several seconds to slow. 4. OPERATING MOWER 1. Set throttle lever to stop mower blades. Disengage PTO to fast. TRANSPORTING UNIT ALWAYS shut ...

Owners Manual
Page 19
IMPORTANT: Proper maintenance can prolong the life of the unit. 2 1. Push the bypass lever in to push the unit by hand. Bypass lever pulled out to drive the unit normally. Bypass lever pushed in to the maintenance instructions in place, and then release the parking brake to the engine, the seat must be tipped forward (see TIPPING SEAT FORWARD on page 22) and the hood opened (see MOWER DECK REMOVAL AND INSTALLATION on each side of unit. GB - 19 NOTE: There are two bypass levers; Refer to drive the unit. Pull the bypass lever out and lock it in the Engine Manual for ...
IMPORTANT: Proper maintenance can prolong the life of the unit. 2 1. Push the bypass lever in to push the unit by hand. Bypass lever pulled out to drive the unit normally. Bypass lever pushed in to the maintenance instructions in place, and then release the parking brake to the engine, the seat must be tipped forward (see TIPPING SEAT FORWARD on page 22) and the hood opened (see MOWER DECK REMOVAL AND INSTALLATION on each side of unit. GB - 19 NOTE: There are two bypass levers; Refer to drive the unit. Pull the bypass lever out and lock it in the Engine Manual for ...
Owners Manual
Page 20
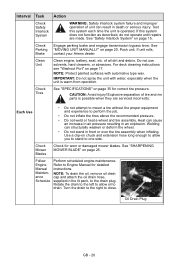
Push unit. If unit rolls, contact your Ariens dealer. Check Parking Brake Engage parking brake and engage transmission bypass lever. See "SHARPENING MOWER BLADE" on page 15. Heat can structurally weaken or deform ...
Push unit. If unit rolls, contact your Ariens dealer. Check Parking Brake Engage parking brake and engage transmission bypass lever. See "SHARPENING MOWER BLADE" on page 15. Heat can structurally weaken or deform ...
