
Owners Manual
Page 2
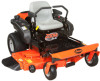
... the engine manufacturer for a replacement manual. TABLE OF CONTENTS SAFETY 4 ASSEMBLY 10 CONTROLS AND FEATURES 12 OPERATION 13 MAINTENANCE SCHEDULE 17 SERVICE AND ADJUSTMENTS . . . . . 18 STORAGE 27 TROUBLESHOOTING 28 SERVICE PARTS 30 ACCESSORIES 30 SPECIFICATIONS 31 WARRANTY 32 INTRODUCTION NON-ENGLISH MANUALS Manuals in languages other than English may be obtained from operator seated in operation position and facing the direction of forward travel. Visite a su distribuidor o vaya a www.ariens.com para...
... the engine manufacturer for a replacement manual. TABLE OF CONTENTS SAFETY 4 ASSEMBLY 10 CONTROLS AND FEATURES 12 OPERATION 13 MAINTENANCE SCHEDULE 17 SERVICE AND ADJUSTMENTS . . . . . 18 STORAGE 27 TROUBLESHOOTING 28 SERVICE PARTS 30 ACCESSORIES 30 SPECIFICATIONS 31 WARRANTY 32 INTRODUCTION NON-ENGLISH MANUALS Manuals in languages other than English may be obtained from operator seated in operation position and facing the direction of forward travel. Visite a su distribuidor o vaya a www.ariens.com para...
Owners Manual
Page 6
... direct discharge toward other people. DO NOT operate on slopes over 10°. • If machine stops going uphill, stop unit and engine, set parking brake and remove key before and while backing. ALWAYS allow parts to bottom of all controls. • Never allow operation by untrained persons. • Disengage PTO, stop blade and back down slowly. • Avoid sudden turns. • Keep safety devices (guards, shields, switches...
... direct discharge toward other people. DO NOT operate on slopes over 10°. • If machine stops going uphill, stop unit and engine, set parking brake and remove key before and while backing. ALWAYS allow parts to bottom of all controls. • Never allow operation by untrained persons. • Disengage PTO, stop blade and back down slowly. • Avoid sudden turns. • Keep safety devices (guards, shields, switches...

Owners Manual
Page 7
... hair that may result in Owner/Operator Manual before operation. ALWAYS keep hands and feet away from operation. Start and operate unit only when seated in neutral, PTO disengaged and parking brake set when starting engine. NEVER direct discharge towards operator. ALWAYS disengage attachment, stop before each use . DO NOT operate unit if safety interlock system is good visibility and light. Tampering with controls and actual operation. Keep children under pressure. Unit can only be hot...
... hair that may result in Owner/Operator Manual before operation. ALWAYS keep hands and feet away from operation. Start and operate unit only when seated in neutral, PTO disengaged and parking brake set when starting engine. NEVER direct discharge towards operator. ALWAYS disengage attachment, stop before each use . DO NOT operate unit if safety interlock system is good visibility and light. Tampering with controls and actual operation. Keep children under pressure. Unit can only be hot...
Owners Manual
Page 8
... unclogging chute. Fuel is running or hot from operation. NEVER overfill fuel tank. If fuel is parked on towed equipment. DO NOT operate at the hitch point. Slow down slopes, not across them. Stop engine before turning. Limit loads to loss of hidden obstacles and children. ALWAYS keep protective structures, guards and panels in good repair, in place. Do not operate without either entire grass catcher or the discharge guard...
... unclogging chute. Fuel is running or hot from operation. NEVER overfill fuel tank. If fuel is parked on towed equipment. DO NOT operate at the hitch point. Slow down slopes, not across them. Stop engine before turning. Limit loads to loss of hidden obstacles and children. ALWAYS keep protective structures, guards and panels in good repair, in place. Do not operate without either entire grass catcher or the discharge guard...
Owners Manual
Page 9
... sparks, NO smoking near battery. A frozen battery can cause death or serious injury. NEVER weld or straighten mower blades. ALWAYS keep batteries out of reach of one blade may result in place and securely fastened. DO NOT run engine in death or serious injury. Mower blades are sharp and can cause injury. Check brake operation frequently. Maintain or replace safety and instruction labels, as necessary. DO NOT reverse battery...
... sparks, NO smoking near battery. A frozen battery can cause death or serious injury. NEVER weld or straighten mower blades. ALWAYS keep batteries out of reach of one blade may result in place and securely fastened. DO NOT run engine in death or serious injury. Mower blades are sharp and can cause injury. Check brake operation frequently. Maintain or replace safety and instruction labels, as necessary. DO NOT reverse battery...
Owners Manual
Page 11
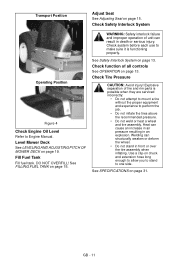
... over the tire assembly when inflating. Fill Fuel Tank Fill fuel tank. See FILLING FUEL TANK on page 19. Level Mower Deck See LEVELING AND ADJUSTING PITCH OF MOWER DECK on page 15. Explosive separation of all controls See OPERATION on page 13. Welding can cause an increase in air pressure resulting in death or serious injury. Use a clip-on page 15. Check Tire Pressure CAUTION: Avoid injury! Transport Position Adjust Seat See Adjusting Seat on chuck...
... over the tire assembly when inflating. Fill Fuel Tank Fill fuel tank. See FILLING FUEL TANK on page 19. Level Mower Deck See LEVELING AND ADJUSTING PITCH OF MOWER DECK on page 15. Explosive separation of all controls See OPERATION on page 13. Welding can cause an increase in air pressure resulting in death or serious injury. Use a clip-on page 15. Check Tire Pressure CAUTION: Avoid injury! Transport Position Adjust Seat See Adjusting Seat on chuck...
Owners Manual
Page 13
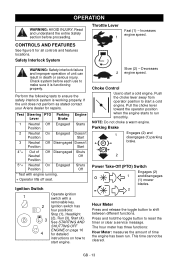
...Start (4). Slow (2) - Push the choke lever away from operator position to ensure the safety interlock system is functioning properly. Perform the following tests to start engine. Ignition Switch 1 2 3 4 Operate ignition switch with engine running. + Operator lifts off seat. Parking Brake 1 Engages (2) and disengages (1) parking brake. 2 Power Take-Off (PTO) Switch Engages (2) 1 and disengages (1) mower blades. 2 Hour Meter Press and release the toggle button to reset the timer or clear a service message. CONTROLS AND FEATURES See figure 5 for repairs. See STARTING...
...Start (4). Slow (2) - Push the choke lever away from operator position to ensure the safety interlock system is functioning properly. Perform the following tests to start engine. Ignition Switch 1 2 3 4 Operate ignition switch with engine running. + Operator lifts off seat. Parking Brake 1 Engages (2) and disengages (1) parking brake. 2 Power Take-Off (PTO) Switch Engages (2) 1 and disengages (1) mower blades. 2 Hour Meter Press and release the toggle button to reset the timer or clear a service message. CONTROLS AND FEATURES See figure 5 for repairs. See STARTING...

Owners Manual
Page 14
... steering levers forward. • Left (3) - Pull left steering lever forward or a combination of the mower deck. Adjustment Hole Figure 6 NOTE: The adjustment pin is programmed for the initial hydraulic oil and filter change at 75hours and for cutting height dimensions. The alert starts counting down two hours before the maintenance is preprogrammed for the initial oil change at 25 hours and for changing the engine oil, changing the hydraulic oil and filter and servicing the air filter...
... steering levers forward. • Left (3) - Pull left steering lever forward or a combination of the mower deck. Adjustment Hole Figure 6 NOTE: The adjustment pin is programmed for the initial hydraulic oil and filter change at 75hours and for cutting height dimensions. The alert starts counting down two hours before the maintenance is preprogrammed for the initial oil change at 25 hours and for changing the engine oil, changing the hydraulic oil and filter and servicing the air filter...
Owners Manual
Page 15
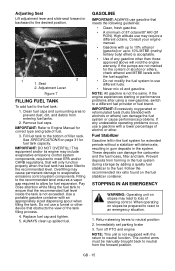
... tank. Consult your engine manual. • Gasoline with up to 10% ethanol (gasohol) or up spilled fuel. Replace fuel cap and tighten. 5. GASOLINE IMPORTANT: ALWAYS use may lead to the desired position. 1 2 1. IMPORTANT: Refer to allow for extended periods without a stabilizer will void the engine warranty. ALWAYS clean up to the recommended level. Fuel Stabilizer Gasoline left in the system. Adjusting Seat Lift adjustment lever and slide seat...
... tank. Consult your engine manual. • Gasoline with up to 10% ethanol (gasohol) or up spilled fuel. Replace fuel cap and tighten. 5. GASOLINE IMPORTANT: ALWAYS use may lead to the desired position. 1 2 1. IMPORTANT: Refer to allow for extended periods without a stabilizer will void the engine warranty. ALWAYS clean up to the recommended level. Fuel Stabilizer Gasoline left in the system. Adjusting Seat Lift adjustment lever and slide seat...
Owners Manual
Page 16
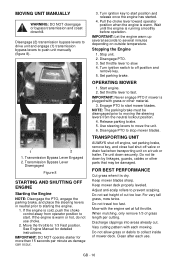
...use choke. 2. IMPORTANT: DO NOT operate starter for detailed instructions. Turn ignition key to off valve or drain fuel when transporting unit on outside temperature. Stopping the Engine 1. Disengage PTO. 3. Turn ignition switch to start mower blades. Set parking brake. OPERATING MOWER 1. NOTE: The parking brake must be damaged. Release parking brake. 5. Use steering levers to push unit manually (figure 8). 1 2 1. Disengage PTO to prevent scalping. TRANSPORTING UNIT ALWAYS shut off engine, set parking brake, remove key, and close fuel shut-off position and remove key...
...use choke. 2. IMPORTANT: DO NOT operate starter for detailed instructions. Turn ignition key to off valve or drain fuel when transporting unit on outside temperature. Stopping the Engine 1. Disengage PTO. 3. Turn ignition switch to start mower blades. Set parking brake. OPERATING MOWER 1. NOTE: The parking brake must be damaged. Release parking brake. 5. Use steering levers to push unit manually (figure 8). 1 2 1. Disengage PTO to prevent scalping. TRANSPORTING UNIT ALWAYS shut off engine, set parking brake, remove key, and close fuel shut-off position and remove key...
Owners Manual
Page 18
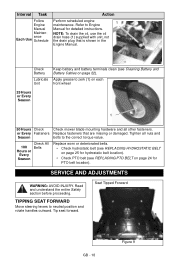
... Follow Engine Manual Maintenance Each Use Schedule Action Perform scheduled engine maintenance. Refer to zerk (1) on each front wheel 25 Hours or Every Season 1 50 Hours Check Check mower blade mounting hardware and all nuts and Season bolts to neutral position and rotate handles outward. Apply grease to Engine 1 Manual for detailed instructions. or Every Fasteners Replace fasteners that is shown in the Engine Manual. SERVICE AND ADJUSTMENTS WARNING: AVOID INJURY. Tighten all...
... Follow Engine Manual Maintenance Each Use Schedule Action Perform scheduled engine maintenance. Refer to zerk (1) on each front wheel 25 Hours or Every Season 1 50 Hours Check Check mower blade mounting hardware and all nuts and Season bolts to neutral position and rotate handles outward. Apply grease to Engine 1 Manual for detailed instructions. or Every Fasteners Replace fasteners that is shown in the Engine Manual. SERVICE AND ADJUSTMENTS WARNING: AVOID INJURY. Tighten all...
Owners Manual
Page 25
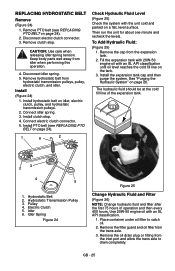
... Remove the filter guard and oil filter from the expansion tank. 2. CAUTION: Use care when releasing idler spring tension. GB - 25 Install clutch stop . Install PTO belt (see REPLACING PTO BELT on idler, electric clutch, pulley, and hydrostatic transmission pulleys. 2. Remove the oil drain plug or fitting from the inlet port and allow the trans axle to catch oil. 2. Disconnect electric clutch connector. 3. Disconnect idler spring. 5. Use 20W-50 engine oil with the unit cold and parked on a flat, level surface. REPLACING HYDROSTATIC BELT Remove (Figure 24) 1. Idler Spring...
... Remove the filter guard and oil filter from the expansion tank. 2. CAUTION: Use care when releasing idler spring tension. GB - 25 Install clutch stop . Install PTO belt (see REPLACING PTO BELT on idler, electric clutch, pulley, and hydrostatic transmission pulleys. 2. Remove the oil drain plug or fitting from the inlet port and allow the trans axle to catch oil. 2. Disconnect electric clutch connector. 3. Disconnect idler spring. 5. Use 20W-50 engine oil with the unit cold and parked on a flat, level surface. REPLACING HYDROSTATIC BELT Remove (Figure 24) 1. Idler Spring...
Owners Manual
Page 26
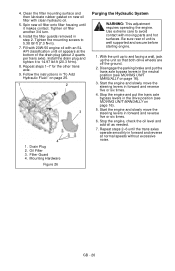
... new oil filter onto filter housing until the trans axles operate smoothly in forward and reverse five or six times. 4. Install the filter guards removed in "To Add Hydraulic Fluid:" on new oil filter with moving parts and hot surfaces. Install the drain plug and tighten it makes contact. Drain Plug 2. Oil Filter 3. Filter Guard 4. Disengage the parking brake and put the trans axle bypass levers in forward and reverse five or six times. 6. Start the engine and slowly move the steering levers in...
... new oil filter onto filter housing until the trans axles operate smoothly in forward and reverse five or six times. 4. Install the filter guards removed in "To Add Hydraulic Fluid:" on new oil filter with moving parts and hot surfaces. Install the drain plug and tighten it makes contact. Drain Plug 2. Oil Filter 3. Filter Guard 4. Disengage the parking brake and put the trans axle bypass levers in forward and reverse five or six times. 6. Start the engine and slowly move the steering levers in...

Owners Manual
Page 28
...Unit does not move with engine running when using steering levers. Connect spark plug wire(s) or replace spark plug(s). Disengage choke. 2. Replace hydrostatic belt (see Charging the Battery on page 25). 3. Fill fuel tanks (see Safety Interlock System on page 15). 3. Discharged battery. 4. Faulty electrical system. 7. Faulty engine. 1. Faulty transmission. Check safety interlock system (see FILLING FUEL TANK on page 13). 2. Refer to Engine Manual for detailed instructions. 6. Tighten battery cables and/or clean battery and battery cables (see on page 22...
...Unit does not move with engine running when using steering levers. Connect spark plug wire(s) or replace spark plug(s). Disengage choke. 2. Replace hydrostatic belt (see Charging the Battery on page 25). 3. Fill fuel tanks (see Safety Interlock System on page 15). 3. Discharged battery. 4. Faulty electrical system. 7. Faulty engine. 1. Faulty transmission. Check safety interlock system (see FILLING FUEL TANK on page 13). 2. Refer to Engine Manual for detailed instructions. 6. Tighten battery cables and/or clean battery and battery cables (see on page 22...

Owners Manual
Page 29
.... Adjust steering levers (see REPLACING PTO BELT on page 31) 2. Faulty PTO belt. 5. Faulty engine. 1. The parking brake needs adjustment. 2. Contact your Ariens Dealer. PROBABLE CAUSE 1. See REPLACING HYDROSTATIC BELT on page 25 for detailed instructions. 2. Contact your Ariens Dealer. 1. Unit creeps with engine turned off . Steering levers need adjustment. 3. Electric clutch connector is in the run position with steering levers in a straight line. Clean cooling system. PROBLEM PTO or mower blades do not engage or shuts off . 1. Ignition key is loose...
.... Adjust steering levers (see REPLACING PTO BELT on page 31) 2. Faulty PTO belt. 5. Faulty engine. 1. The parking brake needs adjustment. 2. Contact your Ariens Dealer. PROBABLE CAUSE 1. See REPLACING HYDROSTATIC BELT on page 25 for detailed instructions. 2. Contact your Ariens Dealer. 1. Unit creeps with engine turned off . Steering levers need adjustment. 3. Electric clutch connector is in the run position with steering levers in a straight line. Clean cooling system. PROBLEM PTO or mower blades do not engage or shuts off . 1. Ignition key is loose...

Owners Manual
Page 30
... 48-Inch Lawn Sweeper 81502200 3-Bag Powered Bagger 71509300 Trailer Hitch 71509400 Light Kit GB - 30 PROBLEM Poor cutting quality. Part No. Description 21541700 Spark Plug 21541500 Fuel Filter 21550700 Air Filter 21550800 Engine Oil Filter 21545100 Hydraulic Oil Filter 02961600 42-Inch Mower Blade 03288600 42-Inch Mulching Blade 02982000 48-Inch Mower Blade 00273000 48-Inch Mulching Blade 02961700 54-Inch Mower Blade 03288700 54-Inch Mulching Blade 07242200 Hydrostatic Belt 07200037 42-Inch PTO Belt 07200436 48-Inch PTO Belt 07200023 54-Inch PTO Belt ACCESSORIES See...
... 48-Inch Lawn Sweeper 81502200 3-Bag Powered Bagger 71509300 Trailer Hitch 71509400 Light Kit GB - 30 PROBLEM Poor cutting quality. Part No. Description 21541700 Spark Plug 21541500 Fuel Filter 21550700 Air Filter 21550800 Engine Oil Filter 21545100 Hydraulic Oil Filter 02961600 42-Inch Mower Blade 03288600 42-Inch Mulching Blade 02982000 48-Inch Mower Blade 00273000 48-Inch Mulching Blade 02961700 54-Inch Mower Blade 03288700 54-Inch Mulching Blade 07242200 Hydrostatic Belt 07200037 42-Inch PTO Belt 07200436 48-Inch PTO Belt 07200023 54-Inch PTO Belt ACCESSORIES See...

Owners Manual
Page 31
...) Mower Deck Cutting Height - Towing Capacity - in . (cm) 42 (107) 48 (122) 54 (137) Max. m.p.h (km/h) 3 (3.2) Turning Radius Zero Brakes Internal Transmission Electrical Starter Electric Battery 12 Volt Maintenance Free PTO (Power Take Off) Electric Clutch/Brake Fuel Fuel Type Refer to Engine Manual Fuel Tank Capacity - SPECIFICATIONS Model Number 915163 915165 915173 Model Zoom XL 42 Zoom XL 48 Zoom XL 54 Engine Kohler SV-715 Kohler SV-720 Kohler SV-725 Displacement - gal. (L) 4.5 (17.0) Transmission Hydrostatic Drive Size and Weight Length...
...) Mower Deck Cutting Height - Towing Capacity - in . (cm) 42 (107) 48 (122) 54 (137) Max. m.p.h (km/h) 3 (3.2) Turning Radius Zero Brakes Internal Transmission Electrical Starter Electric Battery 12 Volt Maintenance Free PTO (Power Take Off) Electric Clutch/Brake Fuel Fuel Type Refer to Engine Manual Fuel Tank Capacity - SPECIFICATIONS Model Number 915163 915165 915173 Model Zoom XL 42 Zoom XL 48 Zoom XL 54 Engine Kohler SV-715 Kohler SV-720 Kohler SV-725 Displacement - gal. (L) 4.5 (17.0) Transmission Hydrostatic Drive Size and Weight Length...
Owners Manual
Page 33
... Limitations section above: lubricants, spark plugs, oil, oil filters, air filters, fuel filters, brake linings, brake arms, brake shoes, skid shoes, scraper blades, shear bolts, mower blades, mower vanes, brushes, headlights, light bulbs, knives, cutters. • Any misuse, alteration, improper assembly, improper adjustment, neglect, or accident which is not approved by the Ariens Company for warranty service. • Transport the product to and from region to incorporate such design changes into previously manufactured products, nor...
... Limitations section above: lubricants, spark plugs, oil, oil filters, air filters, fuel filters, brake linings, brake arms, brake shoes, skid shoes, scraper blades, shear bolts, mower blades, mower vanes, brushes, headlights, light bulbs, knives, cutters. • Any misuse, alteration, improper assembly, improper adjustment, neglect, or accident which is not approved by the Ariens Company for warranty service. • Transport the product to and from region to incorporate such design changes into previously manufactured products, nor...
Owners Manual
Page 34
... for the warranty period defined in subsection (b)(2). MANUFACTURER'S WARRANTY COVERAGE: This evaporative emission control system is defective, the part will be interpreted as : fuel tanks, fuel lines, fuel caps, valves, canisters, filters, vapor hoses, clamps, connectors, and other associated components. The warranty repairs should be repaired or replaced by Ariens Company. If you have a question regarding your warranty coverage, you warranty coverage if your evaporative emission control system part has failed...
... for the warranty period defined in subsection (b)(2). MANUFACTURER'S WARRANTY COVERAGE: This evaporative emission control system is defective, the part will be interpreted as : fuel tanks, fuel lines, fuel caps, valves, canisters, filters, vapor hoses, clamps, connectors, and other associated components. The warranty repairs should be repaired or replaced by Ariens Company. If you have a question regarding your warranty coverage, you warranty coverage if your evaporative emission control system part has failed...

Owners Manual
Page 35
..., of the equipment covered by this Owner's Manual may be sold in the state of any warranty maintenance or repairs and must be provided without charge to in the preceding CARB and EPA Warranty Statement. (4.) Repair or replacement of any warranted part under this Article to the evaporative emission control system Disclaimer New equipment sold in California. Some equipment covered by this Owner's Manual may have been...
..., of the equipment covered by this Owner's Manual may be sold in the state of any warranty maintenance or repairs and must be provided without charge to in the preceding CARB and EPA Warranty Statement. (4.) Repair or replacement of any warranted part under this Article to the evaporative emission control system Disclaimer New equipment sold in California. Some equipment covered by this Owner's Manual may have been...


