
User manual Quick Start Guide EN
Page 1
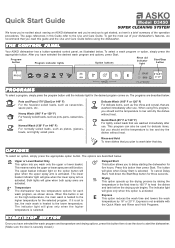
... Care Guide. To cancel Delay Start, hold down the Start/Stop button for the selected program. The indicator light will glow when Delay Start is heated to the lower temperature. THE CONTROL PANEL Your ASKO dishwasher has a button-operated control panel, as casseroles, sauce pans, etc. If it is set the temperature to low and dry the dishes without heat. The button will glow only when this option is activated. Express is not available with the Quick Wash and Rinse...
... Care Guide. To cancel Delay Start, hold down the Start/Stop button for the selected program. The indicator light will glow when Delay Start is heated to the lower temperature. THE CONTROL PANEL Your ASKO dishwasher has a button-operated control panel, as casseroles, sauce pans, etc. If it is set the temperature to low and dry the dishes without heat. The button will glow only when this option is activated. Express is not available with the Quick Wash and Rinse...
User manual Quick Start Guide EN
Page 2
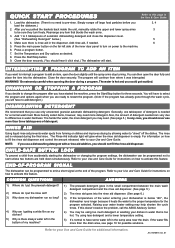
... of detergent needed for instructions on power to the machine. 6. The Rinse Aid indicator light will glow when the rinse aid dispenser is released during a program. Refer to your Use and Care Guide for instructions on my dishes? 5) Why is there always water left in the bottom of the water entering your Use and Care Guide for a normal wash load. Make sure there is rinse aid in the sump area near the drain. Press a program button. 7. Close the door securely...
... of detergent needed for instructions on power to the machine. 6. The Rinse Aid indicator light will glow when the rinse aid dispenser is released during a program. Refer to your Use and Care Guide for instructions on my dishes? 5) Why is there always water left in the bottom of the water entering your Use and Care Guide for a normal wash load. Make sure there is rinse aid in the sump area near the drain. Press a program button. 7. Close the door securely...
User manual Use & Care Guide EN
Page 1
ASKO USE AND CARE GUIDE SAVE THESE INSTRUCTIONS FOR FUTURE REFERENCE TyoiongtuhgeretidntfishisrtehsIrMwtubctePaitsmsOithoReenpT.rseA,rbrNfeoeTarfo!mdraaenllucoseipnfegrroaimtt-for D3450 CONTENTS BEFORE USING YOUR NEW DISHWASHER IMPORTANT SAFETY INSTRUCTIONS CHILD SAFETY TIPS DISHWASHER FEATURES LOADING THE BASKETS DETERGENT DISPENSER DISHWASHING DETERGENT RINSE AID DISPENSER OPERATING INSTRUCTIONS CARE AND CLEANING OVERFILL PROTECTION ENERGY SAVING TIPS SOLUTIONS TO COMMON DISHWASHING PROBLEMS TROUBLESHOOTING WASHING SPECIAL ITEMS INDEX ASKO PRODUCT WARRANTY 2 2 2 3 4 5 5 6 7 9 10 10 11 12 ...
ASKO USE AND CARE GUIDE SAVE THESE INSTRUCTIONS FOR FUTURE REFERENCE TyoiongtuhgeretidntfishisrtehsIrMwtubctePaitsmsOithoReenpT.rseA,rbrNfeoeTarfo!mdraaenllucoseipnfegrroaimtt-for D3450 CONTENTS BEFORE USING YOUR NEW DISHWASHER IMPORTANT SAFETY INSTRUCTIONS CHILD SAFETY TIPS DISHWASHER FEATURES LOADING THE BASKETS DETERGENT DISPENSER DISHWASHING DETERGENT RINSE AID DISPENSER OPERATING INSTRUCTIONS CARE AND CLEANING OVERFILL PROTECTION ENERGY SAVING TIPS SOLUTIONS TO COMMON DISHWASHING PROBLEMS TROUBLESHOOTING WASHING SPECIAL ITEMS INDEX ASKO PRODUCT WARRANTY 2 2 2 3 4 5 5 6 7 9 10 10 11 12 ...
User manual Use & Care Guide EN
Page 2
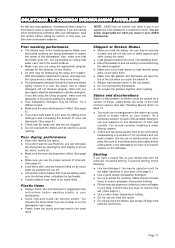
... in or on the dishwasher. ♦ Load all instructions before using the dishwasher turn on all enclosure panels are properly in your new dishwasher. ♦ Read the "Washing Special Items" section before washing any other appliance. ♦ Disconnect electrical power to dishwasher before servicing. ♦ Repairs should be done by removing or changing. ♦ Do not abuse, sit on, or stand on the dishwasher door or baskets . ♦ To reduce the...
... in or on the dishwasher. ♦ Load all instructions before using the dishwasher turn on all enclosure panels are properly in your new dishwasher. ♦ Read the "Washing Special Items" section before washing any other appliance. ♦ Disconnect electrical power to dishwasher before servicing. ♦ Repairs should be done by removing or changing. ♦ Do not abuse, sit on, or stand on the dishwasher door or baskets . ♦ To reduce the...
User manual Use & Care Guide EN
Page 3
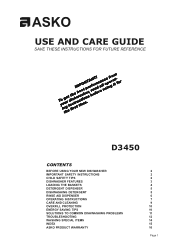
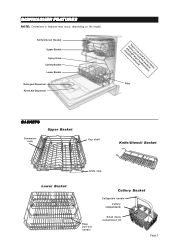
Thbereefaolitsrhsenhoyoouougnulhedleolbadaredgtoretehrrmiefnoomsoveadeicdtphe.amirntseic,les DISHWASHER FEATURES NOTE: Deviations in features may occur, depending on the model. Knife/Utensil Basket Upper Basket Spray Arms Cutlery Basket Lower Basket Detergent Dispenser Rinse Aid Dispenser Filter BASKETS Stemware rack Upper Basket Cup shelf Knife/Utensil Basket Lower Basket Knife stop Easy pull-out handle Cutlery Basket Collapsible handle Cutlery compartments Small items containment lid Page 3
Thbereefaolitsrhsenhoyoouougnulhedleolbadaredgtoretehrrmiefnoomsoveadeicdtphe.amirntseic,les DISHWASHER FEATURES NOTE: Deviations in features may occur, depending on the model. Knife/Utensil Basket Upper Basket Spray Arms Cutlery Basket Lower Basket Detergent Dispenser Rinse Aid Dispenser Filter BASKETS Stemware rack Upper Basket Cup shelf Knife/Utensil Basket Lower Basket Knife stop Easy pull-out handle Cutlery Basket Collapsible handle Cutlery compartments Small items containment lid Page 3
User manual Use & Care Guide EN
Page 4
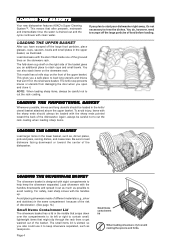
... start your dishwasher right away, it to avoid nesting. LOADING THE BASKETS Your new dishwasher features ASKO's Super Cleaning System™. LOADING THE UPPER BASKET After you open and close it out as much as possible to keep the silverware separated. If you also could use it 's not necessary to cut the rack coating. To avoid injury, items with the sharp ends should be careful not to rinse the dishes...
... start your dishwasher right away, it to avoid nesting. LOADING THE BASKETS Your new dishwasher features ASKO's Super Cleaning System™. LOADING THE UPPER BASKET After you open and close it out as much as possible to keep the silverware separated. If you also could use it 's not necessary to cut the rack coating. To avoid injury, items with the sharp ends should be careful not to rinse the dishes...
User manual Use & Care Guide EN
Page 5
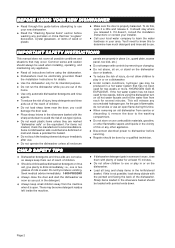
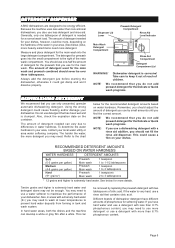
... your dishwasher. In hard water areas, both the dishes and the machine can be over three tablespoons. If the water is very hard, use detergent that contains citric acid. Page 5 Dispenser Lid Lever Prewash Detergent Compartment Rinse Aid Level Indicator Main Wash Detergent Compartment Rinse Aid Compartment Detergent Compartment Lid WARNING! The amount of detergent needed for prewash goes into the large detergent compartment. RECOMMENDED DETERGENT AMOUNTS BASED ON WATER HARDNESS WATER HARDNESS DETERGENT...
... your dishwasher. In hard water areas, both the dishes and the machine can be over three tablespoons. If the water is very hard, use detergent that contains citric acid. Page 5 Dispenser Lid Lever Prewash Detergent Compartment Rinse Aid Level Indicator Main Wash Detergent Compartment Rinse Aid Compartment Detergent Compartment Lid WARNING! The amount of detergent needed for prewash goes into the large detergent compartment. RECOMMENDED DETERGENT AMOUNTS BASED ON WATER HARDNESS WATER HARDNESS DETERGENT...
User manual Use & Care Guide EN
Page 6
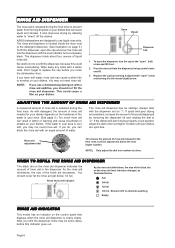
... higher number. Replace the cap by allowing water to the "open the dispenser, turn the adjustment dial to use a dishwashing detergent with a damp cloth. As the rinse aid diminishes, the size of rinse aid in the final rinse, turn the cap to "sheet" off the dishes. It also improves drying by inserting it to overfill the dispenser, because this indicator goes out. Be careful not to the closed (right) arrow. Pour the rinse aid into the dispenser until your dishes...
... higher number. Replace the cap by allowing water to the "open the dispenser, turn the adjustment dial to use a dishwashing detergent with a damp cloth. As the rinse aid diminishes, the size of rinse aid in the final rinse, turn the cap to "sheet" off the dishes. It also improves drying by inserting it to overfill the dispenser, because this indicator goes out. Be careful not to the closed (right) arrow. Pour the rinse aid into the dispenser until your dishes...
User manual Use & Care Guide EN
Page 7
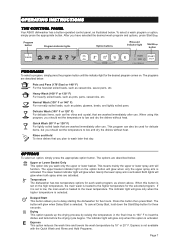
... and dry the dishes without heat. OPTIONS To select an option, simply press the appropriate option button. The lower basket indicator light will glow when both spray arms are washed immediately after use . Heavy Wash (160° F or 130° F) For heavily soiled loads, such as illustrated below . Program button Program indicator lights Option buttons Rinse aid indicator light Start/Stop button PROG E START END S TA R T STOP PC-UPGRADE PROGRAMS To select a program, simply press the program button until the indicator light...
... and dry the dishes without heat. OPTIONS To select an option, simply press the appropriate option button. The lower basket indicator light will glow when both spray arms are washed immediately after use . Heavy Wash (160° F or 130° F) For heavily soiled loads, such as illustrated below . Program button Program indicator lights Option buttons Rinse aid indicator light Start/Stop button PROG E START END S TA R T STOP PC-UPGRADE PROGRAMS To select a program, simply press the program button until the indicator light...
User manual Use & Care Guide EN
Page 8
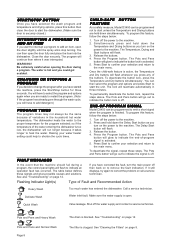
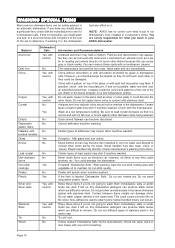
... cycle times. Call a service technician. See "Cleaning the Filters" on to the machine. 2. Press the Program button. The Temperature, Drying and Start buttons will flash whenever you turn the main power off the power to remove the fault indication. Press and hold down the Temperature and Drying buttons as you press any of Fault and Recommended Action Heavy Wash Too much water has entered the dishwasher. Delicate Wash Water inlet fault. Make sure the water supply is finished. Quick Wash Valve...
... cycle times. Call a service technician. See "Cleaning the Filters" on to the machine. 2. Press the Program button. The Temperature, Drying and Start buttons will flash whenever you turn the main power off the power to remove the fault indication. Press and hold down the Temperature and Drying buttons as you press any of Fault and Recommended Action Heavy Wash Too much water has entered the dishwasher. Delicate Wash Water inlet fault. Make sure the water supply is finished. Quick Wash Valve...
User manual Use & Care Guide EN
Page 9
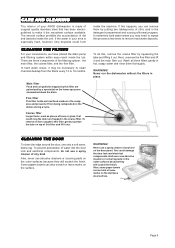
... it and the main filter out. CARE AND CLEANING The interior of your convenience, we have placed the drain pump and filtering system within easy reach inside the tub. There are pulverized by putting two tablespoons of any kind on the lower spray arm and washed down the drain. To prevent penetration of water into the door lock and electrical components, do this filter are three components of...
... it and the main filter out. CARE AND CLEANING The interior of your convenience, we have placed the drain pump and filtering system within easy reach inside the tub. There are pulverized by putting two tablespoons of any kind on the lower spray arm and washed down the drain. To prevent penetration of water into the door lock and electrical components, do this filter are three components of...
User manual Use & Care Guide EN
Page 10
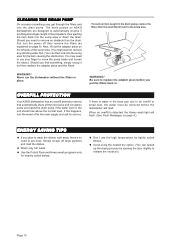
... PROTECTION Your ASKO dishwasher has an overfill protection device that automatically shuts off the inlet valve and circulation pump and starts the drain pump if the water level in the base pan due to an overfill or small leak, the water must be removed before you find something may need to remove an obstacle from the drain, first turn the water off then remove the filters (as explained on page 8.) ENERGY SAVING...
... PROTECTION Your ASKO dishwasher has an overfill protection device that automatically shuts off the inlet valve and circulation pump and starts the drain pump if the water level in the base pan due to an overfill or small leak, the water must be removed before you find something may need to remove an obstacle from the drain, first turn the water off then remove the filters (as explained on page 8.) ENERGY SAVING...
User manual Use & Care Guide EN
Page 11
... performance problems with your dishes that the spray arms could be caused by opening the door slightly to let out the warm, humid air. ♦ Make sure the rinse aid dispenser is filled. (See page 6.) ♦ Make sure you use Heat Dry, you wash in your dishwasher. ♦ Some high-acid foods can decrease the drying time by a number of rinse aid dispensed. (See page 5.) ♦ Check that the spray arm jets are using...
... performance problems with your dishes that the spray arms could be caused by opening the door slightly to let out the warm, humid air. ♦ Make sure the rinse aid dispenser is filled. (See page 6.) ♦ Make sure you use Heat Dry, you wash in your dishwasher. ♦ Some high-acid foods can decrease the drying time by a number of rinse aid dispensed. (See page 5.) ♦ Check that the spray arm jets are using...
User manual Use & Care Guide EN
Page 12
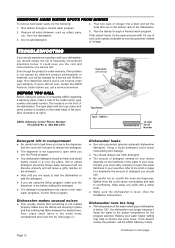
... start the dishwasher to overfill the rinse aid dispenser. Using a liquid detergent could save you should experience a problem with the type name and serial number is not supposed to open when you should review the list of detergent needed for a service call . Continued on the bottom rack of a service call . Run the dishes through a normal wash program. etc., from the dishwasher. TROUBLESHOOTING If you the cost and inconvenience of the dishwasher. 2. If you should use the Rinse...
... start the dishwasher to overfill the rinse aid dispenser. Using a liquid detergent could save you should experience a problem with the type name and serial number is not supposed to open when you should review the list of detergent needed for a service call . Continued on the bottom rack of a service call . Run the dishes through a normal wash program. etc., from the dishwasher. TROUBLESHOOTING If you the cost and inconvenience of the dishwasher. 2. If you should use the Rinse...
User manual Use & Care Guide EN
Page 13
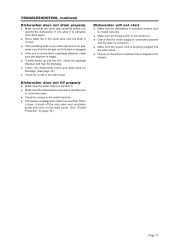
..., allow it shuts off the inlet valve and circulation pump and turns on the drain pump. (See "Overfill Protection" on page 10.) Dishwasher will not start ♦ Make sure the dishwasher is turned on and the door is closed securely. ♦ Make sure the Delay option is not turned on. ♦ Check that the water supply is connected properly and the water is turned on and the door is closed securely. ♦...
..., allow it shuts off the inlet valve and circulation pump and turns on the drain pump. (See "Overfill Protection" on page 10.) Dishwasher will not start ♦ Make sure the dishwasher is turned on and the door is closed securely. ♦ Make sure the Delay option is not turned on. ♦ Check that the water supply is connected properly and the water is turned on and the door is closed securely. ♦...
User manual Use & Care Guide EN
Page 14
... of the set a few times and compare it is put silver and silver plate in very hot water and allowed to wash them immediately; Sharp kitchen knives may also warp, crack, or loosen. Wood handles may become discolored. If marked "Dishwasher Safe." Do no control over or knock against other dishware while being washed. Do not wash disposalbe plastic items. Rinse these...
... of the set a few times and compare it is put silver and silver plate in very hot water and allowed to wash them immediately; Sharp kitchen knives may also warp, crack, or loosen. Wood handles may become discolored. If marked "Dishwasher Safe." Do no control over or knock against other dishware while being washed. Do not wash disposalbe plastic items. Rinse these...
User manual Use & Care Guide EN
Page 15
... 3 R Rinse aid dispenser filling 6 6 12 setting amount dispensed 6 12 S 11 Serial number location 12 14 Service 16 9 Signal, end-of-program 8 13 Silver 14 10 Silver plate 14 Silverware basket 4 8 10 11 Small items compartment Solutions to problems Spray Arms Stainless steel 4 11 3 14 Stains and discolorations 11 8 Start/Stop button 8 13 Stemware rack 3 9 9 14 T Tin Troubleshooting 14 12 Type plate location on unit 12 14 U Unusual noises 12 5 Upper basket 3 12 V Warranty information 16 8 W Wash programs 7 4 Washing...
... 3 R Rinse aid dispenser filling 6 6 12 setting amount dispensed 6 12 S 11 Serial number location 12 14 Service 16 9 Signal, end-of-program 8 13 Silver 14 10 Silver plate 14 Silverware basket 4 8 10 11 Small items compartment Solutions to problems Spray Arms Stainless steel 4 11 3 14 Stains and discolorations 11 8 Start/Stop button 8 13 Stemware rack 3 9 9 14 T Tin Troubleshooting 14 12 Type plate location on unit 12 14 U Unusual noises 12 5 Upper basket 3 12 V Warranty information 16 8 W Wash programs 7 4 Washing...
User manual Use & Care Guide EN
Page 16
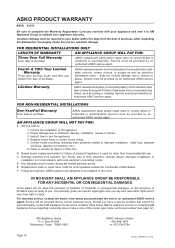
... Limited Warranty Three year full plus fourth and fifth year limited from whom you purchased the unit or an authorized ASKO service agent. Service must be repaired in drain line. Repair and/or replacement parts for failure of purchase. Any shipping costs for any defective solidstate controls, timers, motors, or pumps as well as rusting or cracking. ASKO washers are designed to be provided by an authorized ASKO service agent...
... Limited Warranty Three year full plus fourth and fifth year limited from whom you purchased the unit or an authorized ASKO service agent. Service must be repaired in drain line. Repair and/or replacement parts for failure of purchase. Any shipping costs for any defective solidstate controls, timers, motors, or pumps as well as rusting or cracking. ASKO washers are designed to be provided by an authorized ASKO service agent...


