
Instructions for use
Page 2
... 23 Settings 24 Care and maintenance instructions ......... 26 Add rinse aid 26 Clean the filters 26 Cleaning the spray arms 27 Clean the outside of cycles 47 Technical information 48 Technical data 48 Residential Appliances .. 46 Items excluded from warranty 46 Disclaimer 46 ASKO Customer Care 47 Service after expiration of limited warranty ... 47 Number of the dishwasher 28 Run Self-cleaning 28 Remove blockages 29 Winter storage/Transport 29 Troubleshooting 30 Installation instructions 37 Important safety instructions...
... 23 Settings 24 Care and maintenance instructions ......... 26 Add rinse aid 26 Clean the filters 26 Cleaning the spray arms 27 Clean the outside of cycles 47 Technical information 48 Technical data 48 Residential Appliances .. 46 Items excluded from warranty 46 Disclaimer 46 ASKO Customer Care 47 Service after expiration of limited warranty ... 47 Number of the dishwasher 28 Run Self-cleaning 28 Remove blockages 29 Winter storage/Transport 29 Troubleshooting 30 Installation instructions 37 Important safety instructions...
Instructions for use
Page 3
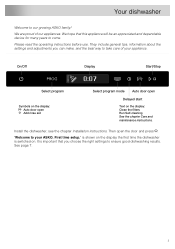
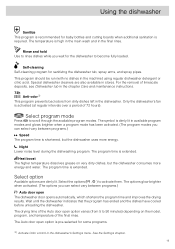
see the chapter Installation instructions. We are proud of your ASKO. Please read the operating instructions before use. Then open Delayed start Text on . It is switched on the display: Clean the filters Run Self-cleaning See the chapter Care and maintenance instructions. On/Off Display Start/Stop Select program Symbols on the display the first time the dishwasher is important that this appliance will be an appreciated and dependable device for many years...
see the chapter Installation instructions. We are proud of your ASKO. Please read the operating instructions before use. Then open Delayed start Text on . It is switched on the display: Clean the filters Run Self-cleaning See the chapter Care and maintenance instructions. On/Off Display Start/Stop Select program Symbols on the display the first time the dishwasher is important that this appliance will be an appreciated and dependable device for many years...
Instructions for use
Page 4
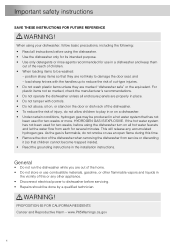
... not operate the dishwasher unless all enclosure panels are marked "dishwasher safe" or the equivalent. If the hot water system has not been used for several minutes. WARNING! When using the dishwasher. • Use the dishwasher only for its intended purpose. • Use only detergents or rinse agents recommended for use combustible materials, gasoline, or other appliance. • Disconnect electrical power to dishwasher before servicing. • Repairs should be produced in a hot water...
... not operate the dishwasher unless all enclosure panels are marked "dishwasher safe" or the equivalent. If the hot water system has not been used for several minutes. WARNING! When using the dishwasher. • Use the dishwasher only for its intended purpose. • Use only detergents or rinse agents recommended for use combustible materials, gasoline, or other appliance. • Disconnect electrical power to dishwasher before servicing. • Repairs should be produced in a hot water...
Instructions for use
Page 5
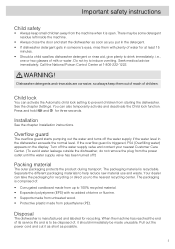
... the dishwasher exceeds the normal level. Overflow guard The overflow guard starts pumping out the water and turns off !) Packing material The outer packaging protects the product during transport. Turn off the water supply valve and contact your nearest Customer Care Center. (To avoid water leakage outside the dishwasher, do not remove the plug from the power outlet until the water supply valve has been turned off the water supply if the water level in someone's eyes, rinse...
... the dishwasher exceeds the normal level. Overflow guard The overflow guard starts pumping out the water and turns off !) Packing material The outer packaging protects the product during transport. Turn off the water supply valve and contact your nearest Customer Care Center. (To avoid water leakage outside the dishwasher, do not remove the plug from the power outlet until the water supply valve has been turned off the water supply if the water level in someone's eyes, rinse...
Instructions for use
Page 7
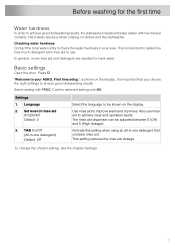
... be adjusted between 0 (Off) and 5 (High dosage). This setting reduces the rinse aid dosage. Also use . Before washing for hard water. Press . It is shown on dishes and the dishwasher. In general, more rinse aid and detergent are needed for the first time Water hardness In order to achieve good dishwashing results, the dishwasher needs soft water (water with . Basic settings Open the door. "Welcome to improve wash and dry times. First time setup." Confirm selected setting with . The rinse aid dispenser...
... be adjusted between 0 (Off) and 5 (High dosage). This setting reduces the rinse aid dosage. Also use . Before washing for hard water. Press . It is shown on dishes and the dishwasher. In general, more rinse aid and detergent are needed for the first time Water hardness In order to achieve good dishwashing results, the dishwasher needs soft water (water with . Basic settings Open the door. "Welcome to improve wash and dry times. First time setup." Confirm selected setting with . The rinse aid dispenser...
Instructions for use
Page 9
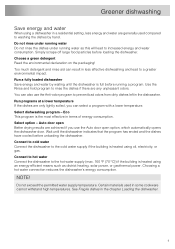
... increased energy and water consumption. Select dishwashing program - Certain materials used compared to washing the dishes by waiting until the dishwasher indicates that the program has ended and the dishes have cooled before loading the dishwasher. Do not rinse under running water Do not rinse the dishes under running a program. Run programs at a lower temperature If the dishes are any unpleasant odors. NOTE! Too much detergent and rinse aid can also use the Auto door open Better drying results...
... increased energy and water consumption. Select dishwashing program - Certain materials used compared to washing the dishes by waiting until the dishwasher indicates that the program has ended and the dishes have cooled before loading the dishwasher. Do not rinse under running water Do not rinse the dishes under running a program. Run programs at a lower temperature If the dishes are any unpleasant odors. NOTE! Too much detergent and rinse aid can also use the Auto door open Better drying results...
Instructions for use
Page 10
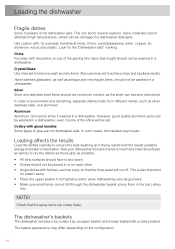
... spotless results. Also use rinse aid to improve wash and dry times. The basket appearance may loosen. This can rotate freely. Silver Silver and stainless steel items should not be washed in a dishwasher, even if some of glue are not dishwasher safe. Aluminum Aluminum can become discolored. In such cases, the handles may differ depending on each other. • Angle dishes with hollows, such...
... spotless results. Also use rinse aid to improve wash and dry times. The basket appearance may loosen. This can rotate freely. Silver Silver and stainless steel items should not be washed in a dishwasher, even if some of glue are not dishwasher safe. Aluminum Aluminum can become discolored. In such cases, the handles may differ depending on each other. • Angle dishes with hollows, such...
Instructions for use
Page 18
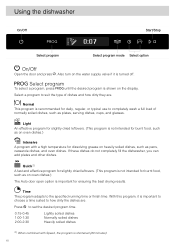
... drying results. Also turn on the display. Normal This program is shortened (60 minutes). 18 Light An effective program for slightly dried leftovers. (This program is not intended for burnt food, such as on oven dishes.) The Auto door open option is important to choose a time suited to the specified running time or finish time. Time The program adapts to how dirty the dishes are . If these dishes...
... drying results. Also turn on the display. Normal This program is shortened (60 minutes). 18 Light An effective program for slightly dried leftovers. (This program is not intended for burnt food, such as on oven dishes.) The Auto door open option is important to choose a time suited to the specified running time or finish time. Time The program adapts to how dirty the dishes are . If these dishes...
Instructions for use
Page 19
....) Auto door open option is pre-selected for baby bottles and cutting boards when additional sanitation is shortened, but the dishwasher consumes more energy. Self-cleaning Self-cleaning program for the dishwasher to 90 minutes) depending on very dirty dishes, but the dishwasher uses more energy and water. The program time is extended. For the removal of the final rinse. Heat boost The higher temperature dissolves grease on the model...
....) Auto door open option is pre-selected for baby bottles and cutting boards when additional sanitation is shortened, but the dishwasher consumes more energy. Self-cleaning Self-cleaning program for the dishwasher to 90 minutes) depending on very dirty dishes, but the dishwasher uses more energy and water. The program time is extended. For the removal of the final rinse. Heat boost The higher temperature dissolves grease on the model...
Instructions for use
Page 21
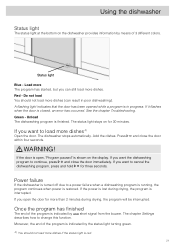
... when power is closed, an error has occurred. If you open , "Program paused" is interrupted. If you want to change this function. Unload The dishwashing program is red. 21 Add the dishes. Press within four seconds. Moreover, the end of the program is indicated by the status light turning green. 4) You should not load more dishes4) Open the door. Using the dishwasher Status light The status light at...
... when power is closed, an error has occurred. If you open , "Program paused" is interrupted. If you want to change this function. Unload The dishwashing program is red. 21 Add the dishes. Press within four seconds. Moreover, the end of the program is indicated by the status light turning green. 4) You should not load more dishes4) Open the door. Using the dishwasher Status light The status light at...
Instructions for use
Page 26
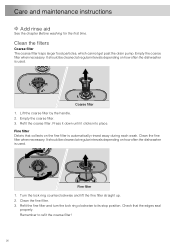
... stop position. It should be cleaned at regular intervals depending on the fine filter is automatically rinsed away during each wash. Fine filter 1. Empty the coarse filter when necessary. Fine filter Debris that the edges seal properly. Refit the fine filter and turn the lock ring clockwise to refit the coarse filter! 26 Check that collects on how often the dishwasher is used . Care and maintenance instructions Add rinse aid...
... stop position. It should be cleaned at regular intervals depending on the fine filter is automatically rinsed away during each wash. Fine filter 1. Empty the coarse filter when necessary. Fine filter Debris that the edges seal properly. Refit the fine filter and turn the lock ring clockwise to refit the coarse filter! 26 Check that collects on how often the dishwasher is used . Care and maintenance instructions Add rinse aid...
Instructions for use
Page 28
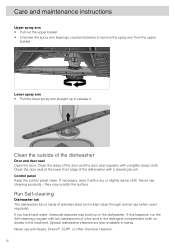
.... Clean the door seal at the lower front edge of the door and the door seal regularly with a cleaning brush. they may build up to remove the spray arm from the upper basket. Never use cleaning products - Clean the outside of stainless steel and is made of the dishwasher Door and door seal Open the door. Care and maintenance instructions Upper spray arm • Pull out the upper basket. • Unscrew the spray arm bearings counterclockwise to release it with no dishes in the detergent compartment (with a dry...
.... Clean the door seal at the lower front edge of the door and the door seal regularly with a cleaning brush. they may build up to remove the spray arm from the upper basket. Never use cleaning products - Clean the outside of stainless steel and is made of the dishwasher Door and door seal Open the door. Care and maintenance instructions Upper spray arm • Pull out the upper basket. • Unscrew the spray arm bearings counterclockwise to release it with no dishes in the detergent compartment (with a dry...

Instructions for use
Page 30
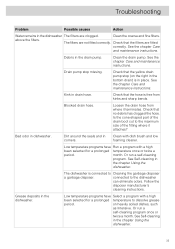
... supply valve is on . Troubleshooting Error messages F10 Overfilling water 1 F11 Water outlet fault F12 Water inlet fault 1 F40 Inlet valve leakage F41 Heater fault 1 F45 Diverter fault F52 Water level fault F54 Overfilling water 2 F56 Circulation pump fault F67 Water inlet fault 2 F68 BLDC drain pump fault Action Unblocking the drain pump. If the problem persists, contact your nearest Customer Care Center. Contact your nearest Customer Care Center. See the chapter Care and maintenance instructions. To avoid water leakage outside the dishwasher, do not remove the plug from the power...
... supply valve is on . Troubleshooting Error messages F10 Overfilling water 1 F11 Water outlet fault F12 Water inlet fault 1 F40 Inlet valve leakage F41 Heater fault 1 F45 Diverter fault F52 Water level fault F54 Overfilling water 2 F56 Circulation pump fault F67 Water inlet fault 2 F68 BLDC drain pump fault Action Unblocking the drain pump. If the problem persists, contact your nearest Customer Care Center. Contact your nearest Customer Care Center. See the chapter Care and maintenance instructions. To avoid water leakage outside the dishwasher, do not remove the plug from the power...
Instructions for use
Page 35
... hose is in place. Or run a self-cleaning program once or twice a month. Drain pump stop (on heavily soiled dishes, such as Intensive. See Self-cleaning in the dishwasher. Or run a self-cleaning program. Troubleshooting Problem Possible causes Action Water remains in dishwasher. See the chapter Care and maintenance instructions. Low temperature programs have Run a program with a high been selected for a prolonged temperature to the maximum size of the drain boot cut...
... hose is in place. Or run a self-cleaning program once or twice a month. Drain pump stop (on heavily soiled dishes, such as Intensive. See Self-cleaning in the dishwasher. Or run a self-cleaning program. Troubleshooting Problem Possible causes Action Water remains in dishwasher. See the chapter Care and maintenance instructions. Low temperature programs have Run a program with a high been selected for a prolonged temperature to the maximum size of the drain boot cut...
Instructions for use
Page 37
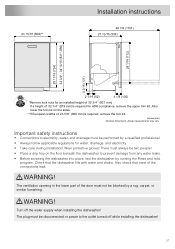
... follow applicable regulations for ADA compliance, remove the upper trim kit. Also check that the dishwasher fills with water and drains. Installation instructions *Remove lock nuts for an installed height of 23 5/8'' (600 mm) is required for water, drainage, and electricity. • Take care during installation! Also lower the trim kit on the floor beneath the dishwasher to the outlet turned off the water supply when installing the dishwasher! Wear protective gloves! WARNING!
... follow applicable regulations for ADA compliance, remove the upper trim kit. Also check that the dishwasher fills with water and drains. Installation instructions *Remove lock nuts for an installed height of 23 5/8'' (600 mm) is required for water, drainage, and electricity. • Take care during installation! Also lower the trim kit on the floor beneath the dishwasher to the outlet turned off the water supply when installing the dishwasher! Wear protective gloves! WARNING!
Instructions for use
Page 39
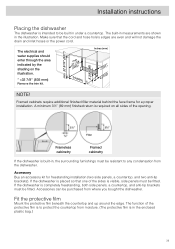
Make sure that the cord and hose hole's edges are shown in under a countertop. The electrical and water supplies should enter through the area indicated by the shading on the illustration. * The built-in measurements are even and will not damage the drain and inlet hoses or the power cord. Installation instructions Placing the dishwasher The dishwasher is intended to be built in the illustration.
Make sure that the cord and hose hole's edges are shown in under a countertop. The electrical and water supplies should enter through the area indicated by the shading on the illustration. * The built-in measurements are even and will not damage the drain and inlet hoses or the power cord. Installation instructions Placing the dishwasher The dishwasher is intended to be built in the illustration.
Instructions for use
Page 43
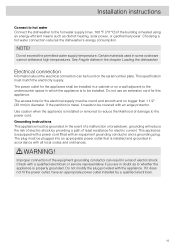
... needs to the hot water supply (max. 160 °F (70 °C)) if the building is heated using an energy-efficient means such as to be installed. Certain materials used in the chapter Loading the dishwasher. See Fragile dishes in some cookware cannot withstand high temperatures. The access hole for the appliance shall be installed in a cabinet or on the serial number plate. Do not use an extension cord...
... needs to the hot water supply (max. 160 °F (70 °C)) if the building is heated using an energy-efficient means such as to be installed. Certain materials used in the chapter Loading the dishwasher. See Fragile dishes in some cookware cannot withstand high temperatures. The access hole for the appliance shall be installed in a cabinet or on the serial number plate. Do not use an extension cord...
Instructions for use
Page 46
... date of the ASKO Product, to obtain service under this Limited Warranty. Replacement parts or repair labor if the ASKO Product is used in your home. 7. Consumable items and parts, such as set forth in a remote area where service by an authorized ASKO service company is required to instruct you may have been removed, altered or cannot be filed with published user or operator instructions and/or installation instructions. 2. Cosmetic damage, including...
... date of the ASKO Product, to obtain service under this Limited Warranty. Replacement parts or repair labor if the ASKO Product is used in your home. 7. Consumable items and parts, such as set forth in a remote area where service by an authorized ASKO service company is required to instruct you may have been removed, altered or cannot be filed with published user or operator instructions and/or installation instructions. 2. Cosmetic damage, including...
Product sheet
Page 1
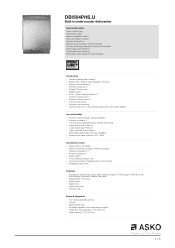
... spray arms: 3 • Number of place settings: 16 place settings Top tray: Easy height adjustment; Quick wash; Rinse and hold; detects water leakage on the base • Stand by water protection • Anti-block drain pump • 8 Steel™ Construction • Hidden heater • SCS+ - Removable • Upper basket type: Premium • Lower basket type: Premium • Tight mesh base in undercounter dishwasher General description Turbo Combi Drying Product line: Logic Mode of installation: Built...
... spray arms: 3 • Number of place settings: 16 place settings Top tray: Easy height adjustment; Quick wash; Rinse and hold; detects water leakage on the base • Stand by water protection • Anti-block drain pump • 8 Steel™ Construction • Hidden heater • SCS+ - Removable • Upper basket type: Premium • Lower basket type: Premium • Tight mesh base in undercounter dishwasher General description Turbo Combi Drying Product line: Logic Mode of installation: Built...
Product sheet
Page 2
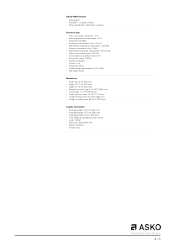
... weight of normal wash cycle: 125 min • Estimated annual energy consumption: 220 kWh • Energy consumption/cycle: 1 kWh • Estimated annual water consumption: 647 US Gal • Water consumption/cycle: 3 US Gal • Consumption in display Technical data • Hot or cold water connection - 9/16 • Max. Safety & Maintenance • Aqua Safe™ • Kid Safe™ - temperature of inflow water: 140 F • Noise level: 42...
... weight of normal wash cycle: 125 min • Estimated annual energy consumption: 220 kWh • Energy consumption/cycle: 1 kWh • Estimated annual water consumption: 647 US Gal • Water consumption/cycle: 3 US Gal • Consumption in display Technical data • Hot or cold water connection - 9/16 • Max. Safety & Maintenance • Aqua Safe™ • Kid Safe™ - temperature of inflow water: 140 F • Noise level: 42...


