

ASKO Design Guide
Page 3
... and durability, as well as environmental awareness. Panel ready models accept a custom panel and handle. DISHWASHER MODELS INTEGRATED HANDLE DBI663IS DBI663ISSOF DBI664IXXLS DBI675IXXLS DBI664IXXLSSOF TUBULAR HANDLE DBI663THS DBI664THXXLS DBI675THXXLS PRO HANDLE DBI663PHS DBI664PHXXLS DBI675PHXXLS PANEL READY DFI663 DFI663XXL OUTDOOR DFI664 DFI664XXL DFI664XXLSOF DFI675XXL DOD651PHXXLS D5956OUTDOORPH askona.com/specs | 3 Tubular and pro handle models match Sub-Zero and Wolf products. ASKO DISHWASHERS Asko Dishwashers At Asko, we design and manufacture premium quality...
... and durability, as well as environmental awareness. Panel ready models accept a custom panel and handle. DISHWASHER MODELS INTEGRATED HANDLE DBI663IS DBI663ISSOF DBI664IXXLS DBI675IXXLS DBI664IXXLSSOF TUBULAR HANDLE DBI663THS DBI664THXXLS DBI675THXXLS PRO HANDLE DBI663PHS DBI664PHXXLS DBI675PHXXLS PANEL READY DFI663 DFI663XXL OUTDOOR DFI664 DFI664XXL DFI664XXLSOF DFI675XXL DOD651PHXXLS D5956OUTDOORPH askona.com/specs | 3 Tubular and pro handle models match Sub-Zero and Wolf products. ASKO DISHWASHERS Asko Dishwashers At Asko, we design and manufacture premium quality...

ASKO Design Guide
Page 7
... plumbing codes. ELECTRICAL REQUIREMENTS Electrical Supply Service Receptacle 115 VAC, 60 Hz 15 amp dedicated circuit 3-prong grounding-type Plumbing The water supply and drain should be located in the illustration below . askona.com/specs | 7 ASKO DISHWASHERS Electrical The electrical supply should be located in the illustration below . PLUMBING REQUIREMENTS Water Connection Pressure 6' (1.8 m) PEX tubing with an easily accessible shut-off valve between the supply and the unit. Installation must be located in...
... plumbing codes. ELECTRICAL REQUIREMENTS Electrical Supply Service Receptacle 115 VAC, 60 Hz 15 amp dedicated circuit 3-prong grounding-type Plumbing The water supply and drain should be located in the illustration below . askona.com/specs | 7 ASKO DISHWASHERS Electrical The electrical supply should be located in the illustration below . PLUMBING REQUIREMENTS Water Connection Pressure 6' (1.8 m) PEX tubing with an easily accessible shut-off valve between the supply and the unit. Installation must be located in...

ASKO Design Guide
Page 19
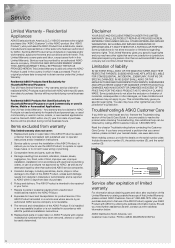
....com TROUBLESHOOTING AND ASKO CUSTOMER CARE If you think you need repair service, first see the "Troubleshooting" section of the Use & Care Guide. This Limited Warranty is valid only when the ASKO Product is free of defects in materials and/or workmanship, subject to the terms and conditions set forth in this Limited Warranty. The ASKO Product is required to jurisdiction. Service must be filed with electrical or plumbing codes, or use , improper installation, installation...
....com TROUBLESHOOTING AND ASKO CUSTOMER CARE If you think you need repair service, first see the "Troubleshooting" section of the Use & Care Guide. This Limited Warranty is valid only when the ASKO Product is free of defects in materials and/or workmanship, subject to the terms and conditions set forth in this Limited Warranty. The ASKO Product is required to jurisdiction. Service must be filed with electrical or plumbing codes, or use , improper installation, installation...

Instructions for installation
Page 2
... outlet turned off the water supply when installing the dishwasher! Important safety instructions • Connections to remove the transport protection for water, drainage, and electricity. • Take care during installation! There must be adjusted backward to fit the 24'' (610 mm) cutout standard. WARNING! The plug must always be performed by running the Rinse and hold program. Turn off while installing the dishwasher! REMOVE Trim kit The dishwasher is equipped with water and drains. Installation instructions...
... outlet turned off the water supply when installing the dishwasher! Important safety instructions • Connections to remove the transport protection for water, drainage, and electricity. • Take care during installation! There must be adjusted backward to fit the 24'' (610 mm) cutout standard. WARNING! The plug must always be performed by running the Rinse and hold program. Turn off while installing the dishwasher! REMOVE Trim kit The dishwasher is equipped with water and drains. Installation instructions...

Instructions for installation
Page 3
.... Placing the dishwasher The dishwasher is intended to be clean and dry. 3½" ¾" Frameless cabinetry 3½" Filler Framed cabinetry 3 The protective film is to the underside of the opening. NOTE! The built-in measurements are even and will not damage the drain and inlet hoses or the power cord. 34 3/8* - 36 1/2 The electrical and water supplies should enter through the area indicated by the...
.... Placing the dishwasher The dishwasher is intended to be clean and dry. 3½" ¾" Frameless cabinetry 3½" Filler Framed cabinetry 3 The protective film is to the underside of the opening. NOTE! The built-in measurements are even and will not damage the drain and inlet hoses or the power cord. 34 3/8* - 36 1/2 The electrical and water supplies should enter through the area indicated by the...

Instructions for installation
Page 4
... with a water supply valve. Do not re-use old or other spare hoses. Adjust the height and slide the dishwasher into place 1 Start by measuring the height from the floor to the bottom edge of the countertop. 2 Measure the height from being emptied of water during the wash cycle. This means that the drain hose runs to water supply Use only the inlet hose supplied with a new hose without joins. Connection to a lower level than...
... with a water supply valve. Do not re-use old or other spare hoses. Adjust the height and slide the dishwasher into place 1 Start by measuring the height from the floor to the bottom edge of the countertop. 2 Measure the height from being emptied of water during the wash cycle. This means that the drain hose runs to water supply Use only the inlet hose supplied with a new hose without joins. Connection to a lower level than...

Instructions for installation
Page 5
Choosing a hot water connection cuts dishwashing times and reduces the dishwasher's energy consumption. NOTE! Electrical connection Information about the electrical connection can result in a risk of electric shock by a qualified electrician. This specification must be grounded. If the partition is equipped with a cord fitted with an edge protector. Grounding Instructions This appliance must be installed in doubt as district heating, solar power, or geothermal power. In the event of a malfunction or...
Choosing a hot water connection cuts dishwashing times and reduces the dishwasher's energy consumption. NOTE! Electrical connection Information about the electrical connection can result in a risk of electric shock by a qualified electrician. This specification must be grounded. If the partition is equipped with a cord fitted with an edge protector. Grounding Instructions This appliance must be installed in doubt as district heating, solar power, or geothermal power. In the event of a malfunction or...
Use and Care Guide
Page 2
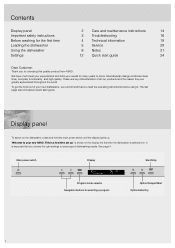
.... "Welcome to come. These are key characteristics of your needs for many years to your new ASKO. Contents Display panel Important safety instructions Before washing for the first time Loading the dishwasher Using the dishwasher Settings 2 Care and maintenance instructions 14 3 Troubleshooting 16 4 Technical information 19 5 Service 20 8 Notes 21 12 Quick start guide. Main power switch Display Eco Speed mode 2:00 Program mode selector Navigation buttons for selecting a program Start/Stop S TA R T STOP Option Delayed Start Option Extra Dry 2
.... "Welcome to come. These are key characteristics of your needs for many years to your new ASKO. Contents Display panel Important safety instructions Before washing for the first time Loading the dishwasher Using the dishwasher Settings 2 Care and maintenance instructions 14 3 Troubleshooting 16 4 Technical information 19 5 Service 20 8 Notes 21 12 Quick start guide. Main power switch Display Eco Speed mode 2:00 Program mode selector Navigation buttons for selecting a program Start/Stop S TA R T STOP Option Delayed Start Option Extra Dry 2
Use and Care Guide
Page 3
... the manufacturer's recommendations. • Do not operate the dishwasher unless all instructions before using the dishwasher turn off the water supply if the water level in or on the door or dish rack of the dishwasher. • To reduce the risk of water for at 1-800-222-1222. • Always close the door and start the dishwasher as soon as possible. • The dishwasher is flammable, do not allow children...
... the manufacturer's recommendations. • Do not operate the dishwasher unless all instructions before using the dishwasher turn off the water supply if the water level in or on the door or dish rack of the dishwasher. • To reduce the risk of water for at 1-800-222-1222. • Always close the door and start the dishwasher as soon as possible. • The dishwasher is flammable, do not allow children...

Use and Care Guide
Page 4
... rinse aid dispenser can be shown on the display. 2 Rinse aid 0/1/2/3/4/5 Use rinse aid to be adjusted between 0 (Off) and 5 (High dosage). This is shown on the dishwasher, press and hold the main power switch until the display lights up ." Also use . Basic settings To switch on the display. is a first time set up . Select setting Main power switch Confirm setting Settings 1 Language Select the language to improve wash and dry times. Select rinse aid dosage. Checking water hardness...
... rinse aid dispenser can be shown on the display. 2 Rinse aid 0/1/2/3/4/5 Use rinse aid to be adjusted between 0 (Off) and 5 (High dosage). This is shown on the dishwasher, press and hold the main power switch until the display lights up ." Also use . Basic settings To switch on the display. is a first time set up . Select setting Main power switch Confirm setting Settings 1 Language Select the language to improve wash and dry times. Select rinse aid dosage. Checking water hardness...

Use and Care Guide
Page 5
... different program modes. Choose a green detergent Read the environmental declaration on the display. NOTE! Press to open the door a little once the program has ended. (If the dishwasher is heated using oil, electricity, or gas. Only add rinse aid to improve wash and dry times. Connection to hot water supply Connect the dishwasher to the cold water supply if the building is fully loaded before running water Simply scrape off large food particles before the...
... different program modes. Choose a green detergent Read the environmental declaration on the display. NOTE! Press to open the door a little once the program has ended. (If the dishwasher is heated using oil, electricity, or gas. Only add rinse aid to improve wash and dry times. Connection to hot water supply Connect the dishwasher to the cold water supply if the building is fully loaded before running water Simply scrape off large food particles before the...

Use and Care Guide
Page 6
... dry times. Fragile decoration Porcelain with hollows, such as crystal glass from Orrefors, using the gentle dishwashing program Crystal glass. The baskets The dishwasher includes an upper, a lower, and a cutlery basket. Also use a small amount of glue are not dishwasher safe. Foldable tines The foldable tines can become discolored. Fragile dishes Some cookware is also important for the "Dishwasher safe" marking. Remember to use rinse aid...
... dry times. Fragile decoration Porcelain with hollows, such as crystal glass from Orrefors, using the gentle dishwashing program Crystal glass. The baskets The dishwasher includes an upper, a lower, and a cutlery basket. Also use a small amount of glue are not dishwasher safe. Foldable tines The foldable tines can become discolored. Fragile dishes Some cookware is also important for the "Dishwasher safe" marking. Remember to use rinse aid...

Use and Care Guide
Page 9
... the display. Night mode Lower noise level during the wash. Also check that the water supply valve is on oven dishes.) Time program The program adapts to suit the type of limescale deposits, see The dishwasher tub in stores. With this program when you only want to how dirty the dishes are. 0:15-0:45 Lightly soiled dishes 1:00-1:30 Normally soiled dishes 2:00-2:30 Heavily soiled dishes - To set...
... the display. Night mode Lower noise level during the wash. Also check that the water supply valve is on oven dishes.) Time program The program adapts to suit the type of limescale deposits, see The dishwasher tub in stores. With this program when you only want to how dirty the dishes are. 0:15-0:45 Lightly soiled dishes 1:00-1:30 Normally soiled dishes 2:00-2:30 Heavily soiled dishes - To set...
Use and Care Guide
Page 10
... not start . NOTE! Chapter Settings describes how to add detergent. Activate the setting High temperature to activate Delayed Start. See also the chapter Troubleshooting. Blue - Flashing red indicates a problem. The dishwasher switches off the water supply valve if away from the upper basket falling onto the dishes in the dishwasher before unloading the dishwasher. To minimize the risk of hours. 2 Press Start/Stop and close the door immediately. Leave the dishes to cancel the dishwashing program...
... not start . NOTE! Chapter Settings describes how to add detergent. Activate the setting High temperature to activate Delayed Start. See also the chapter Troubleshooting. Blue - Flashing red indicates a problem. The dishwasher switches off the water supply valve if away from the upper basket falling onto the dishes in the dishwasher before unloading the dishwasher. To minimize the risk of hours. 2 Press Start/Stop and close the door immediately. Leave the dishes to cancel the dishwashing program...

Use and Care Guide
Page 14
... drain pump. Care and maintenance instructions Coarse filter The coarse filter traps larger food particles, which cannot get past the drain pump. Remember to remove the spray arm from the dishwasher. Fine filter 1 Turn the handle counterclockwise. 2 Lift the filter straight up in stores. Dishwashing results may be affected if the coarse filter is automatically rinsed away during each wash. Use the main power switch to turn off the dishwasher before cleaning the buttons to clean the fine filter. 3 Replace...
... drain pump. Care and maintenance instructions Coarse filter The coarse filter traps larger food particles, which cannot get past the drain pump. Remember to remove the spray arm from the dishwasher. Fine filter 1 Turn the handle counterclockwise. 2 Lift the filter straight up in stores. Dishwashing results may be affected if the coarse filter is automatically rinsed away during each wash. Use the main power switch to turn off the dishwasher before cleaning the buttons to clean the fine filter. 3 Replace...

Use and Care Guide
Page 16
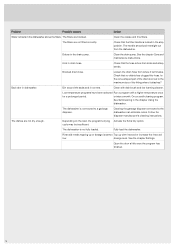
... react when pressed. pump fault Press any button to clear the error message. See the section Care and maintenance instructions. Child lock (button lock) activated. Check that the Delayed Start option has not been Press and hold Start/Stop until the display shows too short a time. Check that the dishes are correctly positioned horizontally, and that the water supply valve is open. Troubleshooting Type of fault on . Turn off the water supply valve and call the Customer Care Center. Open the door.
... react when pressed. pump fault Press any button to clear the error message. See the section Care and maintenance instructions. Child lock (button lock) activated. Check that the Delayed Start option has not been Press and hold Start/Stop until the display shows too short a time. Check that the dishes are correctly positioned horizontally, and that the water supply valve is open. Troubleshooting Type of fault on . Turn off the water supply valve and call the Customer Care Center. Open the door.

Use and Care Guide
Page 17
... repaired, only prevented. The detergent compartment has been blocked. Check that the dishes are not clean. Check that the filter handle is in the detergent compartment The detergent compartment was damp when The detergent compartment must not be difficult to continue, press Start/Stop and close the door within five seconds. Far too much detergent Wash crystal at a low temperature and with water. Dishes loaded incorrectly. Incorrect rinse aid dosage setting. Use a detergent...
... repaired, only prevented. The detergent compartment has been blocked. Check that the dishes are not clean. Check that the filter handle is in the detergent compartment The detergent compartment was damp when The detergent compartment must not be difficult to continue, press Start/Stop and close the door within five seconds. Far too much detergent Wash crystal at a low temperature and with water. Dishes loaded incorrectly. Incorrect rinse aid dosage setting. Use a detergent...
Use and Care Guide
Page 18
... the disposer manufacturer's cleaning instructions. The dishes are blocked. Clean the drain pump. Check that the hose is set too Top up or dosage is free from the dishwasher. Is the cone-shaped part of the drain boot cut to a garbage disposer. or twice a month. Depending on the load, the program's drying Activate the Extra Dry option. Rinse aid needs topping up with rinse aid or increase the rinse aid low. See the...
... the disposer manufacturer's cleaning instructions. The dishes are blocked. Clean the drain pump. Check that the hose is set too Top up or dosage is free from the dishwasher. Is the cone-shaped part of the drain boot cut to a garbage disposer. or twice a month. Depending on the load, the program's drying Activate the Extra Dry option. Rinse aid needs topping up with rinse aid or increase the rinse aid low. See the...
Use and Care Guide
Page 20
... limited warranty does not cover: 1 Replacement parts or repair labor if the ASKO Product is used in materials or workmanship and is intended to be filed with published user or operator instructions and/or installation instructions. 2 Service calls to correct the installation of the ASKO Product, to instruct you on how to use the ASKO Product, to replace or repair house fuses, or to correct house wiring or plumbing. 3 Consumable items and parts, such as filters...
... limited warranty does not cover: 1 Replacement parts or repair labor if the ASKO Product is used in materials or workmanship and is intended to be filed with published user or operator instructions and/or installation instructions. 2 Service calls to correct the installation of the ASKO Product, to instruct you on how to use the ASKO Product, to replace or repair house fuses, or to correct house wiring or plumbing. 3 Consumable items and parts, such as filters...

Quick Spec
Page 1
24" DISHWASHER-TUBULAR HANDLE 50 SERIES DBI675THXXLS F E AT U R E S Exclusive height-adjustable upper rack and exclusive lower rack Exclusive middle rack with removable inserts Heavy-duty stainless steel construction Nylon-coated steel racks TouchProof™ stainless steel Turbo Drying™ system 17 place-setting capacity Quiet operation-40 dB(A) 9Spray™ wash system Hidden controls LED lit interior LED display Delayed start PROGRAMS • Normal Wash • Eco Wash • Sanitation Wash • Time Program • Plastic Wash • Hygiene Wash • Crystal Glass &#...
24" DISHWASHER-TUBULAR HANDLE 50 SERIES DBI675THXXLS F E AT U R E S Exclusive height-adjustable upper rack and exclusive lower rack Exclusive middle rack with removable inserts Heavy-duty stainless steel construction Nylon-coated steel racks TouchProof™ stainless steel Turbo Drying™ system 17 place-setting capacity Quiet operation-40 dB(A) 9Spray™ wash system Hidden controls LED lit interior LED display Delayed start PROGRAMS • Normal Wash • Eco Wash • Sanitation Wash • Time Program • Plastic Wash • Hygiene Wash • Crystal Glass &#...


