

User manual 427000608 ASKO DC7573 EN
Page 3
To get the most out of all our products and the reason they are key characteristics of your needs for choosing this quality product from ASKO. Operating Instructions Drying Cabinet Save these instructions for future reference Dear Customer, Thank you for many years to come. We hope it . Scandinavian design combines clean lines, everyday... will meet your expectations and fulfill your new machine, we recommend that you can help protect the environment. These are greatly appreciated throughout the world. ASKO DC7573, 7583
To get the most out of all our products and the reason they are key characteristics of your needs for choosing this quality product from ASKO. Operating Instructions Drying Cabinet Save these instructions for future reference Dear Customer, Thank you for many years to come. We hope it . Scandinavian design combines clean lines, everyday... will meet your expectations and fulfill your new machine, we recommend that you can help protect the environment. These are greatly appreciated throughout the world. ASKO DC7573, 7583

User manual 427000608 ASKO DC7573 EN
Page 4
...used 23 Disposal 5 Troubleshooting 24 Description of the drying cabinet 6 The machine will not start 24 Control panel 7 Overheating cut-off 24 Assembly area 8 Drying takes too long 24 Electrical requirements 9 The garments do not dry, or are too dry 24 User liability 9 Error messages 24 Electrical ... the door Operation Sort the garments 18 Press the Start button 32 18 Drying program finished 32 19 Once drying has finished 32 19 Garment placement 19 Close the drying cabinet door and switch on the main power switch. 20 Program selection 20 Selecting...
...used 23 Disposal 5 Troubleshooting 24 Description of the drying cabinet 6 The machine will not start 24 Control panel 7 Overheating cut-off 24 Assembly area 8 Drying takes too long 24 Electrical requirements 9 The garments do not dry, or are too dry 24 User liability 9 Error messages 24 Electrical ... the door Operation Sort the garments 18 Press the Start button 32 18 Drying program finished 32 19 Once drying has finished 32 19 Garment placement 19 Close the drying cabinet door and switch on the main power switch. 20 Program selection 20 Selecting...

User manual 427000608 ASKO DC7573 EN
Page 5
... as suitable for use fabric softeners or dryer sheets unless the manufacturer gives written assurance that the product will not damage a drying cabinet. • Do not heat-dry items containing: vinyl, plastic, foam rubber or similarly textured rubberlike materials, fiberglass, or wool unless wool unless the label specifies...not tamper with controls. • Do not attempt to repair or replace any part of the machine should be done by an authorized ASKO service agent. • Do not place items exposed to cooking oils in the appliance. Flexible venting materials are known to download. &#...
... as suitable for use fabric softeners or dryer sheets unless the manufacturer gives written assurance that the product will not damage a drying cabinet. • Do not heat-dry items containing: vinyl, plastic, foam rubber or similarly textured rubberlike materials, fiberglass, or wool unless wool unless the label specifies...not tamper with controls. • Do not attempt to repair or replace any part of the machine should be done by an authorized ASKO service agent. • Do not place items exposed to cooking oils in the appliance. Flexible venting materials are known to download. &#...

User manual 427000608 ASKO DC7573 EN
Page 6
...Care Center 1-800-898-1879 www.askousa.com Safety • The drying cabinet must not be drawn into the room. Safety instructions • The drying cabinet is manufactured and labeled for drying items that have been dry-cleaned at home or fabrics that may contain residues of flammable liquids.... • The drying cabinet is no longer useful, contact your local refuse ...
...Care Center 1-800-898-1879 www.askousa.com Safety • The drying cabinet must not be drawn into the room. Safety instructions • The drying cabinet is manufactured and labeled for drying items that have been dry-cleaned at home or fabrics that may contain residues of flammable liquids.... • The drying cabinet is no longer useful, contact your local refuse ...
User manual 427000608 ASKO DC7573 EN
Page 7
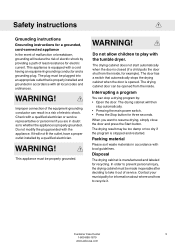
... 1-800-898-1879 www.askousa.com WARNING! WARNING! When you are in accordance with all local codes and ordinances. Disposal The drying cabinet is equipped with a qualified electrician or service representative or personnel if you want to take it . Safety instructions Grounding instructions Grounding ... appliance. Do not modify the plug provided with the tumble dryer. If it will then stop a drying program by: • Open the door. WARNING! The drying cabinet will not fit the outlet, have a proper outlet installed by providing a path of electric shock. ...
... 1-800-898-1879 www.askousa.com WARNING! WARNING! When you are in accordance with all local codes and ordinances. Disposal The drying cabinet is equipped with a qualified electrician or service representative or personnel if you want to take it . Safety instructions Grounding instructions Grounding ... appliance. Do not modify the plug provided with the tumble dryer. If it will then stop a drying program by: • Open the door. WARNING! The drying cabinet will not fit the outlet, have a proper outlet installed by providing a path of electric shock. ...
User manual 427000608 ASKO DC7573 EN
Page 8
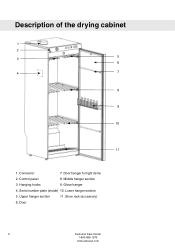
Control panel 8. Hanging hooks 9. Shoe rack (accessory) 6. Middle hanger section 3. Glove hanger 4. Serial number plate (inside) 10. Door 6 Customer Care Center 1-800-898-1879 www.askousa.com Door hanger for light items 2. Description of the drying cabinet 1 2 5 3 6 4 7 8 9 10 11 1. Connector 7. Lower hanger section 5. Upper hanger section 11.
Control panel 8. Hanging hooks 9. Shoe rack (accessory) 6. Middle hanger section 3. Glove hanger 4. Serial number plate (inside) 10. Door 6 Customer Care Center 1-800-898-1879 www.askousa.com Door hanger for light items 2. Description of the drying cabinet 1 2 5 3 6 4 7 8 9 10 11 1. Connector 7. Lower hanger section 5. Upper hanger section 11.

User manual 427000608 ASKO DC7573 EN
Page 10
...(60 kg). • The floor must be flat with a maximum drop of 1,0" (2.5 cm) below the cabinet. • The drying cabinet is only intended for cleaning. 595 127 O102 DC7573 1695-1720 DC7583 1835-1860 600 295 615 8 Customer Care Center 1-800-898-1879 www.askousa.com Assembly area • If... the drying cabinet is to be connected to exhaust air ventilation, the building must have such ventilation. • An ...
...(60 kg). • The floor must be flat with a maximum drop of 1,0" (2.5 cm) below the cabinet. • The drying cabinet is only intended for cleaning. 595 127 O102 DC7573 1695-1720 DC7583 1835-1860 600 295 615 8 Customer Care Center 1-800-898-1879 www.askousa.com Assembly area • If... the drying cabinet is to be connected to exhaust air ventilation, the building must have such ventilation. • An ...

User manual 427000608 ASKO DC7573 EN
Page 11
... the plug can be installed and earthed in these operating instructions. Minimum 16 AWG required and 15 amps overcurrent-protective device. • The drying cabinet is to be unplugged when necessary. • As standard, the connection cable is drawn out from the top panel via the hole at... is not available. If necessary, the connection cable can be connected to the method set out in compliance with applicable regulations. • The drying cabinet is delivered ready for connection with a 79" (2 m) long cable with an earthed plug. • Do not change the cable and plug supplied...
... the plug can be installed and earthed in these operating instructions. Minimum 16 AWG required and 15 amps overcurrent-protective device. • The drying cabinet is to be unplugged when necessary. • As standard, the connection cable is drawn out from the top panel via the hole at... is not available. If necessary, the connection cable can be connected to the method set out in compliance with applicable regulations. • The drying cabinet is delivered ready for connection with a 79" (2 m) long cable with an earthed plug. • Do not change the cable and plug supplied...
User manual 427000608 ASKO DC7573 EN
Page 12
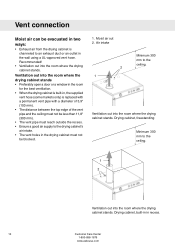
...1-800-898-1879 www.askousa.com Recommended! • Ventilation out into the room where the drying cabinet stands. Drying cabinet, freestanding Minimum 300 mm to the ceiling 1 2 Ventilation out into the room where the drying cabinet stands • Preferably open a door or a window in the room for the best ventilation... • The vent pipe must not be evacuated in two ways: • Exhaust air from the drying cabinet is channeled to an exhaust duct or an outlet in the drying cabinet must reach outside the recess. • Ensure a good air supply to the ceiling Ventilation out into ...
...1-800-898-1879 www.askousa.com Recommended! • Ventilation out into the room where the drying cabinet stands. Drying cabinet, freestanding Minimum 300 mm to the ceiling 1 2 Ventilation out into the room where the drying cabinet stands • Preferably open a door or a window in the room for the best ventilation... • The vent pipe must not be evacuated in two ways: • Exhaust air from the drying cabinet is channeled to an exhaust duct or an outlet in the drying cabinet must reach outside the recess. • Ensure a good air supply to the ceiling Ventilation out into ...
User manual 427000608 ASKO DC7573 EN
Page 13
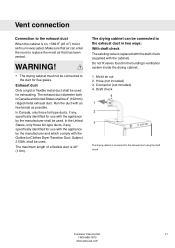
...duct Only a rigid or flexible metal duct shall be used . The exhaust duct diameter both in the building's ventilation system inside the drying cabinet. 1. Draft check 4 1 2 3 The drying cabinet is 40" (1.0m). Make sure that air can be used for exhausting. In Canada, only those foil-type ducts, if any ... the draft check Customer Care Center 11 1-800-898-1879 www.askousa.com Connector (not included) 4. WARNING! • The drying cabinet must not be connected to the duct for Clothes Dryer Transition Duct, Subject 2158A, shall be 4" (102mm) ridged metal exhaust duct. The...
...duct Only a rigid or flexible metal duct shall be used . The exhaust duct diameter both in the building's ventilation system inside the drying cabinet. 1. Draft check 4 1 2 3 The drying cabinet is 40" (1.0m). Make sure that air can be used for exhausting. In Canada, only those foil-type ducts, if any ... the draft check Customer Care Center 11 1-800-898-1879 www.askousa.com Connector (not included) 4. WARNING! • The drying cabinet must not be connected to the duct for Clothes Dryer Transition Duct, Subject 2158A, shall be 4" (102mm) ridged metal exhaust duct. The...
User manual 427000608 ASKO DC7573 EN
Page 14
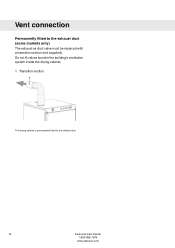
Vent connection Permanently fitted to the exhaust duct 12 Customer Care Center 1-800-898-1879 www.askousa.com Transition section 1 The drying cabinet is permanently fitted to the exhaust duct (some markets only) The exhaust air duct valve must be replaced with a transition section (not supplied). Do not fit valves found in the building's ventilation system inside the drying cabinet. 1.
Vent connection Permanently fitted to the exhaust duct 12 Customer Care Center 1-800-898-1879 www.askousa.com Transition section 1 The drying cabinet is permanently fitted to the exhaust duct (some markets only) The exhaust air duct valve must be replaced with a transition section (not supplied). Do not fit valves found in the building's ventilation system inside the drying cabinet. 1.
User manual 427000608 ASKO DC7573 EN
Page 15
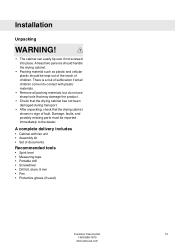
... There is a risk of fault. A complete delivery includes • Cabinet with plastic materials. • Remove all packing materials, but do not use sharp tools that may damage the product. • Check that the drying cabinet has not been damaged during transport. • After unpacking, check that... the drying cabinet shows no sign of suffocation if small children come into place. At least two persons should handle...
... There is a risk of fault. A complete delivery includes • Cabinet with plastic materials. • Remove all packing materials, but do not use sharp tools that may damage the product. • Check that the drying cabinet has not been damaged during transport. • After unpacking, check that... the drying cabinet shows no sign of suffocation if small children come into place. At least two persons should handle...
User manual 427000608 ASKO DC7573 EN
Page 17
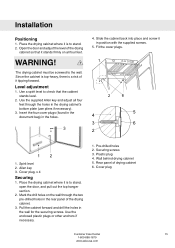
... place and screw it stands firmly on the wall through the holes in the rear panel of drying cabinet 6. Fit the cover plugs. 1 2 6 5 4 3 6 2 12 1. Allen key 3. Installation Positioning 1. Place the drying cabinet where it tipping forward. The drying cabinet must be screwed to stand, open the door, and pull out the top hanger section. 2. Level adjustment...
... place and screw it stands firmly on the wall through the holes in the rear panel of drying cabinet 6. Fit the cover plugs. 1 2 6 5 4 3 6 2 12 1. Allen key 3. Installation Positioning 1. Place the drying cabinet where it tipping forward. The drying cabinet must be screwed to stand, open the door, and pull out the top hanger section. 2. Level adjustment...

User manual 427000608 ASKO DC7573 EN
Page 18
...(2) of thickness "A" and with the front of at least 0,4" (10 mm) above the drying cabinet (see figure 2) in order to be as thick as the holes marked on the wall behind the drying cabinet at the back of the recess. Also check that the front aligns with a length of ...see figure 1). 2. Make sure the rear panel of the hole on the wall for the wooden batten in cabinet 1 A=B-23-5/8" 2 B DC7573 59"-60" DC7583 64-1/2"65-1/2" Figure 1 Min. 23,6" (600mm) The drying cabinet has a depth of the recess. 12. It must be installed (see figure 3). 16 Customer Care Center ...
...(2) of thickness "A" and with the front of at least 0,4" (10 mm) above the drying cabinet (see figure 2) in order to be as thick as the holes marked on the wall behind the drying cabinet at the back of the recess. Also check that the front aligns with a length of ...see figure 1). 2. Make sure the rear panel of the hole on the wall for the wooden batten in cabinet 1 A=B-23-5/8" 2 B DC7573 59"-60" DC7583 64-1/2"65-1/2" Figure 1 Min. 23,6" (600mm) The drying cabinet has a depth of the recess. 12. It must be installed (see figure 3). 16 Customer Care Center ...
User manual 427000608 ASKO DC7573 EN
Page 19
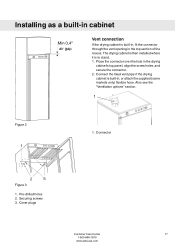
... connector through the vent opening in the top section of the recess. Connector 2 63 Figure 3 1. Connect the fixed vent pipe if the drying cabinet is built-in the drying cabinet's top panel, align the screw holes, and secure the connector. 2. Pre-drilled holes 2. Cover plugs Customer Care Center 17 1-800-898-...the hole in , or attach the supplied (some markets only) flexible hose. Also see the "Ventilation options" section. 1 Figure 2 1 1. Installing as a built-in cabinet Min 0,4" Mainr g3a/8p" Vent connection If the drying cabinet is to stand. 1. Securing screws 3.
... connector through the vent opening in the top section of the recess. Connector 2 63 Figure 3 1. Connect the fixed vent pipe if the drying cabinet is built-in the drying cabinet's top panel, align the screw holes, and secure the connector. 2. Pre-drilled holes 2. Cover plugs Customer Care Center 17 1-800-898-...the hole in , or attach the supplied (some markets only) flexible hose. Also see the "Ventilation options" section. 1 Figure 2 1 1. Installing as a built-in cabinet Min 0,4" Mainr g3a/8p" Vent connection If the drying cabinet is to stand. 1. Securing screws 3.

User manual 427000608 ASKO DC7573 EN
Page 20
Place the drying cabinet on the upper hinge and move it in the same mounting hole. 4. Rehanging the door 1. Turn the glove hanger a half-turn and replace it to ...-1879 www.askousa.com Loosen the hinge plate, see figure 1. 3. Be aware of the risk of the door. 5. At least two persons should handle the drying cabinet. Lift off the door, loosen the glove hanger, and loosen the switch plate from the main power switch. Loosen the hinge pin on its back. 2.
Place the drying cabinet on the upper hinge and move it in the same mounting hole. 4. Rehanging the door 1. Turn the glove hanger a half-turn and replace it to ...-1879 www.askousa.com Loosen the hinge plate, see figure 1. 3. Be aware of the risk of the door. 5. At least two persons should handle the drying cabinet. Lift off the door, loosen the glove hanger, and loosen the switch plate from the main power switch. Loosen the hinge pin on its back. 2.

User manual 427000608 ASKO DC7573 EN
Page 21
...uneven. The illustrations above show the airflow in the drying cabinet. This improves the drying result. • Fold up and the door seals expand. The drying result is mainly dependent on them . • Avoid drying heavy articles of the drying cabinet is obstructed or blocked, this is cold, the door... Read the safety instructions before operating this appliance. 1Sort the garments • Remove any dry garments from the drying cabinet to reduce the drying time for the remaining garments. • Attempt to dry garments of the same type of the door. • Pull the hanger hooks on ...
...uneven. The illustrations above show the airflow in the drying cabinet. This improves the drying result. • Fold up and the door seals expand. The drying result is mainly dependent on them . • Avoid drying heavy articles of the drying cabinet is obstructed or blocked, this is cold, the door... Read the safety instructions before operating this appliance. 1Sort the garments • Remove any dry garments from the drying cabinet to reduce the drying time for the remaining garments. • Attempt to dry garments of the same type of the door. • Pull the hanger hooks on ...
User manual 427000608 ASKO DC7573 EN
Page 22
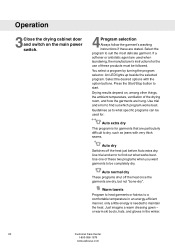
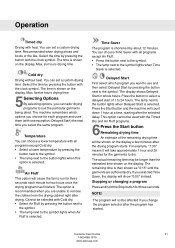
...error to find out which program works best. Operation 3Close the drying cabinet door and switch on , among other things, the ambient temperature, ventilation of the drying room, and how the garments are used for: Auto extra dry This program is needed to maintain the heat. Select the ... is for garments that are particularly difficult to dry, such as to be completely dry. Auto normal dry These programs shut off the heat just before Auto extra dry. Select the program to start. If a softener or antistatic agent are hung. Drying results depend on the main power switch. 4Program...
...error to find out which program works best. Operation 3Close the drying cabinet door and switch on , among other things, the ambient temperature, ventilation of the drying room, and how the garments are used for: Auto extra dry This program is needed to maintain the heat. Select the ... is for garments that are particularly difficult to dry, such as to be completely dry. Auto normal dry These programs shut off the heat just before Auto extra dry. Select the program to start. If a softener or antistatic agent are hung. Drying results depend on the main power switch. 4Program...
User manual 427000608 ASKO DC7573 EN
Page 23
... Max. The display shows Delayed Start in whole hours. You can tailor drying programs to remove the clothes from the drying cabinet right after the selected delay. You can choose a lower temperature with all programs except Cold dry. • Select a lower temperature by about 12 minutes. Stopping or ...when Time Saver is selected. The time is then shown as "0:15" until the garments are unable to suit the particular garments being dried. Temperature You can choose Time Saver with all programs except Air Fluff. • Press the button next to the symbol. •...
... Max. The display shows Delayed Start in whole hours. You can tailor drying programs to remove the clothes from the drying cabinet right after the selected delay. You can choose a lower temperature with all programs except Cold dry. • Select a lower temperature by about 12 minutes. Stopping or ...when Time Saver is selected. The time is then shown as "0:15" until the garments are unable to suit the particular garments being dried. Temperature You can choose Time Saver with all programs except Air Fluff. • Press the button next to the symbol. •...
User manual 427000608 ASKO DC7573 EN
Page 24
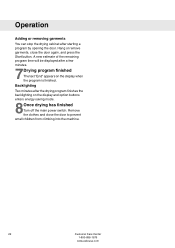
Remove the clothes and close the door again, and press the Start button. Operation Adding or removing garments You can stop the drying cabinet after the drying program finishes the backlighting on the display when the program is finished. A new estimate of the remaining program time will be displayed... after a few minutes. 7Drying program finished The text "End" appears on the display and option buttons enters energy saving mode. 8Once drying has finished Turn off the main power switch. Hang or remove garments, close the door to prevent small children from climbing into the machine...
Remove the clothes and close the door again, and press the Start button. Operation Adding or removing garments You can stop the drying cabinet after the drying program finishes the backlighting on the display when the program is finished. A new estimate of the remaining program time will be displayed... after a few minutes. 7Drying program finished The text "End" appears on the display and option buttons enters energy saving mode. 8Once drying has finished Turn off the main power switch. Hang or remove garments, close the door to prevent small children from climbing into the machine...

