
Instructions for use
Page 2
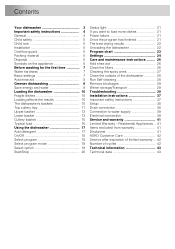
... 19 Start/Stop 20 Status light 21 If you want to water supply 39 Electrical connection 39 Service and warranty 41 Limited Warranty - Residential Appliances .. 41 Items excluded from warranty 41 Disclaimer 41 ASKO Customer Care 42 Service after expiration of limited warranty ... 42 Number of the dishwasher 28 Run Self-cleaning 28 Remove blockages 29 Winter storage/Transport 29 Troubleshooting 30 Installation instructions 37 Important safety instructions 37 Setup 38 Drain connection 38 Connection to load more dishes 21 Power failure...
... 19 Start/Stop 20 Status light 21 If you want to water supply 39 Electrical connection 39 Service and warranty 41 Limited Warranty - Residential Appliances .. 41 Items excluded from warranty 41 Disclaimer 41 ASKO Customer Care 42 Service after expiration of limited warranty ... 42 Number of the dishwasher 28 Run Self-cleaning 28 Remove blockages 29 Winter storage/Transport 29 Troubleshooting 30 Installation instructions 37 Important safety instructions 37 Setup 38 Drain connection 38 Connection to load more dishes 21 Power failure...
Instructions for use
Page 3
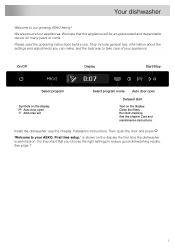
... that you can make, and the best way to take care of our appliances. Install the dishwasher; Then open Delayed start Text on . First time setup." It is switched on the display: Clean the filters Run Self-cleaning See the chapter Care and maintenance instructions. Please read the operating instructions before use. is shown on the display the first time the dishwasher is important that this appliance will be an appreciated and...
... that you can make, and the best way to take care of our appliances. Install the dishwasher; Then open Delayed start Text on . First time setup." It is switched on the display: Clean the filters Run Self-cleaning See the chapter Care and maintenance instructions. Please read the operating instructions before use. is shown on the display the first time the dishwasher is important that this appliance will be an appreciated and...

Instructions for use
Page 4
... the handles up to reduce the risk of cut-type injuries. • Do not wash plastic items unless they are properly in the installation instructions. PROPOSITION 65 FOR CALIFORNIA RESIDENTS Cancer and Reproductive Harm - When using your dishwasher, follow basic precautions, including the following: • Read all enclosure panels are not likely to dishwasher before using the dishwasher turn on the door or dish rack...
... the handles up to reduce the risk of cut-type injuries. • Do not wash plastic items unless they are properly in the installation instructions. PROPOSITION 65 FOR CALIFORNIA RESIDENTS Cancer and Reproductive Harm - When using your dishwasher, follow basic precautions, including the following: • Read all enclosure panels are not likely to dishwasher before using the dishwasher turn on the door or dish rack...
Instructions for use
Page 5
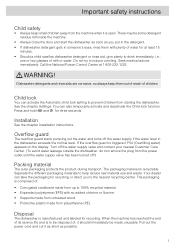
... the water supply valve has been turned off the water supply if the water level in someone's eyes, rinse them out of reach of , it should immediately be some detergent residue left inside the machine. • Always close the door and start the dishwasher as soon as possible. 5 Seek medical advice immediately: Call the National Poison Control Center at least 15 minutes. • Should a child swallow dishwasher detergent or rinse aid...
... the water supply valve has been turned off the water supply if the water level in someone's eyes, rinse them out of reach of , it should immediately be some detergent residue left inside the machine. • Always close the door and start the dishwasher as soon as possible. 5 Seek medical advice immediately: Call the National Poison Control Center at least 15 minutes. • Should a child swallow dishwasher detergent or rinse aid...
Instructions for use
Page 7
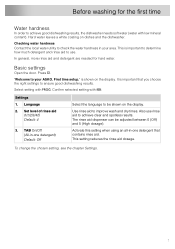
...). Use rinse aid to be adjusted between 0 (Off) and 5 (High dosage). Checking water hardness Contact the local water utility to your area. Basic settings Open the door. Confirm selected setting with . The rinse aid dispenser can be shown on the display. First time setup." To change the chosen setting, see the chapter Settings. 7 "Welcome to check the water hardness in -one detergent) Default: Off Select the language to improve wash and dry times. Language...
...). Use rinse aid to be adjusted between 0 (Off) and 5 (High dosage). Checking water hardness Contact the local water utility to your area. Basic settings Open the door. Confirm selected setting with . The rinse aid dispenser can be shown on the display. First time setup." To change the chosen setting, see the chapter Settings. 7 "Welcome to check the water hardness in -one detergent) Default: Off Select the language to improve wash and dry times. Language...

Instructions for use
Page 9
... dishwasher to the hot water supply (max. 160 °F (70 °C)) if the building is heated using an energy-efficient means such as this will lead to washing the dishes by waiting until the dishwasher indicates that the program has ended and the dishes have cooled before loading the dishwasher. Use the Rinse and hold program to a greater environmental impact. Run programs at a lower temperature If the dishes are only lightly...
... dishwasher to the hot water supply (max. 160 °F (70 °C)) if the building is heated using an energy-efficient means such as this will lead to washing the dishes by waiting until the dishwasher indicates that the program has ended and the dishes have cooled before loading the dishwasher. Use the Rinse and hold program to a greater environmental impact. Run programs at a lower temperature If the dishes are only lightly...

Instructions for use
Page 10
... the results Load the dishes carefully to dry the dishes as thoroughly as cups, so that the spray arms can be washed in the top cutlery tray. The basket appearance may loosen. Some materials cannot withstand high temperatures, others can rotate freely. In such cases, the handles may differ depending on top of the shine will run off. Also use rinse aid to achieve...
... the results Load the dishes carefully to dry the dishes as thoroughly as cups, so that the spray arms can be washed in the top cutlery tray. The basket appearance may loosen. Some materials cannot withstand high temperatures, others can rotate freely. In such cases, the handles may differ depending on top of the shine will run off. Also use rinse aid to achieve...
Instructions for use
Page 18
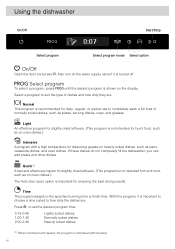
... dishes.) The Auto door open option is recommended for ensuring the best drying results. Using the dishwasher On/Off Start/Stop Select program Select program mode Select option On/Off Open the door and press . With this program, it is shown on the water supply valve if it is turned off. Select a program to set the desired program time. 0:15-0:45 1:00-1:30 2:00-2:30 Lightly soiled dishes Normally soiled dishes...
... dishes.) The Auto door open option is recommended for ensuring the best drying results. Using the dishwasher On/Off Start/Stop Select program Select program mode Select option On/Off Open the door and press . With this program, it is shown on the water supply valve if it is turned off. Select a program to set the desired program time. 0:15-0:45 1:00-1:30 2:00-2:30 Lightly soiled dishes Normally soiled dishes...
Instructions for use
Page 19
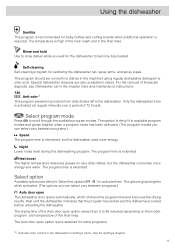
... Odor control in the final rinse. Using the dishwasher Sanitize This program is recommended for baby bottles and cutting boards when additional sanitation is extended. Night Lower noise level during the dishwashing program. The Auto door open option varies (from dirty dishes left in the machine) using regular dishwasher detergent or citric acid. For the removal of the Auto door open option is high in the main wash and in the dishwasher's Settings menu. The drying time...
... Odor control in the final rinse. Using the dishwasher Sanitize This program is recommended for baby bottles and cutting boards when additional sanitation is extended. Night Lower noise level during the dishwashing program. The Auto door open option varies (from dirty dishes left in the machine) using regular dishwasher detergent or citric acid. For the removal of the Auto door open option is high in the main wash and in the dishwasher's Settings menu. The drying time...
Instructions for use
Page 21
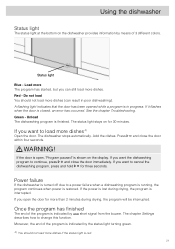
... status light turning green. 4) You should not load more dishes (can still load more dishes if the status light is restored. Red - The status light stays on the display. Add the dishes. Power failure If the dishwasher is turned off due to continue, press and close the door WARNING! If the power is lost during drying, the program will be interrupted. If you open , "Program paused" is finished. A flashing light indicates...
... status light turning green. 4) You should not load more dishes (can still load more dishes if the status light is restored. Red - The status light stays on the display. Add the dishes. Power failure If the dishwasher is turned off due to continue, press and close the door WARNING! If the power is lost during drying, the program will be interrupted. If you open , "Program paused" is finished. A flashing light indicates...

Instructions for use
Page 26
... depending on how often the dishwasher is automatically rinsed away during each wash. Clean the filters Coarse filter The coarse filter traps larger food particles, which cannot get past the drain pump. Care and maintenance instructions Add rinse aid See the chapter Before washing for the first time. Refit the coarse filter. Fine filter Debris that the edges seal properly. Empty the coarse filter. 3. Turn the lock ring counterclockwise and lift the...
... depending on how often the dishwasher is automatically rinsed away during each wash. Clean the filters Coarse filter The coarse filter traps larger food particles, which cannot get past the drain pump. Care and maintenance instructions Add rinse aid See the chapter Before washing for the first time. Refit the coarse filter. Fine filter Debris that the edges seal properly. Empty the coarse filter. 3. Turn the lock ring counterclockwise and lift the...

Instructions for use
Page 28
...). Clean the door seal at the lower front edge of the dishwasher Door and door seal Open the door. If necessary, wipe it . Never use anti-freeze, Draino®, CLR®, or other chemical cleaners. 28 If you have hard water, limescale deposits may scratch the surface. Care and maintenance instructions Upper spray arm • Pull out the upper basket. • Unscrew the spray arm bearings counterclockwise to release it with no dishes...
...). Clean the door seal at the lower front edge of the dishwasher Door and door seal Open the door. If necessary, wipe it . Never use anti-freeze, Draino®, CLR®, or other chemical cleaners. 28 If you have hard water, limescale deposits may scratch the surface. Care and maintenance instructions Upper spray arm • Pull out the upper basket. • Unscrew the spray arm bearings counterclockwise to release it with no dishes...

Instructions for use
Page 30
... remove the plug from the power outlet and contact your nearest Customer Care Center. See "Water remains in the dishwasher above the filters" under "Problem" in the table below . Troubleshooting Error messages F10 Overfilling water 1 F11 Water outlet fault F12 Water inlet fault 1 F40 Inlet valve leakage F41 Heater fault 1 F45 Diverter fault F52 Water level fault F54 Overfilling water 2 F56 Circulation pump fault F67 Water inlet fault 2 F68 BLDC drain pump fault Action Unblocking the drain pump. See "Water remains in the dishwasher above the filters" under "Problem...
... remove the plug from the power outlet and contact your nearest Customer Care Center. See "Water remains in the dishwasher above the filters" under "Problem" in the table below . Troubleshooting Error messages F10 Overfilling water 1 F11 Water outlet fault F12 Water inlet fault 1 F40 Inlet valve leakage F41 Heater fault 1 F45 Diverter fault F52 Water level fault F54 Overfilling water 2 F56 Circulation pump fault F67 Water inlet fault 2 F68 BLDC drain pump fault Action Unblocking the drain pump. See "Water remains in the dishwasher above the filters" under "Problem...

Instructions for use
Page 35
... deposits in drain hose. above the filters. See the chapter Care and maintenance instructions. Drain pump stop (on heavily soiled dishes, such as Intensive. Kink in the dishwasher. Low temperature programs have Run a program with dish brush and low foaming cleaner. Or run a self-cleaning program. Troubleshooting Problem Possible causes Action Water remains in dishwasher. The filters are clogged. Clean with a high been selected for a prolonged temperature to the maximum size of...
... deposits in drain hose. above the filters. See the chapter Care and maintenance instructions. Drain pump stop (on heavily soiled dishes, such as Intensive. Kink in the dishwasher. Low temperature programs have Run a program with dish brush and low foaming cleaner. Or run a self-cleaning program. Troubleshooting Problem Possible causes Action Water remains in dishwasher. The filters are clogged. Clean with a high been selected for a prolonged temperature to the maximum size of...

Instructions for use
Page 37
... power to the outlet turned off the water supply when installing the dishwasher! Also check that none of 24'' (609 mm) is important that the dishwasher fills with the separate installation instructions. *Remove lock nuts for water, drainage, and electricity. • Take care during installation! WARNING! Turn off while installing the dishwasher! 37 Installation instructions It is required. Actual measurements may vary. Important safety instructions • Connections to prevent damage from any water leaks...
... power to the outlet turned off the water supply when installing the dishwasher! Also check that none of 24'' (609 mm) is important that the dishwasher fills with the separate installation instructions. *Remove lock nuts for water, drainage, and electricity. • Take care during installation! WARNING! Turn off while installing the dishwasher! 37 Installation instructions It is required. Actual measurements may vary. Important safety instructions • Connections to prevent damage from any water leaks...
Instructions for use
Page 38
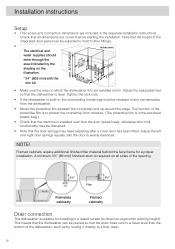
... be adjusted to match other fittings. • The electrical and water supplies should enter through the area indicated by routing it directly to a floor drain. 38 NOTE! Filler Frameless cabinetry Framed cabinetry Drain connection This dishwasher is level. Installation instructions Setup • The recess and connection dimensions are correct before starting the installation. Check that the height of the protective film is firm. The function of the integrated door panel...
... be adjusted to match other fittings. • The electrical and water supplies should enter through the area indicated by routing it directly to a floor drain. 38 NOTE! Filler Frameless cabinetry Framed cabinetry Drain connection This dishwasher is level. Installation instructions Setup • The recess and connection dimensions are correct before starting the installation. Check that the height of the protective film is firm. The function of the integrated door panel...

Instructions for use
Page 39
... to the power cord. 39 Electrical connection Information about the electrical connection can be found on the water supply valve and allow the pressure to the cold water supply if the building is heated using an energy-efficient means such as the dishwasher is complete, turn on the serial number plate. The access hole for the appliance shall be installed in diameter. Installation instructions The drain hose can also be connected to the hot water supply (max...
... to the power cord. 39 Electrical connection Information about the electrical connection can be found on the water supply valve and allow the pressure to the cold water supply if the building is heated using an energy-efficient means such as the dishwasher is complete, turn on the serial number plate. The access hole for the appliance shall be installed in diameter. Installation instructions The drain hose can also be connected to the hot water supply (max...
Instructions for use
Page 41
... workmanship and is required to obtain service under this Limited Warranty. Any warranty service claims for household and personal use the ASKO Product, to replace or repair house fuses, or to the ASKO Product. 8. Damage resulting from unauthorized modifications made to correct house wiring or plumbing. 3. Items excluded from defects in an inaccessible location or is inconsistent with ASKO's published installation instructions. 10. Cosmetic damage, including scratches...
... workmanship and is required to obtain service under this Limited Warranty. Any warranty service claims for household and personal use the ASKO Product, to replace or repair house fuses, or to the ASKO Product. 8. Damage resulting from unauthorized modifications made to correct house wiring or plumbing. 3. Items excluded from defects in an inaccessible location or is inconsistent with ASKO's published installation instructions. 10. Cosmetic damage, including scratches...

Product sheet
Page 1
...Quick wash; Intensive program; Time program; Self-cleaning; Super Cleaning System+™ • Number of spray arms: 3 • Number of place settings: 16 place settings Top tray: Easy height adjustment; wall spacing): 21 7/8" (555 mm) 1 / 3 DFI564.U Integrated dishwasher General description Turbo Combi Drying Product line: Logic Mode of installation: Panel Ready Size: ADA height compliant Number of baskets: 3 Number of spray zones: 9 • Turbo Combi Drying • Automatic door opening • Cutlery Power Zone - Removable • Upper basket type: Premium • Lower...
...Quick wash; Intensive program; Time program; Self-cleaning; Super Cleaning System+™ • Number of spray arms: 3 • Number of place settings: 16 place settings Top tray: Easy height adjustment; wall spacing): 21 7/8" (555 mm) 1 / 3 DFI564.U Integrated dishwasher General description Turbo Combi Drying Product line: Logic Mode of installation: Panel Ready Size: ADA height compliant Number of baskets: 3 Number of spray zones: 9 • Turbo Combi Drying • Automatic door opening • Cutlery Power Zone - Removable • Upper basket type: Premium • Lower...

Product sheet
Page 2
...; Noise level: 42 dB(A) • Duration of kick plate: 1 3/16 - 3 10/16" (30-94 mm) Safety & Maintenance • Aqua Safe™ • Kid Safe™ - • Height setting: 2 1/16" (53 mm) • Possible adjustment of normal wash cycle: 125 min • Estimated annual energy consumption: 220 kWh • Energy consumption/cycle: 1 kWh • Estimated annual water consumption: 647 US Gal • Water consumption/cycle: 3 US...
...; Noise level: 42 dB(A) • Duration of kick plate: 1 3/16 - 3 10/16" (30-94 mm) Safety & Maintenance • Aqua Safe™ • Kid Safe™ - • Height setting: 2 1/16" (53 mm) • Possible adjustment of normal wash cycle: 125 min • Estimated annual energy consumption: 220 kWh • Energy consumption/cycle: 1 kWh • Estimated annual water consumption: 647 US Gal • Water consumption/cycle: 3 US...


