

User manual Use & Care Guide Asko T702C EN
Page 18
After unpacking the washer, thoroughly check the unit for the stainless steel tank if it to register your product warranty by an authorized ASKO service agent. Third Year Full ASKO replacement parts and/or repair labor to extend agent. Complete your dealer within five days from the ... purchase. Cosmetic damage must be reported to the address on the warranty card within 90 days of the date of purchase. Lifetime ASKO replacement parts (labor cost not included) for cosmetic damage. vice must be provided by logging onto www.askousa.com/customercare/regis-...
After unpacking the washer, thoroughly check the unit for the stainless steel tank if it to register your product warranty by an authorized ASKO service agent. Third Year Full ASKO replacement parts and/or repair labor to extend agent. Complete your dealer within five days from the ... purchase. Cosmetic damage must be reported to the address on the warranty card within 90 days of the date of purchase. Lifetime ASKO replacement parts (labor cost not included) for cosmetic damage. vice must be provided by logging onto www.askousa.com/customercare/regis-...

User manual Use & Care Guide Asko T702C EN
Page 19
... gives you specific legal rights and you . Repair damage due to : 1. Replace house fuses or correct house wiring. 5. In no event shall ASKO Appliances Inc. Correct the installation of the model, type name, and serial number. Some states will not pay for any incidental or consequential damages. ... service, contact our Customer Care Center at 1-800-898-1879 www.askousa.com Customer Care Center 19 1-800-898-1879 www.askousa.com ASKO washers are designed to improper installation. 6. Write to contact the ASKO Appliances Inc. Clean or service air device in - How to us at...
... gives you specific legal rights and you . Repair damage due to : 1. Replace house fuses or correct house wiring. 5. In no event shall ASKO Appliances Inc. Correct the installation of the model, type name, and serial number. Some states will not pay for any incidental or consequential damages. ... service, contact our Customer Care Center at 1-800-898-1879 www.askousa.com Customer Care Center 19 1-800-898-1879 www.askousa.com ASKO washers are designed to improper installation. 6. Write to contact the ASKO Appliances Inc. Clean or service air device in - How to us at...

User manual Use & Care Guide Asko T702C EN
Page 23
... cover to the "Important Safety Instructions" for grounding instructions. Note The drain hose must not be properly grounded. ASKO washers rated 208-240 V have two internal fuses of the machine is designed to accommodate ASKO washers ONLY (rated 208-240 V.) To use the ready-fitted plug supplied with the dryer to let the hose...
... cover to the "Important Safety Instructions" for grounding instructions. Note The drain hose must not be properly grounded. ASKO washers rated 208-240 V have two internal fuses of the machine is designed to accommodate ASKO washers ONLY (rated 208-240 V.) To use the ready-fitted plug supplied with the dryer to let the hose...
User manual Use & Care Guide Asko T702C EN
Page 26
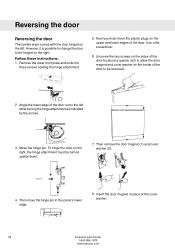
Remove the lower front plate and undo the three screws holding the hinge attachment. 5. Then remove the door magnet (1) and cover washer (2). 1 2 Hinge pin 4. Insert the door magnet in the panel's lower edge. 8. To hinge the door on the right, the hinge attachment must move the hinge ...pin in place of the cover washer. 26 Customer Care Center 1-800-898-1879 www.askousa.com However, it is possible to change the door to be hinged on the sides of...
Remove the lower front plate and undo the three screws holding the hinge attachment. 5. Then remove the door magnet (1) and cover washer (2). 1 2 Hinge pin 4. Insert the door magnet in the panel's lower edge. 8. To hinge the door on the right, the hinge attachment must move the hinge ...pin in place of the cover washer. 26 Customer Care Center 1-800-898-1879 www.askousa.com However, it is possible to change the door to be hinged on the sides of...
User manual Use & Care Guide Asko T702C EN
Page 27
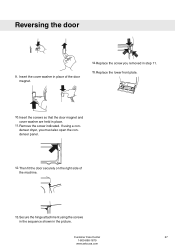
Customer Care Center 27 1-800-898-1879 www.askousa.com If using the screws in the sequence shown in step 11. 15. Secure the hinge attachment using a condenser dryer, you removed in the picture. Reversing the door 9. Insert the screws so that the door magnet and cover washer are held in place of the machine. 13. Remove the screw indicated. Replace the lower front plate. 3 10. Insert the cover washer in place. 11. Replace the screw you must also open the condenser panel. 12. Then fit the door securely on the right side of the door magnet. 1 2 14.
Customer Care Center 27 1-800-898-1879 www.askousa.com If using the screws in the sequence shown in step 11. 15. Secure the hinge attachment using a condenser dryer, you removed in the picture. Reversing the door 9. Insert the screws so that the door magnet and cover washer are held in place of the machine. 13. Remove the screw indicated. Replace the lower front plate. 3 10. Insert the cover washer in place. 11. Replace the screw you must also open the condenser panel. 12. Then fit the door securely on the right side of the door magnet. 1 2 14.
