

User manual 80 891 45 Asko T743 EN
Page 1
... products and the reason they are key characteristics of your needs for many years to avoid damaging the environment. ASKO T743 To ensure that you for choosing this quality product from ASKO. Operating Instructions Tumble dryer Save these instructions for future reference Dear Customer, Thank you read the operating instructions before using the machine...
... products and the reason they are key characteristics of your needs for many years to avoid damaging the environment. ASKO T743 To ensure that you for choosing this quality product from ASKO. Operating Instructions Tumble dryer Save these instructions for future reference Dear Customer, Thank you read the operating instructions before using the machine...

User manual 80 891 45 Asko T743 EN
Page 2
... 15 Child safety 6 Service and guarantee 16 General 6 Warranty 17 Description of the tumble dryer Front panel Advice and tips before you tumble dry 7 How to contact ASKO Appliances 8 Inc. 17 Installation instructions 18 9 Positioning the tumble dryer 18 Have the clothes been spun? 9 Adjusting the feet 20 Materials that can be tumble...
... 15 Child safety 6 Service and guarantee 16 General 6 Warranty 17 Description of the tumble dryer Front panel Advice and tips before you tumble dry 7 How to contact ASKO Appliances 8 Inc. 17 Installation instructions 18 9 Positioning the tumble dryer 18 Have the clothes been spun? 9 Adjusting the feet 20 Materials that can be tumble...
User manual 80 891 45 Asko T743 EN
Page 3
...;rguesela. Log onto www.askousa.com/customer-care to download. ¿Necesita esta Instrucciones de uso y cuidado en español? When starting the tumble dryer for tumble drying. Before using your machine for the first time Do you tumble dry" chapter. Always check and follow the instructions on each item...
...;rguesela. Log onto www.askousa.com/customer-care to download. ¿Necesita esta Instrucciones de uso y cuidado en español? When starting the tumble dryer for tumble drying. Before using your machine for the first time Do you tumble dry" chapter. Always check and follow the instructions on each item...
User manual 80 891 45 Asko T743 EN
Page 4
... SAVE THESE INSTRUCTIONS FOR FUTURE REFERENCE Installation See the "Installation instructions" chapter. WARNING! Children should be cleaned periodically by an authorized ASKO service agent. • Do not place items exposed to repair or replace any part of the appliance or perform any servicing unless... Provide sufficient ventilation, otherwise smoke from open fires or fumes from the accumulation of lint, dust and dirt. • The interior of the dryer will get very hot. When it will be exposed to the weather. • Do not tamper with controls. • Do not attempt to...
... SAVE THESE INSTRUCTIONS FOR FUTURE REFERENCE Installation See the "Installation instructions" chapter. WARNING! Children should be cleaned periodically by an authorized ASKO service agent. • Do not place items exposed to repair or replace any part of the appliance or perform any servicing unless... Provide sufficient ventilation, otherwise smoke from open fires or fumes from the accumulation of lint, dust and dirt. • The interior of the dryer will get very hot. When it will be exposed to the weather. • Do not tamper with controls. • Do not attempt to...

User manual 80 891 45 Asko T743 EN
Page 6
Do not allow children to play with the tumble dryer. Child safety General WARNING! The tumble dryer does not start automatically when the door is closed (if a child pulls the door shut from the inside, for example). 6 Customer Care Center 1-800-898-1879 www.askousa.com
Do not allow children to play with the tumble dryer. Child safety General WARNING! The tumble dryer does not start automatically when the door is closed (if a child pulls the door shut from the inside, for example). 6 Customer Care Center 1-800-898-1879 www.askousa.com
User manual 80 891 45 Asko T743 EN
Page 7
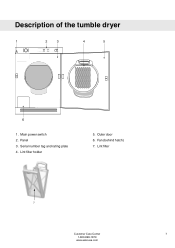
Lint filter holder 5. Panel 3. Serial number tag and rating plate 4. Fan (behind hatch) 7. Outer door 6. Lint filter 79 Customer Care Center 7 1-800-898-1879 www.askousa.com Description of the tumble dryer 1 2 3 4 5 6 1. Main power switch 2.
Lint filter holder 5. Panel 3. Serial number tag and rating plate 4. Fan (behind hatch) 7. Outer door 6. Lint filter 79 Customer Care Center 7 1-800-898-1879 www.askousa.com Description of the tumble dryer 1 2 3 4 5 6 1. Main power switch 2.
User manual 80 891 45 Asko T743 EN
Page 9
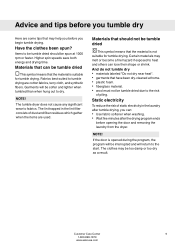
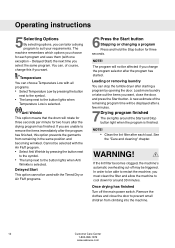
... : • Use fabric softener when washing. • Wait five minutes after the drying program ends before opening the door and removing the laundry from the dryer. The tumble dryer does not cause any significant wear to the start. NOTE! Advice and tips before you tumble dry Here are used.
... : • Use fabric softener when washing. • Wait five minutes after the drying program ends before opening the door and removing the laundry from the dryer. The tumble dryer does not cause any significant wear to the start. NOTE! Advice and tips before you tumble dry Here are used.
User manual 80 891 45 Asko T743 EN
Page 12
... button light when the program is selected. Remove the clothes and close the door, and press the Start button. WARNING! You can stop the tumble dryer after the drying program has finished. A new estimate of course, change this option prevents the garments from climbing into the machine. 12 Customer Care Center...
... button light when the program is selected. Remove the clothes and close the door, and press the Start button. WARNING! You can stop the tumble dryer after the drying program has finished. A new estimate of course, change this option prevents the garments from climbing into the machine. 12 Customer Care Center...
User manual 80 891 45 Asko T743 EN
Page 13
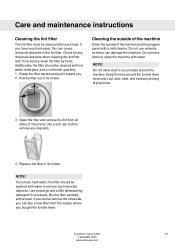
...you . 2. If you cannot remove the limescale, you can buy a new filter from all sides of it toward you bought the tumble dryer. Care and maintenance instructions Cleaning the lint filter The lint filter must be washed with water to remove any limescale deposits. Do not allow ...any limescale deposits when cleaning the lint filter and, if necessary, wash the filter by hand. Use a soft, dry cloth to accumulate around the tumble dryer clean and cool; Dry the filter carefully with water. dust, heat, and moisture prolong drying times. 3. NOTE! Use a sponge and a little ...
...you . 2. If you cannot remove the limescale, you can buy a new filter from all sides of it toward you bought the tumble dryer. Care and maintenance instructions Cleaning the lint filter The lint filter must be washed with water to remove any limescale deposits. Do not allow ...any limescale deposits when cleaning the lint filter and, if necessary, wash the filter by hand. Use a soft, dry cloth to accumulate around the tumble dryer clean and cool; Dry the filter carefully with water. dust, heat, and moisture prolong drying times. 3. NOTE! Use a sponge and a little ...
User manual 80 891 45 Asko T743 EN
Page 14
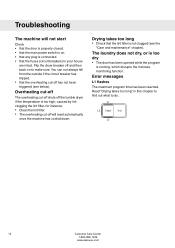
Overheating cut-off The overheating cut-off shuts off the tumble dryer if the temperature is too high, caused by lint clogging the lint filter, for instance. • Clean the lint filter. • The overheating cut -off ... (see below). Drying takes too long • Check that the fuses (circuit breakers) in this chapter to find out what to make sure. Flip the dryer breaker off has not been triggered (see the "Care and maintenance" chapter). Read "Drying takes too long" in your house are intact. Troubleshooting The machine...
Overheating cut-off The overheating cut-off shuts off the tumble dryer if the temperature is too high, caused by lint clogging the lint filter, for instance. • Clean the lint filter. • The overheating cut -off ... (see below). Drying takes too long • Check that the fuses (circuit breakers) in this chapter to find out what to make sure. Flip the dryer breaker off has not been triggered (see the "Care and maintenance" chapter). Read "Drying takes too long" in your house are intact. Troubleshooting The machine...
User manual 80 891 45 Asko T743 EN
Page 18
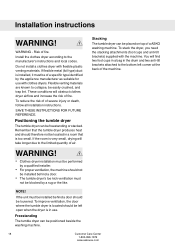
... that is too small. Stacking The tumble dryer can be located in a room that the tumble dryer produces heat and should therefore not be placed on top of a ASKO washing machine. Installation instructions WARNING! To stack the dryer, you need the stacking attachments (foot cups...limited quantity of a specific type identified by a rug or the like. SAVE THESE INSTRUCTIONS FOR FUTURE REFERENCE. WARNING! • Clothes dryer installation must be performed by a qualified installer. • For proper ventilation, the machine should not be installed behind a door should be...
... that is too small. Stacking The tumble dryer can be located in a room that the tumble dryer produces heat and should therefore not be placed on top of a ASKO washing machine. Installation instructions WARNING! To stack the dryer, you need the stacking attachments (foot cups...limited quantity of a specific type identified by a rug or the like. SAVE THESE INSTRUCTIONS FOR FUTURE REFERENCE. WARNING! • Clothes dryer installation must be performed by a qualified installer. • For proper ventilation, the machine should not be installed behind a door should be...

User manual 80 891 45 Asko T743 EN
Page 19
... machine, including between units and cabinet or wall. Do not raise it possible to assemble the stacking kit: 1. See illustration for condenser dryers. Undo the anti-tip device. Customer Care Center 19 1-800-898-1879 www.askousa.com Hole measurements are from center of the machine top...and the back wall. The maximum drain height is 33-1/2" to 34-1/2" (850 mm to 876 mm). Installation instructions Built-in Install in a closet ASKO's front panel controls make it higher than 34-1/2" (876 mm). Make sure there is a ½" (12mm) minimum clearance between the rear edge ...
... machine, including between units and cabinet or wall. Do not raise it possible to assemble the stacking kit: 1. See illustration for condenser dryers. Undo the anti-tip device. Customer Care Center 19 1-800-898-1879 www.askousa.com Hole measurements are from center of the machine top...and the back wall. The maximum drain height is 33-1/2" to 34-1/2" (850 mm to 876 mm). Installation instructions Built-in Install in a closet ASKO's front panel controls make it higher than 34-1/2" (876 mm). Make sure there is a ½" (12mm) minimum clearance between the rear edge ...
User manual 80 891 45 Asko T743 EN
Page 20
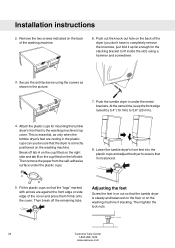
... surface under the metal brackets. AA BB 5. Installation instructions 2. Push the tumble dryer in or out so that the dryer is steady and balanced on the floor or on the washing machine. Adjusting the ...can you don't have to fit inside the slot) using the screws as only when the tumble dryer's feet are against the front edge or side edge of the washing machine. 6. Fit the plastic... cups so that it up far enough for mounting the tumble dryer's front feet to 0,8" (20 mm). 4. Then break off tab A on the cup fitted on the...
... surface under the metal brackets. AA BB 5. Installation instructions 2. Push the tumble dryer in or out so that the dryer is steady and balanced on the floor or on the washing machine. Adjusting the ...can you don't have to fit inside the slot) using the screws as only when the tumble dryer's feet are against the front edge or side edge of the washing machine. 6. Fit the plastic... cups so that it up far enough for mounting the tumble dryer's front feet to 0,8" (20 mm). 4. Then break off tab A on the cup fitted on the...
User manual 80 891 45 Asko T743 EN
Page 21
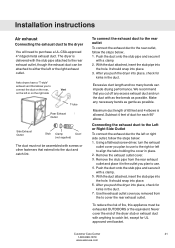
...though the exhaust duct can impede drying performance. It should snap into place, check for each 90° elbow. Subtract 4 feet of the dryer stub or exhaust duct with the stub pipe attached to the rear outlet, follow the steps below :. 1. Using a flathead screw-driver, turn...right side left or right side outlet, follow the steps below : 1. Customer Care Center 21 1-800-898-1879 www.askousa.com Asko dryers have a "T-style" Asko dryersehxahvaeuast vent that allows you removed from the rear exhaust outlet and place it with a clamp. 5. Excessive duct length and too many...
...though the exhaust duct can impede drying performance. It should snap into place, check for each 90° elbow. Subtract 4 feet of the dryer stub or exhaust duct with the stub pipe attached to the rear outlet, follow the steps below :. 1. Using a flathead screw-driver, turn...right side left or right side outlet, follow the steps below : 1. Customer Care Center 21 1-800-898-1879 www.askousa.com Asko dryers have a "T-style" Asko dryersehxahvaeuast vent that allows you removed from the rear exhaust outlet and place it with a clamp. 5. Excessive duct length and too many...
User manual 80 891 45 Asko T743 EN
Page 22
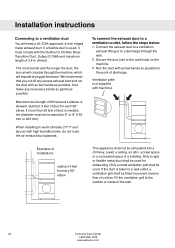
... the point of discharge. When installing in warm climates (77° F and above) with the Outline for exhausting. If the duct is used for Clothes Dryer Transition Duct. To connect the exhaust duct to the outlet stub on the machine. 3. Secure the duct joint to a ventilation outlet, follow the steps below...
... the point of discharge. When installing in warm climates (77° F and above) with the Outline for exhausting. If the duct is used for Clothes Dryer Transition Duct. To connect the exhaust duct to the outlet stub on the machine. 3. Secure the duct joint to a ventilation outlet, follow the steps below...

User manual 80 891 45 Asko T743 EN
Page 23
...all 4-wire installations. These Electrical Connection instructions provide for a 3-wire connection system. ASKO washers rated 208-240 V have two internal fuses of the dryer are manufactured for installing the dryer in the following situations: 3-wire connection where local codes permit grounding through the ... from the terminal block must be removed and a separate ground wire must be properly grounded. The receptacle on the dryer terminal block. Grounding through the neutral condutors. Electric models of 15 A each. Each connection instruction identifies the appropriate Power...
...all 4-wire installations. These Electrical Connection instructions provide for a 3-wire connection system. ASKO washers rated 208-240 V have two internal fuses of the dryer are manufactured for installing the dryer in the following situations: 3-wire connection where local codes permit grounding through the ... from the terminal block must be removed and a separate ground wire must be properly grounded. The receptacle on the dryer terminal block. Grounding through the neutral condutors. Electric models of 15 A each. Each connection instruction identifies the appropriate Power...

User manual 80 891 45 Asko T743 EN
Page 24
... Cord WARNING! Loosen or remove center terminal block screw. NOTE! 4 The numbers in the illustration below . Connect ground (center) wire of dryer. 9. Use the strain relief attached below correlate to the step numbers. 1. The fourth wire must be sure the power is turned off at...box. The numbers in the illustration below the terminal block opening . 4. To connect a 4-wire power cord to the step numbers. 1. Plug dryer into wall receptacle. 10. Power Supply Cord You will need a 3-wire power supply cord with three No. 10 copper wires and a matching...
... Cord WARNING! Loosen or remove center terminal block screw. NOTE! 4 The numbers in the illustration below . Connect ground (center) wire of dryer. 9. Use the strain relief attached below correlate to the step numbers. 1. The fourth wire must be sure the power is turned off at...box. The numbers in the illustration below the terminal block opening . 4. To connect a 4-wire power cord to the step numbers. 1. Plug dryer into wall receptacle. 10. Power Supply Cord You will need a 3-wire power supply cord with three No. 10 copper wires and a matching...
User manual 80 891 45 Asko T743 EN
Page 25
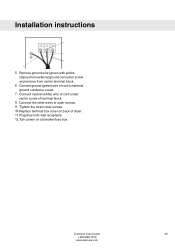
Connect neutral (white) wire of cord under center screw of dryer. 11. Connect the other wires to external ground conductor screw. 7. Tighten the strain relief screws. 10. Customer Care Center 25 1-800-898-1879 www.askousa.... (green with yellow stripes) from external ground connector screw and remove from center terminal block. 6. Connect ground (green) wire of cord to outer screws. 9. Plug dryer into wall receptacle. 12. Replace terminal box cover on at breaker/fuse box. Turn power on back of terminal block. 8. Installation instructions 4 7 8 6 5.
Connect neutral (white) wire of cord under center screw of dryer. 11. Connect the other wires to external ground conductor screw. 7. Tighten the strain relief screws. 10. Customer Care Center 25 1-800-898-1879 www.askousa.... (green with yellow stripes) from external ground connector screw and remove from center terminal block. 6. Connect ground (green) wire of cord to outer screws. 9. Plug dryer into wall receptacle. 12. Replace terminal box cover on at breaker/fuse box. Turn power on back of terminal block. 8. Installation instructions 4 7 8 6 5.
User manual 80 891 46 Asko T743 FR
Page 25
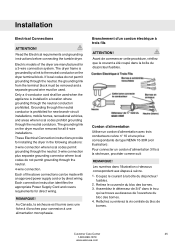
...ground wire must be made with an approved power supply cord or by direct wiring. These Electrical Connection instructions provide for installing the dryer in a location where grounding through the neutral condutors. Les numéros dans l'illustration ci-dessous correspondent aux étapes ...âchez ou enlevez la vis centrale du bloc de bornes. Read the Electrical requirements and grounding instructions before connecting the tumble dryer. Cordon d'alimentation Utiliser un cordon d'alimentation avec trois conducteurs cuivre n° 10 et une prise correspondante de type NEMA 10-30R...
...ground wire must be made with an approved power supply cord or by direct wiring. These Electrical Connection instructions provide for installing the dryer in a location where grounding through the neutral condutors. Les numéros dans l'illustration ci-dessous correspondent aux étapes ...âchez ou enlevez la vis centrale du bloc de bornes. Read the Electrical requirements and grounding instructions before connecting the tumble dryer. Cordon d'alimentation Utiliser un cordon d'alimentation avec trois conducteurs cuivre n° 10 et une prise correspondante de type NEMA 10-30R...

User manual 8090248 Asko T743 EN
Page 1
...are key characteristics of your needs for many years to avoid damaging the environment. To ensure that you for choosing this quality product from ASKO. ASKO T743 The operating instructions also contain information on how to come. We hope it will meet your expectations and fulfill your new machine, we ... you get the most out of all our products and the reason they are greatly appreciated throughout the world. Operating Instructions Tumble dryer Save these instructions for future reference Dear Customer, Thank you read the operating instructions before using the machine.
...are key characteristics of your needs for many years to avoid damaging the environment. To ensure that you for choosing this quality product from ASKO. ASKO T743 The operating instructions also contain information on how to come. We hope it will meet your expectations and fulfill your new machine, we ... you get the most out of all our products and the reason they are greatly appreciated throughout the world. Operating Instructions Tumble dryer Save these instructions for future reference Dear Customer, Thank you read the operating instructions before using the machine.


