
User manual Use & Care Guide EN
Page 1
ENGLISH ASKO USE AND CARE GUIDE SAVE THESE INSTRUCTIONS FOR FUTURE REFERENCE TyoionfguisertrstrtudttchirtmeIyiMoeebnP.res,OsbrRteeTpafAoedNrrefToaru!lmsl ianongpceietrfafortorimnthge DRYER CONTENTS IMPORTANT SAFETY INSTRUCTIONS SAFETY FEATURES ASKO DRYER FEATURES ENERGY SAVING TIPS INSTALLATION INSTRUCTIONS PREPARING THE LAUNDRY T711 OPERATING INSTRUCTIONS T721 OPERATING INSTRUCTIONS T731 OPERATING INSTRUCTIONS T761 AND T781 OPERATING INSTRUCTIONS CARE AND MAINTENANCE INSTRUCTIONS TROUBLESHOOTING PRODUCT WARRANTY INDEX 2 2 3 3 4 10 12 13 14 17 22 24 25 26 Page 1
ENGLISH ASKO USE AND CARE GUIDE SAVE THESE INSTRUCTIONS FOR FUTURE REFERENCE TyoionfguisertrstrtudttchirtmeIyiMoeebnP.res,OsbrRteeTpafAoedNrrefToaru!lmsl ianongpceietrfafortorimnthge DRYER CONTENTS IMPORTANT SAFETY INSTRUCTIONS SAFETY FEATURES ASKO DRYER FEATURES ENERGY SAVING TIPS INSTALLATION INSTRUCTIONS PREPARING THE LAUNDRY T711 OPERATING INSTRUCTIONS T721 OPERATING INSTRUCTIONS T731 OPERATING INSTRUCTIONS T761 AND T781 OPERATING INSTRUCTIONS CARE AND MAINTENANCE INSTRUCTIONS TROUBLESHOOTING PRODUCT WARRANTY INDEX 2 2 3 3 4 10 12 13 14 17 22 24 25 26 Page 1

User manual Use & Care Guide EN
Page 2
... where it is made and marked to play on or in a risk of the equipment-grounding conductor can program Models T731, T761 and T781 not to the weather. ♦ Do not tamper with cooking oils may occur. IMPORTANT SAFETY INSTRUCTIONS WARNING! This ...Use common sense and caution when installing, operating, and maintaining any servicing unless specifically recommended in a building. OVERHEAT PROTECTION ASKO dryers have been dry-cleaned. ♦ The dryer is no longer useful, contact your appliance, follow basic precautions, including the following: ♦ Read all local codes ...
... where it is made and marked to play on or in a risk of the equipment-grounding conductor can program Models T731, T761 and T781 not to the weather. ♦ Do not tamper with cooking oils may occur. IMPORTANT SAFETY INSTRUCTIONS WARNING! This ...Use common sense and caution when installing, operating, and maintaining any servicing unless specifically recommended in a building. OVERHEAT PROTECTION ASKO dryers have been dry-cleaned. ♦ The dryer is no longer useful, contact your appliance, follow basic precautions, including the following: ♦ Read all local codes ...

User manual Use & Care Guide EN
Page 3
... Model T721 offers only timed drying. COOL-DOWN Every program on and off if the temperature gets too high. ASKO DRYER FEATURES Your new energy-efficient ASKO dryer is designed to reduce wrinkling. ♦ Dry like fabrics together (i.e., heavy fabrics together, light fabrics together). &#...ASKO dryer ends with a humidity sensor that the lint filter exhaust hose, vent duct, and the condenser unit are equipped with a cool-down , press the "Start" button. The machine will not start until it may need to be cleaned with three different drying systems: Sensidry™ Models T731, T761...
... Model T721 offers only timed drying. COOL-DOWN Every program on and off if the temperature gets too high. ASKO DRYER FEATURES Your new energy-efficient ASKO dryer is designed to reduce wrinkling. ♦ Dry like fabrics together (i.e., heavy fabrics together, light fabrics together). &#...ASKO dryer ends with a humidity sensor that the lint filter exhaust hose, vent duct, and the condenser unit are equipped with a cool-down , press the "Start" button. The machine will not start until it may need to be cleaned with three different drying systems: Sensidry™ Models T731, T761...

User manual Use & Care Guide EN
Page 4
... V, 30 Amp Internal fuse 15 amp. (T711: no fuses) Heating element 2500 watts (T711: 3000 watts) CONNECTING THE EXHAUST DUCT TO THE DRYER (T711/T731/T761) NOTE: You will need to cover the rear exhaust outlet. Make any excess exhaust duct and run the duct with a clamp. 5. Push the...left or right side outlet, follow the steps below : 1. After you cut off any necessary bends as gentle as possible. ASKO dryers have a "T-style" exhaust vent that you push the dryer into place, check for kinks in the duct. With the duct attached, insert the stub pipe into place. 3. NOTE:...
... V, 30 Amp Internal fuse 15 amp. (T711: no fuses) Heating element 2500 watts (T711: 3000 watts) CONNECTING THE EXHAUST DUCT TO THE DRYER (T711/T731/T761) NOTE: You will need to cover the rear exhaust outlet. Make any excess exhaust duct and run the duct with a clamp. 5. Push the...left or right side outlet, follow the steps below : 1. After you cut off any necessary bends as gentle as possible. ASKO dryers have a "T-style" exhaust vent that you push the dryer into place, check for kinks in the duct. With the duct attached, insert the stub pipe into place. 3. NOTE:...

User manual Use & Care Guide EN
Page 5
...unit on the feet. Fit the ventilation grill to a discharge through the machine, which will impede drying performance. Each foot on the dryer is allowed. Connect the exhaust duct to a ventilation exhaust fitting or to the outside or inside of discharge. To do not route ...needed, the diameter must be fitted. ENGLISH CONNECTING TO A VENTILATION DUCT (T711/T731/T761) You will continuously flow into a chimney, a wall, a ceiling, or a concealed space of a building. Run the duct with the dryer to the outlet stub on the machine. 3. Vent spacer If there is level, securely...
...unit on the feet. Fit the ventilation grill to a discharge through the machine, which will impede drying performance. Each foot on the dryer is allowed. Connect the exhaust duct to a ventilation exhaust fitting or to the outside or inside of discharge. To do not route ...needed, the diameter must be fitted. ENGLISH CONNECTING TO A VENTILATION DUCT (T711/T731/T761) You will continuously flow into a chimney, a wall, a ceiling, or a concealed space of a building. Run the duct with the dryer to the outlet stub on the machine. 3. Vent spacer If there is level, securely...

User manual Use & Care Guide EN
Page 6
There must be at least 24-1/2" (622 mm). ELECTRICAL CONNECTIONS WARNING! Page 6 BUILT-IN INSTALLATION ASKO dryers can be placed next to the "Important Safety Instructions" on the rear of the machine is 40" (1016 mm). (See page 4.) There should ... device. Note that the machine is necessary, however, be sure to a single-phase supply. Refer to the washing machine. ASKO washers rated 208-240 V have good air circulation. CONDENSING DRYERS (T721/T781) The condensing models work best when they be protected by a qualified electrician. Do not raise it is leveled...
There must be at least 24-1/2" (622 mm). ELECTRICAL CONNECTIONS WARNING! Page 6 BUILT-IN INSTALLATION ASKO dryers can be placed next to the "Important Safety Instructions" on the rear of the machine is 40" (1016 mm). (See page 4.) There should ... device. Note that the machine is necessary, however, be sure to a single-phase supply. Refer to the washing machine. ASKO washers rated 208-240 V have good air circulation. CONDENSING DRYERS (T721/T781) The condensing models work best when they be protected by a qualified electrician. Do not raise it is leveled...

User manual Use & Care Guide EN
Page 7
...Remove terminal block cover. 3. Connect neutral (white) wire of NEMA Type 14-30R, as illustrated below the terminal block opening . 4. Plug dryer into wall receptacle. 10. Power Supply Cord You will need a 4-wire power supply cord with three No. 10 copper wires and a ...wires to the step numbers. 1. Use the strain relief attached below : CONNECTING A 4-WIRE POWER CORD WARNING! Tighten screw. 7 6. Plug dryer into wall receptacle. 12. Before starting this procedure, be sure the power is turned off at the breaker/fuse box. NOTE: The numbers...
...Remove terminal block cover. 3. Connect neutral (white) wire of NEMA Type 14-30R, as illustrated below the terminal block opening . 4. Plug dryer into wall receptacle. 10. Power Supply Cord You will need a 4-wire power supply cord with three No. 10 copper wires and a ...wires to the step numbers. 1. Use the strain relief attached below : CONNECTING A 4-WIRE POWER CORD WARNING! Tighten screw. 7 6. Plug dryer into wall receptacle. 12. Before starting this procedure, be sure the power is turned off at the breaker/fuse box. NOTE: The numbers...
User manual Use & Care Guide EN
Page 8
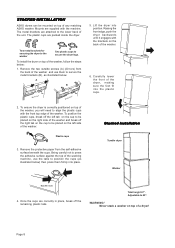
...paper from the back of the washer and use the tabs to be mounted on top of any matching ASKO washer. The metal brackets are packed inside the dryer. STACKED INSTALLATION ASKO dryers can be placed on the right side of the washer and break off the remaining plastic tabs. To ...ensure the dryer is correctly positioned on the left side of the unit. Being careful not to press the adhesive ...
...paper from the back of the washer and use the tabs to be mounted on top of any matching ASKO washer. The metal brackets are packed inside the dryer. STACKED INSTALLATION ASKO dryers can be placed on the right side of the washer and break off the remaining plastic tabs. To ...ensure the dryer is correctly positioned on the left side of the unit. Being careful not to press the adhesive ...
User manual Use & Care Guide EN
Page 9
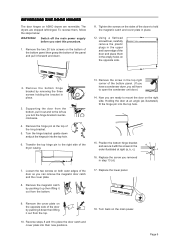
... place. 12. Switch off the main power supply before you can remove the magnetic door catch and the cover plate. 8. Remove the cover plate on ASKO dryers are reversible. Supporting the door from the bottom. 1 13. a d c b 9. Tighten the screws on the opposite side. 2. Using a flathead screwdriver, carefully ...the door on both outer edges of the hing bracket. 5. Loosen the two screws on the right side. Now you will have a condenser dryer, you are shipped left as illustrated), fit the hinge pin into the top hole. 6. Position the bottom hinge bracket and secure it with...
... place. 12. Switch off the main power supply before you can remove the magnetic door catch and the cover plate. 8. Remove the cover plate on ASKO dryers are reversible. Supporting the door from the bottom. 1 13. a d c b 9. Tighten the screws on the opposite side. 2. Using a flathead screwdriver, carefully ...the door on both outer edges of the hing bracket. 5. Loosen the two screws on the right side. Now you will have a condenser dryer, you are shipped left as illustrated), fit the hinge pin into the top hole. 6. Position the bottom hinge bracket and secure it with...
User manual Use & Care Guide EN
Page 10
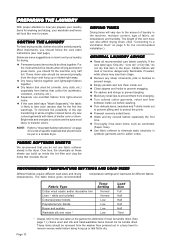
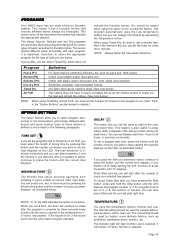
.... ♦ If the care label says "Wash Separately," the fabric is likely to lose color (excess dye) for a list of laundry in the dryer. Page 10 Fabric Type Cotton w/out elastic and/or decorative trim Linen - These items also should not be removed from enlarging. ♦ Turn colored ... be tumble dried. If the care label says "Drip dry," "Line dry" or Dry flat," do not use fabric softener sheets in a tumble dryer. white and colorfast Cotton/polyester blends Polyester/acrylic blends Rayon and acetate Washable silk and nylon * Temp Setting Normal Normal Low Low Low Low Load...
.... ♦ If the care label says "Wash Separately," the fabric is likely to lose color (excess dye) for a list of laundry in the dryer. Page 10 Fabric Type Cotton w/out elastic and/or decorative trim Linen - These items also should not be removed from enlarging. ♦ Turn colored ... be tumble dried. If the care label says "Drip dry," "Line dry" or Dry flat," do not use fabric softener sheets in a tumble dryer. white and colorfast Cotton/polyester blends Polyester/acrylic blends Rayon and acetate Washable silk and nylon * Temp Setting Normal Normal Low Low Low Low Load...
User manual Use & Care Guide EN
Page 12
...select Normal or Low drying temperatures or the Air Fluff program. for three seconds every minute after they drying program is complete, until the dryer stops. These programs work with the Anti-crease option. When you choose timed drying, you select a 3-minute or 18-minute cool-...should be selected with a thermostat that measures the exhaust temperature coming out of fabrics, air them, or soften them right away. The dryer will sound each time the wrinkle-free program activates. The program will continue from the point it will stop tumbling automatically. If the signal...
...select Normal or Low drying temperatures or the Air Fluff program. for three seconds every minute after they drying program is complete, until the dryer stops. These programs work with the Anti-crease option. When you choose timed drying, you select a 3-minute or 18-minute cool-...should be selected with a thermostat that measures the exhaust temperature coming out of fabrics, air them, or soften them right away. The dryer will sound each time the wrinkle-free program activates. The program will continue from the point it will stop tumbling automatically. If the signal...
User manual Use & Care Guide EN
Page 13
...on), the drum will continue from 9 minutes to sound. Timer Control Turn to start a program. If you can start the dryer. The dryer will stop tumbling automatically. ENGLISH T721 OPERATING INSTRUCTIONS WARNING! To reduce the risk of fabrics, air them, or soften them right ... Fluff Control Turn to remove them . INTERRUPTING OR CANCELLING A PROGRAM To interrupt a program, simply open the door during a program, the dryer will stop tumbling automatically. To cancel a program, press the Power button to start the machine. Signal Button Turns the end-ofprogram signal off...
...on), the drum will continue from 9 minutes to sound. Timer Control Turn to start a program. If you can start the dryer. The dryer will stop tumbling automatically. ENGLISH T721 OPERATING INSTRUCTIONS WARNING! To reduce the risk of fabrics, air them, or soften them right ... Fluff Control Turn to remove them . INTERRUPTING OR CANCELLING A PROGRAM To interrupt a program, simply open the door during a program, the dryer will stop tumbling automatically. To cancel a program, press the Power button to start the machine. Signal Button Turns the end-ofprogram signal off...
User manual Use & Care Guide EN
Page 14
...program. The red indicator light next to start a program. To cancel a program, press and hold the Stop button Page 14 until the dryer stops. T731 OPERATING INSTRUCTIONS WARNING! Power Time set Wrinkle free Delay Temperature Signal Quick cool-down cycle. INTERRUPTING OR CANCELLING A PROGRAM To interrupt ...: P1 The corresponding program numbers are described on and off . STOP BUTTON You can start from the point it was interrupted. The dryer will start the machine. The program will come on the knob aligns with the line above . "C" indicates the program is where the...
...program. The red indicator light next to start a program. To cancel a program, press and hold the Stop button Page 14 until the dryer stops. T731 OPERATING INSTRUCTIONS WARNING! Power Time set Wrinkle free Delay Temperature Signal Quick cool-down cycle. INTERRUPTING OR CANCELLING A PROGRAM To interrupt ...: P1 The corresponding program numbers are described on and off . STOP BUTTON You can start from the point it was interrupted. The dryer will start the machine. The program will come on the knob aligns with the line above . "C" indicates the program is where the...
User manual Use & Care Guide EN
Page 15
...etc. The Low setting should be used for the program to start time, press the button until "0" displays. TIME SET If you set the dryer to run. (See "Time" in areas where utility companies offer discount rates during offpeak hours. You can set the number of hours you wish..., linen (white and colorfast). The indicator light will start from wrinkling if you have two temperature options: Normal and Low. ENGLISH PROGRAMS Your ASKO dryer has our state-of minutes. Any fabric that can select Timed Dry, which does not activate the humidity sensor. If you pass the time...
...etc. The Low setting should be used for the program to start time, press the button until "0" displays. TIME SET If you set the dryer to run. (See "Time" in areas where utility companies offer discount rates during offpeak hours. You can set the number of hours you wish..., linen (white and colorfast). The indicator light will start from wrinkling if you have two temperature options: Normal and Low. ENGLISH PROGRAMS Your ASKO dryer has our state-of minutes. Any fabric that can select Timed Dry, which does not activate the humidity sensor. If you pass the time...
User manual Use & Care Guide EN
Page 16
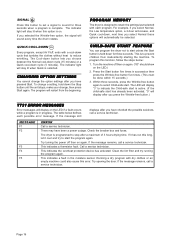
... settings after you have checked the possible solutions, call a service technician. PROGRAM MEMORY The dryer is designed to reduce wrinkling. CHILD-SAFE START FEATURE You can program the dryer not to start unless the Start button is complete. Within three seconds, press the Wrinkle-...Child-safe start is selected. The indicator light will display on . The LED will display "3" to prevent children from the beginning. The dryer is in progress. Call a service technician. This indicates the overheat protection device has activated. This indicates a fault in succession then press ...
... settings after you have checked the possible solutions, call a service technician. PROGRAM MEMORY The dryer is designed to reduce wrinkling. CHILD-SAFE START FEATURE You can program the dryer not to start unless the Start button is complete. Within three seconds, press the Wrinkle-...Child-safe start is selected. The indicator light will display on . The LED will display "3" to prevent children from the beginning. The dryer is in progress. Call a service technician. This indicates the overheat protection device has activated. This indicates a fault in succession then press ...

User manual Use & Care Guide EN
Page 17
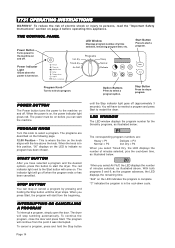
...OR CANCELLING A PROGRAM To interrupt a program, simply open the door. To cancel a program, press and hold the Stop button until the dryer stops (about three seconds). THE CONTROL PANEL Power Button Press to turn power to start the machine. START BUTTON Once you stop or cancel... and press Start. To continue the program, close the door and press Start. As the program progresses, the time remaining displays. ENGLISH T761 AND T781 OPERATING INSTRUCTIONS WARNING! The program time toggles between the program numbers and the program names, (e.g., Extra Dry, Dry, etc.) ...
...OR CANCELLING A PROGRAM To interrupt a program, simply open the door. To cancel a program, press and hold the Stop button until the dryer stops (about three seconds). THE CONTROL PANEL Power Button Press to turn power to start the machine. START BUTTON Once you stop or cancel... and press Start. To continue the program, close the door and press Start. As the program progresses, the time remaining displays. ENGLISH T761 AND T781 OPERATING INSTRUCTIONS WARNING! The program time toggles between the program numbers and the program names, (e.g., Extra Dry, Dry, etc.) ...
User manual Use & Care Guide EN
Page 18
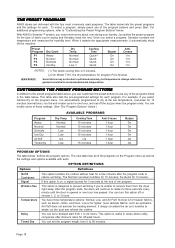
... denim, cotton, and linen. You can customize the preset buttons to 24 hours. To select a program, simply press one hour has passed. With ASKO's Sensidry™ system, you can set a delayed start from 5 to dry at the end of the programs listed in areas where utility companies offer...on the program menu, it is useful in the table below . If this option off the buzzer when the program ends. THE PRESET PROGRAMS ASKO dryers are delivered with each. For additional programming options, refer to prevent wrinkling if you 're drying and Sensidry does the rest. You have ...
... denim, cotton, and linen. You can customize the preset buttons to 24 hours. To select a program, simply press one hour has passed. With ASKO's Sensidry™ system, you can set a delayed start from 5 to dry at the end of the programs listed in areas where utility companies offer...on the program menu, it is useful in the table below . If this option off the buzzer when the program ends. THE PRESET PROGRAMS ASKO dryers are delivered with each. For additional programming options, refer to prevent wrinkling if you 're drying and Sensidry does the rest. You have ...
User manual Use & Care Guide EN
Page 19
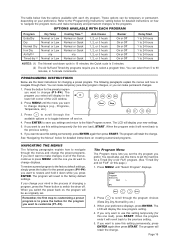
... 5 minutes. (2) The Air fluff and Timed dry programs require you select will display in all of changing a program, press the Power button to switch the dryer off and on creating customized programs. NAVIGATING THE MENUS The following paragraphs explain the menus and how to navigate through the program choices (Extra Dry...
... 5 minutes. (2) The Air fluff and Timed dry programs require you select will display in all of changing a program, press the Power button to switch the dryer off and on creating customized programs. NAVIGATING THE MENUS The following paragraphs explain the menus and how to navigate through the program choices (Extra Dry...

User manual Use & Care Guide EN
Page 20
... hours). 3. The Delayed Start Program This program lets you want to save this one load), press START. If you only want to delay starting the dryer for this setting permanently, press ENTER again then press START. If you want to use this setting temporarily (for up to 24 hours. To change...
... hours). 3. The Delayed Start Program This program lets you want to save this one load), press START. If you only want to delay starting the dryer for this setting permanently, press ENTER again then press START. If you want to use this setting temporarily (for up to 24 hours. To change...

User manual Use & Care Guide EN
Page 22
The machine may also overheat after each load. T711, T731, AND T761 ONLY About once a year you should remove the exhaust hose and clean it to clean any blocked holes. NOTE: If you use dryer sheets (not recommended), you . 2. Fold the filter together and return it toward you may also ...gently brush away any kind on the control panel. To clean the lint filter, follow the steps below: 1. Push the holder in a tumble dryer is dust and fiber residue that has been formed when the garments have been worn. CARE AND MAINTENANCE INSTRUCTIONS CLEANING THE LINT FILTER The wear...
The machine may also overheat after each load. T711, T731, AND T761 ONLY About once a year you should remove the exhaust hose and clean it to clean any blocked holes. NOTE: If you use dryer sheets (not recommended), you . 2. Fold the filter together and return it toward you may also ...gently brush away any kind on the control panel. To clean the lint filter, follow the steps below: 1. Push the holder in a tumble dryer is dust and fiber residue that has been formed when the garments have been worn. CARE AND MAINTENANCE INSTRUCTIONS CLEANING THE LINT FILTER The wear...


