

User manual Use & Care Guide EN
Page 2
...event of malfunction or breakdown, grounding will reduce the risk of the dryer for three seconds. Improper connection of the equipment-grounding conductor can program Models T731, T761 and T781 not to properly dispose of electric shock by a qualified electrician. Use common sense and caution when ...Do not operate appliance while away from inadvertently starting the machine. To reduce the risk of the machine should be done by an authorized ASKO service agent. ♦ Do not place items exposed to cooking oils in , or spotted with all instructions before or after each ...
...event of malfunction or breakdown, grounding will reduce the risk of the dryer for three seconds. Improper connection of the equipment-grounding conductor can program Models T731, T761 and T781 not to properly dispose of electric shock by a qualified electrician. Use common sense and caution when ...Do not operate appliance while away from inadvertently starting the machine. To reduce the risk of the machine should be done by an authorized ASKO service agent. ♦ Do not place items exposed to cooking oils in , or spotted with all instructions before or after each ...

User manual Use & Care Guide EN
Page 4
...all local codes and ordinances for UL approved vent basket. NOTE: Cosmetic damage must be attached to either the right or left exhaust outlet. ASKO dryers have a "T-style" exhaust vent that you cut off any necessary bends as gentle as possible. Vent T-Tube Rear Exhaust Outlet Side Exhaust... amp. (T711: no fuses) Heating element 2500 watts (T711: 3000 watts) CONNECTING THE EXHAUST DUCT TO THE DRYER (T711/T731/T761) NOTE: You will need to catch lint, except for electrical and plumbing connections. After you plan to use . 4. With the duct attached, insert the stub pipe into the...
...all local codes and ordinances for UL approved vent basket. NOTE: Cosmetic damage must be attached to either the right or left exhaust outlet. ASKO dryers have a "T-style" exhaust vent that you cut off any necessary bends as gentle as possible. Vent T-Tube Rear Exhaust Outlet Side Exhaust... amp. (T711: no fuses) Heating element 2500 watts (T711: 3000 watts) CONNECTING THE EXHAUST DUCT TO THE DRYER (T711/T731/T761) NOTE: You will need to catch lint, except for electrical and plumbing connections. After you plan to use . 4. With the duct attached, insert the stub pipe into the...

User manual Use & Care Guide EN
Page 6
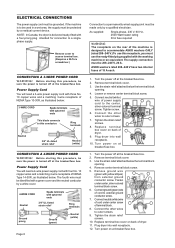
... Space must be installed beneath a cabinet or worktop with a minimum height of the machine top panel and the back wall. CONDENSING DRYERS (T721/T781) The condensing models work best when they be made only by a residual current device. The maximum drain height is designed ...(rated 208-240 V.) To use the ready-fitted plug supplied with a four-prong plug intended for hole sizes and positions. ELECTRICAL CONNECTIONS WARNING! BUILT-IN INSTALLATION ASKO dryers can be protected by a qualified electrician. There must also be at least 1/2" (12 mm) of the machine. NOTES: ...
... Space must be installed beneath a cabinet or worktop with a minimum height of the machine top panel and the back wall. CONDENSING DRYERS (T721/T781) The condensing models work best when they be made only by a residual current device. The maximum drain height is designed ...(rated 208-240 V.) To use the ready-fitted plug supplied with a four-prong plug intended for hole sizes and positions. ELECTRICAL CONNECTIONS WARNING! BUILT-IN INSTALLATION ASKO dryers can be protected by a qualified electrician. There must also be at least 1/2" (12 mm) of the machine. NOTES: ...
User manual Use & Care Guide EN
Page 10
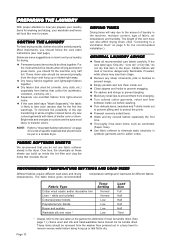
... as comforters (Super rinse). ♦ Use fabric softener to eliminate static electricity in a terry towel to remove excess water before washing. ♦ Turn delicate items, sweaters and T-shirts inside the lint filter and clog the holes that item in a tumble dryer. DRYING TIMES Drying times will look like new for the first...
... as comforters (Super rinse). ♦ Use fabric softener to eliminate static electricity in a terry towel to remove excess water before washing. ♦ Turn delicate items, sweaters and T-shirts inside the lint filter and clog the holes that item in a tumble dryer. DRYING TIMES Drying times will look like new for the first...
User manual Use & Care Guide EN
Page 12
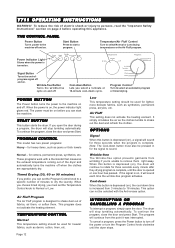
... element. TEMPERATURE CONTROL Normal This temperature setting should be used for three seconds every minute after they drying program is complete, until the dryer stops. OPTIONS Signal When this button is depressed (on), the cool-down When this button is depressed (on . Cool-down time ...90 min Heavy Normal Cool-down cycle. The power must also be selected with a thermostat that measures the exhaust temperature coming out of electric shock or injury to persons, read the "Important Safety Instructions" section on page 2 before operating this button is depressed (on before you...
... element. TEMPERATURE CONTROL Normal This temperature setting should be used for three seconds every minute after they drying program is complete, until the dryer stops. OPTIONS Signal When this button is depressed (on), the cool-down When this button is depressed (on . Cool-down time ...90 min Heavy Normal Cool-down cycle. The power must also be selected with a thermostat that measures the exhaust temperature coming out of electric shock or injury to persons, read the "Important Safety Instructions" section on page 2 before operating this button is depressed (on before you...
User manual Use & Care Guide EN
Page 13
...activate the heating element. OPTIONS Signal When this appliance. To cancel a program, press the Power button to sound. When the power is complete, until the dryer stops. Note: The Cool-down time is depressed (on and off . INTERRUPTING OR CANCELLING A PROGRAM To interrupt a program, simply open the door during ... want to shake out the dust and refresh the clothes. Air Fluff Program The Air Fluff program is designed to shake dust out of electric shock or injury to rotate for three seconds when the program is depressed (on), the drum will continue to persons, read the "Important...
...activate the heating element. OPTIONS Signal When this appliance. To cancel a program, press the Power button to sound. When the power is complete, until the dryer stops. Note: The Cool-down time is depressed (on and off . INTERRUPTING OR CANCELLING A PROGRAM To interrupt a program, simply open the door during ... want to shake out the dust and refresh the clothes. Air Fluff Program The Air Fluff program is designed to shake dust out of electric shock or injury to rotate for three seconds when the program is depressed (on), the drum will continue to persons, read the "Important...
User manual Use & Care Guide EN
Page 14
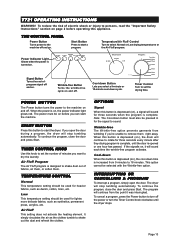
...the desired options, press this knob to select a program. To cancel a program, press and hold the Stop button Page 14 until the dryer stops. LED WINDOW The LED window displays the program number for the Sensidry programs, as illustrated below: P1 The corresponding program numbers are ...persons, read the "Important Safety Instructions" section on page 2 before you select Air Fluff, the LED displays the number of electric shock or injury to start the dryer. When the knob is on and off (approximately 3 seconds). The indicator light will stop a program. Power Time set ...
...the desired options, press this knob to select a program. To cancel a program, press and hold the Stop button Page 14 until the dryer stops. LED WINDOW The LED window displays the program number for the Sensidry programs, as illustrated below: P1 The corresponding program numbers are ...persons, read the "Important Safety Instructions" section on page 2 before you select Air Fluff, the LED displays the number of electric shock or injury to start the dryer. When the knob is on and off (approximately 3 seconds). The indicator light will stop a program. Power Time set ...

User manual Use & Care Guide EN
Page 17
...dryer this appliance. The program will have selected a program (P1-P4) and set the programs or start the machine. The LCD window also displays the menus and options available when you start a program. As the program progresses, the time remaining displays. Preset Programs Press one of electric... a program, press and hold the Stop button until the dryer stops (about three seconds). To reduce the risk of these buttons to start a program, the total time the program runs is running . ENGLISH T761 AND T781 OPERATING INSTRUCTIONS WARNING! THE CONTROL PANEL Power Button ...
...dryer this appliance. The program will have selected a program (P1-P4) and set the programs or start the machine. The LCD window also displays the menus and options available when you start a program. As the program progresses, the time remaining displays. Preset Programs Press one of electric... a program, press and hold the Stop button until the dryer stops (about three seconds). To reduce the risk of these buttons to start a program, the total time the program runs is running . ENGLISH T761 AND T781 OPERATING INSTRUCTIONS WARNING! THE CONTROL PANEL Power Button ...

User manual Use & Care Guide EN
Page 22
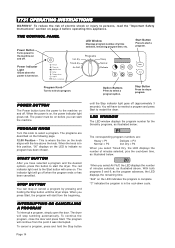
...gently brush away any kind on the control panel. CLEANING THE EXHAUST HOSE- T711, T731, AND T761 ONLY About once a year you . 2. Periodically, you may occasionally need to wash the lint... nothing is blocking the vent. Grasp the handle and pull it snaps into the door lock and electrical components, never spray water or cleaning solvent of water into place. To prevent penetration of any lint...residue that has been formed when the garments have been worn. The lint caught in a tumble dryer is insignificant. The machine may also scratch the finish. Push the holder in until it toward ...
...gently brush away any kind on the control panel. CLEANING THE EXHAUST HOSE- T711, T731, AND T761 ONLY About once a year you . 2. Periodically, you may occasionally need to wash the lint... nothing is blocking the vent. Grasp the handle and pull it snaps into the door lock and electrical components, never spray water or cleaning solvent of water into place. To prevent penetration of any lint...residue that has been formed when the garments have been worn. The lint caught in a tumble dryer is insignificant. The machine may also scratch the finish. Push the holder in until it toward ...

User manual Use & Care Guide EN
Page 24
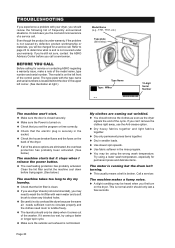
...page 3 for possible causes and instructions on the back of the dryer. ♦ If all of the ASKO washer. Page 24 This is not caused by defective product workmanship or...of frequently encountered situations or go to our website at right.) Model Name (e.g., T711, T761, etc.) Type plate (see below) Type Name 11111222223333344444555556666677777 Type: TDxx xx x xxxxxxxxMxxxxxxxW 111222333444555666777888999000111222333444555666777888...The machine takes too long to dry my laundr y. ♦ Check that the electric plug is on how to restart the unit. The model is securely in the...
...page 3 for possible causes and instructions on the back of the dryer. ♦ If all of the ASKO washer. Page 24 This is not caused by defective product workmanship or...of frequently encountered situations or go to our website at right.) Model Name (e.g., T711, T761, etc.) Type plate (see below) Type Name 11111222223333344444555556666677777 Type: TDxx xx x xxxxxxxxMxxxxxxxW 111222333444555666777888999000111222333444555666777888...The machine takes too long to dry my laundr y. ♦ Check that the electric plug is on how to restart the unit. The model is securely in the...

User manual Use & Care Guide EN
Page 25
...your appliance warranty. Before calling for parts during normal business hours. ENGLISH ASKO PRODUCT WARRANTY MODELS T711, T721, T731, T761, T781 Be sure to complete the Warranty Registration Card you received with local electrical or plumbing codes. Clean or service air device in the home. ...Replacement parts or repair labor costs for cosmetic damage. After unpacking the dryer, thoroughly check the ...
...your appliance warranty. Before calling for parts during normal business hours. ENGLISH ASKO PRODUCT WARRANTY MODELS T711, T721, T731, T761, T781 Be sure to complete the Warranty Registration Card you received with local electrical or plumbing codes. Clean or service air device in the home. ...Replacement parts or repair labor costs for cosmetic damage. After unpacking the dryer, thoroughly check the ...

User manual Use & Care Guide EN
Page 26
... Control panel, cleaning Cool-down T711 T721 T731 T761/T781 Cosmetic damage Customizing the preset programs (T761/T781) D Damage, cosmetic Delayed start T731 T761 and T781 Door, cleaning Door hinges, reversing Dryer features Drying problems Drying times Duct connection E Electrical connections Energy saving tips Error messages T731 T761 & T781 Exhaust duct cleaning connecting F Fabric softener sheets...
... Control panel, cleaning Cool-down T711 T721 T731 T761/T781 Cosmetic damage Customizing the preset programs (T761/T781) D Damage, cosmetic Delayed start T731 T761 and T781 Door, cleaning Door hinges, reversing Dryer features Drying problems Drying times Duct connection E Electrical connections Energy saving tips Error messages T731 T761 & T781 Exhaust duct cleaning connecting F Fabric softener sheets...

User manual Use & Care Guide Asko T701,721,761,781
Page 2
...and situation that is no longer useful, contact your appliance, follow basic precautions, including the following: ♦ Electrical installation, if required, must be plugged into a chimney, wall, ceiling or concealed space in a building....must be easily opened . Do not exhaust into an appliance outlet that may occur. OVERHEAT PROTECTION ASKO dryers have been dry-cleaned at home. ♦ Clean the lint filter before using your ... the equipment grounding conductor can program Models T761 and T781 not to start again until you are in this appliance must be properly grounded...
...and situation that is no longer useful, contact your appliance, follow basic precautions, including the following: ♦ Electrical installation, if required, must be plugged into a chimney, wall, ceiling or concealed space in a building....must be easily opened . Do not exhaust into an appliance outlet that may occur. OVERHEAT PROTECTION ASKO dryers have been dry-cleaned at home. ♦ Clean the lint filter before using your ... the equipment grounding conductor can program Models T761 and T781 not to start again until you are in this appliance must be properly grounded...

User manual Use & Care Guide Asko T701,721,761,781
Page 4
... watts Single-phase, 230 V, 30 Amp 15 amp. 2500 watts CONNECTING AIR EXHAUST (T701 AND T761) The exhaust hose can be more than 40" above the floor. Remove the cover. ...sink, as illustrated. Connect the rubber hose supplied with all local codes and ordinances for electrical and plumbing connections. It should be connected at the rear is delivered, the exhaust outlet at... the hole. Rear Exhaust Outlet Side Exhaust Outlet Stub Clamp Hose (not supplied) The dryer is familiar with the dryer to use . Using a flathead screw- With the hose attached, insert the stub pipe...
... watts Single-phase, 230 V, 30 Amp 15 amp. 2500 watts CONNECTING AIR EXHAUST (T701 AND T761) The exhaust hose can be more than 40" above the floor. Remove the cover. ...sink, as illustrated. Connect the rubber hose supplied with all local codes and ordinances for electrical and plumbing connections. It should be connected at the rear is delivered, the exhaust outlet at... the hole. Rear Exhaust Outlet Side Exhaust Outlet Stub Clamp Hose (not supplied) The dryer is familiar with the dryer to use . Using a flathead screw- With the hose attached, insert the stub pipe...
User manual Use & Care Guide Asko T701,721,761,781
Page 6
...relief attached below : 3-WIRE CORD Spade terminals with the washing machine or an equivalent. ELECTRICAL CONNECTIONS The power supply cord must be protected by a residual current device. Tighten the strain...30 A fuse required WARNING: The receptacle on back of the machine is designed to accommodate ASKO washers ONLY (rated 208-240 V.) To use this procedure, be sure the power is to... CORD WARNING! R e p l a c e t e r m i n a l box cover on the rear of dryer. 9. Tighten the strain relief screws. 10. Turn the power off at the breaker/fuse box. 2. If the machine is turned...
...relief attached below : 3-WIRE CORD Spade terminals with the washing machine or an equivalent. ELECTRICAL CONNECTIONS The power supply cord must be protected by a residual current device. Tighten the strain...30 A fuse required WARNING: The receptacle on back of the machine is designed to accommodate ASKO washers ONLY (rated 208-240 V.) To use this procedure, be sure the power is to... CORD WARNING! R e p l a c e t e r m i n a l box cover on the rear of dryer. 9. Tighten the strain relief screws. 10. Turn the power off at the breaker/fuse box. 2. If the machine is turned...

User manual Use & Care Guide Asko T701,721,761,781
Page 9
...♦ Mend any small rips to prevent them from the washer then pressed out in the dryer. FABRIC SOFTENER SHEETS We recommend that circulate the air. To minimize the possibility of fabric, ... rinse down items, such as comforters (Super rinse). ♦ Use fabric softener to eliminate static electricity in the machine, moisture content, type of the dye transferring to white or lighter colored items, ...also affect drying times. (See "Connecting to a Ventilation Duct (T701/T761)" on how to sort your specific model for different Temp Fabric Type Cotton w/out elastic and/or ...
...♦ Mend any small rips to prevent them from the washer then pressed out in the dryer. FABRIC SOFTENER SHEETS We recommend that circulate the air. To minimize the possibility of fabric, ... rinse down items, such as comforters (Super rinse). ♦ Use fabric softener to eliminate static electricity in the machine, moisture content, type of the dye transferring to white or lighter colored items, ...also affect drying times. (See "Connecting to a Ventilation Duct (T701/T761)" on how to sort your specific model for different Temp Fabric Type Cotton w/out elastic and/or ...

User manual Use & Care Guide Asko T701,721,761,781
Page 18
... which will have been worn. Periodically, you should empty the container every three to pump out the condensed water into the door lock and electrical components, never spray water or cleaning solvent of the control panel. If the container becomes too full, the machine with shut down. The ...machine may also scratch the finish. Some paper towels may also overheat after each load. At this is not installed to five dryer loads, depending on the control panel. Also, never use only a soft, warm, damp (not wet) cloth. NOTE: Do not remove the ...
... which will have been worn. Periodically, you should empty the container every three to pump out the condensed water into the door lock and electrical components, never spray water or cleaning solvent of the control panel. If the container becomes too full, the machine with shut down. The ...machine may also scratch the finish. Some paper towels may also overheat after each load. At this is not installed to five dryer loads, depending on the control panel. Also, never use only a soft, warm, damp (not wet) cloth. NOTE: Do not remove the ...
User manual Use & Care Guide Asko T701,721,761,781
Page 20
... still not sure, contact the ASKO Advisory Center before trying again. (See below.) The machine takes too long to dry my laundry. ♦ Check that the electric plug is securely in the socket. ♦ Check the house breaker/fuses and the fuses on the back of the dryer. ♦ If all of ... could save you the cost and inconvenience of the control panel. The model is on the left corner. (See illustration at right.) Model Name (e.g., T701, T761, etc.) Type plate (see below .) The machine starts but the drum isn't turning. ♦ This usually means a belt is broken. If you can't remove ...
... still not sure, contact the ASKO Advisory Center before trying again. (See below.) The machine takes too long to dry my laundry. ♦ Check that the electric plug is securely in the socket. ♦ Check the house breaker/fuses and the fuses on the back of the dryer. ♦ If all of ... could save you the cost and inconvenience of the control panel. The model is on the left corner. (See illustration at right.) Model Name (e.g., T701, T761, etc.) Type plate (see below .) The machine starts but the drum isn't turning. ♦ This usually means a belt is broken. If you can't remove ...

User manual Use & Care Guide Asko T701,721,761,781
Page 23
...damage must be provided by an authorized ASKO service agent. Service must be reported to your appliance warranty. C. F. ENGLIESNHGLISH ASKO PRODUCT WARRANTY MODELS T701, T721, T761, T781 Be sure to complete the Warranty Registration Card you received with local electrical or plumbing codes. Instruct how to us... home/residential use the appliance. 4. Correct the installation of purchase. Pickup and delivery. After unpacking the dryer, thoroughly check the unit for other rights which vary from date of purchase. Should you purchased the unit or an authorized...
...damage must be provided by an authorized ASKO service agent. Service must be reported to your appliance warranty. C. F. ENGLIESNHGLISH ASKO PRODUCT WARRANTY MODELS T701, T721, T761, T781 Be sure to complete the Warranty Registration Card you received with local electrical or plumbing codes. Instruct how to us... home/residential use the appliance. 4. Correct the installation of purchase. Pickup and delivery. After unpacking the dryer, thoroughly check the unit for other rights which vary from date of purchase. Should you purchased the unit or an authorized...
User manual Use & Care Guide Asko T701,721,761,781
Page 24
... 3, 11, 12, 14 Cosmetic damage 4, 23 Customizing the preset programs T761 & T781 14 D Damage, cosmetic Delayed start (T761 & T781) programming Door, cleaning Door hinges, reversing Door switch Dryer features Drying problems Drying programs (T761 & T781) Drying times 4, 23 14 16 18 8 2 3 10, 20 14 9 E Electrical connections 6 Energy saving tips 3 Exhaust hose, cleaning 18 F Fabric softener...
... 3, 11, 12, 14 Cosmetic damage 4, 23 Customizing the preset programs T761 & T781 14 D Damage, cosmetic Delayed start (T761 & T781) programming Door, cleaning Door hinges, reversing Door switch Dryer features Drying problems Drying programs (T761 & T781) Drying times 4, 23 14 16 18 8 2 3 10, 20 14 9 E Electrical connections 6 Energy saving tips 3 Exhaust hose, cleaning 18 F Fabric softener...


