

Instruction Manual
Page 2
... Customer Care Center 20 6 Installation instructions 21 7 Positioning the tumble dryer 21 Adjusting the feet 23 8 Built-in 23 Materials that can be tumble dried 8 Air exhaust 24 Materials that should not be tumble Electrical installation 26 dried 8 Reversing the door 30 Static electricity 8 Fitting the wooden door 32 Operating instructions 9 Quick guide 36 Sort your fabrics 9 Select the program 10 Selecting Options 13 Press the Start button 13 Drying...
... Customer Care Center 20 6 Installation instructions 21 7 Positioning the tumble dryer 21 Adjusting the feet 23 8 Built-in 23 Materials that can be tumble dried 8 Air exhaust 24 Materials that should not be tumble Electrical installation 26 dried 8 Reversing the door 30 Static electricity 8 Fitting the wooden door 32 Operating instructions 9 Quick guide 36 Sort your fabrics 9 Select the program 10 Selecting Options 13 Press the Start button 13 Drying...
Instruction Manual
Page 3
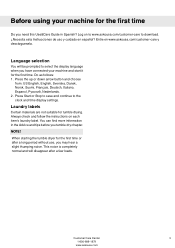
... first time Do you need this Use&Care Guide in the Advice and tips before you may hear a slight thumping noise. Always check and follow the instructions on to www.askousa.com/customer-care to select the display language when you have connected your machine for tumble drying. Entre en www.askousa.com/customer-care y descárguesela. Do as follows: 1. Press Start...
... first time Do you need this Use&Care Guide in the Advice and tips before you may hear a slight thumping noise. Always check and follow the instructions on to www.askousa.com/customer-care to select the display language when you have connected your machine for tumble drying. Entre en www.askousa.com/customer-care y descárguesela. Do as follows: 1. Press Start...
Instruction Manual
Page 4
... grounded. 4 Customer Care Center 1-800-898-1879 www.askousa.com Let the machine cool completely before using the appliance. • Do not wash or dry articles that have been previously cleaned in, washed in, soaked in, or spotted with controls. • Do not attempt to repair or replace any part of the appliance or perform any servicing unless specifically recommended in...
... grounded. 4 Customer Care Center 1-800-898-1879 www.askousa.com Let the machine cool completely before using the appliance. • Do not wash or dry articles that have been previously cleaned in, washed in, soaked in, or spotted with controls. • Do not attempt to repair or replace any part of the appliance or perform any servicing unless specifically recommended in...
Instruction Manual
Page 5
... is equipped with the circuit conductors and connected to prevent personal injury, the machine must be plugged into a chimney, wall, ceiling or concealed space in a risk of electric shock. Do not modify the plug provided with all local codes and ordinances. Use common sense and caution when installing, operating, and maintaining any appliance. The plug must be exhausted outdoors or the...
... is equipped with the circuit conductors and connected to prevent personal injury, the machine must be plugged into a chimney, wall, ceiling or concealed space in a risk of electric shock. Do not modify the plug provided with all local codes and ordinances. Use common sense and caution when installing, operating, and maintaining any appliance. The plug must be exhausted outdoors or the...
Instruction Manual
Page 6
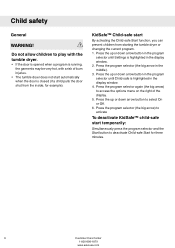
...dryer. • If the door is opened when a program is highlighted in the display window. 4. Child safety General WARNING! Press the up or down arrow button in the program selector until Child-safe is running, the garments may be very hot, with a risk of the display. 5. Do not allow children to access the options menu on the right...; child-safe start automatically when the door is highlighted in the middle). 3. Press the up or down arrow button in the program selector until Settings is closed (if a child pulls the door shut from starting the tumble dryer or changing the...
...dryer. • If the door is opened when a program is highlighted in the display window. 4. Child safety General WARNING! Press the up or down arrow button in the program selector until Child-safe is running, the garments may be very hot, with a risk of the display. 5. Do not allow children to access the options menu on the right...; child-safe start automatically when the door is highlighted in the middle). 3. Press the up or down arrow button in the program selector until Settings is closed (if a child pulls the door shut from starting the tumble dryer or changing the...

Instruction Manual
Page 8
... spin speeds save energy and reduce drying time. In both cases the program is suitable for tumble drying. Advice and tips before you tumble dry Here are some tips that may melt or become a fire hazard if exposed to heat and others can stop the tumble dryer by pressing the Stop button for three seconds or by opening the door and removing...
... spin speeds save energy and reduce drying time. In both cases the program is suitable for tumble drying. Advice and tips before you tumble dry Here are some tips that may melt or become a fire hazard if exposed to heat and others can stop the tumble dryer by pressing the Stop button for three seconds or by opening the door and removing...
Instruction Manual
Page 10
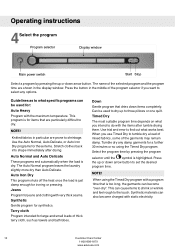
Operating instructions 4Select the program Program selector Display window Main power switch Start Stop Select a program by pressing the program selector until the symbol is highlighted. Press the button in the middle of thick terry cloth, such as to dry. Knitted fabrics in the display window. Auto Iron Dry This program shuts off the heat once the load is too long, the garments can...
Operating instructions 4Select the program Program selector Display window Main power switch Start Stop Select a program by pressing the program selector until the symbol is highlighted. Press the button in the middle of thick terry cloth, such as to dry. Knitted fabrics in the display window. Auto Iron Dry This program shuts off the heat once the load is too long, the garments can...
Instruction Manual
Page 13
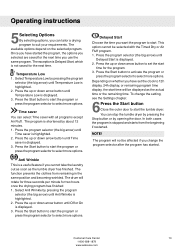
... Temperature Low is shortened by opening the door. Select Anti Wrinkle by pressing the program selector (the big arrow) until Anti Wrinkle is highlighted. 2. NOTE! The available options depend on whether you have started . The program will not be selected with all programs except Air Fluff . Press the program selector (the big arrow) until Time saver is highlighted. 2. Operating instructions...
... Temperature Low is shortened by opening the door. Select Anti Wrinkle by pressing the program selector (the big arrow) until Anti Wrinkle is highlighted. 2. NOTE! The available options depend on whether you have started . The program will not be selected with all programs except Air Fluff . Press the program selector (the big arrow) until Time saver is highlighted. 2. Operating instructions...

Instruction Manual
Page 14
... be triggered. Remove the clothes and close the door to activate the machine. See the Care and maintenance instructions chapter. Clean the filter, wait until the machine has cooled, then try starting it still does not start: Call the Customer Care Center. NOTE! • Clean the lint filter in the outer door after the program is shown on the display and options buttons enters energy saving mode. Backlighting...
... be triggered. Remove the clothes and close the door to activate the machine. See the Care and maintenance instructions chapter. Clean the filter, wait until the machine has cooled, then try starting it still does not start: Call the Customer Care Center. NOTE! • Clean the lint filter in the outer door after the program is shown on the display and options buttons enters energy saving mode. Backlighting...
Instruction Manual
Page 16
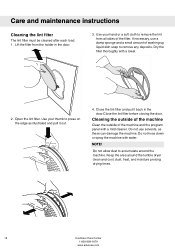
... dish soap to remove the lint from the holder in the door.Close the lint filter before closing the door. If necessary, use solvents, as illustrated and pull it back in the door. 3. Lift the filter from all sides of the machine and the program panel with a mild cleaner. Dry the filter thoroughly with water. dust, heat, and moisture prolong drying times. 16 Customer Care Center 1-800...
... dish soap to remove the lint from the holder in the door.Close the lint filter before closing the door. If necessary, use solvents, as illustrated and pull it back in the door. 3. Lift the filter from all sides of the machine and the program panel with a mild cleaner. Dry the filter thoroughly with water. dust, heat, and moisture prolong drying times. 16 Customer Care Center 1-800...

Instruction Manual
Page 17
... shuts off the tumble dryer if the temperature is too high, caused by lint clogging the lint filter, for three seconds. • that any plug is connected. • that the house fuses or circuit breaker have not been tripped. • that the main power switch is on the display. • Press the Stop button to close any error messages. Drying takes too long • Check that the Delayed Start...
... shuts off the tumble dryer if the temperature is too high, caused by lint clogging the lint filter, for three seconds. • that any plug is connected. • that the house fuses or circuit breaker have not been tripped. • that the main power switch is on the display. • Press the Stop button to close any error messages. Drying takes too long • Check that the Delayed Start...

Instruction Manual
Page 19
... Warranty. Customer Care Center 19 1-800-898-1879 www.askousa.com Any warranty service claims for House Hold Purposes, used in the country in which it is installed in an inaccessible location or is intended to be filed with ASKO within 5 days from defects in accordance with original model/serial numbers that this ASKO Product is required to published user or operator instructions and or/or installation instructions...
... Warranty. Customer Care Center 19 1-800-898-1879 www.askousa.com Any warranty service claims for House Hold Purposes, used in the country in which it is installed in an inaccessible location or is intended to be filed with ASKO within 5 days from defects in accordance with original model/serial numbers that this ASKO Product is required to published user or operator instructions and or/or installation instructions...
Instruction Manual
Page 20
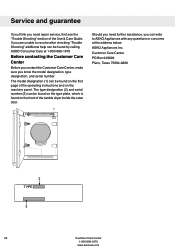
The model designation (1) can be found on the first page of the operating instructions and on the front of the tumble dryer inside the outer door. 1 Should you need repair service, first see the "Trouble Shooting" section of the Use & Care Guide. The type designation (2) and serial number (3) can be found on the machine panel. Customer Care Center PO Box 940609 Plano, Texas 75094-0609 2 TYPE 3 20 Customer Care Center 1-800...
The model designation (1) can be found on the first page of the operating instructions and on the front of the tumble dryer inside the outer door. 1 Should you need repair service, first see the "Trouble Shooting" section of the Use & Care Guide. The type designation (2) and serial number (3) can be found on the machine panel. Customer Care Center PO Box 940609 Plano, Texas 75094-0609 2 TYPE 3 20 Customer Care Center 1-800...
Instruction Manual
Page 21
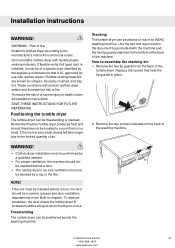
... trap lint. Replace the screws that is UL approved for use . WARNING - Install the clothes dryer according to assemble the stacking kit: 1. Do not install a clothes dryer with the machine and the two tip guards attached to the limited quantity of a specific type identified by a rug or the like. SAVE THESE INSTRUCTIONS FOR FUTURE REFERENCE. To improve ventilation, the door where the tumble dryer is located should be left open...
... trap lint. Replace the screws that is UL approved for use . WARNING - Install the clothes dryer according to assemble the stacking kit: 1. Do not install a clothes dryer with the machine and the two tip guards attached to the limited quantity of a specific type identified by a rug or the like. SAVE THESE INSTRUCTIONS FOR FUTURE REFERENCE. To improve ventilation, the door where the tumble dryer is located should be left open...
Instruction Manual
Page 24
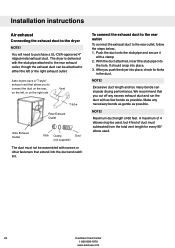
..., check for every 90° elbow used. 24 Customer Care Center 1-800-898-1879 www.askousa.com Maximum duct length of duct must not be attached to the rear exhaust outlet, though the exhaust duct can impede drying performance. Installation instructions Air exhaust Connecting the exhaust duct to the rear outlet, follow the steps below:. 1. Make any excess exhaust duct and run the duct with a clamp 2. NOTE! To connect the exhaust duct to the rear outlet To connect the exhaust duct to the dryer...
..., check for every 90° elbow used. 24 Customer Care Center 1-800-898-1879 www.askousa.com Maximum duct length of duct must not be attached to the rear exhaust outlet, though the exhaust duct can impede drying performance. Installation instructions Air exhaust Connecting the exhaust duct to the rear outlet, follow the steps below:. 1. Make any excess exhaust duct and run the duct with a clamp 2. NOTE! To connect the exhaust duct to the rear outlet To connect the exhaust duct to the dryer...

Instruction Manual
Page 25
..., insert the stub pipe into place, check for Clothes Dryer Transition Duct. NOTE! A maximum of installations subtract 4 feet for UL approved vent basket. Remove the exhaust outlet cover. 3. Installation instructions Connecting the exhaust duct to the Left or Right Side Outlet To connect the exhaust duct to use to the right or left or right side outlet, follow the steps below: 1. Using a flathead screw-driver, turn the exhaust outlet cover you removed from the rear exhaust outlet and place it with the Outline for...
..., insert the stub pipe into place, check for Clothes Dryer Transition Duct. NOTE! A maximum of installations subtract 4 feet for UL approved vent basket. Remove the exhaust outlet cover. 3. Installation instructions Connecting the exhaust duct to the Left or Right Side Outlet To connect the exhaust duct to use to the right or left or right side outlet, follow the steps below: 1. Using a flathead screw-driver, turn the exhaust outlet cover you removed from the rear exhaust outlet and place it with the Outline for...

Instruction Manual
Page 26
... power supply cord must be used for grounding instructions. The receptacle on the machine. 3. Run the duct with machine) The machine should only be protected by a qualified electrician. As supplied: Single-phase, 230 V, 60 Hz, 3000W heater rating 30 A circuit required WARNING! Only a rigid or flexible metal duct shall be grounded. ASKO washers rated 208-240 V have two internal fuses of discharge. Connect the exhaust duct to a ventilation exhaust...
... power supply cord must be used for grounding instructions. The receptacle on the machine. 3. Run the duct with machine) The machine should only be protected by a qualified electrician. As supplied: Single-phase, 230 V, 60 Hz, 3000W heater rating 30 A circuit required WARNING! Only a rigid or flexible metal duct shall be grounded. ASKO washers rated 208-240 V have two internal fuses of discharge. Connect the exhaust duct to a ventilation exhaust...

Instruction Manual
Page 27
... Canada, the dryer is grounded by direct wiring. Read the Electrical requirements and grounding instructions before connecting the tumble dryer. The grounding link on the dryer terminal block. Electric models of the above connections can be removed for installing the dryer in a location where grounding through the neutral conductor is installed in the following situations: 3-wire connection where local codes permit grounding through the neutral. 3-wire connection plus separate grounding connector where local codes do not...
... Canada, the dryer is grounded by direct wiring. Read the Electrical requirements and grounding instructions before connecting the tumble dryer. The grounding link on the dryer terminal block. Electric models of the above connections can be removed for installing the dryer in a location where grounding through the neutral conductor is installed in the following situations: 3-wire connection where local codes permit grounding through the neutral. 3-wire connection plus separate grounding connector where local codes do not...

Instruction Manual
Page 28
... the breaker or fuse box. 2. Ground Ground (center) 5. Connect the other wires to the step numbers. 1. Installation instructions Connecting a 3-wire Power Cord WARNING! Connect ground (center) wire of dryer. 9. Before starting this procedure, be sure the power is turned off at the breaker/fuse box. 2. NOTE! Turn the power off at the breaker/fuse box. The numbers in the illustration correlate to outer screws. 7. Use the strain relief attached below the terminal block opening . 4. Remove center terminal block screw. 28 Customer Care...
... the breaker or fuse box. 2. Ground Ground (center) 5. Connect the other wires to the step numbers. 1. Installation instructions Connecting a 3-wire Power Cord WARNING! Connect ground (center) wire of dryer. 9. Before starting this procedure, be sure the power is turned off at the breaker/fuse box. 2. NOTE! Turn the power off at the breaker/fuse box. The numbers in the illustration correlate to outer screws. 7. Use the strain relief attached below the terminal block opening . 4. Remove center terminal block screw. 28 Customer Care...

Instruction Manual
Page 29
...) from external ground connector screw and remove from center terminal block. 6. Customer Care Center 29 1-800-898-1879 www.askousa.com Connect the other wires to external ground conductor screw. 7. Tighten the strain relief screws. 10. Connect ground (green) wire of terminal block. 8. Replace terminal box cover on at breaker/fuse box. Turn power on back of dryer. 11. Connect neutral (white) wire of cord under center screw of cord to outer screws. 9. Installation instructions 4 7 8 6 5.
...) from external ground connector screw and remove from center terminal block. 6. Customer Care Center 29 1-800-898-1879 www.askousa.com Connect the other wires to external ground conductor screw. 7. Tighten the strain relief screws. 10. Connect ground (green) wire of terminal block. 8. Replace terminal box cover on at breaker/fuse box. Turn power on back of dryer. 11. Connect neutral (white) wire of cord under center screw of cord to outer screws. 9. Installation instructions 4 7 8 6 5.


