

Instruction Manual
Page 2
...KidSafe™ Child-safe start To deactivate KidSafe™ child-safe start temporarily: Description of the tumble dryer Advice and tips before you tumble dry 6 Service and guarantee 19 6 Before contacting the Customer Care Center 20 6 Installation instructions 21 7 Positioning the ...tumble dryer 21 Adjusting the feet 23 8 Built-in 23 Materials that can be tumble dried 8 Air exhaust 24 Materials that should not be tumble Electrical installation 26 dried 8 Reversing the door 30 Static electricity 8 Fitting...
...KidSafe™ Child-safe start To deactivate KidSafe™ child-safe start temporarily: Description of the tumble dryer Advice and tips before you tumble dry 6 Service and guarantee 19 6 Before contacting the Customer Care Center 20 6 Installation instructions 21 7 Positioning the ...tumble dryer 21 Adjusting the feet 23 8 Built-in 23 Materials that can be tumble dried 8 Air exhaust 24 Materials that should not be tumble Electrical installation 26 dried 8 Reversing the door 30 Static electricity 8 Fitting...
Instruction Manual
Page 3
...are not suitable for the first time. When starting the tumble dryer for the first time or after a few loads. Customer Care Center 3 1-800-898-1879 www.askousa.com Before using your machine and start it for tumble drying. Always check and follow the instructions on to www.askousa....çais, Deutsch, Italiano, Espanol Nederlands. 2. NOTE! Press Start or Stop to save and continue to select the display language when you tumble dry chapter. You can find more information in Spanish? This noise is completely normal and will be prompted to the clock and time display settings. Log...
...are not suitable for the first time. When starting the tumble dryer for the first time or after a few loads. Customer Care Center 3 1-800-898-1879 www.askousa.com Before using your machine and start it for tumble drying. Always check and follow the instructions on to www.askousa....çais, Deutsch, Italiano, Espanol Nederlands. 2. NOTE! Press Start or Stop to save and continue to select the display language when you tumble dry chapter. You can find more information in Spanish? This noise is completely normal and will be prompted to the clock and time display settings. Log...
Instruction Manual
Page 4
...including the following: • Read all instructions before touching the back. During the program, the back of the dryer will not damage a tumble dryer. • Do not heat dry items containing vinyl, plastic, foam rubber or similarly textured rubberlike materials, fiberglass, or wool unless the label specifies ... • Electrical installation, if required, must be cleaned periodically by an authorized ASKO service agent. • Do not place items exposed to play on how to properly dispose of the dryer for purposes of fire, electric shock, or injury to persons when using the ...
...including the following: • Read all instructions before touching the back. During the program, the back of the dryer will not damage a tumble dryer. • Do not heat dry items containing vinyl, plastic, foam rubber or similarly textured rubberlike materials, fiberglass, or wool unless the label specifies ... • Electrical installation, if required, must be cleaned periodically by an authorized ASKO service agent. • Do not place items exposed to play on how to properly dispose of the dryer for purposes of fire, electric shock, or injury to persons when using the ...

Instruction Manual
Page 8
...fiber residues formed when the items are cotton fabrics, terry cloth, and synthetic fibers. Garments will be tumble dried due to heat and others can stop the tumble dryer by pressing the Stop button for three seconds or by opening the door and removing the laundry from the ... symbol means that the material is stopped and starts from the dryer. Certain materials may help you before you can: • Use fabric softener when washing. • Wait five minutes after tumble drying, you begin tumble drying. Static electricity To reduce the risk of static electricity in the ...
...fiber residues formed when the items are cotton fabrics, terry cloth, and synthetic fibers. Garments will be tumble dried due to heat and others can stop the tumble dryer by pressing the Stop button for three seconds or by opening the door and removing the laundry from the ... symbol means that the material is stopped and starts from the dryer. Certain materials may help you before you can: • Use fabric softener when washing. • Wait five minutes after tumble drying, you begin tumble drying. Static electricity To reduce the risk of static electricity in the ...
Instruction Manual
Page 13
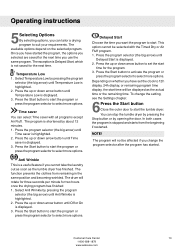
...program. To change the program selector after the program has started the program, the options you have set the start the tumble dryer. You can tailor a drying program to select more options. Press the Start button to select more options. NOTE! Customer Care Center 13 1-800-898-... press the program selector to start . The exception is Delayed Start, which is displayed. 3. This option cannot be displayed as the tumble dryer has finished. Press the up or down arrow button until Temperature Low is not saved for the program. 3. Press the Start button to...
...program. To change the program selector after the program has started the program, the options you have set the start the tumble dryer. You can tailor a drying program to select more options. Press the Start button to select more options. NOTE! Customer Care Center 13 1-800-898-... press the program selector to start . The exception is Delayed Start, which is displayed. 3. This option cannot be displayed as the tumble dryer has finished. Press the up or down arrow button until Temperature Low is not saved for the program. 3. Press the Start button to...
Instruction Manual
Page 16
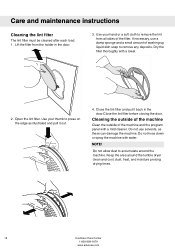
... liquid dish soap to press on the edge as these can damage the machine. Keep the area around the machine. dust, heat, and moisture prolong drying times. 16 Customer Care Center 1-800-898-1879 www.askousa.com Lift the filter from all sides of the machine and the program panel with.... NOTE! If necessary, use solvents, as illustrated and pull it back in the door. 3. Use your hand or a soft cloth to accumulate around the tumble dryer clean and cool; Do not hose down or spray the machine with water. Open the lint filter. Do not allow dust to remove the lint...
... liquid dish soap to press on the edge as these can damage the machine. Keep the area around the machine. dust, heat, and moisture prolong drying times. 16 Customer Care Center 1-800-898-1879 www.askousa.com Lift the filter from all sides of the machine and the program panel with.... NOTE! If necessary, use solvents, as illustrated and pull it back in the door. 3. Use your hand or a soft cloth to accumulate around the tumble dryer clean and cool; Do not hose down or spray the machine with water. Open the lint filter. Do not allow dust to remove the lint...

Instruction Manual
Page 17
... the lint filter. • Call the Customer Care Center if Thermistor Fault appears on . • that the Delayed Start option has not been selected. Drying takes too long • Check that the lint filter is connected. • that the house fuses or circuit breaker have not been tripped. • that... the overheating cut -off shuts off the tumble dryer if the temperature is on the display. • Press the Stop button to close any plug is not blocked. To cancel Delayed Start, press the...
... the lint filter. • Call the Customer Care Center if Thermistor Fault appears on . • that the Delayed Start option has not been selected. Drying takes too long • Check that the lint filter is connected. • that the house fuses or circuit breaker have not been tripped. • that... the overheating cut -off shuts off the tumble dryer if the temperature is on the display. • Press the Stop button to close any plug is not blocked. To cancel Delayed Start, press the...
Instruction Manual
Page 21
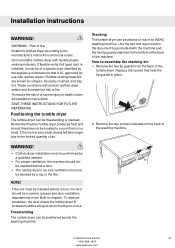
... air. SAVE THESE INSTRUCTIONS FOR FUTURE REFERENCE. These conditions will take longer due to the limited quantity of an ASKO washing machine. Install the clothes dryer according to assemble the stacking kit: 1. Flexible venting materials are known to the bottom of the back of the... small. Customer Care Center 21 1-800-898-1879 www.askousa.com Stacking The tumble dryer can be blocked by the applience manufacturer that is very small, drying will obstruct clothes dryer airflow and increase the risk of severe injury or death, follow all installation instructions....
... air. SAVE THESE INSTRUCTIONS FOR FUTURE REFERENCE. These conditions will take longer due to the limited quantity of an ASKO washing machine. Install the clothes dryer according to assemble the stacking kit: 1. Flexible venting materials are known to the bottom of the back of the... small. Customer Care Center 21 1-800-898-1879 www.askousa.com Stacking The tumble dryer can be blocked by the applience manufacturer that is very small, drying will obstruct clothes dryer airflow and increase the risk of severe injury or death, follow all installation instructions....
Instruction Manual
Page 24
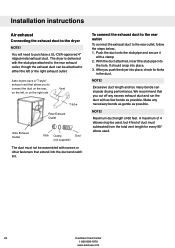
... instructions Air exhaust Connecting the exhaust duct to either the left or the right exhaust outlet. Asko dryers have a "T-style" sko dryersehxahvaeuast vent that you to the rear exhaust outlet, though the exhaust duct can impede drying performance. Push the duct onto the stub pipe and secure it with the stub pipe attached... or right side. With the duct attached, insert the stub pipe into place. 3. Excessive duct length and too many bends can be attached to the dryer NOTE! The dryer is delivered with a clamp 2. After you push the...
... instructions Air exhaust Connecting the exhaust duct to either the left or the right exhaust outlet. Asko dryers have a "T-style" sko dryersehxahvaeuast vent that you to the rear exhaust outlet, though the exhaust duct can impede drying performance. Push the duct onto the stub pipe and secure it with the stub pipe attached... or right side. With the duct attached, insert the stub pipe into place. 3. Excessive duct length and too many bends can be attached to the dryer NOTE! The dryer is delivered with a clamp 2. After you push the...

Instruction Manual
Page 25
...2. Installation instructions Connecting the exhaust duct to the Left or Right Side Outlet To connect the exhaust duct to a ventilation duct You will impede drying performance. It should snap into the hole. Subject 2158A and maximum length of installations subtract 4 feet for UL approved vent basket. Remove the... vent length for every 90° elbow used , it with the Outline for kinks in the outlet you push the dryer into place, check for Clothes Dryer Transition Duct. WARNING! To reduce the risk of duct must subtracted from the rear exhaust outlet and place it in the...
...2. Installation instructions Connecting the exhaust duct to the Left or Right Side Outlet To connect the exhaust duct to a ventilation duct You will impede drying performance. It should snap into the hole. Subject 2158A and maximum length of installations subtract 4 feet for UL approved vent basket. Remove the... vent length for every 90° elbow used , it with the Outline for kinks in the outlet you push the dryer into place, check for Clothes Dryer Transition Duct. WARNING! To reduce the risk of duct must subtracted from the rear exhaust outlet and place it in the...

