
User manual 8090338 Asko TDC 111 VACS-EN
Page 2
... Installation instructions 17 tumble dried 9 Positioning the tumble dryer 17 Operating instructions 10 Adjusting the feet 19 Sort your fabrics 10 Air exhaust 20 Turn on the main power switch. 10 Electrical installation 23 Open the door, load the items, and Reversing the door 26 then close the door 10 Follow these instructions: 27 Select the program 10 Press the Start button 11 Drying program finished 11 Once drying has finished 11 Settings...
... Installation instructions 17 tumble dried 9 Positioning the tumble dryer 17 Operating instructions 10 Adjusting the feet 19 Sort your fabrics 10 Air exhaust 20 Turn on the main power switch. 10 Electrical installation 23 Open the door, load the items, and Reversing the door 26 then close the door 10 Follow these instructions: 27 Select the program 10 Press the Start button 11 Drying program finished 11 Once drying has finished 11 Settings...
User manual 8090338 Asko TDC 111 VACS-EN
Page 4
... unless the label specifies "washable". • Clean the lint filter before or after each load. • Keep the area around the exhaust opening and adjacent surrounding areas free from the accumulation of lint, dust and dirt. • The interior of recycling. • Damaged power cables should be done by an authorized ASKO service agent. • Do not place items exposed...
... unless the label specifies "washable". • Clean the lint filter before or after each load. • Keep the area around the exhaust opening and adjacent surrounding areas free from the accumulation of lint, dust and dirt. • The interior of recycling. • Damaged power cables should be done by an authorized ASKO service agent. • Do not place items exposed...
User manual 8090338 Asko TDC 111 VACS-EN
Page 5
... the main power switch. • Press the Stop button for three seconds. Check with local guidelines. Important safety instructions Grounding instructions A) Grounding instructions for a grounded, cord-connected appliance In the event of malfunction or breakdown, grounding will then stop a drying program by a qualified electrician. Improper connection of the equipment-grounding conductor can be recycled correctly. Use common sense and caution when installing, operating, and...
... the main power switch. • Press the Stop button for three seconds. Check with local guidelines. Important safety instructions Grounding instructions A) Grounding instructions for a grounded, cord-connected appliance In the event of malfunction or breakdown, grounding will then stop a drying program by a qualified electrician. Improper connection of the equipment-grounding conductor can be recycled correctly. Use common sense and caution when installing, operating, and...
User manual 8090338 Asko TDC 111 VACS-EN
Page 6
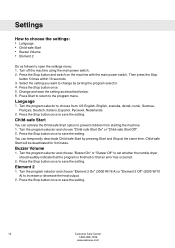
... to open the settings menu: 1. Then press the Stop button 5 times within 10 seconds. 3. You can activate the Child-safe Start option to save the setting as follows to change by pressing Start and Stop at the same time. Child safety General WARNING! Turn off the machine using the main power switch. 2. You can activate the Child-safe Start option. Activating/deactivating Child-safe Start Do as described below. 6. Child-safe Start...
... to open the settings menu: 1. Then press the Stop button 5 times within 10 seconds. 3. You can activate the Child-safe Start option to save the setting as follows to change by pressing Start and Stop at the same time. Child safety General WARNING! Turn off the machine using the main power switch. 2. You can activate the Child-safe Start option. Activating/deactivating Child-safe Start Do as described below. 6. Child-safe Start...
User manual 8090338 Asko TDC 111 VACS-EN
Page 9
...? NOTE! Higher spin speeds save both energy and drying time. Advice and tips before you begin tumble drying. Materials that have been dry-cleaned at 1000 rpm or faster. The lint trapped in the lint filter consists of piling. Customer Care Center 9 1-800-898-1879 www.askousa.com NOTE! If the door is opened during the program, the program will be...
...? NOTE! Higher spin speeds save both energy and drying time. Advice and tips before you begin tumble drying. Materials that have been dry-cleaned at 1000 rpm or faster. The lint trapped in the lint filter consists of piling. Customer Care Center 9 1-800-898-1879 www.askousa.com NOTE! If the door is opened during the program, the program will be...
User manual 8090338 Asko TDC 111 VACS-EN
Page 10
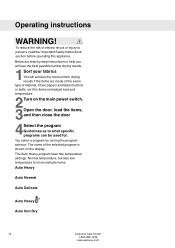
... settings. Normal temperature, but also low temperature for . sort the items and adjust load and temperature. 2Turn on the display. The name of electric shock or injury to persons, read the "Important Safety Instructions" section before operating this appliance. You select a program by -step instructions to what specific programs can be used for more delicate items. Auto Heavy Auto Normal Auto Delicate Auto Heavy Auto Iron Dry 10 Customer Care...
... settings. Normal temperature, but also low temperature for . sort the items and adjust load and temperature. 2Turn on the display. The name of electric shock or injury to persons, read the "Important Safety Instructions" section before operating this appliance. You select a program by -step instructions to what specific programs can be used for more delicate items. Auto Heavy Auto Normal Auto Delicate Auto Heavy Auto Iron Dry 10 Customer Care...
User manual 8090338 Asko TDC 111 VACS-EN
Page 11
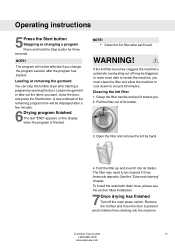
... drain hose, please see the section titled Installation 7Once drying has finished Turn off may need to cool down for three seconds. Customer Care Center 11 1-800-898-1879 www.askousa.com WARNING! If the lint filter becomes clogged, the machine's automatic overheating cut-off the main power switch. See the "Care and cleaning" chapter. Cleaning the lint filter 1. Open the filter and remove the lint by opening the door...
... drain hose, please see the section titled Installation 7Once drying has finished Turn off may need to cool down for three seconds. Customer Care Center 11 1-800-898-1879 www.askousa.com WARNING! If the lint filter becomes clogged, the machine's automatic overheating cut-off the main power switch. See the "Care and cleaning" chapter. Cleaning the lint filter 1. Open the filter and remove the lint by opening the door...
User manual 8090338 Asko TDC 111 VACS-EN
Page 12
... error has occurred. 2. Element 2 1. Press the Stop button once. 5. Buzzer Volume 1. Press the Stop button and switch on the machine with the main power switch. Press Start to return to open the settings menu: 1. Child-safe Start You can temporarily deactivate Child-safe Start by turning the program selector. 4. Select the setting you want to save the setting. 12 Customer Care Center 1-800-898-1879 www.askousa.com Child-safe Start...
... error has occurred. 2. Element 2 1. Press the Stop button once. 5. Buzzer Volume 1. Press the Stop button and switch on the machine with the main power switch. Press Start to return to open the settings menu: 1. Child-safe Start You can temporarily deactivate Child-safe Start by turning the program selector. 4. Select the setting you want to save the setting. 12 Customer Care Center 1-800-898-1879 www.askousa.com Child-safe Start...
User manual 8090338 Asko TDC 111 VACS-EN
Page 13
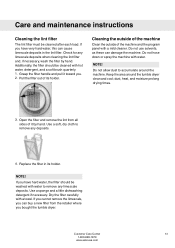
.... Use a sponge and a little dishwashing detergent if necessary. Check for any limescale deposits when cleaning the lint filter and, if necessary, wash the filter by hand. Do not hose down or spray the machine with a towel. Dry the filter carefully with water. Additionally, the filter should be cleaned after each load. Keep the area around the machine. Care and maintenance instructions Cleaning the lint filter The lint filter must be washed with water to remove...
.... Use a sponge and a little dishwashing detergent if necessary. Check for any limescale deposits when cleaning the lint filter and, if necessary, wash the filter by hand. Do not hose down or spray the machine with a towel. Dry the filter carefully with water. Additionally, the filter should be cleaned after each load. Keep the area around the machine. Care and maintenance instructions Cleaning the lint filter The lint filter must be washed with water to remove...
User manual 8090338 Asko TDC 111 VACS-EN
Page 14
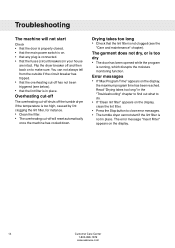
... the lint filter, for instance. • Clean the filter. • The overheating cut -off will not start if the lint filter is not in place. The error message "Insert Filter" appears on the display, clean the lint filter. • Press the Stop button to do. • If "Clean lint filter" appears on the display. 14 Customer Care Center 1-800-898-1879 www.askousa.com Troubleshooting The machine will reset automatically...
... the lint filter, for instance. • Clean the filter. • The overheating cut -off will not start if the lint filter is not in place. The error message "Insert Filter" appears on the display, clean the lint filter. • Press the Stop button to do. • If "Clean lint filter" appears on the display. 14 Customer Care Center 1-800-898-1879 www.askousa.com Troubleshooting The machine will reset automatically...
User manual 8090338 Asko TDC 111 VACS-EN
Page 15
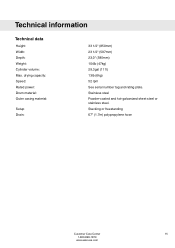
Technical information Technical data Height: Width: Depth: Weight: Cylinder volume: Max. Stainless steel Powder-coated and hot-galvanized sheet steel or stainless steel. drying capacity: Speed: Rated power: Drum material: Outer casing material: Setup Drain: 33 1/2'' (850mm) 23 1/2'' (597mm) 23,0" (585mm) 104lb (47kg) 29,3gal (111l) 13lb (6kg) 52 rpm See serial number tag and rating plate. Stacking or freestanding 67" (1.7m) polypropylene hose Customer Care Center 15 1-800-898-1879 www.askousa.com
Technical information Technical data Height: Width: Depth: Weight: Cylinder volume: Max. Stainless steel Powder-coated and hot-galvanized sheet steel or stainless steel. drying capacity: Speed: Rated power: Drum material: Outer casing material: Setup Drain: 33 1/2'' (850mm) 23 1/2'' (597mm) 23,0" (585mm) 104lb (47kg) 29,3gal (111l) 13lb (6kg) 52 rpm See serial number tag and rating plate. Stacking or freestanding 67" (1.7m) polypropylene hose Customer Care Center 15 1-800-898-1879 www.askousa.com
User manual 8090338 Asko TDC 111 VACS-EN
Page 16
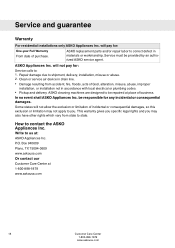
... in drain line. • Damage resulting from state to be repaired at 1-800-898-1879 www.askousa.com 16 Customer Care Center 1-800-898-1879 www.askousa.com Repair damage due to us at: ASKO Appliances Inc. be provided by an authorized ASKO service agent. Write to shipment, delivery, installation, misuse or abuse. 2. Clean or service air device in accordance with local electrical or plumbing codes...
... in drain line. • Damage resulting from state to be repaired at 1-800-898-1879 www.askousa.com 16 Customer Care Center 1-800-898-1879 www.askousa.com Repair damage due to us at: ASKO Appliances Inc. be provided by an authorized ASKO service agent. Write to shipment, delivery, installation, misuse or abuse. 2. Clean or service air device in accordance with local electrical or plumbing codes...
User manual 8090338 Asko TDC 111 VACS-EN
Page 17
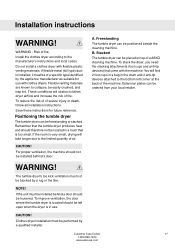
... be installed behind a door. Install the clothes dryer according to the limited quantity of a ASKO cleaning machine. WARNING! To improve ventilation, the door where the tumble dryer is located should therefore not be located in a room that come with the machine: You will find 2 foot cups in a bag in use with flexible plastic venting materials. WARNING - Save these instructions for use . A. Stacked...
... be installed behind a door. Install the clothes dryer according to the limited quantity of a ASKO cleaning machine. WARNING! To improve ventilation, the door where the tumble dryer is located should therefore not be located in a room that come with the machine: You will find 2 foot cups in a bag in use with flexible plastic venting materials. WARNING - Save these instructions for use . A. Stacked...
User manual 8090338 Asko TDC 111 VACS-EN
Page 18
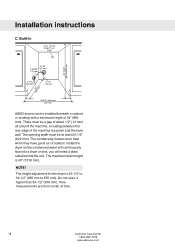
...). The condensing models work best when they have good air circulation. Install the dryer so the condensed water will continuously flow into a drain or sink, you will need a drain outlet behind the unit. NOTE! Installation instructions C. There must be installed beneath a cabinet or worktop with a minimum height of hole. 18 Customer Care Center 1-800-898-1879 www.askousa.com The height adjustment for the dryer...
...). The condensing models work best when they have good air circulation. Install the dryer so the condensed water will continuously flow into a drain or sink, you will need a drain outlet behind the unit. NOTE! Installation instructions C. There must be installed beneath a cabinet or worktop with a minimum height of hole. 18 Customer Care Center 1-800-898-1879 www.askousa.com The height adjustment for the dryer...
User manual 8090338 Asko TDC 111 VACS-EN
Page 19
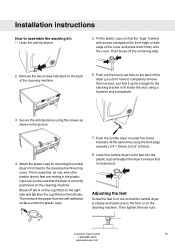
... remove the paper from the self-adhesive surface under the metal brackets. This is balanced. Installation instructions How to the cleaning machine's top cover. Push out the knock-out hole on the cleaning machine. Attach the plastic cups for the stacking bracket to fit inside the slot) using ...up far enough for mounting the tumble dryer's front feet to assemble the stacking kit: 1. Lock nut Customer Care Center 19 1-800-898-1879 www.askousa.com Lower the tumble dryer's front feet into the plastic cups and adjust the dryer to 0,8" (20mm). 8. Adjusting the feet Screw the ...
... remove the paper from the self-adhesive surface under the metal brackets. This is balanced. Installation instructions How to the cleaning machine's top cover. Push out the knock-out hole on the cleaning machine. Attach the plastic cups for the stacking bracket to fit inside the slot) using ...up far enough for mounting the tumble dryer's front feet to assemble the stacking kit: 1. Lock nut Customer Care Center 19 1-800-898-1879 www.askousa.com Lower the tumble dryer's front feet into the plastic cups and adjust the dryer to 0,8" (20mm). 8. Adjusting the feet Screw the ...
User manual 8090338 Asko TDC 111 VACS-EN
Page 20
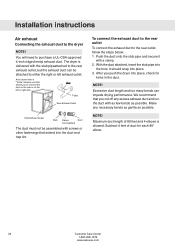
Installation instructions Air exhaust Connecting the exhaust duct to purchase a UL-CSA-approved 4-inch ridged metal exhaust duct. T-tube Rear Exhaust Outlet Side Exhaust Outlet Stub Clamp Duct (not supplied) The duct must not be attached to the rear exhaust outlet, but the exhaust duct can impede drying... connect the exhaust duct to connect the duct on the rear or on the left exhaust outlet. With the duct attached, insert the stub pipe into place. 3. Asko dryers have a "T-stile" exhaust vent that extend into place, check for each 90° elbow. 20 Customer Care ...
Installation instructions Air exhaust Connecting the exhaust duct to purchase a UL-CSA-approved 4-inch ridged metal exhaust duct. T-tube Rear Exhaust Outlet Side Exhaust Outlet Stub Clamp Duct (not supplied) The duct must not be attached to the rear exhaust outlet, but the exhaust duct can impede drying... connect the exhaust duct to connect the duct on the rear or on the left exhaust outlet. With the duct attached, insert the stub pipe into place. 3. Asko dryers have a "T-stile" exhaust vent that extend into place, check for each 90° elbow. 20 Customer Care ...

User manual 8090338 Asko TDC 111 VACS-EN
Page 21
...). WARNING! Never cover the end of duct for kinks in the outlet you cut off any necessary bends as gentle as possible. Subject 2158A and maximum length of installations subtract 4 feet for UL approved vent basket. We recommend that you plan to use to catch lint, except for every 90° elbow Customer Care Center 21 1-800-898...
...). WARNING! Never cover the end of duct for kinks in the outlet you cut off any necessary bends as gentle as possible. Subject 2158A and maximum length of installations subtract 4 feet for UL approved vent basket. We recommend that you plan to use to catch lint, except for every 90° elbow Customer Care Center 21 1-800-898...
User manual 8090338 Asko TDC 111 VACS-EN
Page 23
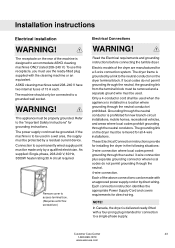
..., the dryer is prohibited for all 4-wire installations. The power supply cord must be properly grounded. Each connection instruction identifies the appropriate Power Supply Cord and covers requirements for connection to a permanently wired supply point must use the ready-fitted plug supplied with the cleaning machine or an equivalent. This appliance must be used when the applience is grounded by direct wiring. Only a 4-conductor cord shall be grounded. Grounding through the...
..., the dryer is prohibited for all 4-wire installations. The power supply cord must be properly grounded. Each connection instruction identifies the appropriate Power Supply Cord and covers requirements for connection to a permanently wired supply point must use the ready-fitted plug supplied with the cleaning machine or an equivalent. This appliance must be used when the applience is grounded by direct wiring. Only a 4-conductor cord shall be grounded. Grounding through the...
User manual 8090338 Asko TDC 111 VACS-EN
Page 24
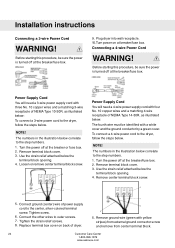
... or remove center terminal block screw. 4 Power Supply Cord You will need a 4-wire power supply cord with yellow stripes) from external ground connector screw and remove from center terminal block. 24 Customer Care Center 1-800-898-1879 www.askousa.com Use the strain relief attached below the terminal block opening . 4. Tighten the strain relief screws. 8. Remove terminal block cover. 3. Turn power on back of power supply cord to outer screws. 7. Installation instructions Connecting a 3-wire Power Cord...
... or remove center terminal block screw. 4 Power Supply Cord You will need a 4-wire power supply cord with yellow stripes) from external ground connector screw and remove from center terminal block. 24 Customer Care Center 1-800-898-1879 www.askousa.com Use the strain relief attached below the terminal block opening . 4. Tighten the strain relief screws. 8. Remove terminal block cover. 3. Turn power on back of power supply cord to outer screws. 7. Installation instructions Connecting a 3-wire Power Cord...
User manual 8090338 Asko TDC 111 VACS-EN
Page 25
Connect neutral (white) wire of cord under center screw of cord to outer screws. 9. Customer Care Center 25 1-800-898-1879 www.askousa.com Connect the other wires to external ground conductor screw. 7. Installation instructions 6. Tighten the strain relief screws. 10. Turn power on back of dryer. 11. Plug dryer into wall receptacle. 12. Connect ground (green) wire of terminal block. 8. Replace terminal box cover on at breaker/fuse box.
Connect neutral (white) wire of cord under center screw of cord to outer screws. 9. Customer Care Center 25 1-800-898-1879 www.askousa.com Connect the other wires to external ground conductor screw. 7. Installation instructions 6. Tighten the strain relief screws. 10. Turn power on back of dryer. 11. Plug dryer into wall receptacle. 12. Connect ground (green) wire of terminal block. 8. Replace terminal box cover on at breaker/fuse box.


