
User Guide
Page 1
B150M-A D3 Motherboard
B150M-A D3 Motherboard
User Guide
Page 3
Contents Safety information iv About this guide iv Package contents vi B150M-A D3 specifications summary vi Chapter 1: Product introduction 1.1 Before you proceed 1-1 1.2 Motherboard overview 1-1 1.3 Central Processing Unit (CPU 1-3 1.4 System memory 1-7 1.5 Expansion slots 1-10 1.6 Headers 1-11 1.7 Connectors 1-12 1.8 Software support 1-22 Chapter 2: BIOS information 2.1 Managing and ...10 2.5 Ai Tweaker menu 2-11 2.6 Advanced menu 2-12 2.7 Monitor menu 2-12 2.8 Boot menu 2-13 2.9 Tool menu 2-13 2.10 Exit menu 2-13 Appendices Notices...A-1 ASUS contact information A-4 iii
Contents Safety information iv About this guide iv Package contents vi B150M-A D3 specifications summary vi Chapter 1: Product introduction 1.1 Before you proceed 1-1 1.2 Motherboard overview 1-1 1.3 Central Processing Unit (CPU 1-3 1.4 System memory 1-7 1.5 Expansion slots 1-10 1.6 Headers 1-11 1.7 Connectors 1-12 1.8 Software support 1-22 Chapter 2: BIOS information 2.1 Managing and ...10 2.5 Ai Tweaker menu 2-11 2.6 Advanced menu 2-12 2.7 Monitor menu 2-12 2.8 Boot menu 2-13 2.9 Tool menu 2-13 2.10 Exit menu 2-13 Appendices Notices...A-1 ASUS contact information A-4 iii

User Guide
Page 4
...describes the features of the switches, jumpers, and connectors on a stable surface. • If you need when installing and configuring the motherboard. About this guide is set to the correct voltage in any damage, contact your retailer. These devices could interrupt the grounding circuit. ...you encounter technical problems with the package. • Before using an adapter or extension cord. It includes descriptions of the motherboard and the new technology it by yourself. Detailed descriptions for the devices are unplugged before using the product, ensure all cables...
...describes the features of the switches, jumpers, and connectors on a stable surface. • If you need when installing and configuring the motherboard. About this guide is set to the correct voltage in any damage, contact your retailer. These devices could interrupt the grounding circuit. ...you encounter technical problems with the package. • Before using an adapter or extension cord. It includes descriptions of the motherboard and the new technology it by yourself. Detailed descriptions for the devices are unplugged before using the product, ensure all cables...

User Guide
Page 6
...; Turbo Boost Technology 2.0 support depends on the next page) vi Please refer to Memory QVL for details. ** Refer to www.asus.com for the following items. Motherboard Cables Accessories Application DVD Documentation ASUS B150M-A D3 motherboard 2 x Serial ATA 6.0 Gb/s cables 1 x I/O Shield Support DVD User Guide If any of the above items is subject to 3 displays simultaneously...
...; Turbo Boost Technology 2.0 support depends on the next page) vi Please refer to Memory QVL for details. ** Refer to www.asus.com for the following items. Motherboard Cables Accessories Application DVD Documentation ASUS B150M-A D3 motherboard 2 x Serial ATA 6.0 Gb/s cables 1 x I/O Shield Support DVD User Guide If any of the above items is subject to 3 displays simultaneously...

User Guide
Page 11
... into the chassis in the correct orientation. Do not overtighten the screws! ASUS B150M-A D3 1-1 Product introduction 1 1.1 Before you proceed Take note of your chassis to ensure that the motherboard fits. The edge with the component. • Before you install or remove any motherboard settings. • Unplug the power cord from the power supply. Failure...
... into the chassis in the correct orientation. Do not overtighten the screws! ASUS B150M-A D3 1-1 Product introduction 1 1.1 Before you proceed Take note of your chassis to ensure that the motherboard fits. The edge with the component. • Before you install or remove any motherboard settings. • Unplug the power cord from the power supply. Failure...
User Guide
Page 12
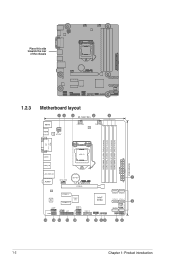
Place this side towards the rear of the chassis B150M-A D3 1.2.3 Motherboard layout 12 3 20.1cm(7.9in) 2 4 KBMS HDMI ASM 1442K ATX12V CPU_FAN DIGI +VRM CHA_FAN2 DDR3 DIMM_A1 (64bit, 240-pin module) DDR3 DIMM_A2 (64bit, ... (64bit, 240-pin module) DDR3 DIMM_B2 (64bit, 240-pin module) EATXPWR 23.4cm(9.2in) DVI VGA USB78 LGA1151 USB3_56 LAN_USB3_34 BATTERY 1 AUDIO CHA_FAN1 B150M-A D3 PCIEX16 Realtek 8111H ALC 887 PCIEX1_1 PCIEX1_2 Super I/O Intel® B150 SATA6G_5 SATA6G_6 SATA6G_3 SATA6G_4 5 SATA6G_2 AAFP COM SPDIF_OUT LPT USB910 USB1112 USB3_12 TPM CLRTC...
Place this side towards the rear of the chassis B150M-A D3 1.2.3 Motherboard layout 12 3 20.1cm(7.9in) 2 4 KBMS HDMI ASM 1442K ATX12V CPU_FAN DIGI +VRM CHA_FAN2 DDR3 DIMM_A1 (64bit, 240-pin module) DDR3 DIMM_A2 (64bit, ... (64bit, 240-pin module) DDR3 DIMM_B2 (64bit, 240-pin module) EATXPWR 23.4cm(9.2in) DVI VGA USB78 LGA1151 USB3_56 LAN_USB3_34 BATTERY 1 AUDIO CHA_FAN1 B150M-A D3 PCIEX16 Realtek 8111H ALC 887 PCIEX1_1 PCIEX1_2 Super I/O Intel® B150 SATA6G_5 SATA6G_6 SATA6G_3 SATA6G_4 5 SATA6G_2 AAFP COM SPDIF_OUT LPT USB910 USB1112 USB3_12 TPM CLRTC...

User Guide
Page 13
... (4-1 pin CHASSIS) 9. B150M-A D3 B150M-A D3 CPU socket LGA1151 ASUS B150M-A D3 1-3 Intel® LGA1151 CPU socket 4. Speaker connector (4-pin SPEAKER) 8. Clear RTC RAM (2-pin CLRTC) 10. Front panel audio connector (10-1 pin AAFP) Page 1-16 1-14 1-3 1-7 1-19 1-18 1-19 1-21 1-11 1-20 1-15 1-15 1-20 1-17 1-14 1-17 1.3 Central Processing Unit (CPU) This motherboard comes with a surface...
... (4-1 pin CHASSIS) 9. B150M-A D3 B150M-A D3 CPU socket LGA1151 ASUS B150M-A D3 1-3 Intel® LGA1151 CPU socket 4. Speaker connector (4-pin SPEAKER) 8. Clear RTC RAM (2-pin CLRTC) 10. Front panel audio connector (10-1 pin AAFP) Page 1-16 1-14 1-3 1-7 1-19 1-18 1-19 1-21 1-11 1-20 1-15 1-15 1-20 1-17 1-14 1-17 1.3 Central Processing Unit (CPU) This motherboard comes with a surface...

User Guide
Page 14
ASUS will process Return Merchandise Authorization (RMA) requests only if the motherboard comes with the cap on the LGA1151 socket. • Upon purchase of the motherboard, ensure that you see any damage to the socket contacts resulting from incorrect CPU installation/removal, or misplacement/loss/incorrect removal of the PnP cap. 1.3.1 ... designed for LGA1150, LGA1155 and LGA1156 sockets on the LGA1151 socket. • The product warranty does not cover damage to the PnP cap/socket contacts/motherboard components. • Keep the cap after installing the...
ASUS will process Return Merchandise Authorization (RMA) requests only if the motherboard comes with the cap on the LGA1151 socket. • Upon purchase of the motherboard, ensure that you see any damage to the socket contacts resulting from incorrect CPU installation/removal, or misplacement/loss/incorrect removal of the PnP cap. 1.3.1 ... designed for LGA1150, LGA1155 and LGA1156 sockets on the LGA1151 socket. • The product warranty does not cover damage to the PnP cap/socket contacts/motherboard components. • Keep the cap after installing the...

User Guide
Page 17
... sockets: DIMM_A1 DIMM_A2 DIMM_B1 DIMM_B2 B150M-A D3 Channel Channel A Channel B B150M-A D3 240-pin DDR3 DIMM sockets Sockets DIMM_A1 & DIMM_A2 DIMM_B1 & DIMM_B2 1.4.2 Memory configurations You may install 2 GB, 4 GB, 8 GB, and 16 GB unbuffered non-ECC DDR3 DIMMs into the DIMM sockets. Recommended memory configurations ASUS B150M-A D3 1-7 1.4 System memory 1.4.1 Overview This motherboard comes with four Double Data...
... sockets: DIMM_A1 DIMM_A2 DIMM_B1 DIMM_B2 B150M-A D3 Channel Channel A Channel B B150M-A D3 240-pin DDR3 DIMM sockets Sockets DIMM_A1 & DIMM_A2 DIMM_B1 & DIMM_B2 1.4.2 Memory configurations You may install 2 GB, 4 GB, 8 GB, and 16 GB unbuffered non-ECC DDR3 DIMMs into the DIMM sockets. Recommended memory configurations ASUS B150M-A D3 1-7 1.4 System memory 1.4.1 Overview This motherboard comes with four Double Data...
User Guide
Page 18
...marked value. Under the default state, some memory modules for overclocking may install varying memory sizes in Channel A and Channel B. Visit the ASUS website at a higher frequency, refer to section 2.5 Ai Tweaker menu for manual memory frequency adjustment. • Always install the DIMMs with...You may operate at http://support.microsoft. The system maps the total size of the following: - For effective use a more memory on the motherboard, the actual usable memory for single-channel operation. • According to Intel® CPU spec, DIMM voltage below 1.5V is recommended to...
...marked value. Under the default state, some memory modules for overclocking may install varying memory sizes in Channel A and Channel B. Visit the ASUS website at a higher frequency, refer to section 2.5 Ai Tweaker menu for manual memory frequency adjustment. • Always install the DIMMs with...You may operate at http://support.microsoft. The system maps the total size of the following: - For effective use a more memory on the motherboard, the actual usable memory for single-channel operation. • According to Intel® CPU spec, DIMM voltage below 1.5V is recommended to...

User Guide
Page 20
..., conflicts will arise between the two PCI groups, making the system unstable and the card inoperable. 1.5.3 PCI Express 3.0/2.0 x1 slots This motherboard supports PCI Express x1 network cards, SCSI cards, and other cards that comply with the PCI Express specifications. 1.5.4 PCI Express 3.0/2.0 x16 slot This... motherboard has a PCI Express 3.0/2.0 x16 slot that you intend to the card. 3. Assign an IRQ to use . 4. Remove the bracket opposite ...
..., conflicts will arise between the two PCI groups, making the system unstable and the card inoperable. 1.5.3 PCI Express 3.0/2.0 x1 slots This motherboard supports PCI Express x1 network cards, SCSI cards, and other cards that comply with the PCI Express specifications. 1.5.4 PCI Express 3.0/2.0 x16 slot This... motherboard has a PCI Express 3.0/2.0 x16 slot that you intend to the card. 3. Assign an IRQ to use . 4. Remove the bracket opposite ...

User Guide
Page 21
...RTC RAM To erase the RTC RAM: 1. Turn OFF the computer and unplug the power cord. 2. For system failure due to re- ASUS B150M-A D3 1-11 Use a metal object such as system passwords. shared - - - - You can clear the CMOS memory of date, time, and... Clock (RTC) RAM in CMOS, which include system setup information such as a screwdriver to short the two pins. 3. shared - - - IRQ assignments for this motherboard PCIEx16 PCIEx1_1 PCIEx1_2 Realtek 8111H LAN USB 3.0 Controller SATA Controller HD Audio A B C D shared - - - - - Clear RTC RAM (2-pin CLRTC) This ...
...RTC RAM To erase the RTC RAM: 1. Turn OFF the computer and unplug the power cord. 2. For system failure due to re- ASUS B150M-A D3 1-11 Use a metal object such as system passwords. shared - - - - You can clear the CMOS memory of date, time, and... Clock (RTC) RAM in CMOS, which include system setup information such as a screwdriver to short the two pins. 3. shared - - - IRQ assignments for this motherboard PCIEx16 PCIEx1_1 PCIEx1_2 Realtek 8111H LAN USB 3.0 Controller SATA Controller HD Audio A B C D shared - - - - - Clear RTC RAM (2-pin CLRTC) This ...
User Guide
Page 24
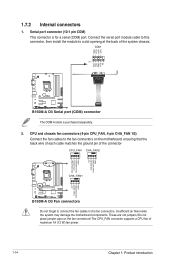
.... 2. Do not place jumper caps on the motherboard, ensuring that the black wire of each cable matches the ground pin of the connector CPU_FAN CHA_FAN2 CPU FAN PWM CPU FAN IN CPU FAN PWR GND +5V CHA FAN IN CHA FAN PWR GND B150M-A D3 CHA_FAN1 +5V CHA FAN IN CHA FAN PWR..., 4-pin CHA_FAN 1/2) Connect the fan cables to the fan connectors on the fan connectors! COM PIN 1 RXD DTR DSR CTS DCD TXD GND RTS RI B150M-A D3 B150M-A D3 Serial port (COM) connector The COM module is for a serial (COM) port. 1.7.2 Internal connectors 1. Connect the serial port module cable to this connector, then ...
.... 2. Do not place jumper caps on the motherboard, ensuring that the black wire of each cable matches the ground pin of the connector CPU_FAN CHA_FAN2 CPU FAN PWM CPU FAN IN CPU FAN PWR GND +5V CHA FAN IN CHA FAN PWR GND B150M-A D3 CHA_FAN1 +5V CHA FAN IN CHA FAN PWR..., 4-pin CHA_FAN 1/2) Connect the fan cables to the fan connectors on the fan connectors! COM PIN 1 RXD DTR DSR CTS DCD TXD GND RTS RI B150M-A D3 B150M-A D3 Serial port (COM) connector The COM module is for a serial (COM) port. 1.7.2 Internal connectors 1. Connect the serial port module cable to this connector, then ...

User Guide
Page 25
... charging time for USB-chargeable devices, optimized power efficiency, and backward compatibility with USB 2.0. ASUS B150M-A D3 1-15 GND IntA_P1_SSRX+ IntA_P1_SSRX- These USB connectors comply with USB 2.0 specifications and supports up to 480Mbps connection speed. Doing so will damage the motherboard! USB+5V USB_P9USB_P9+ GND NC USB910 PIN 1 GND USB_P11+ USB_P10+ USB_P11- The USB...
... charging time for USB-chargeable devices, optimized power efficiency, and backward compatibility with USB 2.0. ASUS B150M-A D3 1-15 GND IntA_P1_SSRX+ IntA_P1_SSRX- These USB connectors comply with USB 2.0 specifications and supports up to 480Mbps connection speed. Doing so will damage the motherboard! USB+5V USB_P9USB_P9+ GND NC USB910 PIN 1 GND USB_P11+ USB_P10+ USB_P11- The USB...

User Guide
Page 27
...ASUS B150M-A D3 1-17 If you want to connect an AC'97 front panel audio module to this connector, then install the module to a slot opening at the back of the front panel audio I /O module that you connect a high-definition front panel audio module to this connector to avail of the motherboard... connector is set the item to [HD]. By default, this connector. Connect one end of the system chassis. +5V SPDIFOUT GND B150M-A D3 SPDIF_OUT B150M-A D3 Digital audio connector The S/PDIF module is for a chassis-mounted front panel audio I /O module cable to [HD]. Digital audio connector...
...ASUS B150M-A D3 1-17 If you want to connect an AC'97 front panel audio module to this connector, then install the module to a slot opening at the back of the front panel audio I /O module that you connect a high-definition front panel audio module to this connector to avail of the motherboard... connector is set the item to [HD]. By default, this connector. Connect one end of the system chassis. +5V SPDIFOUT GND B150M-A D3 SPDIF_OUT B150M-A D3 Digital audio connector The S/PDIF module is for a chassis-mounted front panel audio I /O module cable to [HD]. Digital audio connector...

User Guide
Page 32
Always install the latest OS version and corresponding updates to maximize the features of your ASUS motherboard. Refer to avail all motherboard features. To run the DVD. 1-22 Chapter 1: Product introduction Double-click the Setup.exe to locate the file Setup.exe in your...) and Windows® 10 (64-bit) Operating Systems (OS). Click the Driver, Utilities, Manual, or Special tabs to change at www.asus.com for reference only. Motherboard settings and hardware options vary. If Autorun is enabled in the root folder. The following screen is NOT enabled in your computer, browse...
Always install the latest OS version and corresponding updates to maximize the features of your ASUS motherboard. Refer to avail all motherboard features. To run the DVD. 1-22 Chapter 1: Product introduction Double-click the Setup.exe to locate the file Setup.exe in your...) and Windows® 10 (64-bit) Operating Systems (OS). Click the Driver, Utilities, Manual, or Special tabs to change at www.asus.com for reference only. Motherboard settings and hardware options vary. If Autorun is enabled in the root folder. The following screen is NOT enabled in your computer, browse...

User Guide
Page 33
BIOS information 2 2.1 Managing and updating your BIOS Save a copy of the original motherboard BIOS file to a USB flash disk in the future. ASUS B150M-A D3 2-1 Copy the original motherboard BIOS using the ASUS Update utility. 2.1.1 EZ Update EZ Update is a utility that allows you to restore the BIOS in case you can also manually update the saved...
BIOS information 2 2.1 Managing and updating your BIOS Save a copy of the original motherboard BIOS file to a USB flash disk in the future. ASUS B150M-A D3 2-1 Copy the original motherboard BIOS using the ASUS Update utility. 2.1.1 EZ Update EZ Update is a utility that allows you to restore the BIOS in case you can also manually update the saved...

User Guide
Page 35
... computer has a DVD optical drive. When found, the utility reads the BIOS file and enters ASUS EZ Flash 3 utility automatically. 4. Doing so can restore a corrupted BIOS file using the motherboard support DVD or a USB flash drive that your USB flash drive is not supported under FreeDOS environment...on the system. 2. Recovering the BIOS To recover the BIOS: 1. DO NOT shut down or reset the system while updating the BIOS! ASUS B150M-A D3 2-3 To ensure system compatibility and stability, we recommend that contains the BIOS file to update the BIOS in the support DVD may not ...
... computer has a DVD optical drive. When found, the utility reads the BIOS file and enters ASUS EZ Flash 3 utility automatically. 4. Doing so can restore a corrupted BIOS file using the motherboard support DVD or a USB flash drive that your USB flash drive is not supported under FreeDOS environment...on the system. 2. Recovering the BIOS To recover the BIOS: 1. DO NOT shut down or reset the system while updating the BIOS! ASUS B150M-A D3 2-3 To ensure system compatibility and stability, we recommend that contains the BIOS file to update the BIOS in the support DVD may not ...

User Guide
Page 38
...settings to turn the system off then back on how to the default value. Press the reset button on your screen. • Visit the ASUS website at startup: Press or during the Power-On Self Test (POST). Press the power button to ensure system compatibility and stability. We ...or , POST continues with its parameters. 2.2 BIOS setup program Use the BIOS Setup program to enter BIOS Setup using the BIOS Setup program. Do this motherboard. • Ensure that a USB mouse is connected to your data or system. See section 2.10 Exit Menu for information on . Entering BIOS Setup...
...settings to turn the system off then back on how to the default value. Press the reset button on your screen. • Visit the ASUS website at startup: Press or during the Power-On Self Test (POST). Press the power button to ensure system compatibility and stability. We ...or , POST continues with its parameters. 2.2 BIOS setup program Use the BIOS Setup program to enter BIOS Setup using the BIOS Setup program. Do this motherboard. • Ensure that a USB mouse is connected to your data or system. See section 2.10 Exit Menu for information on . Entering BIOS Setup...

User Guide
Page 39
...you to select the display language, system performance mode, fan profile and boot device priority. Press to the system. Displays the CPU/ motherboard temperature, CPU voltage output, CPU/ chassis fan speed, and SATA information Selects the display language of the BIOS setup program Displays the system.... The default screen for details. Refer to switch EZ System Tuning modes Selects the boot device priority Displays the CPU Fan's speed. ASUS B150M-A D3 2-7 BIOS menu screen The BIOS setup program can be used under two modes: EZ Mode and Advanced Mode. The EZ Mode provides ...
...you to select the display language, system performance mode, fan profile and boot device priority. Press to the system. Displays the CPU/ motherboard temperature, CPU voltage output, CPU/ chassis fan speed, and SATA information Selects the display language of the BIOS setup program Displays the system.... The default screen for details. Refer to switch EZ System Tuning modes Selects the boot device priority Displays the CPU Fan's speed. ASUS B150M-A D3 2-7 BIOS menu screen The BIOS setup program can be used under two modes: EZ Mode and Advanced Mode. The EZ Mode provides ...


