
User Guide
Page 3
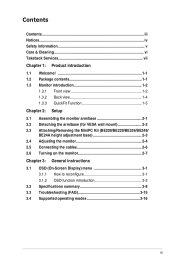
... 1.3.2 Back view 1-4 1.3.3 QuickFit Function 1-5 Chapter 2: Setup 2.1 Assembling the monitor arm/base 2-1 2.2 Detaching the arm/base (for VESA wall mount 2-2 2.3 Attaching/Removing the MiniPC Kit .(BE209/BE229/BE239/BE249/ BE24A height adjustment base 2-3 2.4 Adjusting the monitor 2-4 2.5 Connecting the cables 2-6 2.6 Turning on the monitor 2-7 Chapter 3: General instructions 3.1 OSD (On-Screen Display) menu 3-1 3.1.1 How to reconfigure 3-1 3.1.2 OSD function introduction 3-2 3.2 Specifications summary 3-8 3.3 Troubleshooting (FAQ 3-15 3.4 Supported operating modes 3-16...
... 1.3.2 Back view 1-4 1.3.3 QuickFit Function 1-5 Chapter 2: Setup 2.1 Assembling the monitor arm/base 2-1 2.2 Detaching the arm/base (for VESA wall mount 2-2 2.3 Attaching/Removing the MiniPC Kit .(BE209/BE229/BE239/BE249/ BE24A height adjustment base 2-3 2.4 Adjusting the monitor 2-4 2.5 Connecting the cables 2-6 2.6 Turning on the monitor 2-7 Chapter 3: General instructions 3.1 OSD (On-Screen Display) menu 3-1 3.1.1 How to reconfigure 3-1 3.1.2 OSD function introduction 3-2 3.2 Specifications summary 3-8 3.3 Troubleshooting (FAQ 3-15 3.4 Supported operating modes 3-16...
User Guide
Page 4
... or television reception, which the receiver is connected. • Consult the dealer or an experienced radio/TV technician for help. The use of shielded cables for energy efficiency. This equipment generates, uses and can be determined by turning the equipment off and on a circuit different from digital apparatus set out in a particular installation. As an Energy Star® Partner...
... or television reception, which the receiver is connected. • Consult the dealer or an experienced radio/TV technician for help. The use of shielded cables for energy efficiency. This equipment generates, uses and can be determined by turning the equipment off and on a circuit different from digital apparatus set out in a particular installation. As an Energy Star® Partner...

User Guide
Page 5
... all cables are correctly connected and the power cables are not sure of the type of power supply to your home, consult your dealer or local power company. • Use the appropriate power plug which have appropriate configured receptacles marked between 100-240V AC. • If you encounter technical problems with the monitor, contact a qualified service technician or your retailer. • Adjustment of the volume control...
... all cables are correctly connected and the power cables are not sure of the type of power supply to your home, consult your dealer or local power company. • Use the appropriate power plug which have appropriate configured receptacles marked between 100-240V AC. • If you encounter technical problems with the monitor, contact a qualified service technician or your retailer. • Adjustment of the volume control...

User Guide
Page 6
... guide WARNING: Information to prevent injury to yourself when trying to disconnect the cables and power cord. Turn your monitor off the Power Switch for use with the monitor: • You may find slightly uneven brightness on the screen depending on the screen, as it may be removed with a cloth dampened with a lint-free, non-abrasive cloth. Do not repair the screen by the stand or the cord. • Cleaning...
... guide WARNING: Information to prevent injury to yourself when trying to disconnect the cables and power cord. Turn your monitor off the Power Switch for use with the monitor: • You may find slightly uneven brightness on the screen depending on the screen, as it may be removed with a cloth dampened with a lint-free, non-abrasive cloth. Do not repair the screen by the stand or the cord. • Cleaning...

User Guide
Page 10
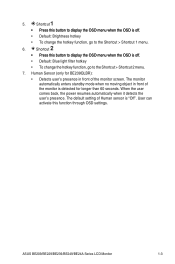
... display the OSD menu when the OSD is off . • Enters the OSD menu. 3. Status White Amber Off Description On Standby mode Off 2. Power button/power indicator • Turns the monitor on/off . • This is as the below table. QuickFit button: • Press this button to 1.3.3 QuickFit Function). 1-2 Chapter 1: Product introduction 1.3 1.3.1 Monitor introduction Front view BE229/BE239/BE249 simple base BE209/BE229/BE239/BE249/BE24A height adjustment base Menu Close Quick Fit Brightness Blue Light...
... display the OSD menu when the OSD is off . • Enters the OSD menu. 3. Status White Amber Off Description On Standby mode Off 2. Power button/power indicator • Turns the monitor on/off . • This is as the below table. QuickFit button: • Press this button to 1.3.3 QuickFit Function). 1-2 Chapter 1: Product introduction 1.3 1.3.1 Monitor introduction Front view BE229/BE239/BE249 simple base BE209/BE229/BE239/BE249/BE24A height adjustment base Menu Close Quick Fit Brightness Blue Light...
User Guide
Page 11
... OSD is off . • Default: Brightness hotkey • To change the hotkey function, go to the Shortcut > Shortcut 2 menu. 7. Shortcut • Press this button to display the OSD menu when the OSD is off . • Default: Blue light filter hotkey • To change the hotkey function, go to the Shortcut > Shortcut 1 menu. 6. ASUS BE209/BE229/BE239/BE249/BE24A Series LCD Monitor 1-3 5. User can activate this function through OSD settings. The default setting of the monitor screen...
... OSD is off . • Default: Brightness hotkey • To change the hotkey function, go to the Shortcut > Shortcut 2 menu. 7. Shortcut • Press this button to display the OSD menu when the OSD is off . • Default: Blue light filter hotkey • To change the hotkey function, go to the Shortcut > Shortcut 1 menu. 6. ASUS BE209/BE229/BE239/BE249/BE24A Series LCD Monitor 1-3 5. User can activate this function through OSD settings. The default setting of the monitor screen...

User Guide
Page 12
... audio cable. 1-4 Chapter 1: Product introduction 1.3.2 Back view BE229Q/BE239Q/BE249Q 12 3 4 5 BE229QB/BE239QB/BE249QB 6 78 10 12 3 4 5 6 789 BE209QL/BE229QL/BE239QL/BE249QL BE209TL 12 3 4 5 6 78 12 3 5 67 BE209QLB/BE229QLB/BE239QLB/BE239QLBR/BE249QLB/BE24AQLB 10 12 3 4 5 6 789 BE209TLB 10 12 3 5 67 9 1. Audio-in . Press the switch to turn on/off power. 3. VGA port. DisplayPort in port. This port is for PC (Personal Computer) DVI-D digital signal connection. 6. DVI port...
... audio cable. 1-4 Chapter 1: Product introduction 1.3.2 Back view BE229Q/BE239Q/BE249Q 12 3 4 5 BE229QB/BE239QB/BE249QB 6 78 10 12 3 4 5 6 789 BE209QL/BE229QL/BE239QL/BE249QL BE209TL 12 3 4 5 6 78 12 3 5 67 BE209QLB/BE229QLB/BE239QLB/BE239QLBR/BE249QLB/BE24AQLB 10 12 3 4 5 6 789 BE209TLB 10 12 3 5 67 9 1. Audio-in . Press the switch to turn on/off power. 3. VGA port. DisplayPort in port. This port is for PC (Personal Computer) DVI-D digital signal connection. 6. DVI port...

User Guide
Page 13
... viewing and photo editing. The connection enables the USB ports on the screen. To activate the patterns, press the QuickFit button. Grid patterns The grid patterns facilitate users to the actual patterns shown on your monitor. 1. Photo size ASUS BE209/BE229/BE239/BE249/BE24A Series LCD Monitor 1-5 Alignment Grid 1 Alignment Grid 2 Alignment Grid 1 Alignment Grid 2 2. This port is connected. 9. USB 2.0 downstream ports. Press the buttons as USB keyboard/mouse, USB flash...
... viewing and photo editing. The connection enables the USB ports on the screen. To activate the patterns, press the QuickFit button. Grid patterns The grid patterns facilitate users to the actual patterns shown on your monitor. 1. Photo size ASUS BE209/BE229/BE239/BE249/BE24A Series LCD Monitor 1-5 Alignment Grid 1 Alignment Grid 2 Alignment Grid 1 Alignment Grid 2 2. This port is connected. 9. USB 2.0 downstream ports. Press the buttons as USB keyboard/mouse, USB flash...
User Guide
Page 17
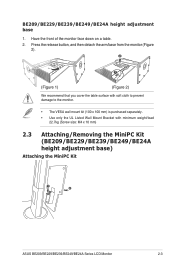
... with soft cloth to prevent damage to the monitor. • The VESA wall mount kit (100 x 100 mm) is purchased separately. • Use only the UL Listed Wall Mount Bracket with minimum weight/load 22.7kg (Screw size: M4 x 10 mm) 2.3 Attaching/Removing the MiniPC Kit (BE209/BE229/BE239/BE249/BE24A height adjustment base) Attaching the MiniPC Kit 1 2 ASUS BE209/BE229/BE239/BE249/BE24A Series LCD Monitor 2-3
... with soft cloth to prevent damage to the monitor. • The VESA wall mount kit (100 x 100 mm) is purchased separately. • Use only the UL Listed Wall Mount Bracket with minimum weight/load 22.7kg (Screw size: M4 x 10 mm) 2.3 Attaching/Removing the MiniPC Kit (BE209/BE229/BE239/BE249/BE24A height adjustment base) Attaching the MiniPC Kit 1 2 ASUS BE209/BE229/BE239/BE249/BE24A Series LCD Monitor 2-3

User Guide
Page 20
... following instructions: • To connect the power cord: Connect one end of the audio cable to the monitor's Audio-in the OSD menu. 2-6 Chapter 2: Setup Connect the other end to your computer's USB 2.0 port. When these cables are connected, you can choose the desired signal from the Input Select item in port, the other end of the VGA/DVI/DisplayPort cable to work. That will enable the USB ports on the monitor to the monitor's VGA/ DVI/DisplayPort jack. Plug one...
... following instructions: • To connect the power cord: Connect one end of the audio cable to the monitor's Audio-in the OSD menu. 2-6 Chapter 2: Setup Connect the other end to your computer's USB 2.0 port. When these cables are connected, you can choose the desired signal from the Input Select item in port, the other end of the VGA/DVI/DisplayPort cable to work. That will enable the USB ports on the monitor to the monitor's VGA/ DVI/DisplayPort jack. Plug one...
User Guide
Page 25
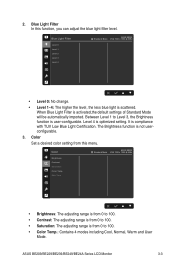
... 1 to 100. • Color Temp.: Contains 4 modes including Cool, Normal, Warm and User Mode. ASUS BE209/BE229/BE239/BE249/BE24A Series LCD Monitor 3-3 2. Color Set a desired color setting from 0 to Level 3, the Brightness function is scattered. Blue Light Filter Level 0 Level 1 Level 2 Level 3 Level 4 Standard Mode ASUS BE229 VGA 1920 x 1080 @ 60Hz • Level 0: No change. • Level 1~4: The higher the level, the less blue light is user-configurable. Blue Light Filter In this menu.
... 1 to 100. • Color Temp.: Contains 4 modes including Cool, Normal, Warm and User Mode. ASUS BE209/BE229/BE239/BE249/BE24A Series LCD Monitor 3-3 2. Color Set a desired color setting from 0 to Level 3, the Brightness function is scattered. Blue Light Filter Level 0 Level 1 Level 2 Level 3 Level 4 Standard Mode ASUS BE229 VGA 1920 x 1080 @ 60Hz • Level 0: No change. • Level 1~4: The higher the level, the less blue light is user-configurable. Blue Light Filter In this menu.
User Guide
Page 26
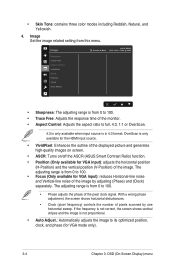
... signal. With a wrong phase adjustment, the screen shows horizontal disturbances. • Clock (pixel frequency) controls the number of the displayed picture and generates high-quality images on screen. • ASCR: Turns on/off the ASCR (ASUS Smart Contrast Ratio) function. • Position (Only available for VGA mode only). 3-4 Chapter 3: OSD (On-Screen Display) menu If the frequency is not correct, the screen shows vertical stripes and the image is from 0 to its optimized position, clock, and phase (for VGA input): adjusts...
... signal. With a wrong phase adjustment, the screen shows horizontal disturbances. • Clock (pixel frequency) controls the number of the displayed picture and generates high-quality images on screen. • ASCR: Turns on/off the ASCR (ASUS Smart Contrast Ratio) function. • Position (Only available for VGA mode only). 3-4 Chapter 3: OSD (On-Screen Display) menu If the frequency is not correct, the screen shows vertical stripes and the image is from 0 to its optimized position, clock, and phase (for VGA input): adjusts...
User Guide
Page 28
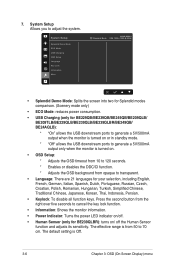
... keys. 7. System Setup Splendid Demo Mode ECO Mode USB Charging OSD Setup Language Key Lock Information More ASUS BE229 Standard Mode VGA 1920 x 1080 @ 60Hz • Splendid Demo Mode: Splits the screen into two for Splendid modes comparison. (Scenery mode only) • ECO Mode: reduces power consumption. • USB Charging (only for BE229QB/BE239QB/BE249QB/BE209QLB/ BE209TLB/BE229QLB/BE239QLB/BE239QLBR/BE249QB/ BE24AQLB): * "On" allows the USB downstream ports to generate a 5V...
... keys. 7. System Setup Splendid Demo Mode ECO Mode USB Charging OSD Setup Language Key Lock Information More ASUS BE229 Standard Mode VGA 1920 x 1080 @ 60Hz • Splendid Demo Mode: Splits the screen into two for Splendid modes comparison. (Scenery mode only) • ECO Mode: reduces power consumption. • USB Charging (only for BE229QB/BE239QB/BE249QB/BE209QLB/ BE209TLB/BE229QLB/BE239QLB/BE239QLBR/BE249QB/ BE24AQLB): * "On" allows the USB downstream ports to generate a 5V...
User Guide
Page 29
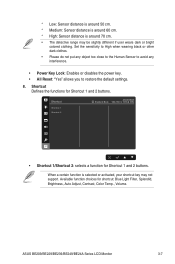
... 2 buttons. When a certain function is around 60 cm. * High: Sensor distance is selected or activated, your shortcut key may be slightly different if user wears dark or bright colored clothing. Shortcut Shortcut 1 Shortcut 2 ASUS BE229 Standard Mode VGA 1920 x 1080 @ 60Hz • Shortcut 1/Shortcut 2: selects a function for shortcut: Blue Light Filter, Splendid, Brightness, Auto Adjust, Contrast, Color Temp., Volume. ASUS BE209/BE229/BE239/BE249/BE24A Series LCD Monitor 3-7 * Low...
... 2 buttons. When a certain function is around 60 cm. * High: Sensor distance is selected or activated, your shortcut key may be slightly different if user wears dark or bright colored clothing. Shortcut Shortcut 1 Shortcut 2 ASUS BE229 Standard Mode VGA 1920 x 1080 @ 60Hz • Shortcut 1/Shortcut 2: selects a function for shortcut: Blue Light Filter, Splendid, Brightness, Auto Adjust, Contrast, Color Temp., Volume. ASUS BE209/BE229/BE239/BE249/BE24A Series LCD Monitor 3-7 * Low...

User Guide
Page 30
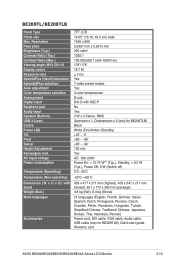
Resolution Pixel pitch Brightness (Typ.) Contrast Ratio (Typ.) Contrast Ratio (Max.) Viewing angle (H/V) CR>10 Display colors Response time SplendidPlus Video Enhancement SplendidPlus selection Auto adjustment Color temperature selection Analog input Digital input Earphone jack Audio input Speaker (Built-in) USB 2.0 port Colors Power LED Tilt Pivot Swivel Height Adjustment Kensington lock AC input voltage Power consumption Temperature (Operating) Temperature (Non-operating) TFT LCD BE229QB/BE229Q: 21.5" (16:9, 54.6 cm) wide screen BE239QB/BE239Q: 23" (16:9, 58.4 cm) wide screen BE249QB/BE249Q...
Resolution Pixel pitch Brightness (Typ.) Contrast Ratio (Typ.) Contrast Ratio (Max.) Viewing angle (H/V) CR>10 Display colors Response time SplendidPlus Video Enhancement SplendidPlus selection Auto adjustment Color temperature selection Analog input Digital input Earphone jack Audio input Speaker (Built-in) USB 2.0 port Colors Power LED Tilt Pivot Swivel Height Adjustment Kensington lock AC input voltage Power consumption Temperature (Operating) Temperature (Non-operating) TFT LCD BE229QB/BE229Q: 21.5" (16:9, 54.6 cm) wide screen BE239QB/BE239Q: 23" (16:9, 58.4 cm) wide screen BE249QB/BE249Q...

User Guide
Page 31
..., Korean, Thai, Indonesia, Persian) Power cord, DVI cable (optional), DisplayPort cable, VGA cable, Audio cable, USB cable (only for BE229QB/BE239QB/BE249QB), Quick start guide, Warranty card UL/cUL, CB, CE, ErP, FCC, ISO9241-307, RCM, VCCI, RoHS, Windows 7 & 8 WHQL, Energy Star 6.0, EPEAT Gold, TCO 6.0, Flicker Free, Low blue Light, TUV-GS, TUV-Ergo, CU, PSE, WEEE, EMC DoC, UkrSEPRO, MEPS *Specifications are subject to change without notice. ** Based on Energy Star 6.0 standard...
..., Korean, Thai, Indonesia, Persian) Power cord, DVI cable (optional), DisplayPort cable, VGA cable, Audio cable, USB cable (only for BE229QB/BE239QB/BE249QB), Quick start guide, Warranty card UL/cUL, CB, CE, ErP, FCC, ISO9241-307, RCM, VCCI, RoHS, Windows 7 & 8 WHQL, Energy Star 6.0, EPEAT Gold, TCO 6.0, Flicker Free, Low blue Light, TUV-GS, TUV-Ergo, CU, PSE, WEEE, EMC DoC, UkrSEPRO, MEPS *Specifications are subject to change without notice. ** Based on Energy Star 6.0 standard...

User Guide
Page 32
Resolution Pixel pitch Brightness (Typ.) Contrast Ratio (Typ.) Contrast Ratio (Max.) Viewing angle (H/V) CR>10 Display colors Response time SplendidPlus Video Enhancement SplendidPlus selection Auto adjustment Color temperature selection Analog input Digital input Earphone jack Audio input Speaker (Built-in) USB 2.0 port Colors Power LED Tilt Pivot Swivel Height Adjustment TFT LCD BE209QLB/BE209QL: 19.45" (16:10, 49.4 cm) wide screen BE229QLB/BE229QL: 21.5" (16:9, 54.6 cm) wide screen BE239QLB/BE239QL/BE239QLBR: 23" (16:9, 58.4 cm) wide screen BE249QLB/BE249QL: 23.8" (16:9, 60.5 cm) wide ...
Resolution Pixel pitch Brightness (Typ.) Contrast Ratio (Typ.) Contrast Ratio (Max.) Viewing angle (H/V) CR>10 Display colors Response time SplendidPlus Video Enhancement SplendidPlus selection Auto adjustment Color temperature selection Analog input Digital input Earphone jack Audio input Speaker (Built-in) USB 2.0 port Colors Power LED Tilt Pivot Swivel Height Adjustment TFT LCD BE209QLB/BE209QL: 19.45" (16:10, 49.4 cm) wide screen BE229QLB/BE229QL: 21.5" (16:9, 54.6 cm) wide screen BE239QLB/BE239QL/BE239QLBR: 23" (16:9, 58.4 cm) wide screen BE249QLB/BE249QL: 23.8" (16:9, 60.5 cm) wide ...
User Guide
Page 35
... Panel Type Panel size Max. Resolution Pixel pitch Brightness (Typ.) Contrast Ratio (Typ.) Contrast Ratio (Max.) Viewing angle (H/V) CR>10 Display colors Response time SplendidPlus Video Enhancement SplendidPlus selection Auto adjustment Color temperature selection Analog input Digital input Earphone jack Audio input Speaker (Built-in) USB 2.0 port Colors Power LED Tilt Pivot Swivel Height Adjustment Kensington lock AC input voltage Power consumption Temperature (Operating) Temperature (Non-operating) Dimension (W x H x D) with stand Weight (Esti.) Multi-languages Accessories TFT LCD...
... Panel Type Panel size Max. Resolution Pixel pitch Brightness (Typ.) Contrast Ratio (Typ.) Contrast Ratio (Max.) Viewing angle (H/V) CR>10 Display colors Response time SplendidPlus Video Enhancement SplendidPlus selection Auto adjustment Color temperature selection Analog input Digital input Earphone jack Audio input Speaker (Built-in) USB 2.0 port Colors Power LED Tilt Pivot Swivel Height Adjustment Kensington lock AC input voltage Power consumption Temperature (Operating) Temperature (Non-operating) Dimension (W x H x D) with stand Weight (Esti.) Multi-languages Accessories TFT LCD...
User Guide
Page 37
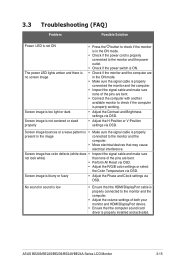
... may cause electrical interference. Screen image is properly present in the ON mode. • Make sure the signal cable is properly connected the monitor and the computer. • Inspect the signal cable and make sure not look white) that the HDMI/DisplayPort cable is properly connected to check if the computer is properly working. • Adjust the Contrast and Brightness settings via OSD. • Adjust the H-Position or V-Position settings via OSD. No sound or sound is low •...
... may cause electrical interference. Screen image is properly present in the ON mode. • Make sure the signal cable is properly connected the monitor and the computer. • Inspect the signal cable and make sure not look white) that the HDMI/DisplayPort cable is properly connected to check if the computer is properly working. • Adjust the Contrast and Brightness settings via OSD. • Adjust the H-Position or V-Position settings via OSD. No sound or sound is low •...

User Guide
Page 40
When the monitor is operating in the video mode (ie, not displaying data) using the HDMI connector, the following high definition modes shall be supported. For optimal resolution, we recommend that you choose a mode listed in addition to standard definition video. Pixel . (Hz)...Pixel Rate (MHz) 27 74.25 27 74.25 148.5 148.5 OSD Display 480p-60Hz 720p-60Hz 576p-50Hz 720p-50Hz 1080p-60Hz 1080p-50Hz 3-18 Chapter 3: OSD (On-Screen Display) menu Preset Timing Name 1 480p 2 720p60 3 576p 4 720p50 5 1080p60 6 1080p50 Pixel Format Horizational Vertical Frequency Frequency...
When the monitor is operating in the video mode (ie, not displaying data) using the HDMI connector, the following high definition modes shall be supported. For optimal resolution, we recommend that you choose a mode listed in addition to standard definition video. Pixel . (Hz)...Pixel Rate (MHz) 27 74.25 27 74.25 148.5 148.5 OSD Display 480p-60Hz 720p-60Hz 576p-50Hz 720p-50Hz 1080p-60Hz 1080p-50Hz 3-18 Chapter 3: OSD (On-Screen Display) menu Preset Timing Name 1 480p 2 720p60 3 576p 4 720p50 5 1080p60 6 1080p50 Pixel Format Horizational Vertical Frequency Frequency...


