
User Guide
Page 3
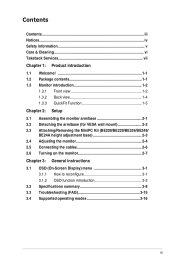
... the arm/base (for VESA wall mount 2-2 2.3 Attaching/Removing the MiniPC Kit .(BE209/BE229/BE239/BE249/ BE24A height adjustment base 2-3 2.4 Adjusting the monitor 2-4 2.5 Connecting the cables 2-6 2.6 Turning on the monitor 2-7 Chapter 3: General instructions 3.1 OSD (On-Screen Display) menu 3-1 3.1.1 How to reconfigure 3-1 3.1.2 OSD function introduction 3-2 3.2 Specifications summary 3-8 3.3 Troubleshooting (FAQ 3-15 3.4 Supported operating modes...
... the arm/base (for VESA wall mount 2-2 2.3 Attaching/Removing the MiniPC Kit .(BE209/BE229/BE239/BE249/ BE24A height adjustment base 2-3 2.4 Adjusting the monitor 2-4 2.5 Connecting the cables 2-6 2.6 Turning on the monitor 2-7 Chapter 3: General instructions 3.1 OSD (On-Screen Display) menu 3-1 3.1.1 How to reconfigure 3-1 3.1.2 OSD function introduction 3-2 3.2 Specifications summary 3-8 3.3 Troubleshooting (FAQ 3-15 3.4 Supported operating modes...
User Guide
Page 4
... du Réglement sur le matériel brouiller du Canada. This equipment generates, uses and can be determined by one or more of the monitor to the graphics card is required to the following measures: • Reorient or relocate the receiving antenna. • Increase the separation between the equipment and...
... du Réglement sur le matériel brouiller du Canada. This equipment generates, uses and can be determined by one or more of the monitor to the graphics card is required to the following measures: • Reorient or relocate the receiving antenna. • Increase the separation between the equipment and...
User Guide
Page 5
... cell battery) should be used for a long period of time. This symbol of the crossed out wheeled bin indicates that came with the monitor, contact a qualified service technician or your dealer or local power company. • Use the appropriate power plug which have appropriate configured receptacles... marked between 100-240V AC. • If you detect any area where it will protect the monitor from the type of power source indicated on a stable surface. • Unplug the unit during a lightning storm or if it may ...
... cell battery) should be used for a long period of time. This symbol of the crossed out wheeled bin indicates that came with the monitor, contact a qualified service technician or your dealer or local power company. • Use the appropriate power plug which have appropriate configured receptacles... marked between 100-240V AC. • If you detect any area where it will protect the monitor from the type of power source indicated on a stable surface. • Unplug the unit during a lightning storm or if it may ...

User Guide
Page 6
... symptoms are normal with mild cleaner. • Avoid using a cleaner containing alcohol or acetone. IMPORTANT: Information that you lift or reposition your monitor, it is displayed for hours. • When the screen becomes black or flashes, or cannot work anymore, contact your...damage to the components when trying to complete a task. Do not lift the display by yourself! Follow the correct lifting techniques when positioning the monitor. Stubborn stains may remain after switching the image. The screen will recover slowly or you use with a lint-free, non-abrasive cloth. NOTE:...
... symptoms are normal with mild cleaner. • Avoid using a cleaner containing alcohol or acetone. IMPORTANT: Information that you lift or reposition your monitor, it is displayed for hours. • When the screen becomes black or flashes, or cannot work anymore, contact your...damage to the components when trying to complete a task. Do not lift the display by yourself! Follow the correct lifting techniques when positioning the monitor. Stubborn stains may remain after switching the image. The screen will recover slowly or you use with a lint-free, non-abrasive cloth. NOTE:...
User Guide
Page 9
... models) VGA cable USB cable (for selected models) Audio cable MiniPC Kit (for purchasing the ASUS® LCD monitor! The latest widescreen LCD monitor from ASUS provides a broader, brighter and crystal-clear display, plus a host of features that the monitor brings to you for selected models) If any of the above items is damaged or...
... models) VGA cable USB cable (for selected models) Audio cable MiniPC Kit (for purchasing the ASUS® LCD monitor! The latest widescreen LCD monitor from ASUS provides a broader, brighter and crystal-clear display, plus a host of features that the monitor brings to you for selected models) If any of the above items is damaged or...

User Guide
Page 10
...Close button: • Press this button to display the OSD menu when the OSD is as the below table. 1.3 1.3.1 Monitor introduction Front view BE229/BE239/BE249 simple base BE209/BE229/BE239/BE249/BE24A height adjustment base Menu Close Quick Fit Brightness Blue Light... Filter 7 Menu Close Quick Fit Brightness Blue Light Filter 6 5 4 3 2 1 1. Power button/power indicator • Turns the monitor on/off. • The color definition of common grid patterns, paper sizes, and photo sizes. (Please refer to display the OSD menu when the OSD...
...Close button: • Press this button to display the OSD menu when the OSD is as the below table. 1.3 1.3.1 Monitor introduction Front view BE229/BE239/BE249 simple base BE209/BE229/BE239/BE249/BE24A height adjustment base Menu Close Quick Fit Brightness Blue Light... Filter 7 Menu Close Quick Fit Brightness Blue Light Filter 6 5 4 3 2 1 1. Power button/power indicator • Turns the monitor on/off. • The color definition of common grid patterns, paper sizes, and photo sizes. (Please refer to display the OSD menu when the OSD...
User Guide
Page 11
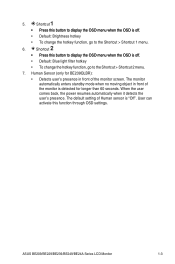
... through OSD settings. When the user comes back, the power resumes automatically when it detects the user's presence. The monitor automatically enters standby mode when no moving object in front of the monitor is "Off". Human Sensor (only for longer than 60 seconds. The default setting of Human sensor is detected for...
... through OSD settings. When the user comes back, the power resumes automatically when it detects the user's presence. The monitor automatically enters standby mode when no moving object in front of the monitor is "Off". Human Sensor (only for longer than 60 seconds. The default setting of Human sensor is detected for...

User Guide
Page 13
...commonly used standard paper sizes for connection with USB devices, such as spreadsheet viewing and photo editing. Photo size ASUS BE209/BE229/BE239/BE249/BE24A Series LCD Monitor 1-5 This port is only available when an HDMI/DisplayPort cable is for users to select a desired pattern. ...Grid patterns The grid patterns facilitate users to the actual patterns shown on the monitor. 10. Earphone jack. USB 2.0 upstream port. USB 2.0 downstream ports. To activate the patterns, press the QuickFit button. Please refer ...
...commonly used standard paper sizes for connection with USB devices, such as spreadsheet viewing and photo editing. Photo size ASUS BE209/BE229/BE239/BE249/BE24A Series LCD Monitor 1-5 This port is only available when an HDMI/DisplayPort cable is for users to select a desired pattern. ...Grid patterns The grid patterns facilitate users to the actual patterns shown on the monitor. 10. Earphone jack. USB 2.0 upstream port. USB 2.0 downstream ports. To activate the patterns, press the QuickFit button. Please refer ...

User Guide
Page 15
Fix the base to the monitor. Attach the base into the arm, making sure the tab on the arm fits into the groove on a table. 2. We recommend that you cover the table surface with soft cloth to prevent damage to the arm by fastening the bundled screw. Have the front of the monitor face down on the base. 3. BE229/BE239/BE249 simple base BE209/BE229/BE239/BE249/BE24A height adjustment base ASUS BE209/BE229/BE239/BE249/BE24A Series LCD Monitor 2-1 2.1 Assembling the monitor arm/base To assemble the monitor base: 1.
Fix the base to the monitor. Attach the base into the arm, making sure the tab on the arm fits into the groove on a table. 2. We recommend that you cover the table surface with soft cloth to prevent damage to the arm by fastening the bundled screw. Have the front of the monitor face down on the base. 3. BE229/BE239/BE249 simple base BE209/BE229/BE239/BE249/BE24A height adjustment base ASUS BE209/BE229/BE239/BE249/BE24A Series LCD Monitor 2-1 2.1 Assembling the monitor arm/base To assemble the monitor base: 1.

User Guide
Page 16
Remove the base (Figure 2). 5. Use a screwdriver to remove the screw on a table. 2. Remove the rubbers in the four screw holes. (Figure 1) 3. 2.2 Detaching the arm/base (for VESA wall mount) The detachable arm/base of the monitor face down on the hinge (Figure 3), then remove the hinge. 1 2 (Figure 1) 1 2 (Figure 2) (Figure 3) 2-2 Chapter 2: Setup To detach the arm/base: BE229/BE239/BE249 simple base 1. Have the front of this monitor is specially designed for VESA wall mount.
Remove the base (Figure 2). 5. Use a screwdriver to remove the screw on a table. 2. Remove the rubbers in the four screw holes. (Figure 1) 3. 2.2 Detaching the arm/base (for VESA wall mount) The detachable arm/base of the monitor face down on the hinge (Figure 3), then remove the hinge. 1 2 (Figure 1) 1 2 (Figure 2) (Figure 3) 2-2 Chapter 2: Setup To detach the arm/base: BE229/BE239/BE249 simple base 1. Have the front of this monitor is specially designed for VESA wall mount.
User Guide
Page 17
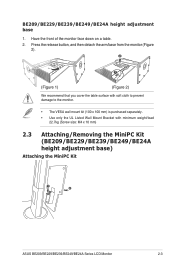
... 2). 2 1 (Figure 1) (Figure 2) We recommend that you cover the table surface with soft cloth to prevent damage to the monitor. • The VESA wall mount kit (100 x 100 mm) is purchased separately. • Use only the UL Listed Wall Mount Bracket with minimum weight/load ...22.7kg (Screw size: M4 x 10 mm) 2.3 Attaching/Removing the MiniPC Kit (BE209/BE229/BE239/BE249/BE24A height adjustment base) Attaching the MiniPC Kit 1 2 ASUS BE209/BE229/BE239/BE249/BE24A Series LCD Monitor 2-3 BE209/BE229/BE239/BE249/BE24A height adjustment base 1.
... 2). 2 1 (Figure 1) (Figure 2) We recommend that you cover the table surface with soft cloth to prevent damage to the monitor. • The VESA wall mount kit (100 x 100 mm) is purchased separately. • Use only the UL Listed Wall Mount Bracket with minimum weight/load ...22.7kg (Screw size: M4 x 10 mm) 2.3 Attaching/Removing the MiniPC Kit (BE209/BE229/BE239/BE249/BE24A height adjustment base) Attaching the MiniPC Kit 1 2 ASUS BE209/BE229/BE239/BE249/BE24A Series LCD Monitor 2-3 BE209/BE229/BE239/BE249/BE24A height adjustment base 1.

User Guide
Page 18
...; For optimal viewing, we recommend that you look at the full face of the monitor, then adjust the monitor to the angle that is most comfortable for you. • Hold the stand to prevent the monitor from falling when you change its angle. • BE229/BE239/BE249 simple base: The recommended adjusting angle... it allows 90˚ swivel adjustment from +33˚ to -5˚. • BE209/BE229/BE239/BE249/BE24A height adjustment base: You can also adjust the monitor's height within +/- 130 mm. 2-4 Chapter 2: Setup
...; For optimal viewing, we recommend that you look at the full face of the monitor, then adjust the monitor to the angle that is most comfortable for you. • Hold the stand to prevent the monitor from falling when you change its angle. • BE229/BE239/BE249 simple base: The recommended adjusting angle... it allows 90˚ swivel adjustment from +33˚ to -5˚. • BE209/BE229/BE239/BE249/BE24A height adjustment base: You can also adjust the monitor's height within +/- 130 mm. 2-4 Chapter 2: Setup

User Guide
Page 19
ASUS BE209/BE229/BE239/BE249/BE24A Series LCD Monitor 2-5 Pivot the monitor clockwise/counterclockwise to its maximum angle. 3. Tilt the monitor to the angle you need. -5° ~ +33° 130mm It is normal that the monitor slightly shakes while you adjust the viewing angle. BE229/BE239/BE249 simple base -5° ~ +20° BE209/BE229/BE239/BE249...
ASUS BE209/BE229/BE239/BE249/BE24A Series LCD Monitor 2-5 Pivot the monitor clockwise/counterclockwise to its maximum angle. 3. Tilt the monitor to the angle you need. -5° ~ +33° 130mm It is normal that the monitor slightly shakes while you adjust the viewing angle. BE229/BE239/BE249 simple base -5° ~ +20° BE209/BE229/BE239/BE249...

User Guide
Page 20
...• To use the USB 2.0 ports: Take the supplied USB 2.0 cable, and plug the smaller end (type B) of the USB upstream cable to the monitor's USB upstream port, and the larger end (type A) to a power outlet. • To connect the VGA/DVI/DisplayPort cable: a. Tighten the two screws ...to secure the VGA/DVI connector. • To connect the audio cable: connect one end of the audio cable to the monitor's Audio-in the OSD menu. 2-6 Chapter 2: Setup b. 2.5 Connecting the cables Connect the cables as the following instructions: • To connect the power ...
...• To use the USB 2.0 ports: Take the supplied USB 2.0 cable, and plug the smaller end (type B) of the USB upstream cable to the monitor's USB upstream port, and the larger end (type A) to a power outlet. • To connect the VGA/DVI/DisplayPort cable: a. Tighten the two screws ...to secure the VGA/DVI connector. • To connect the audio cable: connect one end of the audio cable to the monitor's Audio-in the OSD menu. 2-6 Chapter 2: Setup b. 2.5 Connecting the cables Connect the cables as the following instructions: • To connect the power ...

User Guide
Page 21
2.6 Turning on the monitor Press the power button . ASUS BE209/BE229/BE239/BE249/BE24A Series LCD Monitor 2-7 The power indicator lights up in white to show that the monitor is ON. See page 1-2 for the location of the power button.
2.6 Turning on the monitor Press the power button . ASUS BE209/BE229/BE239/BE249/BE24A Series LCD Monitor 2-7 The power indicator lights up in white to show that the monitor is ON. See page 1-2 for the location of the power button.
User Guide
Page 23
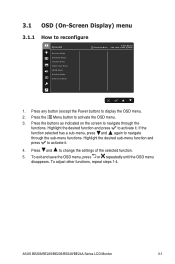
... the sub-menu functions. Press the buttons as indicated on the screen to activate it . Press and to activate the OSD menu. 3. ASUS BE209/BE229/BE239/BE249/BE24A Series LCD Monitor 3-1 3.1 OSD (On-Screen Display) menu 3.1.1 How to display the OSD menu. 2. Highlight the desired function and press to navigate through the... button (except the Power button) to reconfigure Splendid Scenery Mode Standard Mode Theater Mode Night View Mode sRGB Mode Reading Mode Darkroom Mode Standard Mode ASUS BE229 VGA 1920 x 1080 @ 60Hz 1.
... the sub-menu functions. Press the buttons as indicated on the screen to activate it . Press and to activate the OSD menu. 3. ASUS BE209/BE229/BE239/BE249/BE24A Series LCD Monitor 3-1 3.1 OSD (On-Screen Display) menu 3.1.1 How to display the OSD menu. 2. Highlight the desired function and press to navigate through the... button (except the Power button) to reconfigure Splendid Scenery Mode Standard Mode Theater Mode Night View Mode sRGB Mode Reading Mode Darkroom Mode Standard Mode ASUS BE229 VGA 1920 x 1080 @ 60Hz 1.
User Guide
Page 25
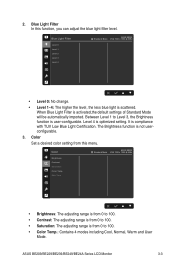
... from 0 to 100. • Saturation: The adjusting range is from this function, you can adjust the blue light filter level. ASUS BE209/BE229/BE239/BE249/BE24A Series LCD Monitor 3-3 Blue Light Filter In this menu. Blue Light Filter Level 0 Level 1 Level 2 Level 3 Level 4 Standard Mode... ASUS BE229 VGA 1920 x 1080 @ 60Hz • Level 0: No change. • Level 1~4: The higher the level, the less blue light is optimized...
... from 0 to 100. • Saturation: The adjusting range is from this function, you can adjust the blue light filter level. ASUS BE209/BE229/BE239/BE249/BE24A Series LCD Monitor 3-3 Blue Light Filter In this menu. Blue Light Filter Level 0 Level 1 Level 2 Level 3 Level 4 Standard Mode... ASUS BE229 VGA 1920 x 1080 @ 60Hz • Level 0: No change. • Level 1~4: The higher the level, the less blue light is optimized...
User Guide
Page 26
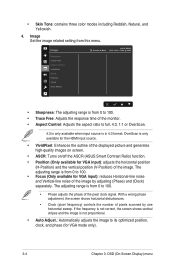
... the pixel clock signal. With a wrong phase adjustment, the screen shows horizontal disturbances. • Clock (pixel frequency) controls the number of the monitor. • Aspect Control: Adjusts the aspect ratio to full, 4:3, 1:1 or OverScan. 4:3 is only available when input source is from 0 to...8226; VividPixel: Enhances the outline of the displayed picture and generates high-quality images on screen. • ASCR: Turns on/off the ASCR (ASUS Smart Contrast Ratio) function. • Position (Only available for VGA mode only). 3-4 Chapter 3: OSD (On-Screen Display) menu OverScan is ...
... the pixel clock signal. With a wrong phase adjustment, the screen shows horizontal disturbances. • Clock (pixel frequency) controls the number of the monitor. • Aspect Control: Adjusts the aspect ratio to full, 4:3, 1:1 or OverScan. 4:3 is only available when input source is from 0 to...8226; VividPixel: Enhances the outline of the displayed picture and generates high-quality images on screen. • ASCR: Turns on/off the ASCR (ASUS Smart Contrast Ratio) function. • Position (Only available for VGA mode only). 3-4 Chapter 3: OSD (On-Screen Display) menu OverScan is ...

User Guide
Page 27
...• Mute: toggles the monitor sound between on and off. • Source: decides the monitor sound comes from this menu. Input Select In this function, you can adjust Volume, Mute and Source from which source. 6. Input Select VGA DVI DisplayPort Standard Mode ASUS BE229 VGA 1920 x 1080... @ 60Hz Input Select VGA DVI ASUS BE209TLB Standard Mode VGA 1920 x 1080 @ 60Hz ASUS BE209/BE229/BE239/BE249/BE24A Series LCD Monitor 3-5 Sound You can select your desired input source. 5.
...• Mute: toggles the monitor sound between on and off. • Source: decides the monitor sound comes from this menu. Input Select In this function, you can adjust Volume, Mute and Source from which source. 6. Input Select VGA DVI DisplayPort Standard Mode ASUS BE229 VGA 1920 x 1080... @ 60Hz Input Select VGA DVI ASUS BE209TLB Standard Mode VGA 1920 x 1080 @ 60Hz ASUS BE209/BE229/BE239/BE249/BE24A Series LCD Monitor 3-5 Sound You can select your desired input source. 5.
User Guide
Page 28
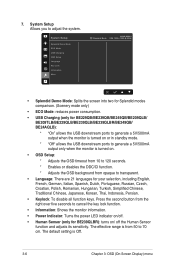
... the second button from opaque to 70 cm. System Setup Splendid Demo Mode ECO Mode USB Charging OSD Setup Language Key Lock Information More ASUS BE229 Standard Mode VGA 1920 x 1080 @ 60Hz • Splendid Demo Mode: Splits the screen into two for Splendid modes comparison. (...Mode: reduces power consumption. • USB Charging (only for BE229QB/BE239QB/BE249QB/BE209QLB/ BE209TLB/BE229QLB/BE239QLB/BE239QLBR/BE249QB/ BE24AQLB): * "On" allows the USB downstream ports to generate a 5V/500mA output when the monitor is turned on or in standby mode. * "Off" allows the USB downstream ports to ...
... the second button from opaque to 70 cm. System Setup Splendid Demo Mode ECO Mode USB Charging OSD Setup Language Key Lock Information More ASUS BE229 Standard Mode VGA 1920 x 1080 @ 60Hz • Splendid Demo Mode: Splits the screen into two for Splendid modes comparison. (...Mode: reduces power consumption. • USB Charging (only for BE229QB/BE239QB/BE249QB/BE209QLB/ BE209TLB/BE229QLB/BE239QLB/BE239QLBR/BE249QB/ BE24AQLB): * "On" allows the USB downstream ports to generate a 5V/500mA output when the monitor is turned on or in standby mode. * "Off" allows the USB downstream ports to ...


