Asus BT1AE Support and Manuals
Get Help and Manuals for this Asus item

Popular Asus BT1AE Manual Pages
User Manual - Page 8
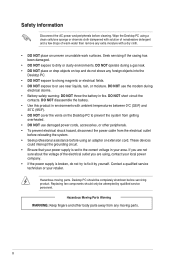
..., contact your local power company. • If the power supply is set to the correct voltage in your retailer. DO NOT disassemble the battery. ...before cleaning. Contact a qualified service technician or your area. DO NOT short circuit the
contacts.
Hazardous moving parts.
8 Replacing fan components should be attempted by yourself. Wipe the Desktop PC using a clean cellulose sponge ...
User Manual - Page 10
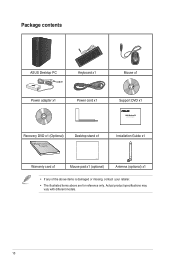
... x1
Support DVD x1
ASUS Desktop PC
Quick Start Guide
Recovery DVD x1 (Optional)
Desktop stand x1
Installation Guide x1
Warranty card x1
Mouse pad x1 (optional)
Antenna (optional) x1
• If any of the above items is damaged or missing, contact your retailer.
• The illustrated items above are for reference only. Actual product specifications may...
User Manual - Page 11

... PC.
The ASUS Desktop PC provides cutting-edge performance, uncompromised reliability, and user-centric utilities. ASUS BT1AE
11
Thank you for reference only. Read the ASUS Warranty Card before setting up your computer
Illustrations are encapsulated in a stunningly futuristic and stylish system casing. The ports, their locations and the chassis color vary with different models...
User Manual - Page 16
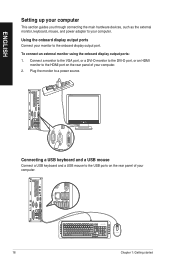
... using the onboard display output ports:
1.
Connecting a USB keyboard and a USB mouse
Connect a USB keyboard and a USB mouse to your computer.
ENGLISH
Setting up your computer
This section guides you through connecting the main hardware devices, such as the external monitor, keyboard, mouse, and power adapter to the USB ports on the...
User Manual - Page 48

...settings.
The BIOS settings have been changed.
Action
It is too noisy when in an area with good air flow.
• Update the BIOS. • If you are using a compatible or ASUS...
The CPU fan has been replaced.
Visit the ASUS Support site at http://support.asus.com for the service center information.
48
Chapter 5: Troubleshooting
If the problem still persists, refer to your...
User Manual - Page 51
... click Next. 5. Select Use recommended settings or Install important updates only to skip this step without entering any information. You may
also click Next to set up your password, then click Next. Key in the necessary information to guide you in configuring the basic settings of screens appear to set up the
security settings for your computer. Carefully read...
User Manual - Page 57

...Select All Programs > Windows Update. 3.
Key in this chapter.
ASUS Desktop PC
57 From Windows® 7 Action Center, click the task that you want to do . Setting up a user account:
...Update screen, click the task that you to check and install the latest updates to automatically troubleshoot and fix some common computer problems.
You may create user accounts and passwords...
User Manual - Page 58
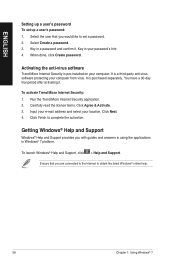
...7 Select the user that you with guides and answers in using the applications in...Support
Windows® Help and Support provides you are connected to the Internet to set up a user's password: 1. Click Next. 4. Key in a password and confirm it . Run the Trend Micro Internet Security application. 2. Click Finish to complete the activation. Select Create a password. 3. It is pre-installed...
User Manual - Page 73
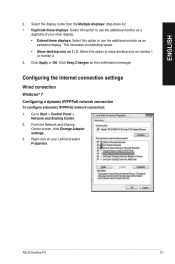
... to show desktop only on 1 / 2: Select this option to use the additional monitor as an
extension display. ASUS Desktop PC
73 Configuring the Internet connection settings
Wired connection
Windows® 7
Configuring a dynamic IP/PPPoE network connection To configure a dynamic IP/PPPoE network connection:
1. Select the display mode from the Multiple displays: ...
User Manual - Page 75
... the configuration.
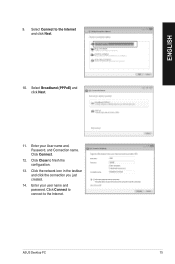
13. Click Connect.
12. Click Close to the Internet and click Next.
10. ASUS Desktop PC
75
Enter your user name and password. Select Broadband (PPPoE) and click Next.
11. ENGLISH
9. Enter your User name and, Password, and Connection name. Click the network icon in the taskbar and click the connection you...
User Manual - Page 77
ASUS Desktop PC
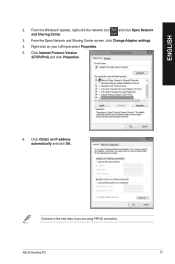
77 Right-click on your LAN and select Properties.
5. Continue to the next steps if you are using PPPoE connection.
From the Open Network and Sharing Center screen, click Change Adapter settings.
4.
Click Internet Protocol Version 4(TCP/IPv4) and click Properties.
6. From the Windows® taskbar, right-click the network icon...
User Manual - Page 79
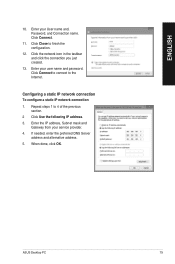
Enter your service provider. 4. ASUS Desktop PC
79 Click Connect.
11.
Enter the IP address, Subnet mask and
Gateway from your user name and password. Enter your User name and, Password, and Connection name. Click the network icon in the taskbar and click the connection you just created.
13.
Repeat steps 1 to finish the configuration.
12...
User Manual - Page 81
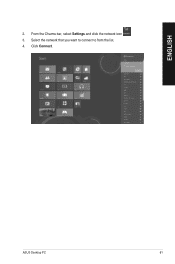
Select the network that you want to connect to from the list. 4. From the Charms bar, select Settings and click the network icon . 3. ASUS Desktop PC
81 Click Connect. ENGLISH
2.
User Manual - Page 82
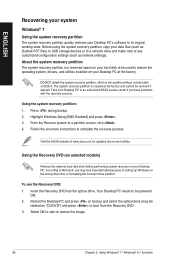
... system recovery partition, copy your Desktop PC. DO NOT delete the system recovery partition, which is a reserved space on your data files (such as "CD/DVD") and press to restore the operating system, drivers, and utilities installed on Disk 0. To use the Recovery DVD: 1.
Visit the ASUS website at www.asus.com for updated drivers and utilities.
User Manual - Page 83
....
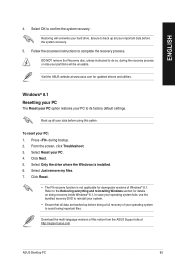
• The F9 recovery function is installed. 6. Windows® 8.1 Resetting your PC
The Reset your PC option restores your PC. 4. From the screen, click Troubleshoot. 3.
ENGLISH
4.
Refer to its factory default settings. Visit the ASUS website at http://support.asus.com
ASUS Desktop PC
83 Click Next. 5.
Follow the onscreen instructions to confirm the system recovery...
Asus BT1AE Reviews
We have not received any reviews for Asus yet.