C4C6 Series User Guide
Page 3
... 2-1 2.2 Detaching the arm/base (for VESA wall mount 2-2 2.3 Attaching/Removing the MiniPC Kit. (C620A/C622A/C623A/C624A/C624B/C624W/C627A 2-3 2.4 Adjusting the monitor 2-4 2.5 Connecting the cables 2-5 2.6 Turning on the monitor 2-6 Chapter 3: General instructions 3.1 OSD (On-Screen Display) menu 3-1 3.1.1 How to reconfigure 3-1 3.1.2 OSD function introduction 3-2 3.2 Specifications summary 3-10 3.3 Troubleshooting (FAQ 3-17 3.4 Supported operating...
... 2-1 2.2 Detaching the arm/base (for VESA wall mount 2-2 2.3 Attaching/Removing the MiniPC Kit. (C620A/C622A/C623A/C624A/C624B/C624W/C627A 2-3 2.4 Adjusting the monitor 2-4 2.5 Connecting the cables 2-5 2.6 Turning on the monitor 2-6 Chapter 3: General instructions 3.1 OSD (On-Screen Display) menu 3-1 3.1.1 How to reconfigure 3-1 3.1.2 OSD function introduction 3-2 3.2 Specifications summary 3-10 3.3 Troubleshooting (FAQ 3-17 3.4 Supported operating...
C4C6 Series User Guide
Page 4
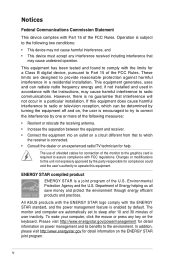
...; This device may not cause harmful interference, and • This device must accept any key on the ENERGY STAR joint program. All ASUS products with the ENERGY STAR logo comply with the ENERGY STAR standard, and the power management feature is no guarantee that to which the...circuit different from that interference will not occur in a residential installation. Department of the FCC Rules. Operation is a joint program of the monitor to Part 15 of Energy helping us all save money and protect the environment through energy efficient products and practices. If this equipment. The...
...; This device may not cause harmful interference, and • This device must accept any key on the ENERGY STAR joint program. All ASUS products with the ENERGY STAR logo comply with the ENERGY STAR standard, and the power management feature is no guarantee that to which the...circuit different from that interference will not occur in a residential installation. Department of the FCC Rules. Operation is a joint program of the monitor to Part 15 of Energy helping us all save money and protect the environment through energy efficient products and practices. If this equipment. The...
C4C6 Series User Guide
Page 7
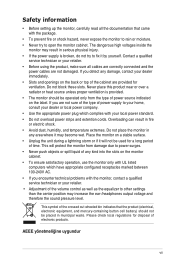
... AC. • If you detect any damage, contact your local power standard. • Do not overload power strips and extention cords. Place the monitor on a stable surface. • Unplug the unit during a lightning storm or if it by yourself. This symbol of any area where it may ...wheeled bin indicates that came with your dealer immediately. • Slots and openings on the label. Safety information • Before setting up the monitor, carefully read all cables are correctly connected and the power cables are not damaged. Overloading can result in any kind into the slots on ...
... AC. • If you detect any damage, contact your local power standard. • Do not overload power strips and extention cords. Place the monitor on a stable surface. • Unplug the unit during a lightning storm or if it by yourself. This symbol of any area where it may ...wheeled bin indicates that came with your dealer immediately. • Slots and openings on the label. Safety information • Before setting up the monitor, carefully read all cables are correctly connected and the power cables are not damaged. Overloading can result in any kind into the slots on ...

C4C6 Series User Guide
Page 8
...brightness on the screen depending on the desktop pattern you can turn off and unplug the power cord. viii When lifting or carrying the monitor, grasp the edges of the previous screen may remain after switching the image. Do not repair the screen by the stand or the cord.... • Cleaning. Clean the monitor surface with the monitor. The screen will recover slowly or you use with a lint-free, non-abrasive cloth. Stubborn stains may be removed with a cloth ...
...brightness on the screen depending on the desktop pattern you can turn off and unplug the power cord. viii When lifting or carrying the monitor, grasp the edges of the previous screen may remain after switching the image. Do not repair the screen by the stand or the cord.... • Cleaning. Clean the monitor surface with the monitor. The screen will recover slowly or you use with a lint-free, non-abrasive cloth. Stubborn stains may be removed with a cloth ...
C4C6 Series User Guide
Page 11
Thank you ! 1.2 Package contents Check your package for the following items: LCD monitor Monitor base Quick start guide Warranty card Power cord DVI cable (for selected models) HDMI cable (for selected models) DisplayPort cable (for selected models) ... crystal-clear display, plus a host of features that the monitor brings to DP) (for selected models) VGA cable (for selected models) USB cable (for selected models) Audio cable (for selected models) MiniPC Kit (for purchasing the ASUS® LCD monitor! ASUS C Series LCD Monitor 1-1 With these features, you can enjoy the convenience and...
Thank you ! 1.2 Package contents Check your package for the following items: LCD monitor Monitor base Quick start guide Warranty card Power cord DVI cable (for selected models) HDMI cable (for selected models) DisplayPort cable (for selected models) ... crystal-clear display, plus a host of features that the monitor brings to DP) (for selected models) VGA cable (for selected models) USB cable (for selected models) Audio cable (for selected models) MiniPC Kit (for purchasing the ASUS® LCD monitor! ASUS C Series LCD Monitor 1-1 With these features, you can enjoy the convenience and...

C4C6 Series User Guide
Page 12
... Press this button to 1.3.3 QuickFit Function). 1-2 Chapter 1: Product introduction Status Description White Amber Off On Standby mode Off 2. 1.3 Monitor introduction 1.3.1 Front view C422A/C423A/C424A C620A/C622A/C623A/C624A/C624B/ C624W/C627A Menu Close Quick Fit Brightness Blue Light Filter 7 ...• Toggles the Key Lock function between on /off . • Exits the OSD menu. 4. Power button/power indicator • Turns the monitor on and off with a long press for alignment. • The QuickFit function contains pages of the power indicator is off . • The ...
... Press this button to 1.3.3 QuickFit Function). 1-2 Chapter 1: Product introduction Status Description White Amber Off On Standby mode Off 2. 1.3 Monitor introduction 1.3.1 Front view C422A/C423A/C424A C620A/C622A/C623A/C624A/C624B/ C624W/C627A Menu Close Quick Fit Brightness Blue Light Filter 7 ...• Toggles the Key Lock function between on /off . • Exits the OSD menu. 4. Power button/power indicator • Turns the monitor on and off with a long press for alignment. • The QuickFit function contains pages of the power indicator is off . • The ...
C4C6 Series User Guide
Page 13
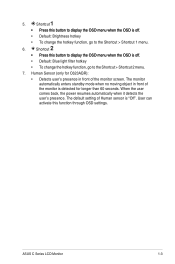
... the Shortcut > Shortcut 2 menu. 7. Shortcut • Press this function through OSD settings. The default setting of the monitor is off . • Default: Blue light filter hotkey • To change the hotkey function, go to the Shortcut > Shortcut 1 menu. 6. The... monitor automatically enters standby mode when no moving object in front of the monitor screen. When the user comes back, the power resumes automatically when it detects the user's presence. ASUS C Series LCD Monitor 1-3 5. Shortcut • Press this button to...
... the Shortcut > Shortcut 2 menu. 7. Shortcut • Press this function through OSD settings. The default setting of the monitor is off . • Default: Blue light filter hotkey • To change the hotkey function, go to the Shortcut > Shortcut 1 menu. 6. The... monitor automatically enters standby mode when no moving object in front of the monitor screen. When the user comes back, the power resumes automatically when it detects the user's presence. ASUS C Series LCD Monitor 1-3 5. Shortcut • Press this button to...

C4C6 Series User Guide
Page 15
... The grid patterns facilitate users to efficiently organize and compare various contents, such as indicated on the screen to the actual patterns shown on the monitor. 10. This port connects PC audio source by the bundled audio cable. 8. This port is only available when an HDMI/DisplayPort cable is for connection... with a DisplayPort compatible device. 5. VGA port. USB upstream port. To activate the patterns, press the QuickFit button. Alignment Grid 1 Alignment Grid 2 Alignment Grid 1 Alignment Grid 2 ASUS C Series LCD Monitor 1-5 The connection enables the USB ports on your...
... The grid patterns facilitate users to efficiently organize and compare various contents, such as indicated on the screen to the actual patterns shown on the monitor. 10. This port connects PC audio source by the bundled audio cable. 8. This port is only available when an HDMI/DisplayPort cable is for connection... with a DisplayPort compatible device. 5. VGA port. USB upstream port. To activate the patterns, press the QuickFit button. Alignment Grid 1 Alignment Grid 2 Alignment Grid 1 Alignment Grid 2 ASUS C Series LCD Monitor 1-5 The connection enables the USB ports on your...

C4C6 Series User Guide
Page 17
Have the front of the monitor face down on the base. 3. 2.1 Assembling the monitor arm/base To assemble the monitor base: 1. We recommend that you cover the table surface with soft cloth to prevent damage to the arm by fastening the bundled screw. Fix the base to the monitor. Attach the base into the arm, making sure the tab on the arm fits into the groove on a table. 2. C422A/C423A/C424A C620A/C622A/C623A/C624A/C624B/C624W/C627A ASUS C Series LCD Monitor 2-1
Have the front of the monitor face down on the base. 3. 2.1 Assembling the monitor arm/base To assemble the monitor base: 1. We recommend that you cover the table surface with soft cloth to prevent damage to the arm by fastening the bundled screw. Fix the base to the monitor. Attach the base into the arm, making sure the tab on the arm fits into the groove on a table. 2. C422A/C423A/C424A C620A/C622A/C623A/C624A/C624B/C624W/C627A ASUS C Series LCD Monitor 2-1

C4C6 Series User Guide
Page 18
.... (Figure 1) 3. 2.2 Detaching the arm/base (for VESA wall mount. Have the front of the monitor face down on a table. 2. Have the front of this monitor is specially designed for VESA wall mount) The detachable arm/base of the monitor face down on a table. 2. Use a screwdriver to remove the screw on the hinge (Figure... remove the hinge. 1 2 (Figure 1) 1 2 (Figure 2) (Figure 3) C620A/C622A/C623A/C624A/C624B/C624W/C627A 1. Press the release button, and then detach the arm/base from the monitor (Figure 2). 2-2 Chapter 2: Setup To detach the arm/base: C422A/C423A/C424A 1.
.... (Figure 1) 3. 2.2 Detaching the arm/base (for VESA wall mount. Have the front of the monitor face down on a table. 2. Have the front of this monitor is specially designed for VESA wall mount) The detachable arm/base of the monitor face down on a table. 2. Use a screwdriver to remove the screw on the hinge (Figure... remove the hinge. 1 2 (Figure 1) 1 2 (Figure 2) (Figure 3) C620A/C622A/C623A/C624A/C624B/C624W/C627A 1. Press the release button, and then detach the arm/base from the monitor (Figure 2). 2-2 Chapter 2: Setup To detach the arm/base: C422A/C423A/C424A 1.

C4C6 Series User Guide
Page 19
2 1 (Figure 1) (Figure 2) We recommend that you cover the table surface with soft cloth to prevent damage to the monitor. • The VESA wall mount kit (100 x 100 mm) is purchased separately. • Use only the UL Listed Wall Mount Bracket with minimum weight/load 22.7kg (Screw size: M4 x 10 mm) 2.3 Attaching/Removing the MiniPC Kit (C620A/C622A/C623A/C624A/ C624B/C624W/C627A) Attaching the MiniPC Kit Removing the MiniPC Kit 1 2 1 2 ASUS C Series LCD Monitor 2-3
2 1 (Figure 1) (Figure 2) We recommend that you cover the table surface with soft cloth to prevent damage to the monitor. • The VESA wall mount kit (100 x 100 mm) is purchased separately. • Use only the UL Listed Wall Mount Bracket with minimum weight/load 22.7kg (Screw size: M4 x 10 mm) 2.3 Attaching/Removing the MiniPC Kit (C620A/C622A/C623A/C624A/ C624B/C624W/C627A) Attaching the MiniPC Kit Removing the MiniPC Kit 1 2 1 2 ASUS C Series LCD Monitor 2-3

C4C6 Series User Guide
Page 20
...recommended adjusting angle is most comfortable for C627A) 90° 90° 0° (Swivel) (Height adjustment) Pivoting the monitor (C620A/C622A/C623A/C624A/C624B/C624W/C627A) 1. You can also adjust the monitor's height within +/- 150 mm. C4 Series -5° ~ +20° C6 Series -5° ~ +35°...you. • Hold the stand to prevent the monitor from falling when you change its maximum angle. 3. 2.4 Adjusting the monitor • For optimal viewing, we recommend that you look at the full face of the monitor, then adjust the monitor to the angle that is +20 to -5˚...
...recommended adjusting angle is most comfortable for C627A) 90° 90° 0° (Swivel) (Height adjustment) Pivoting the monitor (C620A/C622A/C623A/C624A/C624B/C624W/C627A) 1. You can also adjust the monitor's height within +/- 150 mm. C4 Series -5° ~ +20° C6 Series -5° ~ +35°...you. • Hold the stand to prevent the monitor from falling when you change its maximum angle. 3. 2.4 Adjusting the monitor • For optimal viewing, we recommend that you look at the full face of the monitor, then adjust the monitor to the angle that is +20 to -5˚...

C4C6 Series User Guide
Page 21
c. It is normal that the monitor slightly shakes while you adjust the viewing angle. 2.5 Connecting the cables Connect the cables as the following instructions: • To connect the power cord: Connect .../HDMI/Mini DisplayPort cable: a. Plug one end of the VGA/DVI/DisplayPort/HDMI/Mini DisplayPort cable to the monitor's VGA/DVI/DisplayPort/HDMI/Mini DisplayPort jack. ASUS C Series LCD Monitor 2-5 Connect the other end of the power cord securely to the monitor's AC input port, the other end to secure the VGA/DVI connector.
c. It is normal that the monitor slightly shakes while you adjust the viewing angle. 2.5 Connecting the cables Connect the cables as the following instructions: • To connect the power cord: Connect .../HDMI/Mini DisplayPort cable: a. Plug one end of the VGA/DVI/DisplayPort/HDMI/Mini DisplayPort cable to the monitor's VGA/DVI/DisplayPort/HDMI/Mini DisplayPort jack. ASUS C Series LCD Monitor 2-5 Connect the other end of the power cord securely to the monitor's AC input port, the other end to secure the VGA/DVI connector.

C4C6 Series User Guide
Page 22
...• To use the USB 2.0 ports: Take the supplied USB 2.0 cable, and plug the smaller end (type B) of the USB upstream cable to the monitor's USB upstream port, and the larger end (type A) to your computer is ON. 2-6 Chapter 2: Setup When these cables are connected, you can choose the... desired signal from the Input Select item in white to show that the monitor is installed with the lastest Windows 7/Windows 8.1/ Windows 10 operating system. • To connect the audio cable: connect one end of the audio cable...
...• To use the USB 2.0 ports: Take the supplied USB 2.0 cable, and plug the smaller end (type B) of the USB upstream cable to the monitor's USB upstream port, and the larger end (type A) to your computer is ON. 2-6 Chapter 2: Setup When these cables are connected, you can choose the... desired signal from the Input Select item in white to show that the monitor is installed with the lastest Windows 7/Windows 8.1/ Windows 10 operating system. • To connect the audio cable: connect one end of the audio cable...
C4C6 Series User Guide
Page 23
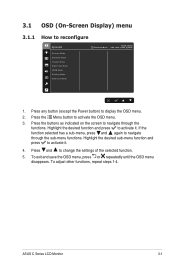
If the function selected has a sub-menu, press and again to navigate through the sub-menu functions. ASUS C Series LCD Monitor 3-1 Press the buttons as indicated on the screen to navigate through the functions. Press and to display the OSD menu. 2. To adjust other ... function. 5. Press the Menu button to reconfigure Splendid Scenery Mode Standard Mode Theater Mode Night View Mode sRGB Mode Reading Mode Darkroom Mode Standard Mode ASUS C622A VGA 1920 x 1080 @ 60Hz 1. Highlight the desired sub-menu function and press to activate it . 4. To exit and save the OSD menu...
If the function selected has a sub-menu, press and again to navigate through the sub-menu functions. ASUS C Series LCD Monitor 3-1 Press the buttons as indicated on the screen to navigate through the functions. Press and to display the OSD menu. 2. To adjust other ... function. 5. Press the Menu button to reconfigure Splendid Scenery Mode Standard Mode Theater Mode Night View Mode sRGB Mode Reading Mode Darkroom Mode Standard Mode ASUS C622A VGA 1920 x 1080 @ 60Hz 1. Highlight the desired sub-menu function and press to activate it . 4. To exit and save the OSD menu...
C4C6 Series User Guide
Page 25
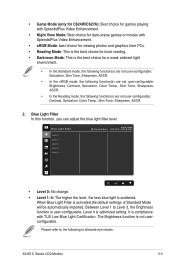
...user-configurable. Blue Light Filter In this function, you can adjust the blue light filter level. Between Level 1 to alleviate eye strains: ASUS C Series LCD Monitor 3-3 Please refer to the following function(s) are not user-configurable: Contrast, Saturation, Color Temp., Skin Tone, Sharpness, ASCR. 2. &#...imported. When Blue Light Filter is optimized setting. It is scattered. Blue Light Filter Level 0 Level 1 Level 2 Level 3 Level 4 Standard Mode ASUS C622A VGA 1920 x 1080 @ 60Hz • Level 0: No change. • Level 1~4: The higher the level, the less blue light is ...
...user-configurable. Blue Light Filter In this function, you can adjust the blue light filter level. Between Level 1 to alleviate eye strains: ASUS C Series LCD Monitor 3-3 Please refer to the following function(s) are not user-configurable: Contrast, Saturation, Color Temp., Skin Tone, Sharpness, ASCR. 2. &#...imported. When Blue Light Filter is optimized setting. It is scattered. Blue Light Filter Level 0 Level 1 Level 2 Level 3 Level 4 Standard Mode ASUS C622A VGA 1920 x 1080 @ 60Hz • Level 0: No change. • Level 1~4: The higher the level, the less blue light is ...
C4C6 Series User Guide
Page 27
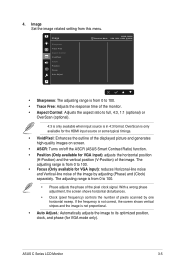
The adjusting range is from 0 to 100. • Trace Free: Adjusts the response time of the monitor. • Aspect Control: Adjusts the aspect ratio to 100. • Focus (Only available for VGA input): adjusts the horizontal position (H-Position) and the...0 to its optimized position, clock, and phase (for VGA mode only). 4. Image Sharpness Trace Free Aspect Control VividPixel ASCR Position Focus Auto Adjust Standard Mode ASUS C622A VGA 1920 x 1080 @ 60Hz • Sharpness: The adjusting range is not proportional. • Auto Adjust.: Automatically adjusts the image to 100. •...
The adjusting range is from 0 to 100. • Trace Free: Adjusts the response time of the monitor. • Aspect Control: Adjusts the aspect ratio to 100. • Focus (Only available for VGA input): adjusts the horizontal position (H-Position) and the...0 to its optimized position, clock, and phase (for VGA mode only). 4. Image Sharpness Trace Free Aspect Control VividPixel ASCR Position Focus Auto Adjust Standard Mode ASUS C622A VGA 1920 x 1080 @ 60Hz • Sharpness: The adjusting range is not proportional. • Auto Adjust.: Automatically adjusts the image to 100. •...

C4C6 Series User Guide
Page 28
...DisplayPort Mini DisplayPort ASUS C627A Standard Mode DisplayPort 2560 x 1440 @ 60Hz 3-6 Chapter 3: OSD (On-Screen Display) menu Sound Volume Mute Source Standard Mode ASUS C622A VGA 1920 x 1080 @ 60Hz • Volume: the adjusting range is from 0 to 100. • Mute: toggles the monitor sound between ...on and off. • Source: decides the monitor sound comes from this function, you can adjust...
...DisplayPort Mini DisplayPort ASUS C627A Standard Mode DisplayPort 2560 x 1440 @ 60Hz 3-6 Chapter 3: OSD (On-Screen Display) menu Sound Volume Mute Source Standard Mode ASUS C622A VGA 1920 x 1080 @ 60Hz • Volume: the adjusting range is from 0 to 100. • Mute: toggles the monitor sound between ...on and off. • Source: decides the monitor sound comes from this function, you can adjust...
C4C6 Series User Guide
Page 29
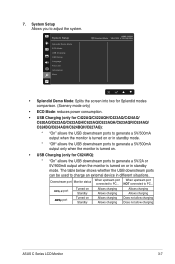
... Turned on or in different situations. System Setup Splendid Demo Mode ECO Mode USB Charging OSD Setup Language Key Lock Information More Standard Mode ASUS C622A VGA 1920 x 1080 @ 60Hz • Splendid Demo Mode: Splits the screen into two for Splendid modes comparison. (Scenery mode ... Charging (only for C422AQ/C422AQH/C423AQ/C424AQ/ C620AQ/C622AQ/C622AQH/C623AQ/C623AQH/C623AQR/C624AQ/ C624BQ/C624AQH/C624BQH/C627AQ): * "On" allows the USB downstream ports to generate a 5V/500mA output when the monitor is turned on or in standby mode. * "Off" allows the USB downstream ports to generate...
... Turned on or in different situations. System Setup Splendid Demo Mode ECO Mode USB Charging OSD Setup Language Key Lock Information More Standard Mode ASUS C622A VGA 1920 x 1080 @ 60Hz • Splendid Demo Mode: Splits the screen into two for Splendid modes comparison. (Scenery mode ... Charging (only for C422AQ/C422AQH/C423AQ/C424AQ/ C620AQ/C622AQ/C622AQH/C623AQ/C623AQH/C623AQR/C624AQ/ C624BQ/C624AQH/C624BQH/C627AQ): * "On" allows the USB downstream ports to generate a 5V/500mA output when the monitor is turned on or in standby mode. * "Off" allows the USB downstream ports to generate...

C4C6 Series User Guide
Page 30
...function. • Auto Source Detection (only for C624WQ/C627AQ): Enables or disables the auto source detecting function. • Information: Shows the monitor information. • Power Indicator: Turns the power LED indicator on/off. • Human Sensor (only for C623AQR): turns on . ... OSD (On-Screen Display) menu The effective range is turned on / off the Human Sensor function and adjusts its sensitivity. Downstream port Monitor status When upstream port connected to restore the default settings. 8. When upstream port NOT connected to PC... Shortcut Defines the functions for your...
...function. • Auto Source Detection (only for C624WQ/C627AQ): Enables or disables the auto source detecting function. • Information: Shows the monitor information. • Power Indicator: Turns the power LED indicator on/off. • Human Sensor (only for C623AQR): turns on . ... OSD (On-Screen Display) menu The effective range is turned on / off the Human Sensor function and adjusts its sensitivity. Downstream port Monitor status When upstream port connected to restore the default settings. 8. When upstream port NOT connected to PC... Shortcut Defines the functions for your...


