
Intel 100 Series Ai Suite3 ManualEnglish
Page 14
... motherboard's driver, software and firmware Click to find and select the BIOS from file Click to select a boot logo Click to update the BIOS Manually update the BIOS and selecting a boot logo Click or tap to search an image file for your boot logo Click or tap to go back to EZ Update main screen Click or tap to proceed the updating BIOS and boot logo After you click or tap BIOS Update button...
... motherboard's driver, software and firmware Click to find and select the BIOS from file Click to select a boot logo Click to update the BIOS Manually update the BIOS and selecting a boot logo Click or tap to search an image file for your boot logo Click or tap to go back to EZ Update main screen Click or tap to proceed the updating BIOS and boot logo After you click or tap BIOS Update button...

Windows RAID Setup Guide for C232 series.English
Page 4
7. Click Browse. 8. Select the RAID_Driver folder and click OK to install the RAID driver. 4 Windows® RAID Setup Guide
7. Click Browse. 8. Select the RAID_Driver folder and click OK to install the RAID driver. 4 Windows® RAID Setup Guide
Users manual English
Page 2
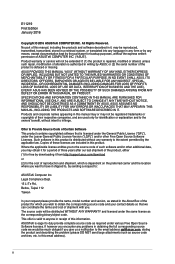
... FROM ANY DEFECT OR ERROR IN THIS MANUAL OR PRODUCT. SPECIFICATIONS AND INFORMATION CONTAINED IN THIS MANUAL ARE FURNISHED FOR INFORMATIONAL USE ONLY, AND ARE SUBJECT TO CHANGE AT ANY TIME WITHOUT NOTICE, AND SHOULD NOT BE CONSTRUED AS A COMMITMENT BY ASUS. Products and corporate names appearing in obtaining the full corresponding source code we can coordinate the...
... FROM ANY DEFECT OR ERROR IN THIS MANUAL OR PRODUCT. SPECIFICATIONS AND INFORMATION CONTAINED IN THIS MANUAL ARE FURNISHED FOR INFORMATIONAL USE ONLY, AND ARE SUBJECT TO CHANGE AT ANY TIME WITHOUT NOTICE, AND SHOULD NOT BE CONSTRUED AS A COMMITMENT BY ASUS. Products and corporate names appearing in obtaining the full corresponding source code we can coordinate the...

Users manual English
Page 6
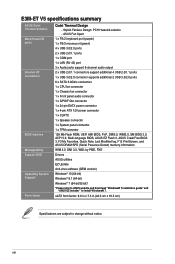
... Motherboard Cables ASUS E3M-ET V5 motherboard 2 x Serial ATA 6.0 Gb/s cables Accessories 1 x I/O Shield 1 x M.2 screw package Application DVD Documentation Support DVD User Guide If any of the above items is subject to the physical characteristics of the sensitive audio signals - Premium Japanese-made audio capacitors: Provide warm, natural and immersive sound with M Key, type 2242/2260/2280 storage devices support(both PCIE & SATA mode) - 6 x Serial ATA 6.0 Gb/s connectors (gray) Realtek® 8111H Gigabit LAN Controller Realtek® ALC887 8-channel High Definition Audio...
... Motherboard Cables ASUS E3M-ET V5 motherboard 2 x Serial ATA 6.0 Gb/s cables Accessories 1 x I/O Shield 1 x M.2 screw package Application DVD Documentation Support DVD User Guide If any of the above items is subject to the physical characteristics of the sensitive audio signals - Premium Japanese-made audio capacitors: Provide warm, natural and immersive sound with M Key, type 2242/2260/2280 storage devices support(both PCIE & SATA mode) - 6 x Serial ATA 6.0 Gb/s connectors (gray) Realtek® 8111H Gigabit LAN Controller Realtek® ALC887 8-channel High Definition Audio...
Users manual English
Page 8
...Front panel audio connector 1 x S/PDIF Out connector 1 x 24-pin EATX power connector 1 x 4-pin ATX 12V power connector 1 x CLRTC 1 x Speaker connector 1 x System panel connector 1 x TPM connector 128 Mb Flash ROM, UEFI AMI BIOS, PnP, DMI3.0, WfM2.0, SM BIOS 3.0, ACPI 5.0, Multi-language BIOS, ASUS EZ Flash 3, ASUS CrashFree BIOS 3, F3 My Favorites, Quick Note, Last Modified log, F12 PrintScreen, and ASUS DRAM SPD (Serial Presence Detect) memory information WfM 2.0, DMI 3.0, WOL by PME, PXE Drivers ASUS utilities EZ Update Anti-virus software (OEM version) Windows® 10 (64-bit) Windows®...
...Front panel audio connector 1 x S/PDIF Out connector 1 x 24-pin EATX power connector 1 x 4-pin ATX 12V power connector 1 x CLRTC 1 x Speaker connector 1 x System panel connector 1 x TPM connector 128 Mb Flash ROM, UEFI AMI BIOS, PnP, DMI3.0, WfM2.0, SM BIOS 3.0, ACPI 5.0, Multi-language BIOS, ASUS EZ Flash 3, ASUS CrashFree BIOS 3, F3 My Favorites, Quick Note, Last Modified log, F12 PrintScreen, and ASUS DRAM SPD (Serial Presence Detect) memory information WfM 2.0, DMI 3.0, WOL by PME, PXE Drivers ASUS utilities EZ Update Anti-virus software (OEM version) Windows® 10 (64-bit) Windows®...
Users manual English
Page 9
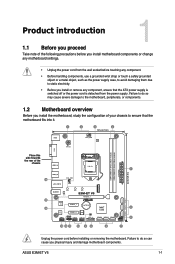
ASUS E3M-ET V5 1-1 Failure to do so may cause severe damage to the motherboard, peripherals, or components. 1.2 Motherboard overview Before you install the motherboard, study the configuration of your chassis to ensure that the ATX power supply is switched off or the power cord is detached from the wall socket before touching any component. • Before handling components, use a grounded wrist strap or touch a safely grounded object or a metal...
ASUS E3M-ET V5 1-1 Failure to do so may cause severe damage to the motherboard, peripherals, or components. 1.2 Motherboard overview Before you install the motherboard, study the configuration of your chassis to ensure that the ATX power supply is switched off or the power cord is detached from the wall socket before touching any component. • Before handling components, use a grounded wrist strap or touch a safely grounded object or a metal...

Users manual English
Page 10
... jumper caps on the motherboard, ensuring that you use a PSU with higher power output GND +5 Volts GND GND GND GND when configuring a system with more power-consuming devices +5 Volts PSON# GND GND or when you use an ATX 12V Specification 2.0‑compliant power supply unit (PSU) with a minimum of maximum 1A (12 W) fan power. Intel® C232 Serial ATA 6.0Gb/s connector (7-pin SATA6G_1~6) 6. Clear RTC RAM (2-pin CLRTC) 10. Digital audio connector (4-1 pin...
... jumper caps on the motherboard, ensuring that you use a PSU with higher power output GND +5 Volts GND GND GND GND when configuring a system with more power-consuming devices +5 Volts PSON# GND GND or when you use an ATX 12V Specification 2.0‑compliant power supply unit (PSU) with a minimum of maximum 1A (12 W) fan power. Intel® C232 Serial ATA 6.0Gb/s connector (7-pin SATA6G_1~6) 6. Clear RTC RAM (2-pin CLRTC) 10. Digital audio connector (4-1 pin...

Users manual English
Page 11
3. When using hot-plug and NCQ, set the SATA Mode Selection item GND RSATA_TXP RSATA_TXN GND RSATA_RXN RSATA_RXP GND in sleep mode. Connect the HDD Activity LED cable to [AHCI]. +5V GND GND Speaker Out 6. ASUS E3M-ET V5 1-3 Intel® LGA1151 CPU socket This motherboard comes with a surface mount LGA1151 socket designed for the HDD Activity LED. SPEAKER PIN 1 7. Connect the chassis power LED cable to System memory. 5. DDR4 DIMM slots Install 2GB, 4GB, 8GB and 16GB unbuffered non‑ECC DDR4 DIMMs...
3. When using hot-plug and NCQ, set the SATA Mode Selection item GND RSATA_TXP RSATA_TXN GND RSATA_RXN RSATA_RXP GND in sleep mode. Connect the HDD Activity LED cable to [AHCI]. +5V GND GND Speaker Out 6. ASUS E3M-ET V5 1-3 Intel® LGA1151 CPU socket This motherboard comes with a surface mount LGA1151 socket designed for the HDD Activity LED. SPEAKER PIN 1 7. Connect the chassis power LED cable to System memory. 5. DDR4 DIMM slots Install 2GB, 4GB, 8GB and 16GB unbuffered non‑ECC DDR4 DIMMs...

Users manual English
Page 12
... connect a 1394 cable to overclocking. The onboard button cell battery powers the RAM data in CMOS. Use a metal object such as system passwords. These USB connectors comply with USB 2.0. Turn OFF the computer and unplug the power cord. 2. Connect the USB module cable to any of these connectors, then install the module to a slot opening at the back of up to short the two pins. 3. USB+5V USB_P12USB_P12+ GND 1-4 Chapter 1: Product introduction Clear RTC RAM (2-pin CLRTC) This header...
... connect a 1394 cable to overclocking. The onboard button cell battery powers the RAM data in CMOS. Use a metal object such as system passwords. These USB connectors comply with USB 2.0. Turn OFF the computer and unplug the power cord. 2. Connect the USB module cable to any of these connectors, then install the module to a slot opening at the back of up to short the two pins. 3. USB+5V USB_P12USB_P12+ GND 1-4 Chapter 1: Product introduction Clear RTC RAM (2-pin CLRTC) This header...
Users manual English
Page 13
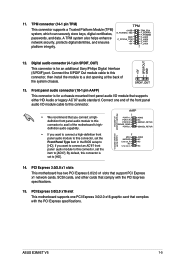
... audio capability. Connect one PCI Express 3.0/2.0 x16 graphic card that comply with the PCI Express specifications. If you connect a highdefinition front panel audio module to this connector. ASUS E3M-ET V5 1-5 AAFP PIN 1 HD-audio-compliant • We recommend that supports either HD Audio or legacy AC`97 audio standard. TPM connector (14-1 pin TPM) TPM This connector supports a Trusted Platform Module (TPM) system, which can securely store keys, digital certificates, passwords, and data. Digital audio connector (4-1 pin SPDIF_OUT) This connector is for a chassis...
... audio capability. Connect one PCI Express 3.0/2.0 x16 graphic card that comply with the PCI Express specifications. If you connect a highdefinition front panel audio module to this connector. ASUS E3M-ET V5 1-5 AAFP PIN 1 HD-audio-compliant • We recommend that supports either HD Audio or legacy AC`97 audio standard. TPM connector (14-1 pin TPM) TPM This connector supports a Trusted Platform Module (TPM) system, which can securely store keys, digital certificates, passwords, and data. Digital audio connector (4-1 pin SPDIF_OUT) This connector is for a chassis...

Users manual English
Page 15
...Front Speaker Out. 5. LAN (RJ-45) port. Line In port (light blue). 1.2.2 Rear panel connectors 1 2 34 9 8 7 6 5 1. Refer to support a 7.1-channel audio output. Line Out port (lime). Microphone port (pink). ASUS E3M-ET V5 1-7 PS/2 Mouse port (green). This port connects a headphone or a speaker. LAN port LED indications Activity/Link LED Status Description Off No link Orange Linked Orange (Blinking) Data activity Orange (Blinking Ready to a Local Area Network (LAN) through a network hub. To configure a 7.1-channel audio output: Use a chassis with HD audio module...
...Front Speaker Out. 5. LAN (RJ-45) port. Line In port (light blue). 1.2.2 Rear panel connectors 1 2 34 9 8 7 6 5 1. Refer to support a 7.1-channel audio output. Line Out port (lime). Microphone port (pink). ASUS E3M-ET V5 1-7 PS/2 Mouse port (green). This port connects a headphone or a speaker. LAN port LED indications Activity/Link LED Status Description Off No link Orange Linked Orange (Blinking) Data activity Orange (Blinking Ready to a Local Area Network (LAN) through a network hub. To configure a 7.1-channel audio output: Use a chassis with HD audio module...

Users manual English
Page 18
.... Use a maximum of the same version or date code (D/C) from the same vendor. The stability and compatibility of these memory modules depend on the CPU's capabilities and other installed devices. • The default memory operation frequency is the standard way of the DDR4 DIMM sockets: DIMM_A1 DIMM_B1 Channel Channel A Channel B Sockets DIMM_A1 DIMM_B1 • You may operate at http://support.microsoft. The figure illustrates the location of accessing information...
.... Use a maximum of the same version or date code (D/C) from the same vendor. The stability and compatibility of these memory modules depend on the CPU's capabilities and other installed devices. • The default memory operation frequency is the standard way of the DDR4 DIMM sockets: DIMM_A1 DIMM_B1 Channel Channel A Channel B Sockets DIMM_A1 DIMM_B1 • You may operate at http://support.microsoft. The figure illustrates the location of accessing information...
Users manual English
Page 20
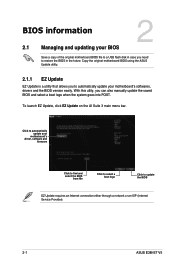
... automatically update your motherboard's driver, software and firmware Click to find and select the BIOS from file Click to select a boot logo Click to restore the BIOS in case you can also manually update the saved BIOS and select a boot logo when the system goes into POST. With this utlity, you need to update the BIOS EZ Update requires an Internet connection either through a network or an ISP (Internet Service Provider). 2-1 ASUS E3M-ET V5
... automatically update your motherboard's driver, software and firmware Click to find and select the BIOS from file Click to select a boot logo Click to restore the BIOS in case you can also manually update the saved BIOS and select a boot logo when the system goes into POST. With this utlity, you need to update the BIOS EZ Update requires an Internet connection either through a network or an ISP (Internet Service Provider). 2-1 ASUS E3M-ET V5

Users manual English
Page 21
... Flash 3: 1. Enter the Advanced Mode of the BIOS setup program. b) Press to switch to the Folder Info field. c) Press the Up/Down arrow keys to find the BIOS file, and then press to perform the BIOS update process. d) Press to switch to the Drive field. To update the BIOS using an OS‑based utility. • Ensure that you load the BIOS default settings to the USB port, then select via Internet. Via Storage Device...
... Flash 3: 1. Enter the Advanced Mode of the BIOS setup program. b) Press to switch to the Folder Info field. c) Press the Up/Down arrow keys to find the BIOS file, and then press to perform the BIOS update process. d) Press to switch to the Drive field. To update the BIOS using an OS‑based utility. • Ensure that you load the BIOS default settings to the USB port, then select via Internet. Via Storage Device...
Users manual English
Page 22
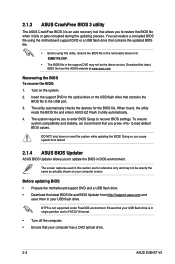
... screen captures used in the support DVD may not be the latest version. 2.1.3 ASUS CrashFree BIOS 3 utility The ASUS CrashFree BIOS 3 is an auto recovery tool that allows you to load default BIOS values. Recovering the BIOS To recover the BIOS: 1. DO NOT shut down or reset the system while updating the BIOS! Before updating BIOS • Prepare the motherboard support DVD and a USB flash drive. • Download the latest BIOS file and BIOS Updater from the ASUS website at www.asus.com. Download the latest BIOS file...
... screen captures used in the support DVD may not be the latest version. 2.1.3 ASUS CrashFree BIOS 3 utility The ASUS CrashFree BIOS 3 is an auto recovery tool that allows you to load default BIOS values. Recovering the BIOS To recover the BIOS: 1. DO NOT shut down or reset the system while updating the BIOS! Before updating BIOS • Prepare the motherboard support DVD and a USB flash drive. • Download the latest BIOS file and BIOS Updater from the ASUS website at www.asus.com. Download the latest BIOS file...

Users manual English
Page 23
... or reset the system while updating the BIOS to Drives panel then select D:. On the FreeDOS prompt, type d: then press to switch the disk from Drives panel to Files panel then press keys to Drive D (USB flash drive). Press to switch from Drive C (optical drive) to select the BIOS file and press . 4. Boot your computer. On the BIOS Updater screen, press to switch from Files panel to prevent system boot failure. ASUSTeK BIOS Updater for DOS V1.30 [2014/01/01] Drives panel Current ROM BOARD: E3M-ET V5 VER...
... or reset the system while updating the BIOS to Drives panel then select D:. On the FreeDOS prompt, type d: then press to switch the disk from Drives panel to Files panel then press keys to Drive D (USB flash drive). Press to switch from Drive C (optical drive) to select the BIOS file and press . 4. Boot your computer. On the BIOS Updater screen, press to switch from Files panel to prevent system boot failure. ASUSTeK BIOS Updater for DOS V1.30 [2014/01/01] Drives panel Current ROM BOARD: E3M-ET V5 VER...

Users manual English
Page 24
... EZ Mode/Advanced Mode screen. 2-5 ASUS E3M-ET V5 BIOS menu screen The BIOS setup program can cause damage to force reset from the Exit/Advanced Mode button in using the first two options. Using the power button, reset button, or the ++ keys to your screen. • Visit the ASUS website at startup: • Press or during the Power-On Self Test (POST). Entering BIOS Setup at startup To enter BIOS Setup at www.asus.com to the default value. Entering BIOS Setup after POST To enter BIOS Setup after changing any BIOS setting, load the default settings...
... EZ Mode/Advanced Mode screen. 2-5 ASUS E3M-ET V5 BIOS menu screen The BIOS setup program can cause damage to force reset from the Exit/Advanced Mode button in using the first two options. Using the power button, reset button, or the ++ keys to your screen. • Visit the ASUS website at startup: • Press or during the Power-On Self Test (POST). Entering BIOS Setup at startup To enter BIOS Setup at www.asus.com to the default value. Entering BIOS Setup after POST To enter BIOS Setup after changing any BIOS setting, load the default settings...

Users manual English
Page 25
Chapter 2: BIOS information 2-6 Click the button to manually tune the fans Loads optimized default settings Displays the Advanced mode Shows the menus bootable devices Search on FAQs Saves the changes and resets the system Selects the boot device priority The boot device options vary depending on the devices you enter the BIOS setup program. Displays the CPU/motherboard temperature, CPU voltage output, CPU/chassis fan speed, and SATA information Selects the display language of the BIOS setup program Displays the system properties of the basic system information...
Chapter 2: BIOS information 2-6 Click the button to manually tune the fans Loads optimized default settings Displays the Advanced mode Shows the menus bootable devices Search on FAQs Saves the changes and resets the system Selects the boot device priority The boot device options vary depending on the devices you enter the BIOS setup program. Displays the CPU/motherboard temperature, CPU voltage output, CPU/chassis fan speed, and SATA information Selects the display language of the BIOS setup program Displays the system properties of the basic system information...

Users manual English
Page 28
... a QR code. Use the navigation keys to display the other items on FAQ Move your mouse over this QR code with your mobile device to connect to enter your notes. Last Modified button This button shows the items that is a brief description of the field opposite the item. Press the Up/Down arrow keys or / keys to select items in BIOS Setup. 2-9 ASUS E3M-ET V5 Quick Note...
... a QR code. Use the navigation keys to display the other items on FAQ Move your mouse over this QR code with your mobile device to connect to enter your notes. Last Modified button This button shows the items that is a brief description of the field opposite the item. Press the Up/Down arrow keys or / keys to select items in BIOS Setup. 2-9 ASUS E3M-ET V5 Quick Note...

Users manual English
Page 30
... frequency energy and, if not installed and used in a residential installation. The use of shielded cables for a Class B digital device, pursuant to Part 15 of the monitor to the graphics card is encouraged to try to comply with the limits for connection of the FCC Rules. Appendices Appendices Notices Federal Communications Commission Statement This device complies with manufacturer's instructions, may cause undesired operation. Appendices A-1 ASUS E3M-ET V5...
... frequency energy and, if not installed and used in a residential installation. The use of shielded cables for a Class B digital device, pursuant to Part 15 of the monitor to the graphics card is encouraged to try to comply with the limits for connection of the FCC Rules. Appendices Appendices Notices Federal Communications Commission Statement This device complies with manufacturer's instructions, may cause undesired operation. Appendices A-1 ASUS E3M-ET V5...


