
User's Manual for English Edition
Page 2
No part of ASUSTeK COMPUTER, INC. ("ASUS"). Products and corporate names mentioned in any form or by any means, except documentation kept by the purchaser for identification purposes only. However, the manufacturer makes no guarantee regarding the accuracy of its contents, and reserves the ...owners. Every effort has been made to ensure that the contents of this manual may or may be registered trademarks or copyrights of their respective companies, and are correct and up to make changes without the express written permission of this manual, including the products and software ...
No part of ASUSTeK COMPUTER, INC. ("ASUS"). Products and corporate names mentioned in any form or by any means, except documentation kept by the purchaser for identification purposes only. However, the manufacturer makes no guarantee regarding the accuracy of its contents, and reserves the ...owners. Every effort has been made to ensure that the contents of this manual may or may be registered trademarks or copyrights of their respective companies, and are correct and up to make changes without the express written permission of this manual, including the products and software ...

User's Manual for English Edition
Page 3
... 7 France Restricted Wireless Frequency Bands 8 REACH...9 Global Environmental Regulation Compliance and Declaration 10 ASUS Recycling/Takeback Services 10 UL Safety Precaution...10 ENERGY STAR complied product 11 Notes for this manual...11 Safety information...12 Setting up your system...12 Care during use...12 Sound Pressure Warning...13 TV Tuner (on selected models 13 Adapter...13 DC Fan Warning...13...
... 7 France Restricted Wireless Frequency Bands 8 REACH...9 Global Environmental Regulation Compliance and Declaration 10 ASUS Recycling/Takeback Services 10 UL Safety Precaution...10 ENERGY STAR complied product 11 Notes for this manual...11 Safety information...12 Setting up your system...12 Care during use...12 Sound Pressure Warning...13 TV Tuner (on selected models 13 Adapter...13 DC Fan Warning...13...

User's Manual for English Edition
Page 4
... 26 Connecting the wired keyboard and mouse 26 Connecting the wireless keyboard and mouse 26 Powering on the system...27 Powering off...27 Configuring a wireless connection 28 Configuring a wired connection 29 Using a static IP...29 Using a dynamic IP (PPPoE 31 Connecting to external audio devices 34 Configuring audio output settings 34 Recovering your system 36 Using the recovery partition...36 Recovering the OS to the Factory Default Partition (F9 Recovery 36 Backing up the Factory Default Environment Data to a USB Drive (F9 Backup).36 Using the USB storage device (USB Restore...
... 26 Connecting the wired keyboard and mouse 26 Connecting the wireless keyboard and mouse 26 Powering on the system...27 Powering off...27 Configuring a wireless connection 28 Configuring a wired connection 29 Using a static IP...29 Using a dynamic IP (PPPoE 31 Connecting to external audio devices 34 Configuring audio output settings 34 Recovering your system 36 Using the recovery partition...36 Recovering the OS to the Factory Default Partition (F9 Recovery 36 Backing up the Factory Default Environment Data to a USB Drive (F9 Backup).36 Using the USB storage device (USB Restore...

User's Manual for English Edition
Page 5
... device may not cause harmful interference, and • This device must be installed and operated in accordance with the limits for a Class B digital device, pursuant to operate the equipment. If this device could void the user's authority to Part 15 of the FCC Rules. This equipment has been tested and found to comply with provided instructions and the antenna(s) used in a particular installation...
... device may not cause harmful interference, and • This device must be installed and operated in accordance with the limits for a Class B digital device, pursuant to operate the equipment. If this device could void the user's authority to Part 15 of the FCC Rules. This equipment has been tested and found to comply with provided instructions and the antenna(s) used in a particular installation...

User's Manual for English Edition
Page 11
... for reference only. IMPORTANT: Instructions that help you complete a task. To wake your computer, click the mouse or press any key on Freedos and Linux-based products. TIP: Tips and useful information that you MUST follow to prevent injury to sleep after 15 and 30 minutes of the following symbols used throughout this manual To ensure that you...
... for reference only. IMPORTANT: Instructions that help you complete a task. To wake your computer, click the mouse or press any key on Freedos and Linux-based products. TIP: Tips and useful information that you MUST follow to prevent injury to sleep after 15 and 30 minutes of the following symbols used throughout this manual To ensure that you...

User's Manual for English Edition
Page 12
... use an abrasive cleaner or a coarse cloth when cleaning the screen. • If you follow all power, modem, and network cables from foreign objects or excessive dust accumulation. To clean the screen: • Turn off , a small amount of space around the system for ventilation. English Safety information Your All-in-one PC ET2411/ ET2210 Series Always unplug all instructions...
... use an abrasive cleaner or a coarse cloth when cleaning the screen. • If you follow all power, modem, and network cables from foreign objects or excessive dust accumulation. To clean the screen: • Turn off , a small amount of space around the system for ventilation. English Safety information Your All-in-one PC ET2411/ ET2210 Series Always unplug all instructions...

User's Manual for English Edition
Page 13
... the volume control as well as the equalizer to settings other than the center position may cause DANGER. TV Tuner (on selected models) Note to CATV System Installer-This reminder is a moving fan blades. Input voltage: 100-240Vac Input frequency: 50-60Hz Rating output current: 120W (19V, 6.32A) Rating output voltage: 19Vdc 2. DC Fan Warning Please note...
... the volume control as well as the equalizer to settings other than the center position may cause DANGER. TV Tuner (on selected models) Note to CATV System Installer-This reminder is a moving fan blades. Input voltage: 100-240Vac Input frequency: 50-60Hz Rating output current: 120W (19V, 6.32A) Rating output voltage: 19Vdc 2. DC Fan Warning Please note...

User's Manual for English Edition
Page 14
... product specifications may vary with territories. 14 All-in-one PC ET2411/ ET2210 Series Keyboard (wired or wireless) Mouse (wired or wireless) Quick Guide AC adapter Power cord Quick Start Guide Remote Control (optional) Warranty Card Subwoofer (optional) KBM USB receiver dongle (optional) Note: The keyboard, mouse, power supply, remote control, and KBM USB receiver dongle illustrations are for reference only. The following items is damaged or missing, contact your new product. If any of the following illustrations display...
... product specifications may vary with territories. 14 All-in-one PC ET2411/ ET2210 Series Keyboard (wired or wireless) Mouse (wired or wireless) Quick Guide AC adapter Power cord Quick Start Guide Remote Control (optional) Warranty Card Subwoofer (optional) KBM USB receiver dongle (optional) Note: The keyboard, mouse, power supply, remote control, and KBM USB receiver dongle illustrations are for reference only. The following items is damaged or missing, contact your new product. If any of the following illustrations display...

User's Manual for English Edition
Page 16
... a standard desktop LCD monitor. 11 12 Audio Speaker The built-in stereo speaker system allows you to your fingertips. 5 6 Hard Disk Drive LED Indicates hard disk drive activity. Power switch The power switch allows you to switch the system ON/OFF. 7 Volume Increase Button Press this button to decrease the volume. 10 MODE Button Press to switch the display signal source.When switched to hear audio without additional attachments. Webcam LED Indicates that produces rich, vibrant sound...
... a standard desktop LCD monitor. 11 12 Audio Speaker The built-in stereo speaker system allows you to your fingertips. 5 6 Hard Disk Drive LED Indicates hard disk drive activity. Power switch The power switch allows you to switch the system ON/OFF. 7 Volume Increase Button Press this button to decrease the volume. 10 MODE Button Press to switch the display signal source.When switched to hear audio without additional attachments. Webcam LED Indicates that produces rich, vibrant sound...

User's Manual for English Edition
Page 18
... paid services. 4 Cable Holder Gather all the cables with this cable holder. 5 USB 2.0 port The Universal Serial Bus (USB) port is compatible with USB devices such as keyboards, mouse devices, cameras, and hard disk drives. 6 LAN port The eight-pin RJ-45 LAN port supports a standard Ethernet cable for connection to a local network. 7 HDMI Input Port HDMI (High-Definition Multimedia Interface) is an uncompressed all-digital audio/ video interface between any audio/video source, such as set-top box or DVD player. 8 HDMI Output Port Please connect this port with...
... paid services. 4 Cable Holder Gather all the cables with this cable holder. 5 USB 2.0 port The Universal Serial Bus (USB) port is compatible with USB devices such as keyboards, mouse devices, cameras, and hard disk drives. 6 LAN port The eight-pin RJ-45 LAN port supports a standard Ethernet cable for connection to a local network. 7 HDMI Input Port HDMI (High-Definition Multimedia Interface) is an uncompressed all-digital audio/ video interface between any audio/video source, such as set-top box or DVD player. 8 HDMI Output Port Please connect this port with...

User's Manual for English Edition
Page 19
... with USB devices such as keyboards, mouse devices, cameras, and hard disk drives. 2 E-SATA + USB 2.0 Combo 1 This port connects to an external Serial-ATA hard disk drive. 2 3 DO NOT insert a different connector to headphones. English Side views Refer to the following diagrams to identify the components on both sides of the system. 1 USB 3.0/ 2.0 port (vary by model) The Universal Serial Bus (USB) port is used in -one PC has a built-in memory card reader that supports SD cards used to connect the system's audio...
... with USB devices such as keyboards, mouse devices, cameras, and hard disk drives. 2 E-SATA + USB 2.0 Combo 1 This port connects to an external Serial-ATA hard disk drive. 2 3 DO NOT insert a different connector to headphones. English Side views Refer to the following diagrams to identify the components on both sides of the system. 1 USB 3.0/ 2.0 port (vary by model) The Universal Serial Bus (USB) port is used in -one PC has a built-in memory card reader that supports SD cards used to connect the system's audio...

User's Manual for English Edition
Page 20
... subwoofer allows you to this jack. See the marketing specifications for opening the tray.You can ONLY be connected to the ASUS All-in-one PC subwoofers or sound devices by right clicking the optical drive in Windows "Computer" and selecting Eject. 8 Optical Drive The built-in optical drive may support compact discs (CD) and/or digital video discs (DVD), and may have recordable (R) or re-writable (RW...
... subwoofer allows you to this jack. See the marketing specifications for opening the tray.You can ONLY be connected to the ASUS All-in-one PC subwoofers or sound devices by right clicking the optical drive in Windows "Computer" and selecting Eject. 8 Optical Drive The built-in optical drive may support compact discs (CD) and/or digital video discs (DVD), and may have recordable (R) or re-writable (RW...

User's Manual for English Edition
Page 21
... the Windows® desktop, click Start > Control Panel > View Devices and Printer. All-in -one PC brings digital life to your command. With a few touches, you use the touch-enabled screen more conveniently. English Using the touch screen All-in -one PC ET2411/ ET2210 Series 21 Showing the touch pointer The touch pointer, or virtual mouse, helps you can make All-in-one PC work...
... the Windows® desktop, click Start > Control Panel > View Devices and Printer. All-in -one PC brings digital life to your command. With a few touches, you use the touch-enabled screen more conveniently. English Using the touch screen All-in -one PC ET2411/ ET2210 Series 21 Showing the touch pointer The touch pointer, or virtual mouse, helps you can make All-in-one PC work...

User's Manual for English Edition
Page 22
... before Show the touch pointer when you touch the screen. Click Change touch input settings. 3. Click OK to achieve the best touch sensitivity. Cleaning the touch screen The touch screen requires periodic cleaning to finish the configuration. To clean the screen: • Turn off the system and disconnect the power cord from foreign objects or excessive dust accumulation. Click...
... before Show the touch pointer when you touch the screen. Click Change touch input settings. 3. Click OK to achieve the best touch sensitivity. Cleaning the touch screen The touch screen requires periodic cleaning to finish the configuration. To clean the screen: • Turn off the system and disconnect the power cord from foreign objects or excessive dust accumulation. Click...

User's Manual for English Edition
Page 26
Plug the wireless dongle for reference only. Avoid other nearby WiFi devices at the back of the panel if the keyboard cable is not long enough. 1 2 Connecting the wireless keyboard and mouse 1. You can begin using the wireless keyboard and mouse. 1. Actual appearances and specifications (wired or wireless) of the keyboard and mouse may vary by territory. 26 All-in -one PC ET2411/ ET2210 Series Install batteries to a USB port. 3. Push the buttons at least 20 cm...
Plug the wireless dongle for reference only. Avoid other nearby WiFi devices at the back of the panel if the keyboard cable is not long enough. 1 2 Connecting the wireless keyboard and mouse 1. You can begin using the wireless keyboard and mouse. 1. Actual appearances and specifications (wired or wireless) of the keyboard and mouse may vary by territory. 26 All-in -one PC ET2411/ ET2210 Series Install batteries to a USB port. 3. Push the buttons at least 20 cm...

User's Manual for English Edition
Page 27
... the normal Windows shutdown process. To bring the system back to the OS, press the Power switch again, click the mouse, touch the display or press any key on the right. All-in-one PC ET2411/ ET2210 Series 27 English Powering on the system Connect the supplied AC adapter to the DC IN jack on the rear panel ( 1 2 3 ) and then press the Power switch on...
... the normal Windows shutdown process. To bring the system back to the OS, press the Power switch again, click the mouse, touch the display or press any key on the right. All-in-one PC ET2411/ ET2210 Series 27 English Powering on the system Connect the supplied AC adapter to the DC IN jack on the rear panel ( 1 2 3 ) and then press the Power switch on...

User's Manual for English Edition
Page 29
English Configuring a wired connection Using a static IP 1. Ensure that you have connected the LAN cable to the All-in -one PC. 2. All-in -one PC ET2411/ ET2210 Series 29 Right-click Local Area Connection and select Properties. Click the network icon with a yellow warning triangle in the left panel. 3. Click Change adapter settings in the Windows® Notification area and select Open Network and Sharing Center.
English Configuring a wired connection Using a static IP 1. Ensure that you have connected the LAN cable to the All-in -one PC. 2. All-in -one PC ET2411/ ET2210 Series 29 Right-click Local Area Connection and select Properties. Click the network icon with a yellow warning triangle in the left panel. 3. Click Change adapter settings in the Windows® Notification area and select Open Network and Sharing Center.

User's Manual for English Edition
Page 34
... ET2411/ ET2210 Series Doing so may damage the device. Configuring audio output settings After connecting a speaker system to your All-in -one PC subwoofers or sound devices by ASUS. DO NOT connect other devices to headphones. English Connecting to external audio devices In addition to built-in stereo speakers (2-channel, left panel and their functions. Audio jack Description Audio Out; Mic In; Right-click the speaker icon in the Windows® notification...
... ET2411/ ET2210 Series Doing so may damage the device. Configuring audio output settings After connecting a speaker system to your All-in -one PC subwoofers or sound devices by ASUS. DO NOT connect other devices to headphones. English Connecting to external audio devices In addition to built-in stereo speakers (2-channel, left panel and their functions. Audio jack Description Audio Out; Mic In; Right-click the speaker icon in the Windows® notification...
User's Manual for English Edition
Page 36
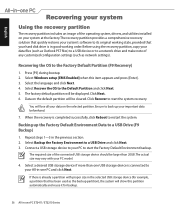
... network settings). Click Next. 6. English Recovering your system Using the recovery partition The recovery partition includes an image of the operating system, drivers, and utilities installed on the selected partition. Repeat steps 1-3 in -one USB storage device is completed successfully, click Reboot to start the system recovery. Select Backup the Factory Environment to the Factory Default Partition (F9 Recovery) 1. Data on the default partition will be larger than one PC ET2411/ ET2210 Series When the recovery is connected...
... network settings). Click Next. 6. English Recovering your system Using the recovery partition The recovery partition includes an image of the operating system, drivers, and utilities installed on the selected partition. Repeat steps 1-3 in -one USB storage device is completed successfully, click Reboot to start the system recovery. Select Backup the Factory Environment to the Factory Default Partition (F9 Recovery) 1. Data on the default partition will be larger than one PC ET2411/ ET2210 Series When the recovery is connected...
User's Manual for English Edition
Page 37
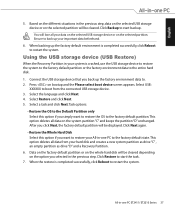
... step, data on the selected USB storage device or on the selected partition will lose all data on bootup and the Please select boot device screen appears. Click Restore to the factory default partition.This option deletes all your hard disk and creates a new system partition as drive "C" , an empty partition as drive "D" and a Recovery Partition. 6. Select USB: XXXXXX to restart the system. You will be displayed. Select a task and click Next...
... step, data on the selected USB storage device or on the selected partition will lose all data on bootup and the Please select boot device screen appears. Click Restore to the factory default partition.This option deletes all your hard disk and creates a new system partition as drive "C" , an empty partition as drive "D" and a Recovery Partition. 6. Select USB: XXXXXX to restart the system. You will be displayed. Select a task and click Next...


