

GUGV Users Manual
Page 3
Table of Contents About this manual...7 Conventions used in this manual 8 Icons...8 Typography...8 Safety precautions...9 Using your Notebook PC 9 Caring for your Notebook PC 10 Proper disposal...11 Chapter 1: Hardware Setup Getting to know your Notebook PC 14 Top View...14 Bottom...19 Right Side...21 Left Side...23 Chapter 2: Using your Notebook PC Getting started...26 Charge your Notebook PC 26 Lift to open the display panel 29 Press the power button 29 Using the touchpad...30 Using the keyboard...37 Function keys...37 Windows® 10 keys...39 Notebook PC E-Manual 3
Table of Contents About this manual...7 Conventions used in this manual 8 Icons...8 Typography...8 Safety precautions...9 Using your Notebook PC 9 Caring for your Notebook PC 10 Proper disposal...11 Chapter 1: Hardware Setup Getting to know your Notebook PC 14 Top View...14 Bottom...19 Right Side...21 Left Side...23 Chapter 2: Using your Notebook PC Getting started...26 Charge your Notebook PC 26 Lift to open the display panel 29 Press the power button 29 Using the touchpad...30 Using the keyboard...37 Function keys...37 Windows® 10 keys...39 Notebook PC E-Manual 3
GUGV Users Manual
Page 4
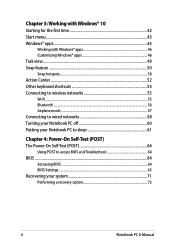
... Action Center...52 Other keyboard shortcuts 53 Connecting to wireless networks 55 Wi-Fi...55 Bluetooth ...56 Airplane mode...57 Connecting to wired networks 58 Turning your Notebook PC off 60 Putting your Notebook PC to sleep 61 Chapter 4: Power-On Self-Test (POST) The Power-On Self-Test (POST 64 Using POST to access BIOS and Troubleshoot 64 BIOS...64 Accessing BIOS...64 BIOS Settings...65 Recovering your system 71 Performing a recovery option 72 4 Notebook PC E-Manual
... Action Center...52 Other keyboard shortcuts 53 Connecting to wireless networks 55 Wi-Fi...55 Bluetooth ...56 Airplane mode...57 Connecting to wired networks 58 Turning your Notebook PC off 60 Putting your Notebook PC to sleep 61 Chapter 4: Power-On Self-Test (POST) The Power-On Self-Test (POST 64 Using POST to access BIOS and Troubleshoot 64 BIOS...64 Accessing BIOS...64 BIOS Settings...65 Recovering your system 71 Performing a recovery option 72 4 Notebook PC E-Manual
GUGV Users Manual
Page 7
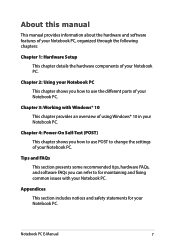
... using Windows® 10 in your Notebook PC. Chapter 2: Using your Notebook PC This chapter shows you can refer to use the different parts of your Notebook PC. Chapter 4: Power-On Self-Test (POST) This chapter shows you how to for your Notebook PC. Chapter 3: Working with your Notebook PC. Notebook PC E-Manual 7 About this manual This manual provides information about the hardware and software features of your Notebook...
... using Windows® 10 in your Notebook PC. Chapter 2: Using your Notebook PC This chapter shows you can refer to use the different parts of your Notebook PC. Chapter 4: Power-On Self-Test (POST) This chapter shows you how to for your Notebook PC. Chapter 3: Working with your Notebook PC. Notebook PC E-Manual 7 About this manual This manual provides information about the hardware and software features of your Notebook...

GUGV Users Manual
Page 10
... as thinners, benzene, or other chemicals on top of warm water. Do not expose your Notebook PC. Do not expose your Notebook PC. Do not place objects on or near gas leaks. 10 Notebook PC E-Manual Caring for your Notebook PC Disconnect the AC power and remove the battery pack (if applicable) before cleaning your Notebook PC using a dry cloth.
... as thinners, benzene, or other chemicals on top of warm water. Do not expose your Notebook PC. Do not expose your Notebook PC. Do not place objects on or near gas leaks. 10 Notebook PC E-Manual Caring for your Notebook PC Disconnect the AC power and remove the battery pack (if applicable) before cleaning your Notebook PC using a dry cloth.

GUGV Users Manual
Page 13
Chapter 1: Hardware Setup Notebook PC E-Manual 13
Chapter 1: Hardware Setup Notebook PC E-Manual 13

GUGV Users Manual
Page 17
... typing. It also enables you to exit the Notebook PC. NOTE: The keyboard layout differs by model or territory. Capital lock indicator This indicator lights up when the capital lock function is activated. WARNING! Notebook PC E-Manual 17 Air vents The air vents allow cool air to enter and warm air to type capitalized letters (such as A, B, C) using your Notebook PC's keyboard. Ensure that paper, books, clothing, cables, or other multimedia functions...
... typing. It also enables you to exit the Notebook PC. NOTE: The keyboard layout differs by model or territory. Capital lock indicator This indicator lights up when the capital lock function is activated. WARNING! Notebook PC E-Manual 17 Air vents The air vents allow cool air to enter and warm air to type capitalized letters (such as A, B, C) using your Notebook PC's keyboard. Ensure that paper, books, clothing, cables, or other multimedia functions...

GUGV Users Manual
Page 20
Audio features are software-controlled. NOTE: • For more details, refer to the Installing an M.2 card section in your Notebook PC. Audio speakers The built-in audio speakers allow cool air to enter and warm air to exit the Notebook PC. Compartment cover This cover protects the reserved spaces in the Upgrade Guide. 20 Notebook PC E-Manual For more details, refer to the Upgrade Guide on our multi- Ensure...
Audio features are software-controlled. NOTE: • For more details, refer to the Installing an M.2 card section in your Notebook PC. Audio speakers The built-in audio speakers allow cool air to enter and warm air to exit the Notebook PC. Compartment cover This cover protects the reserved spaces in the Upgrade Guide. 20 Notebook PC E-Manual For more details, refer to the Upgrade Guide on our multi- Ensure...
GUGV Users Manual
Page 21
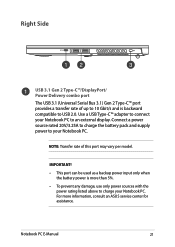
... a backup power input only when the battery power is backward compatible to an external display. For more than 5%. • To prevent any damage, use only power sources with the power rating listed above to your Notebook PC. Right Side USB 3.1 Gen 2 Type-C™/DisplayPort/ Power Delivery combo port The USB 3.1 (Universal Serial Bus 3.1) Gen 2 Type-C™ port provides a transfer rate of this port may vary per model. Notebook PC E-Manual 21 Use a USB Type-C™ adapter to connect...
... a backup power input only when the battery power is backward compatible to an external display. For more than 5%. • To prevent any damage, use only power sources with the power rating listed above to your Notebook PC. Right Side USB 3.1 Gen 2 Type-C™/DisplayPort/ Power Delivery combo port The USB 3.1 (Universal Serial Bus 3.1) Gen 2 Type-C™ port provides a transfer rate of this port may vary per model. Notebook PC E-Manual 21 Use a USB Type-C™ adapter to connect...

GUGV Users Manual
Page 28
... precautions for your Notebook PC's battery: • Only ASUS-authorized technicians should remove the battery inside the device (for non-removable battery only). • Discontinue usage if leakage is connected to disassemble and reassemble the battery (for non-removable battery only). • The battery used in this device may have multiple rating output currents based on the available SKU. • Ensure that it on power adapter mode. • The...
... precautions for your Notebook PC's battery: • Only ASUS-authorized technicians should remove the battery inside the device (for non-removable battery only). • Discontinue usage if leakage is connected to disassemble and reassemble the battery (for non-removable battery only). • The battery used in this device may have multiple rating output currents based on the available SKU. • Ensure that it on power adapter mode. • The...

GUGV Users Manual
Page 37
Notebook PC E-Manual 37 Using the keyboard Function keys The function keys on your Notebook PC's keyboard can trigger the following commands: Turns the speaker on or off Skips to previous track Plays or pauses Skips to next track Toggles the fan mode Turns the display panel on or off Decreases display brightness Increases display brightness Toggles the display mode NOTE: Ensure that the second display is connected to your Notebook PC.
Notebook PC E-Manual 37 Using the keyboard Function keys The function keys on your Notebook PC's keyboard can trigger the following commands: Turns the speaker on or off Skips to previous track Plays or pauses Skips to next track Toggles the fan mode Turns the display panel on or off Decreases display brightness Increases display brightness Toggles the display mode NOTE: Ensure that the second display is connected to your Notebook PC.

GUGV Users Manual
Page 38
Enables or disables the touchpad Puts the Notebook PC into Sleep mode Turns Airplane mode on or off NOTE: When enabled, the Airplane mode disables all wireless connectivity. Displays the drop-down menu Increases brightness for the backlit keyboard Decreases brightness for the backlit keyboard Toggles the Aura lighting effect (left) Toggles the Aura lighting effect (right) 38 Notebook PC E-Manual
Enables or disables the touchpad Puts the Notebook PC into Sleep mode Turns Airplane mode on or off NOTE: When enabled, the Airplane mode disables all wireless connectivity. Displays the drop-down menu Increases brightness for the backlit keyboard Decreases brightness for the backlit keyboard Toggles the Aura lighting effect (left) Toggles the Aura lighting effect (right) 38 Notebook PC E-Manual

GUGV Users Manual
Page 43
... user account Notebook PC E-Manual 43 Change account settings, lock, or sign out from your account Launch an app from the Start screen Launch Taskview Launch an app from the taskbar Launch Search Launch the Start menu Launch All apps Shut down, restart, or put your Notebook PC to sleep Launch Settings Launch File Explorer You can use the Start menu to do these common activities: • Start...
... user account Notebook PC E-Manual 43 Change account settings, lock, or sign out from your account Launch an app from the Start screen Launch Taskview Launch an app from the taskbar Launch Search Launch the Start menu Launch All apps Shut down, restart, or put your Notebook PC to sleep Launch Settings Launch File Explorer You can use the Start menu to do these common activities: • Start...

GUGV Users Manual
Page 64
... service personnel. Using POST to run the BIOS Setup. • You have installed a new system component that run troubleshooting options using any of the following circumstances: • An error message appears onscreen during system bootup and requests you to access BIOS and Troubleshoot During POST, you can access the BIOS settings or run when you change the default BIOS settings except in the Notebook PC. Accessing BIOS Enter the BIOS settings by using the function keys of your Notebook PC...
... service personnel. Using POST to run the BIOS Setup. • You have installed a new system component that run troubleshooting options using any of the following circumstances: • An error message appears onscreen during system bootup and requests you to access BIOS and Troubleshoot During POST, you can access the BIOS settings or run when you change the default BIOS settings except in the Notebook PC. Accessing BIOS Enter the BIOS settings by using the function keys of your Notebook PC...
GUGV Users Manual
Page 65
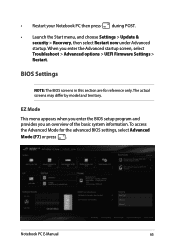
... enter the BIOS setup program and provides you enter the Advanced startup screen, select Troubleshoot > Advanced options > UEFI Firmware Settings > Restart. The actual screens may differ by model and territory. • Restart your Notebook PC then press during POST. • Launch the Start menu, and choose Settings > Update & security > Recovery, then select Restart now under Advanced startup. When you an overview of the basic system information. To access the Advanced Mode...
... enter the BIOS setup program and provides you enter the Advanced startup screen, select Troubleshoot > Advanced options > UEFI Firmware Settings > Restart. The actual screens may differ by model and territory. • Restart your Notebook PC then press during POST. • Launch the Start menu, and choose Settings > Update & security > Recovery, then select Restart now under Advanced startup. When you an overview of the basic system information. To access the Advanced Mode...

GUGV Users Manual
Page 67
Notebook PC E-Manual 67 It also allows you will be prompted to input this before entering BIOS. NOTE: • If you install a User Password, you will be prompted to input this before entering the operating system. • If you install an Administrator Password, you to control the access to set up the administrator and user password of your Notebook PC's hard disk drive, input/output (I/O) interface, and USB interface. Security This menu allows you to your Notebook PC.
Notebook PC E-Manual 67 It also allows you will be prompted to input this before entering BIOS. NOTE: • If you install a User Password, you will be prompted to input this before entering the operating system. • If you install an Administrator Password, you to control the access to set up the administrator and user password of your Notebook PC's hard disk drive, input/output (I/O) interface, and USB interface. Security This menu allows you to your Notebook PC.
GUGV Users Manual
Page 70
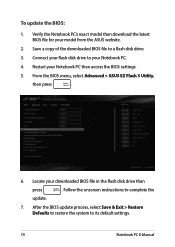
... default settings. 70 Notebook PC E-Manual Restart your downloaded BIOS file in the flash disk drive then press . Locate your Notebook PC then access the BIOS settings. 5. After the BIOS update process, select Save & Exit > Restore Defaults to restore the system to a flash disk drive. 3. To update the BIOS: 1. Connect your flash disk drive to complete the update. 7. Follow the onscreen instructions to your model from the ASUS website. 2. Verify the Notebook PC's exact model then download the latest BIOS file for your Notebook PC. 4. From the BIOS menu...
... default settings. 70 Notebook PC E-Manual Restart your downloaded BIOS file in the flash disk drive then press . Locate your Notebook PC then access the BIOS settings. 5. After the BIOS update process, select Save & Exit > Restore Defaults to restore the system to a flash disk drive. 3. To update the BIOS: 1. Connect your flash disk drive to complete the update. 7. Follow the onscreen instructions to your model from the ASUS website. 2. Verify the Notebook PC's exact model then download the latest BIOS file for your Notebook PC. 4. From the BIOS menu...

GUGV Users Manual
Page 76
...; Update Windows® periodically to ensure that you take out the battery if the battery is removable. • Disconnect all external devices and ensure you maximize the use of time (at least a month), we recommend that your applications have the following items prior to create a backup data in ID and password - Product key for your operating systems and other installed applications - Useful tips for your Notebook...
...; Update Windows® periodically to ensure that you take out the battery if the battery is removable. • Disconnect all external devices and ensure you maximize the use of time (at least a month), we recommend that your applications have the following items prior to create a backup data in ID and password - Product key for your operating systems and other installed applications - Useful tips for your Notebook...

GUGV Users Manual
Page 77
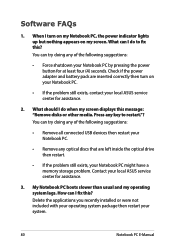
... display panel. 3. Although these dots normally appear onscreen, they will not affect your Notebook PC may use the function keys or the display settings in your operating system to adjust the display brightness. • If you are not using any Wi-Fi connection, switch your system into Airplane mode. • Disconnect unused USB devices. • Close unused applications, especially those that take up too much system memory. You can I fix...
... display panel. 3. Although these dots normally appear onscreen, they will not affect your Notebook PC may use the function keys or the display settings in your operating system to adjust the display brightness. • If you are not using any Wi-Fi connection, switch your system into Airplane mode. • Disconnect unused USB devices. • Close unused applications, especially those that take up too much system memory. You can I fix...
GUGV Users Manual
Page 78
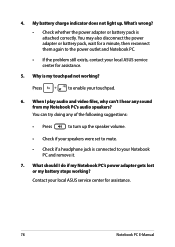
...; Press to turn up . Contact your Notebook PC and remove it. 7. My battery charge indicator does not light up the speaker volume. • Check if your speakers were set to mute. • Check if a headphone jack is connected to the power outlet and Notebook PC. • If the problem still exists, contact your touchpad. 6. When I do if my Notebook PC's power adapter gets lost or my battery stops working ? What...
...; Press to turn up . Contact your Notebook PC and remove it. 7. My battery charge indicator does not light up the speaker volume. • Check if your speakers were set to mute. • Check if a headphone jack is connected to the power outlet and Notebook PC. • If the problem still exists, contact your touchpad. 6. When I do if my Notebook PC's power adapter gets lost or my battery stops working ? What...
GUGV Users Manual
Page 80
... any key to fix this message: "Remove disks or other media. Check if the power adapter and battery pack are left inside the optical drive then restart. • If the problem still exists, your local ASUS service center for assistance. 3. What should I do when my screen displays this ? How can try doing any of the following suggestions: • Remove all connected USB devices then restart your Notebook PC. • Remove...
... any key to fix this message: "Remove disks or other media. Check if the power adapter and battery pack are left inside the optical drive then restart. • If the problem still exists, your local ASUS service center for assistance. 3. What should I do when my screen displays this ? How can try doing any of the following suggestions: • Remove all connected USB devices then restart your Notebook PC. • Remove...


