
GUGV Users Manual
Page 4
... 60 Putting your Notebook PC to sleep 61 Chapter 4: Power-On Self-Test (POST) The Power-On Self-Test (POST 64 Using POST to access BIOS and Troubleshoot 64 BIOS...64 Accessing BIOS...64 BIOS Settings...65 Recovering your system 71 Performing a recovery option 72 4 Notebook PC E-Manual
... 60 Putting your Notebook PC to sleep 61 Chapter 4: Power-On Self-Test (POST) The Power-On Self-Test (POST 64 Using POST to access BIOS and Troubleshoot 64 BIOS...64 Accessing BIOS...64 BIOS Settings...65 Recovering your system 71 Performing a recovery option 72 4 Notebook PC E-Manual

GUGV Users Manual
Page 64
... Self-Test (POST) The POST (Power-On Self-Test) is installed as a permanent part of the Notebook PC's architecture. Accessing BIOS Enter the BIOS settings by using the function keys of your Notebook PC. You may result to system instability or boot failure. The software that controls the... POST is a series of software-controlled diagnostic tests that run when you can access the BIOS settings or run the BIOS Setup. • You have installed a new system component that are needed for more details. We strongly recommend that you to...
... Self-Test (POST) The POST (Power-On Self-Test) is installed as a permanent part of the Notebook PC's architecture. Accessing BIOS Enter the BIOS settings by using the function keys of your Notebook PC. You may result to system instability or boot failure. The software that controls the... POST is a series of software-controlled diagnostic tests that run when you can access the BIOS settings or run the BIOS Setup. • You have installed a new system component that are needed for more details. We strongly recommend that you to...
GUGV Users Manual
Page 65
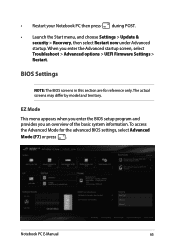
...under Advanced startup. The actual screens may differ by model and territory. EZ Mode This menu appears when you enter the BIOS setup program and provides you enter the Advanced startup screen, select Troubleshoot > Advanced options > UEFI Firmware Settings > Restart.... BIOS Settings NOTE: The BIOS screens in this section are for the advanced BIOS settings, select Advanced Mode (F7) or press . To access the Advanced Mode for reference only. Notebook PC E-Manual...
...under Advanced startup. The actual screens may differ by model and territory. EZ Mode This menu appears when you enter the BIOS setup program and provides you enter the Advanced startup screen, select Troubleshoot > Advanced options > UEFI Firmware Settings > Restart.... BIOS Settings NOTE: The BIOS screens in this section are for the advanced BIOS settings, select Advanced Mode (F7) or press . To access the Advanced Mode for reference only. Notebook PC E-Manual...

GUGV Users Manual
Page 67
NOTE: • If you install a User Password, you will be prompted to input this before entering the operating system. • If you install an Administrator Password, you will be prompted to input this before entering BIOS. It also allows you to control the access to your Notebook PC. Notebook PC E-Manual 67 Security This menu allows you to set up the administrator and user password of your Notebook PC's hard disk drive, input/output (I/O) interface, and USB interface.
NOTE: • If you install a User Password, you will be prompted to input this before entering the operating system. • If you install an Administrator Password, you will be prompted to input this before entering BIOS. It also allows you to control the access to your Notebook PC. Notebook PC E-Manual 67 Security This menu allows you to set up the administrator and user password of your Notebook PC's hard disk drive, input/output (I/O) interface, and USB interface.

GUGV Users Manual
Page 69
Save & Exit To keep your configuration settings, select Save Changes and Exit before exiting the BIOS. Notebook PC E-Manual 69
Save & Exit To keep your configuration settings, select Save Changes and Exit before exiting the BIOS. Notebook PC E-Manual 69
GUGV Users Manual
Page 70
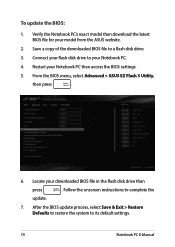
... to a flash disk drive. 3. To update the BIOS: 1. From the BIOS menu, select Advanced > ASUS EZ Flash 3 Utility, then press . 6. After the BIOS update process, select Save & Exit > Restore Defaults to restore the system to your downloaded BIOS file in the flash disk drive then press . Restart... your model from the ASUS website. 2. Verify the Notebook PC's exact model then download the latest BIOS file for your Notebook PC then access the BIOS settings. 5. Locate your Notebook PC...
... to a flash disk drive. 3. To update the BIOS: 1. From the BIOS menu, select Advanced > ASUS EZ Flash 3 Utility, then press . 6. After the BIOS update process, select Save & Exit > Restore Defaults to restore the system to your downloaded BIOS file in the flash disk drive then press . Restart... your model from the ASUS website. 2. Verify the Notebook PC's exact model then download the latest BIOS file for your Notebook PC then access the BIOS settings. 5. Locate your Notebook PC...

