User Guide
Page 6
H81M-CS specifications summary CPU Chipset Memory Graphics Expansion slots Storage LGA1150 socket for... Refer to the physical characteristics of individual CPUs. Please refer to Memory QVL for details. ** Refer to www.asus.com for the 4th Generation and New 4th Generation Intel® CoreTM i7/ i5 / i3, Pentium® ...Smart Connect Technology** * Due to the limitation of the above items is subject to www.asus.com for the following items. Motherboard Cables Accessories Application DVD Documentation ASUS H81M-CS motherboard 2 x Serial ATA 6.0 Gb/s cables 1 x I/O Shield Support DVD User ...
H81M-CS specifications summary CPU Chipset Memory Graphics Expansion slots Storage LGA1150 socket for... Refer to the physical characteristics of individual CPUs. Please refer to Memory QVL for details. ** Refer to www.asus.com for the 4th Generation and New 4th Generation Intel® CoreTM i7/ i5 / i3, Pentium® ...Smart Connect Technology** * Due to the limitation of the above items is subject to www.asus.com for the following items. Motherboard Cables Accessories Application DVD Documentation ASUS H81M-CS motherboard 2 x Serial ATA 6.0 Gb/s cables 1 x I/O Shield Support DVD User ...
User Guide
Page 9
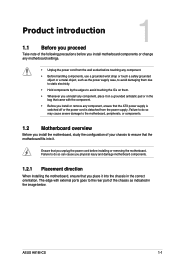
... you physical injury and damage motherboard components. 1.2.1 Placement direction When installing the motherboard, ensure that the motherboard fits into the chassis in the correct orientation. ASUS H81M-CS 1-1 Product introduction 1 1.1 Before you proceed Take note of the chassis as the power supply case, to avoid damaging them due to static electricity. • Hold...
... you physical injury and damage motherboard components. 1.2.1 Placement direction When installing the motherboard, ensure that the motherboard fits into the chassis in the correct orientation. ASUS H81M-CS 1-1 Product introduction 1 1.1 Before you proceed Take note of the chassis as the power supply case, to avoid damaging them due to static electricity. • Hold...

User Guide
Page 11
...CPU socket 6. Serial port connectors (10-1 pin COM) Page 1-19 1-15 1-16 1-18 1-3 1-7 1-17 1-11 1-19 1-16 1-17 1-18 1-14 1-15 1-14 ASUS H81M-CS 1-3 Clear RTC RAM (2-pin CLRTC) 9. DDR3 DIMM slots 7. TPM header (20-1 pin TPM) 2. CPU and chassis fan connectors (4-pin CPU_FAN, 4-pin CHA_FAN) 3. Intel&#...174; F_PANEL 14 H81 8 AUDIO USB56 USB910 9 SPEAKER SATA3G_2 SATA3G_1 Realtek® 8111GR PCIEX1_1 64Mb BIOS 10 ALC 887 CHASSIS H81M-CS 11 AAFP PCIEX16 13 12 1.2.4 Layout contents Connectors/Jumpers/Slots/LED 1. System panel connector (10-1 pin F_PANEL) 10.
...CPU socket 6. Serial port connectors (10-1 pin COM) Page 1-19 1-15 1-16 1-18 1-3 1-7 1-17 1-11 1-19 1-16 1-17 1-18 1-14 1-15 1-14 ASUS H81M-CS 1-3 Clear RTC RAM (2-pin CLRTC) 9. DDR3 DIMM slots 7. TPM header (20-1 pin TPM) 2. CPU and chassis fan connectors (4-pin CPU_FAN, 4-pin CHA_FAN) 3. Intel&#...174; F_PANEL 14 H81 8 AUDIO USB56 USB910 9 SPEAKER SATA3G_2 SATA3G_1 Realtek® 8111GR PCIEX1_1 64Mb BIOS 10 ALC 887 CHASSIS H81M-CS 11 AAFP PCIEX16 13 12 1.2.4 Layout contents Connectors/Jumpers/Slots/LED 1. System panel connector (10-1 pin F_PANEL) 10.

User Guide
Page 13
2 3 4 C 5 A B 1.3.2 CPU heatsink and fan assembly installation Apply the Thermal Interface Material to the CPU heatsink and CPU before you install the heatsink and fan if necessary. ASUS H81M-CS 1-5
2 3 4 C 5 A B 1.3.2 CPU heatsink and fan assembly installation Apply the Thermal Interface Material to the CPU heatsink and CPU before you install the heatsink and fan if necessary. ASUS H81M-CS 1-5

User Guide
Page 15
...and its corresponding timing or the loaded X.M.P. Use a maximum of 3GB system memory if you are available in Channel A and Channel B. ASUS H81M-CS 1-7 Check with the retailer to get the correct memory modules. • Due to the memory address limitation on the motherboard, the actual...512 megabits (Mb) chips or less. • Memory modules with 8GB or above DIMMs. ASUS will run at http://support.microsoft. DIMM_A1 DIMM_B1 Channel Channel A Channel B Sockets DIMM_A1 DIMM_B1 H81M-CS H81M-CS 240-pin DDR3 DIMM sockets 1.4.2 Memory configurations You may install 1GB, 2GB, 4GB, and ...
...and its corresponding timing or the loaded X.M.P. Use a maximum of 3GB system memory if you are available in Channel A and Channel B. ASUS H81M-CS 1-7 Check with the retailer to get the correct memory modules. • Due to the memory address limitation on the motherboard, the actual...512 megabits (Mb) chips or less. • Memory modules with 8GB or above DIMMs. ASUS will run at http://support.microsoft. DIMM_A1 DIMM_B1 Channel Channel A Channel B Sockets DIMM_A1 DIMM_B1 H81M-CS H81M-CS 240-pin DDR3 DIMM sockets 1.4.2 Memory configurations You may install 1GB, 2GB, 4GB, and ...

User Guide
Page 17
... and press firmly until the card is already installed in a chassis). 3. Remove the bracket opposite the slot that the cards do not need IRQ assignments. ASUS H81M-CS 1-9
... and press firmly until the card is already installed in a chassis). 3. Remove the bracket opposite the slot that the cards do not need IRQ assignments. ASUS H81M-CS 1-9

User Guide
Page 19
... steps above do not need to clear the RTC when the system hangs due to short the two pins. 3. For system failure due to re- ASUS H81M-CS 1-11 1.6 Headers 1. Turn OFF the computer and unplug the power cord. 2. Clear RTC RAM (2-pin CLRTC) This header allows you to clear the Real Time... RTC RAM data. You can clear the CMOS memory of date, time, and system setup parameters by erasing the CMOS RTC RAM data. H81M-CS CLRTC GND +3V_BAT PIN 1 H81M-CS Clear RTC RAM To erase the RTC RAM: 1. After clearing the CMOS, reinstall the battery. • You do not help, remove the ...
... steps above do not need to clear the RTC when the system hangs due to short the two pins. 3. For system failure due to re- ASUS H81M-CS 1-11 1.6 Headers 1. Turn OFF the computer and unplug the power cord. 2. Clear RTC RAM (2-pin CLRTC) This header allows you to clear the Real Time... RTC RAM data. You can clear the CMOS memory of date, time, and system setup parameters by erasing the CMOS RTC RAM data. H81M-CS CLRTC GND +3V_BAT PIN 1 H81M-CS Clear RTC RAM To erase the RTC RAM: 1. After clearing the CMOS, reinstall the battery. • You do not help, remove the ...

User Guide
Page 21
This port connects a headphone or a speaker. USB 2.0 ports 3 and 4. This port is for USB 2.0/1.1 devices. 9. ASUS H81M-CS 1-13 5. This port connects the tape, CD, DVD player, or other audio sources. 6. These two 4-pin Universal Serial Bus (USB) ports are for a PS/2 keyboard. ...
This port connects a headphone or a speaker. USB 2.0 ports 3 and 4. This port is for USB 2.0/1.1 devices. 9. ASUS H81M-CS 1-13 5. This port connects the tape, CD, DVD player, or other audio sources. 6. These two 4-pin Universal Serial Bus (USB) ports are for a PS/2 keyboard. ...

User Guide
Page 23
... jumpers! USB56 USB910 USB+5V USB_P5USB_P5+ GND NC USB+5V USB_P9USB_P9+ GND NC PIN 1 PIN 1 USB+5V USB_P6USB_P6+ GND USB+5V USB_P10USB_P10+ GND H81M-CS H81M-CS USB2.0 connectors Never connect a 1394 cable to the fan connectors. CPU_FAN CPU FAN PWM CPU FAN IN CPU FAN PWR GND... motherboard! Insufficient air flow inside the system may damage the motherboard components. Connect the USB module cable to any of the system chassis. ASUS H81M-CS 1-15 CPU and chassis fan connectors (4-pin CPU_FAN, 4-pin CHA_FAN) Connect the fan cables to the fan connectors on the fan connectors!
... jumpers! USB56 USB910 USB+5V USB_P5USB_P5+ GND NC USB+5V USB_P9USB_P9+ GND NC PIN 1 PIN 1 USB+5V USB_P6USB_P6+ GND USB+5V USB_P10USB_P10+ GND H81M-CS H81M-CS USB2.0 connectors Never connect a 1394 cable to the fan connectors. CPU_FAN CPU FAN PWM CPU FAN IN CPU FAN PWR GND... motherboard! Insufficient air flow inside the system may damage the motherboard components. Connect the USB module cable to any of the system chassis. ASUS H81M-CS 1-15 CPU and chassis fan connectors (4-pin CPU_FAN, 4-pin CHA_FAN) Connect the fan cables to the fan connectors on the fan connectors!
User Guide
Page 25
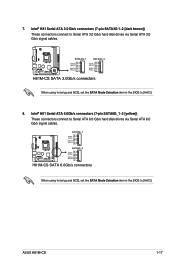
...Mode Selection item in the BIOS to [AHCI]. 8. SATA6G_1 GND RSATA_TXP1 RSATA_TXN1 GND RSATA_RXN1 RSATA_RXP1 GND H81M-CS SATA6G_2 GND RSATA_TXP2 RSATA_TXN2 GND RSATA_RXN2 RSATA_RXP2 GND H81M-CS SATA 6.0Gb/s connectors When using hot-plug and NCQ, set the SATA Mode Selection item in .../s connectors (7-pin SATA6G_1~2 [yellow]) These connectors connect to Serial ATA 3.0 Gb/s hard disk drives via Serial ATA 6.0 Gb/s signal cables. ASUS H81M-CS 1-17 Intel® H81 Serial ATA 3.0 Gb/s connectors (7-pin SATA3G 1~2 [dark brown]) These connectors connect to Serial ATA 6.0 Gb/s hard...
...Mode Selection item in the BIOS to [AHCI]. 8. SATA6G_1 GND RSATA_TXP1 RSATA_TXN1 GND RSATA_RXN1 RSATA_RXP1 GND H81M-CS SATA6G_2 GND RSATA_TXP2 RSATA_TXN2 GND RSATA_RXN2 RSATA_RXP2 GND H81M-CS SATA 6.0Gb/s connectors When using hot-plug and NCQ, set the SATA Mode Selection item in .../s connectors (7-pin SATA6G_1~2 [yellow]) These connectors connect to Serial ATA 3.0 Gb/s hard disk drives via Serial ATA 6.0 Gb/s signal cables. ASUS H81M-CS 1-17 Intel® H81 Serial ATA 3.0 Gb/s connectors (7-pin SATA3G 1~2 [dark brown]) These connectors connect to Serial ATA 6.0 Gb/s hard...

User Guide
Page 27
..., protects digital identities, and ensures platform integrity. +PWR LED PWR BTN +HDD_LED RESET 11. ASUS H81M-CS 1-19 Connect the HDD Activity LED cable to this connector. H81M-CS TPM LCLK LFRAME# LREST# LAD3 +3V LAD0 NC +3VSB GND LPCPD# GND NC LAD2 LAD1... Activity LED. System panel connector (10-1 pin F_PANEL) This connector supports several chassis-mounted functions. F_PANEL H81M-CS GND PWR PWR_LEDPWR_LED+ (NC) HWRST# Ground HDD_LEDHDD_LED+ PIN 1 H81M-CS System panel connector • System power LED (2-pin PWR_LED) This 2-pin connector is purchased separately. TPM...
..., protects digital identities, and ensures platform integrity. +PWR LED PWR BTN +HDD_LED RESET 11. ASUS H81M-CS 1-19 Connect the HDD Activity LED cable to this connector. H81M-CS TPM LCLK LFRAME# LREST# LAD3 +3V LAD0 NC +3VSB GND LPCPD# GND NC LAD2 LAD1... Activity LED. System panel connector (10-1 pin F_PANEL) This connector supports several chassis-mounted functions. F_PANEL H81M-CS GND PWR PWR_LEDPWR_LED+ (NC) HWRST# Ground HDD_LEDHDD_LED+ PIN 1 H81M-CS System panel connector • System power LED (2-pin PWR_LED) This 2-pin connector is purchased separately. TPM...
User Guide
Page 29
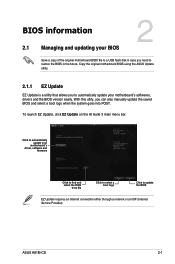
...information 2.1 Managing and updating your BIOS 2 Save a copy of the original motherboard BIOS file to a USB flash disk in the future. ASUS H81M-CS 2-1 With this utlity, you need to update the BIOS EZ Update requires an Internet connection either through a network or an ISP (Internet ...Service Provider). Copy the original motherboard BIOS using the ASUS Update utility. 2.1.1 EZ Update EZ Update is a utility that allows you to automatically update your motherboard's driver, software and firmware ...
...information 2.1 Managing and updating your BIOS 2 Save a copy of the original motherboard BIOS file to a USB flash disk in the future. ASUS H81M-CS 2-1 With this utlity, you need to update the BIOS EZ Update requires an Internet connection either through a network or an ISP (Internet ...Service Provider). Copy the original motherboard BIOS using the ASUS Update utility. 2.1.1 EZ Update EZ Update is a utility that allows you to automatically update your motherboard's driver, software and firmware ...

User Guide
Page 31
... • Prepare the motherboard support DVD and a USB flash drive. • Download the latest BIOS file and BIOS Updater from the ASUS website at www.asus.com. Recovering the BIOS To recover the BIOS: 1. The system requires you press to load default BIOS values. Ensure that your computer ... the removable device to H81MCS.CAP. • The BIOS file in the support DVD may not be the latest version. ASUS H81M-CS 2-3 2.1.3 ASUS CrashFree BIOS 3 utility The ASUS CrashFree BIOS 3 is an auto recovery tool that allows you to update the BIOS in DOS environment. Insert the support DVD...
... • Prepare the motherboard support DVD and a USB flash drive. • Download the latest BIOS file and BIOS Updater from the ASUS website at www.asus.com. Recovering the BIOS To recover the BIOS: 1. The system requires you press to load default BIOS values. Ensure that your computer ... the removable device to H81MCS.CAP. • The BIOS file in the support DVD may not be the latest version. ASUS H81M-CS 2-3 2.1.3 ASUS CrashFree BIOS 3 utility The ASUS CrashFree BIOS 3 is an auto recovery tool that allows you to update the BIOS in DOS environment. Insert the support DVD...

User Guide
Page 33
... Files panel then press keys to prevent system boot failure. Restart your motherboard user guide for DOS V1.30 [2014/01/01] Current ROM BOARD: H81M-CS VER: 0302 (H :00 B :00) DATE: 07/15/2014 PATH: C:\ Update ROM BOARD: Unknown VER: Unknown DATE: Unknown C: FORMAN~1 D: H81MCS....Esc] Exit [V] Drive Info 3. DO NOT shut down or reset the system while updating the BIOS to select the BIOS file and press . 4. ASUS H81M-CS 2-5 See Chapter 2 of your computer. Select the Load Optimized Defaults item under the Exit BIOS menu. After the BIOS Updater checks the selected BIOS...
... Files panel then press keys to prevent system boot failure. Restart your motherboard user guide for DOS V1.30 [2014/01/01] Current ROM BOARD: H81M-CS VER: 0302 (H :00 B :00) DATE: 07/15/2014 PATH: C:\ Update ROM BOARD: Unknown VER: Unknown DATE: Unknown C: FORMAN~1 D: H81MCS....Esc] Exit [V] Drive Info 3. DO NOT shut down or reset the system while updating the BIOS to select the BIOS file and press . 4. ASUS H81M-CS 2-5 See Chapter 2 of your computer. Select the Load Optimized Defaults item under the Exit BIOS menu. After the BIOS Updater checks the selected BIOS...

User Guide
Page 35
... is installed to the system. To access the Advanced Mode, click Advanced Mode(F7) or press . The default screen for details. ASUS H81M-CS 2-7 Selects the display language of the BIOS setup program Displays the CPU/motherboard temperature, CPU core voltage, DRAM information, CPU/chassis fan... the changes, saves the changes and resets the system, or enters the Advanced Mode Power Saving mode Selects the boot device ASUS Optimal mode Loads optimized default Selects the priority Displays the system properties Advanced mode Normal mode of the basic system information, and...
... is installed to the system. To access the Advanced Mode, click Advanced Mode(F7) or press . The default screen for details. ASUS H81M-CS 2-7 Selects the display language of the BIOS setup program Displays the CPU/motherboard temperature, CPU core voltage, DRAM information, CPU/chassis fan... the changes, saves the changes and resets the system, or enters the Advanced Mode Power Saving mode Selects the boot device ASUS Optimal mode Loads optimized default Selects the priority Displays the system properties Advanced mode Normal mode of the basic system information, and...

User Guide
Page 37
... submenu options • User-configurable items such as language and boot device order • Configuration items such as Memory SPD Information, system time and date ASUS H81M-CS 2-9 2.3 My Favorites MyFavorites is your personal space where you want to add.
... submenu options • User-configurable items such as language and boot device order • Configuration items such as Memory SPD Information, system time and date ASUS H81M-CS 2-9 2.3 My Favorites MyFavorites is your personal space where you want to add.

User Guide
Page 39
2.5 Ai Tweaker menu The Ai Tweaker menu items allow you installed on the motherboard. Scroll down to malfunction. The configuration options for this section vary depending on the CPU and DIMM model you to configure overclocking-related items. Be cautious when changing the settings of the Ai Tweaker menu items. Incorrect field values can cause the system to display the following items: ASUS H81M-CS 2-11
2.5 Ai Tweaker menu The Ai Tweaker menu items allow you installed on the motherboard. Scroll down to malfunction. The configuration options for this section vary depending on the CPU and DIMM model you to configure overclocking-related items. Be cautious when changing the settings of the Ai Tweaker menu items. Incorrect field values can cause the system to display the following items: ASUS H81M-CS 2-11

User Guide
Page 41
2.7 Monitor menu The Monitor menu displays the system temperature/power status, and allows you to display the following items: ASUS H81M-CS 2-13 Scroll down to change the fan settings.
2.7 Monitor menu The Monitor menu displays the system temperature/power status, and allows you to display the following items: ASUS H81M-CS 2-13 Scroll down to change the fan settings.

User Guide
Page 43
ASUS H81M-CS 2-15 Select an item then press to display the submenu. 2.10 Exit menu The Exit menu items allow you to load the optimal default values for the BIOS items, and save or discard your changes to configure options for special functions. 2.9 Tool menu The Tools menu items allow you to the BIOS items. You can access the EZ Mode from the Exit menu.
ASUS H81M-CS 2-15 Select an item then press to display the submenu. 2.10 Exit menu The Exit menu items allow you to load the optimal default values for the BIOS items, and save or discard your changes to configure options for special functions. 2.9 Tool menu The Tools menu items allow you to the BIOS items. You can access the EZ Mode from the Exit menu.

User Guide
Page 45
.... Operation is subject to provide reasonable protection against harmful interference in a particular installation. Cet appareil est conforme aux normes CNR exemptes de licence d'Industrie Canada. ASUS H81M-CS A-1
.... Operation is subject to provide reasonable protection against harmful interference in a particular installation. Cet appareil est conforme aux normes CNR exemptes de licence d'Industrie Canada. ASUS H81M-CS A-1


