User Manual
Page 114
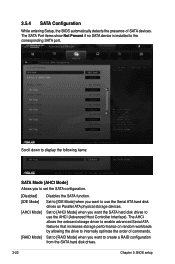
... from the SATA hard disk drives. 3-22 Chapter 3: BIOS setup Scroll down to display the following items: SATA Mode [AHCI Mode] Allows you want to set the SATA configuration. [Disabled] [IDE Mode] [AHCI Mode] [RAID Mode] Disables the SATA function. Set to [AHCI Mode] when you want the SATA hard disk drives.... The SATA Port items show Not Present if no SATA device is installed to use the AHCI (Advanced Host Controller Interface). 3.5.4 SATA Configuration While entering Setup, the BIOS automatically detects the presence of commands.
... from the SATA hard disk drives. 3-22 Chapter 3: BIOS setup Scroll down to display the following items: SATA Mode [AHCI Mode] Allows you want to set the SATA configuration. [Disabled] [IDE Mode] [AHCI Mode] [RAID Mode] Disables the SATA function. Set to [AHCI Mode] when you want the SATA hard disk drives.... The SATA Port items show Not Present if no SATA device is installed to use the AHCI (Advanced Host Controller Interface). 3.5.4 SATA Configuration While entering Setup, the BIOS automatically detects the presence of commands.

User Manual
Page 118
...Enabled] and install the JMicron JMB36X Controller Driver from the motherboard support DVD. 3-26 Chapter 3: BIOS setup Intel 82583 LAN [Enabled] [Enabled] Enables the Intel 82583 LAN controller. [Disabled] Disables the ...] and allows you to enable or disable the OptionRom of commands. [RAID S�e�t�t�o�[�R�A��ID��]...65533;A��h�a�rd��d�i�s�k�d�r�iv�e��s as Parallel ATA physical storage devices. [AHCI] Set to...
...Enabled] and install the JMicron JMB36X Controller Driver from the motherboard support DVD. 3-26 Chapter 3: BIOS setup Intel 82583 LAN [Enabled] [Enabled] Enables the Intel 82583 LAN controller. [Disabled] Disables the ...] and allows you to enable or disable the OptionRom of commands. [RAID S�e�t�t�o�[�R�A��ID��]...65533;A��h�a�rd��d�i�s�k�d�r�iv�e��s as Parallel ATA physical storage devices. [AHCI] Set to...

User Manual
Page 145
... ASUS Maximus IV Extreme-Z 4-1 The Drivers menu shows the available device drivers if the system detects installed devices. Click an item to open the folder of the support DVD are subject to change at www.asus...ASUS website at any time without notice. The Utilities menu shows the applications and other software that you want to use the devices. Double-click the ASSETUP.EXE to create the RAID/...DVD to locate the file ASSETUP.EXE from the BIN folder. Use the setup procedures presented in your hardware. • Motherboard settings and hardware options vary. The Manual ...
... ASUS Maximus IV Extreme-Z 4-1 The Drivers menu shows the available device drivers if the system detects installed devices. Click an item to open the folder of the support DVD are subject to change at www.asus...ASUS website at any time without notice. The Utilities menu shows the applications and other software that you want to use the devices. Double-click the ASSETUP.EXE to create the RAID/...DVD to locate the file ASSETUP.EXE from the BIN folder. Use the setup procedures presented in your hardware. • Motherboard settings and hardware options vary. The Manual ...
User Manual
Page 165
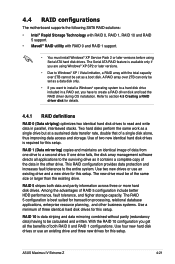
... drive but at a sustained data transfer rate, double that of RAID 5 configuration include better HDD performance, fault tolerance, and higher storage capacity. RAID 5 stripes both RAID 0 and RAID 1 configurations. ASUS Maximus IV Extreme-Z 4-21 Use two new drives or use an existing drive and three new drives for this setup. Among the advantages of a single disk alone, thus improving...
... drive but at a sustained data transfer rate, double that of RAID 5 configuration include better HDD performance, fault tolerance, and higher storage capacity. RAID 5 stripes both RAID 0 and RAID 1 configurations. ASUS Maximus IV Extreme-Z 4-21 Use two new drives or use an existing drive and three new drives for this setup. Among the advantages of a single disk alone, thus improving...

User Manual
Page 166
... do this: 1. To install the SATA hard disks for details on entering and navigating through the BIOS Setup. Enter the BIOS Setup during POST. 2. For optimal performance, install identical drives of SATA ports to Chapter 3 for a RAID configuration: 1. Connect a SATA power cable to the power connector on the system. 2. During POST, press + to...
... do this: 1. To install the SATA hard disks for details on entering and navigating through the BIOS Setup. Enter the BIOS Setup during POST. 2. For optimal performance, install identical drives of SATA ports to Chapter 3 for a RAID configuration: 1. Connect a SATA power cable to the power connector on the system. 2. During POST, press + to...

User Manual
Page 167
... include in creating the volume. [↑↓]-Prev/Next [SPACE]-SelectDisk [ENTER]-Done ASUS Maximus IV Extreme-Z 4-23 When the Disks item is selected, press to select the hard disk drives you to create, and then press . 4. Option ROM - When the RAID Level item is 16 characters or less. From the utility main menu, select... Menu [ENTER]-Select 2. The utility supports maximum four hard disk drives for reference only and may not exactly match the items on your screen. The RAID BIOS setup screens shown in this section are for...
... include in creating the volume. [↑↓]-Prev/Next [SPACE]-SelectDisk [ENTER]-Done ASUS Maximus IV Extreme-Z 4-23 When the Disks item is selected, press to select the hard disk drives you to create, and then press . 4. Option ROM - When the RAID Level item is 16 characters or less. From the utility main menu, select... Menu [ENTER]-Select 2. The utility supports maximum four hard disk drives for reference only and may not exactly match the items on your screen. The RAID BIOS setup screens shown in this section are for...
User Manual
Page 170
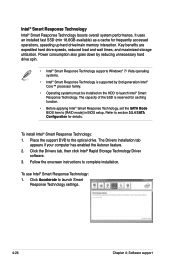
... of the SSD is supported by 2nd generation Intel® Core™ processor family. • Operating systems must be installed on the HDD to [RAID mode] in BIOS setup. Intel® Smart Response Technology Intel® Smart Response Technology boosts overall system performance. Place the support DVD to section 3.5.4 SATA Configuration for...
... of the SSD is supported by 2nd generation Intel® Core™ processor family. • Operating systems must be installed on the HDD to [RAID mode] in BIOS setup. Intel® Smart Response Technology Intel® Smart Response Technology boosts overall system performance. Place the support DVD to section 3.5.4 SATA Configuration for...

User Manual
Page 172
...hard disk drives will be included in your motherboard user manual for the RAID array, press to create a RAID 0 or RAID 1 array using two SATA hard disk drives. Move the selection bar to the drive status. Marvell BIOS Setup (c) 2009 Marvell Technology Group Ltd. An asterisk (*) appears in the... array. After selecting all your data in the RAID array. ENTER: Operation SPACE: Select F10: Exit/Save ESC: Return 3. Press to...
...hard disk drives will be included in your motherboard user manual for the RAID array, press to create a RAID 0 or RAID 1 array using two SATA hard disk drives. Move the selection bar to the drive status. Marvell BIOS Setup (c) 2009 Marvell Technology Group Ltd. An asterisk (*) appears in the... array. After selecting all your data in the RAID array. ENTER: Operation SPACE: Select F10: Exit/Save ESC: Return 3. Press to...

User Manual
Page 173
...ENTER: Select F10: Exit/Save ESC: Return 4. Yes No Press to create the RAID array, or press to create this virtual disk ? RAID Level: Select a RAID Level. Configuration options: [RAID 0] [RAID 1] Stripe Size: Specifies the size of single data block on the virtual disk. ...for applications with content in the image below. Move the selection bar to configure further RAID settings. ASUS Maximus IV Extreme-Z 4-29 Marvell BIOS Setup (c) 2009 Marvell Technology Group Ltd. The new RAID array appears under Virtual Disks, as shown in much smaller size, such as audio,...
...ENTER: Select F10: Exit/Save ESC: Return 4. Yes No Press to create the RAID array, or press to create this virtual disk ? RAID Level: Select a RAID Level. Configuration options: [RAID 0] [RAID 1] Stripe Size: Specifies the size of single data block on the virtual disk. ...for applications with content in the image below. Move the selection bar to configure further RAID settings. ASUS Maximus IV Extreme-Z 4-29 Marvell BIOS Setup (c) 2009 Marvell Technology Group Ltd. The new RAID array appears under Virtual Disks, as shown in much smaller size, such as audio,...

User Manual
Page 174
... 1. ENTER: Operation F10: Exit/Save ESC: Return 6. Yes No Press to delete and press . Select the RAID array to save the RAID setting and exit the Marvell RAID utility. Select Delete and press . Marvell BIOS Setup (c) 2009 Marvell Technology Group Ltd. ENTER: Operation F10: Exit/Save ESC: Return 4-30 Chapter 4: Software support The following...
... 1. ENTER: Operation F10: Exit/Save ESC: Return 6. Yes No Press to delete and press . Select the RAID array to save the RAID setting and exit the Marvell RAID utility. Select Delete and press . Marvell BIOS Setup (c) 2009 Marvell Technology Group Ltd. ENTER: Operation F10: Exit/Save ESC: Return 4-30 Chapter 4: Software support The following...

User Manual
Page 175
The following warning message appears: Delete Virtual Disk Do you want to delete this virtual disk Yes No Press to delete the Master Boot Record (MBR) from the selected RAID array. 3. Press . The following warning message appears: Delete MBR Do you want to exit from this virtual disk ? The following warning message appears: Exit Do you want to delete MBR from Marvell BIOS Setup? ASUS Maximus IV Extreme-Z 4-31 Yes No Press to save the RAID setting and exit the Marvell RAID utility. Yes No Press to delete the selected RAID array. 2.
The following warning message appears: Delete Virtual Disk Do you want to delete this virtual disk Yes No Press to delete the Master Boot Record (MBR) from the selected RAID array. 3. Press . The following warning message appears: Delete MBR Do you want to exit from this virtual disk ? The following warning message appears: Exit Do you want to delete MBR from Marvell BIOS Setup? ASUS Maximus IV Extreme-Z 4-31 Yes No Press to save the RAID setting and exit the Marvell RAID utility. Yes No Press to delete the selected RAID array. 2.
User Manual
Page 176
... DVD into the USB floppy disk drive, then press . 8. Write-protect the floppy disk to enter the BIOS setup utility. 3. Follow the succeeding screen instructions to create a RAID driver disk. 7. Select USB floppy disk drive as the primary boot device. 4. Boot your computer. 2. Save changes... 1. To work around this OS limitation, refer to create a RAID driver disk. 5. When the Make Disk menu appears, press to complete the process. 4.5.2 Creating a RAID driver disk in Windows® To create a RAID driver disk in a RAID set. • The motherboard does not provide a floppy drive ...
... DVD into the USB floppy disk drive, then press . 8. Write-protect the floppy disk to enter the BIOS setup utility. 3. Follow the succeeding screen instructions to create a RAID driver disk. 7. Select USB floppy disk drive as the primary boot device. 4. Boot your computer. 2. Save changes... 1. To work around this OS limitation, refer to create a RAID driver disk. 5. When the Make Disk menu appears, press to complete the process. 4.5.2 Creating a RAID driver disk in Windows® To create a RAID driver disk in a RAID set. • The motherboard does not provide a floppy drive ...


