Series User Guide
Page 2
... FOR A PARTICULAR PURPOSE. SPECIFICATIONS AND INFORMATION CONTAINED IN THIS MANUAL ARE FURNISHED FOR INFORMATIONAL USE ONLY, AND ARE SUBJECT TO CHANGE AT ANY TIME WITHOUT NOTICE, AND SHOULD NOT BE CONSTRUED AS A COMMITMENT BY ASUS. Product warranty or service will not be extended if: (1) the product is repaired, modified or altered, unless such repair, modification of the product...
... FOR A PARTICULAR PURPOSE. SPECIFICATIONS AND INFORMATION CONTAINED IN THIS MANUAL ARE FURNISHED FOR INFORMATIONAL USE ONLY, AND ARE SUBJECT TO CHANGE AT ANY TIME WITHOUT NOTICE, AND SHOULD NOT BE CONSTRUED AS A COMMITMENT BY ASUS. Product warranty or service will not be extended if: (1) the product is repaired, modified or altered, unless such repair, modification of the product...
Series User Guide
Page 3
... 1.1 Welcome 1-1 1.2 Package contents 1-1 1.3.1 Front view 1-2 1.3.2 Back view 1-3 1.3.3 GamePlus Function 1-4 1.3.4 GameVisual Function 1-5 Chapter 2: Setup 2.1 Assembling the monitor arm/base 2-1 2.2 Adjusting the monitor 2-1 2.3 Detaching the arm (for VESA wall mount 2-2 2.4 Connecting the cables 2-2 2.5 Turning on the monitor 2-3 Chapter 3: General instructions 3.1 OSD (On-Screen Display) menu 3-1 3.1.1 How to reconfigure 3-1 3.1.2 OSD function introduction 3-1 3.2 Specifications summary 3-7 3.3 Troubleshooting (FAQ 3-8 3.4 Supported operating mode 3-9 iii
... 1.1 Welcome 1-1 1.2 Package contents 1-1 1.3.1 Front view 1-2 1.3.2 Back view 1-3 1.3.3 GamePlus Function 1-4 1.3.4 GameVisual Function 1-5 Chapter 2: Setup 2.1 Assembling the monitor arm/base 2-1 2.2 Adjusting the monitor 2-1 2.3 Detaching the arm (for VESA wall mount 2-2 2.4 Connecting the cables 2-2 2.5 Turning on the monitor 2-3 Chapter 3: General instructions 3.1 OSD (On-Screen Display) menu 3-1 3.1.1 How to reconfigure 3-1 3.1.2 OSD function introduction 3-1 3.2 Specifications summary 3-7 3.3 Troubleshooting (FAQ 3-8 3.4 Supported operating mode 3-9 iii

Series User Guide
Page 4
...connection of the Canadian Interference - If this equipment. This class B digital apparatus complies with Part 15 of Communications. Causing Equipment Regulations. This equipment generates, uses and can be determined by turning the equipment off and on a circuit different from digital apparatus set out in a residential installation...FCC Rules. This Class B digital apparatus meets all requirements of the monitor to the graphics card is required to which can radiate radio frequency energy and, if not installed and used in a particular installation. iv Cet appareil numé...
...connection of the Canadian Interference - If this equipment. This class B digital apparatus complies with Part 15 of Communications. Causing Equipment Regulations. This equipment generates, uses and can be determined by turning the equipment off and on a circuit different from digital apparatus set out in a residential installation...FCC Rules. This Class B digital apparatus meets all requirements of the monitor to the graphics card is required to which can radiate radio frequency energy and, if not installed and used in a particular installation. iv Cet appareil numé...
Series User Guide
Page 5
... UL listed computers which complies with the monitor, contact a qualified service technician or your dealer or local power company. • Use the appropriate power plug which have appropriate configured receptacles marked between 100-240V AC. • If you are provided for disposal of the volume control as well as the equalizer to fix it may result in fire or...
... UL listed computers which complies with the monitor, contact a qualified service technician or your dealer or local power company. • Use the appropriate power plug which have appropriate configured receptacles marked between 100-240V AC. • If you are provided for disposal of the volume control as well as the equalizer to fix it may result in fire or...

Series User Guide
Page 6
... not lift the display by yourself! Clean the monitor surface with mild cleaner. • Avoid using a cleaner containing alcohol or acetone. NOTE: Tips and additional information to disconnect the cables and power cord. Stubborn stains may remain after switching the image. Turn off the Power Switch and turn off and unplug the power cord. Do not repair the screen by the stand or the cord. • Cleaning. Conventions used in completing...
... not lift the display by yourself! Clean the monitor surface with mild cleaner. • Avoid using a cleaner containing alcohol or acetone. NOTE: Tips and additional information to disconnect the cables and power cord. Stubborn stains may remain after switching the image. Turn off the Power Switch and turn off and unplug the power cord. Do not repair the screen by the stand or the cord. • Cleaning. Conventions used in completing...
Series User Guide
Page 9
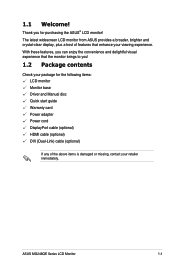
ASUS MG248QE Series LCD Monitor 1-1 Thank you ! 1.2 Package contents Check your package for purchasing the ASUS® LCD monitor! The latest widescreen LCD monitor from ASUS provides a broader, brighter and crystal-clear display, plus a host of features that the monitor brings to you for the following items: LCD monitor Monitor base Driver and Manual disc Quick start guide Warranty card Power adapter Power cord DisplayPort cable (optional) HDMI cable (optional) DVI (Dual-Link) cable (optional) If any of the above items is damaged or...
ASUS MG248QE Series LCD Monitor 1-1 Thank you ! 1.2 Package contents Check your package for purchasing the ASUS® LCD monitor! The latest widescreen LCD monitor from ASUS provides a broader, brighter and crystal-clear display, plus a host of features that the monitor brings to you for the following items: LCD monitor Monitor base Driver and Manual disc Quick start guide Warranty card Power adapter Power cord DisplayPort cable (optional) HDMI cable (optional) DVI (Dual-Link) cable (optional) If any of the above items is damaged or...
Series User Guide
Page 11
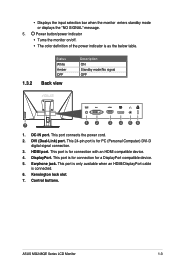
...(Personal Computer) DVI-D digital signal connection. 3. DVI (Dual-Link) port. This port is only available when an HDMI/DisplayPort cable is for connection for connection with an HDMI compatible device. 4. • Displays the input selection bar when the monitor enters standby mode or displays the "NO SIGNAL" message. 5. This port is connected. 6. DC-IN port. This port is for a DisplayPort compatible device. 5. ASUS MG248QE Series LCD Monitor 1-3 This port connects the power cord. 2. Kensington lock slot. 7. HDMI port. DisplayPort. Earphone jack. Control buttons.
...(Personal Computer) DVI-D digital signal connection. 3. DVI (Dual-Link) port. This port is only available when an HDMI/DisplayPort cable is for connection for connection with an HDMI compatible device. 4. • Displays the input selection bar when the monitor enters standby mode or displays the "NO SIGNAL" message. 5. This port is connected. 6. DC-IN port. This port is for a DisplayPort compatible device. 5. ASUS MG248QE Series LCD Monitor 1-3 This port connects the power cord. 2. Kensington lock slot. 7. HDMI port. DisplayPort. Earphone jack. Control buttons.
Series User Guide
Page 13
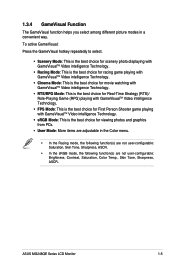
... PCs. • User Mode: More items are not user-configurable: Brightness, Contrast, Saturation, Color Temp., Skin Tone, Sharpness, ASCR. ASUS MG248QE Series LCD Monitor 1-5 1.3.4 GameVisual Function The GameVisual function helps you select among different picture modes in the Color menu. • In the Racing mode, the following function(s) are not user-configurable: Saturation, Skin Tone, Sharpness, ASCR. • In the sRGB mode, the following function(s) are adjustable in a convenient way...
... PCs. • User Mode: More items are not user-configurable: Brightness, Contrast, Saturation, Color Temp., Skin Tone, Sharpness, ASCR. ASUS MG248QE Series LCD Monitor 1-5 1.3.4 GameVisual Function The GameVisual function helps you select among different picture modes in the Color menu. • In the Racing mode, the following function(s) are not user-configurable: Saturation, Skin Tone, Sharpness, ASCR. • In the sRGB mode, the following function(s) are adjustable in a convenient way...
Series User Guide
Page 15
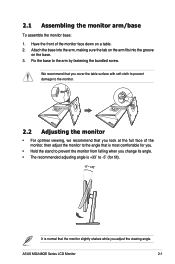
Fix the base to -5˚ (for tilt). -5° ~ +33° It is normal that the monitor slightly shakes while you adjust the viewing angle. ASUS MG248QE Series LCD Monitor 2-1 We recommend that you cover the table surface with soft cloth to prevent damage to the monitor. 2.2 Adjusting the monitor • For optimal viewing, we recommend that you change its angle. • The recommended adjusting angle is most comfortable for you...
Fix the base to -5˚ (for tilt). -5° ~ +33° It is normal that the monitor slightly shakes while you adjust the viewing angle. ASUS MG248QE Series LCD Monitor 2-1 We recommend that you cover the table surface with soft cloth to prevent damage to the monitor. 2.2 Adjusting the monitor • For optimal viewing, we recommend that you change its angle. • The recommended adjusting angle is most comfortable for you...

Series User Guide
Page 16
... down on the hinge (Figure 3), then remove the hinge. 1 2 1 2 (Figure 1) (Figure 2) (Figure 3) We recommend that you cover the table surface with soft cloth to prevent damage to remove the screw on a table. 2. Remove the base (Figure 2). 4. 2.3 Detaching the arm (for VESA wall mount. Remove the rubbers in the four screw holes. (Figure 1) 3. Use a screwdriver to the monitor. 2.4 Connecting the cables Connect the cables as the following instructions: 2-2 Chapter 2: Setup
... down on the hinge (Figure 3), then remove the hinge. 1 2 1 2 (Figure 1) (Figure 2) (Figure 3) We recommend that you cover the table surface with soft cloth to prevent damage to remove the screw on a table. 2. Remove the base (Figure 2). 4. 2.3 Detaching the arm (for VESA wall mount. Remove the rubbers in the four screw holes. (Figure 1) 3. Use a screwdriver to the monitor. 2.4 Connecting the cables Connect the cables as the following instructions: 2-2 Chapter 2: Setup
Series User Guide
Page 17
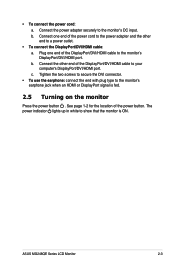
.../DVI/HDMI cable to the monitor's DC input. b. ASUS MG248QE Series LCD Monitor 2-3 c. The power indicator lights up in white to a power outlet. • To connect the DisplayPort/DVI/HDMI cable: a. b. Connect the other end to show that the monitor is fed. 2.5 Turning on the monitor Press the power button . See page 1-2 for the location of the DisplayPort/DVI/HDMI cable to the monitor's earphone jack when an HDMI or DisplayPort signal is ON. Tighten the two screws to secure the DVI connector...
.../DVI/HDMI cable to the monitor's DC input. b. ASUS MG248QE Series LCD Monitor 2-3 c. The power indicator lights up in white to a power outlet. • To connect the DisplayPort/DVI/HDMI cable: a. b. Connect the other end to show that the monitor is fed. 2.5 Turning on the monitor Press the power button . See page 1-2 for the location of the DisplayPort/DVI/HDMI cable to the monitor's earphone jack when an HDMI or DisplayPort signal is ON. Tighten the two screws to secure the DVI connector...
Series User Guide
Page 19
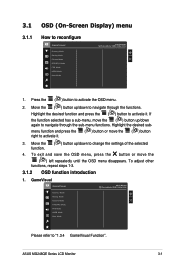
... desired sub- Move the ( ) button up /down to navigate through the sub-menu functions. GameVisual GameVisual Scenery Mode Racing Mode Cinema Mode RTS/RPG Mode FPS Mode sRGB Mode User Mode ASUS MG248 RacingMode HDMI 1080p 60Hz Please refer to activate it . menu function and press the right to "1.3.4 GameVisual Function". To adjust other functions, repeat steps 1-3. 3.1.2 OSD function introduction 1. ASUS MG248QE Series LCD Monitor 3-1 Highlight the desired function and...
... desired sub- Move the ( ) button up /down to navigate through the sub-menu functions. GameVisual GameVisual Scenery Mode Racing Mode Cinema Mode RTS/RPG Mode FPS Mode sRGB Mode User Mode ASUS MG248 RacingMode HDMI 1080p 60Hz Please refer to activate it . menu function and press the right to "1.3.4 GameVisual Function". To adjust other functions, repeat steps 1-3. 3.1.2 OSD function introduction 1. ASUS MG248QE Series LCD Monitor 3-1 Highlight the desired function and...

Series User Guide
Page 20
.... • High energy blue light may lead to reduces eye strain. Taking short and frequent breaks is activated,the default settings of continuous working for long hours. Blue Light Filter ASUS MG248 RacingMode HDMI 1080p 60Hz Level 0 Level 1 Level 2 Level 3 Level 4 • Level 0: No change. • Level 1~4: The higher the level, the less blue light is not userconfigurable. The Brightness function is scattered.
.... • High energy blue light may lead to reduces eye strain. Taking short and frequent breaks is activated,the default settings of continuous working for long hours. Blue Light Filter ASUS MG248 RacingMode HDMI 1080p 60Hz Level 0 Level 1 Level 2 Level 3 Level 4 • Level 0: No change. • Level 1~4: The higher the level, the less blue light is not userconfigurable. The Brightness function is scattered.
Series User Guide
Page 21
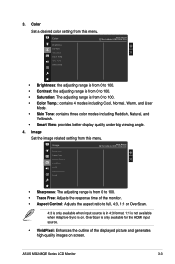
3. Image Set the image related setting from this menu. ASUS MG248QE Series LCD Monitor 3-3 Color Set a desired color setting from this menu. Color ASUS MG248 RacingMode HDMI 1080p 60Hz Brightness Contrast Saturation Color Temp. OverScan is only available for the HDMI input source. • VividPixel: Enhances the outline of the monitor. • Aspect Control: Adjusts the aspect ratio to full, 4:3, 1:1 or OverScan. 4:3 is only available when input source is in 4:3 format. 1:1 is not available when Adaptive-Sync is on screen. Skin Tone Smart...
3. Image Set the image related setting from this menu. ASUS MG248QE Series LCD Monitor 3-3 Color Set a desired color setting from this menu. Color ASUS MG248 RacingMode HDMI 1080p 60Hz Brightness Contrast Saturation Color Temp. OverScan is only available for the HDMI input source. • VividPixel: Enhances the outline of the monitor. • Aspect Control: Adjusts the aspect ratio to full, 4:3, 1:1 or OverScan. 4:3 is only available when input source is in 4:3 format. 1:1 is not available when Adaptive-Sync is on screen. Skin Tone Smart...
Series User Guide
Page 22
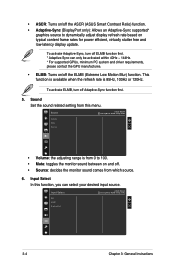
.... Input Select ASUS MG248 RacingMode HDMI 1080p 60Hz DVI HDMI DisplayPort 3-4 Chapter 3: General Instructions Input Select In this menu. This function is available when the refresh rate is from 0 to dynamically adjust display refresh rate based on /off ELMB function first. * Adaptive-Sync can select your desired input source. To activate Adaptive-Sync, turn off the ASCR (ASUS Smart Contrast Ratio) function. • Adaptive-Sync (DisplayPort only): Allows an Adaptive-Sync supported* graphics source to 100. • Mute: toggles the monitor sound...
.... Input Select ASUS MG248 RacingMode HDMI 1080p 60Hz DVI HDMI DisplayPort 3-4 Chapter 3: General Instructions Input Select In this menu. This function is available when the refresh rate is from 0 to dynamically adjust display refresh rate based on /off ELMB function first. * Adaptive-Sync can select your desired input source. To activate Adaptive-Sync, turn off the ASCR (ASUS Smart Contrast Ratio) function. • Adaptive-Sync (DisplayPort only): Allows an Adaptive-Sync supported* graphics source to 100. • Mute: toggles the monitor sound...
Series User Guide
Page 23
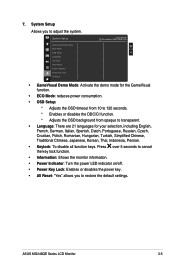
.../CI function. * Adjusts the OSD background from opaque to restore the default settings. System Setup Allows you to transparent. • Language: There are 21 languages for your selection, including English, French, German, Italian, Spanish, Dutch, Portuguese, Russian, Czech, Croatian, Polish, Romanian, Hungarian, Turkish, Simplified Chinese, Traditional Chinese, Japanese, Korean, Thai, Indonesia, Persian. • Keylock: To disable all function keys. 7. ASUS MG248QE Series LCD Monitor 3-5
.../CI function. * Adjusts the OSD background from opaque to restore the default settings. System Setup Allows you to transparent. • Language: There are 21 languages for your selection, including English, French, German, Italian, Spanish, Dutch, Portuguese, Russian, Czech, Croatian, Polish, Romanian, Hungarian, Turkish, Simplified Chinese, Traditional Chinese, Japanese, Korean, Thai, Indonesia, Persian. • Keylock: To disable all function keys. 7. ASUS MG248QE Series LCD Monitor 3-5
Series User Guide
Page 25
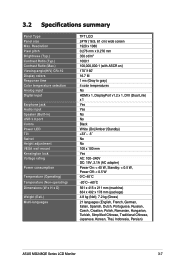
Resolution Pixel pitch Brightness (Typ.) Contrast Ratio (Typ.) Contrast Ratio (Max.) Viewing angle(H/V) CR>10 Display colors Response time Color temperature selection Analog input Digital input Earphone jack Audio input Speaker (Built-in) USB 3.0 port Colors Power LED Tilt Swivel Height adjustment VESA wall mount Kensington lock Voltage rating Power consumption Temperature (Operating) Temperature (Non-operating) Dimensions (W x H x D) Weight (Esti.) Multi-languages TFT LCD 24"W (16:9, 61 cm) wide screen 1920 x 1080 0.276 mm x 0.276 mm 350 cd/m2 1000:1 100,000,000:1 (with ASCR on) 170...
Resolution Pixel pitch Brightness (Typ.) Contrast Ratio (Typ.) Contrast Ratio (Max.) Viewing angle(H/V) CR>10 Display colors Response time Color temperature selection Analog input Digital input Earphone jack Audio input Speaker (Built-in) USB 3.0 port Colors Power LED Tilt Swivel Height adjustment VESA wall mount Kensington lock Voltage rating Power consumption Temperature (Operating) Temperature (Non-operating) Dimensions (W x H x D) Weight (Esti.) Multi-languages TFT LCD 24"W (16:9, 61 cm) wide screen 1920 x 1080 0.276 mm x 0.276 mm 350 cd/m2 1000:1 100,000,000:1 (with ASCR on) 170...
Series User Guide
Page 26
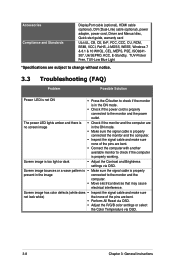
... DisplayPort cable (optional), HDMI cable (optional), DVI (Dual-Link) cable (optional), power adapter, power cord, Driver and Manual disc, Quick start guide, warranty card UL/cUL, CB, CE, ErP, FCC, CCC, CU, RCM, BSMI, VCCI, RoHS, J-MOSS, WEEE, Windows 7 & 8.1 & 10 WHQL, CEL, MEPS, PSE, ISO9241307, UkrSEPRO, KCC, E-Standby, TUV-Flicker Free, TUV-Low Blue Light *Specifications are subject to change without notice. 3.3 Troubleshooting (FAQ) Problem Possible Solution Power LED is not ON • Press the button to check...
... DisplayPort cable (optional), HDMI cable (optional), DVI (Dual-Link) cable (optional), power adapter, power cord, Driver and Manual disc, Quick start guide, warranty card UL/cUL, CB, CE, ErP, FCC, CCC, CU, RCM, BSMI, VCCI, RoHS, J-MOSS, WEEE, Windows 7 & 8.1 & 10 WHQL, CEL, MEPS, PSE, ISO9241307, UkrSEPRO, KCC, E-Standby, TUV-Flicker Free, TUV-Low Blue Light *Specifications are subject to change without notice. 3.3 Troubleshooting (FAQ) Problem Possible Solution Power LED is not ON • Press the button to check...
Series User Guide
Page 27
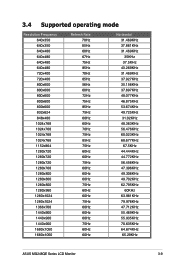
3.4 Supported operating mode Resolution Frequency 640x350 640x350 640x480 640x480 640x480 640x480 720x400 720x400 800x600 800x600 800x600 800x600 800x600 832x624 848x480 1024x768 1024x768 1024x768 1024x768 1152x864 1280x720 1280x720 1280x720 1280x768 1280x800 1280x800 1280x800 1280x960 1280x1024 1280x1024 1366x768 1440x900 1440x900 1440x900 1680x1050 1680x1050 Refresh Rate 70Hz 85Hz 60Hz 67Hz 75Hz 85Hz 70Hz 85Hz 56Hz 60Hz 72Hz 75Hz ...396KHz 49.306KHz 49.702KHz 62.795KHz 60KHz 63.981KHz 79.976KHz 47.712KHz 55.469KHz 55.935KHz 70.635KHz 64.674KHz 65.29KHz ASUS MG248QE Series LCD Monitor 3-9
3.4 Supported operating mode Resolution Frequency 640x350 640x350 640x480 640x480 640x480 640x480 720x400 720x400 800x600 800x600 800x600 800x600 800x600 832x624 848x480 1024x768 1024x768 1024x768 1024x768 1152x864 1280x720 1280x720 1280x720 1280x768 1280x800 1280x800 1280x800 1280x960 1280x1024 1280x1024 1366x768 1440x900 1440x900 1440x900 1680x1050 1680x1050 Refresh Rate 70Hz 85Hz 60Hz 67Hz 75Hz 85Hz 70Hz 85Hz 56Hz 60Hz 72Hz 75Hz ...396KHz 49.306KHz 49.702KHz 62.795KHz 60KHz 63.981KHz 79.976KHz 47.712KHz 55.469KHz 55.935KHz 70.635KHz 64.674KHz 65.29KHz ASUS MG248QE Series LCD Monitor 3-9

Series User Guide
Page 28
Resolution Frequency 1920x1080 1920x1080 1920x1080* (DVI/DP/HDMI) 1920x1080* (DVI/DP/HDMI) 1920x1080* (DVI/DP/HDMI) 1920x1080* (DVI/DP) 640x480P (HDMI) 720x480P (HDMI) 720x576P (HDMI) 1280x720P (HDMI) 1280x720P (HDMI) 1440x480P (HDMI) 1440x576P (HDMI) 1920x1080P (HDMI) 1920x1080P (HDMI) Refresh Rate 60Hz 60Hz 85Hz 100Hz 120Hz 144Hz 59.94/60Hz 59.94/60Hz 50Hz 50Hz 59.94/60Hz 59.94/60Hz 50Hz 50Hz 59.94/60Hz Horizontal 66.... 67.433KHz/67.5KHz Note: You must select one of the "*" timings for enabling ELMB or 144Hz feature with a compatible GPU graphic card. 3-10 Chapter 3: General Instructions
Resolution Frequency 1920x1080 1920x1080 1920x1080* (DVI/DP/HDMI) 1920x1080* (DVI/DP/HDMI) 1920x1080* (DVI/DP/HDMI) 1920x1080* (DVI/DP) 640x480P (HDMI) 720x480P (HDMI) 720x576P (HDMI) 1280x720P (HDMI) 1280x720P (HDMI) 1440x480P (HDMI) 1440x576P (HDMI) 1920x1080P (HDMI) 1920x1080P (HDMI) Refresh Rate 60Hz 60Hz 85Hz 100Hz 120Hz 144Hz 59.94/60Hz 59.94/60Hz 50Hz 50Hz 59.94/60Hz 59.94/60Hz 50Hz 50Hz 59.94/60Hz Horizontal 66.... 67.433KHz/67.5KHz Note: You must select one of the "*" timings for enabling ELMB or 144Hz feature with a compatible GPU graphic card. 3-10 Chapter 3: General Instructions


