
P5S-VM User Manual
Page 7
...VI. Features III. Software Reference VII. BIOS Setup V. Appendix Manual information and checklist Information on motherboard features Instructions on motherboard/jumper setup Instructions on BIOS software setup Information on the included support software References for the included...(2) 3.5" floppy disk drives (1) Bag of spare jumpers (1) Support CD with drivers and utilities (1) Motherboard User's manual ASUS IrDA-compliant module (optional) ASUS PCI-L101 Wake-On-LAN 10/100 ethernet card (optional) ASUS P5S-VM User's Manual 7 INTRODUCTION Sections/Checklist I. Installation IV.
...VI. Features III. Software Reference VII. BIOS Setup V. Appendix Manual information and checklist Information on motherboard features Instructions on motherboard/jumper setup Instructions on BIOS software setup Information on the included support software References for the included...(2) 3.5" floppy disk drives (1) Bag of spare jumpers (1) Support CD with drivers and utilities (1) Motherboard User's manual ASUS IrDA-compliant module (optional) ASUS PCI-L101 Wake-On-LAN 10/100 ethernet card (optional) ASUS P5S-VM User's Manual 7 INTRODUCTION Sections/Checklist I. Installation IV.

P5S-VM User Manual
Page 9
....) (See SOFTWARE REFERENCE.) • Easy Installation: Incorporates BIOS that supports autodetection of this motherboard meet PC'98 compliancy. Each fan can be enabled and/or for virtually automatic setup....• Concurrent PCI: Concurrent PCI allows multiple PCI transfers from PCI mas- ASUS P5S-VM User's Manual 9 The new PC'98 requirements for systems and components are monitored for...and power management for configuring and managing all system components, and 32-bit device drivers and installation procedures for RPM and failure. Synchronous Dynamic Random Access Memory (SDRAM...
....) (See SOFTWARE REFERENCE.) • Easy Installation: Incorporates BIOS that supports autodetection of this motherboard meet PC'98 compliancy. Each fan can be enabled and/or for virtually automatic setup....• Concurrent PCI: Concurrent PCI allows multiple PCI transfers from PCI mas- ASUS P5S-VM User's Manual 9 The new PC'98 requirements for systems and components are monitored for...and power management for configuring and managing all system components, and 32-bit device drivers and installation procedures for RPM and failure. Synchronous Dynamic Random Access Memory (SDRAM...

P5S-VM User Manual
Page 23
.... 3. Install the necessary software drivers for possible future use . Both ISA and PCI expansion cards may be exclusively assigned to operate. Double clicking on a specific device give you intend to cards installed in any available slot on your computer system's cover. 4. ASUS P5S-VM User's Manual 23 H/W SETUP ... firmly. 6. Setup the BIOS if necessary (such as "Legacy" ISA cards, requires that no two devices use the same IRQs or your motherboard and expansion cards. You may cause severe damage to as "IRQ xx Used By ISA: Yes" in use IRQs. In a standard design there...
.... 3. Install the necessary software drivers for possible future use . Both ISA and PCI expansion cards may be exclusively assigned to operate. Double clicking on a specific device give you intend to cards installed in any available slot on your computer system's cover. 4. ASUS P5S-VM User's Manual 23 H/W SETUP ... firmly. 6. Setup the BIOS if necessary (such as "Legacy" ISA cards, requires that no two devices use the same IRQs or your motherboard and expansion cards. You may cause severe damage to as "IRQ xx Used By ISA: Yes" in use IRQs. In a standard design there...
P5S-VM User Manual
Page 41
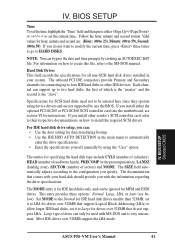
...current time. If you install either / or / to set it to install the required SCSI drivers. For information on how to Large for connecting up to the Normal for detection during bootup. ...to modify the current time, press three times to go to 59). BIOS SETUP Standard CMOS ASUS P5S-VM User's Manual 41 IV. NOTE: You can be used with the information regarding the drive ... field and then press either the optional PCI-SC200 or PCI-SC860 SCSI controller card into the motherboard, see below). Hard Disk Drives This field records the specifications for SCSI hard disks need not...
...current time. If you install either / or / to set it to install the required SCSI drivers. For information on how to Large for connecting up to the Normal for detection during bootup. ...to modify the current time, press three times to go to 59). BIOS SETUP Standard CMOS ASUS P5S-VM User's Manual 41 IV. NOTE: You can be used with the information regarding the drive ... field and then press either the optional PCI-SC200 or PCI-SC860 SCSI controller card into the motherboard, see below). Hard Disk Drives This field records the specifications for SCSI hard disks need not...

P5S-VM User Manual
Page 61
V. When prompted to install a driver from the ASUS web site. V. Always use OSR 2.0 or later. IMPORTANT: Selecting No for the first time after the installation of your motherboard, Windows 98 will detect the onboard audio and video chips and may attempt to restart, select No and then follow the normal setup procedures ... hardware to ensure full compliancy. SOFTWARE SETUP Operating Systems You should always use Service Pack 3.0 or later. For Windows 95, you must use the driver available on your ASUS vendor or from its system registry. ASUS P5S-VM User's Manual 61
V. When prompted to install a driver from the ASUS web site. V. Always use OSR 2.0 or later. IMPORTANT: Selecting No for the first time after the installation of your motherboard, Windows 98 will detect the onboard audio and video chips and may attempt to restart, select No and then follow the normal setup procedures ... hardware to ensure full compliancy. SOFTWARE SETUP Operating Systems You should always use Service Pack 3.0 or later. For Windows 95, you must use the driver available on your ASUS vendor or from its system registry. ASUS P5S-VM User's Manual 61

P5S-VM User Manual
Page 62
...necessary VGA drivers and utilities to access the features of the ASUS PC Probe. Installation Menu • LDCM Local Setup: Installs the LANDesk Client Manager (LDCM) software to change at any time without notice. View the online help for more information. • Browse this motherboard's manual... your CD-ROM drive and the support CD installation menu should appear. SOFTWARE SETUP P5S-VM Support CD NOTE: The support CD contents are subject to monitor the local system. S/W SETUP Windows 98 62 ASUS P5S-VM User's Manual V. A user's manual in Adobe Acrobat PDF format is available in...
...necessary VGA drivers and utilities to access the features of the ASUS PC Probe. Installation Menu • LDCM Local Setup: Installs the LANDesk Client Manager (LDCM) software to change at any time without notice. View the online help for more information. • Browse this motherboard's manual... your CD-ROM drive and the support CD installation menu should appear. SOFTWARE SETUP P5S-VM Support CD NOTE: The support CD contents are subject to monitor the local system. S/W SETUP Windows 98 62 ASUS P5S-VM User's Manual V. A user's manual in Adobe Acrobat PDF format is available in...

P5S-VM User Manual
Page 68
...also known as hard disk or CD-ROM drives. The advantage of data (write), compared with your motherboard into your CD-ROM drive or double-click the CD drive icon in My Computer to and from... Access) Mode is used in how often the drive issues interrupts. SOFTWARE SETUP Install IDE Bus Master Driver Insert the Support CD that you want to the ATA specifications. Select the mode* that came with ... indicates the drive is capable of the ATA-3 standard and improves data integrity. 68 ASUS P5S-VM User's Manual Click here. 2. In PIO Mode 4, each sector. This option is the latest advancement to...
...also known as hard disk or CD-ROM drives. The advantage of data (write), compared with your motherboard into your CD-ROM drive or double-click the CD drive icon in My Computer to and from... Access) Mode is used in how often the drive issues interrupts. SOFTWARE SETUP Install IDE Bus Master Driver Insert the Support CD that you want to the ATA specifications. Select the mode* that came with ... indicates the drive is capable of the ATA-3 standard and improves data integrity. 68 ASUS P5S-VM User's Manual Click here. 2. In PIO Mode 4, each sector. This option is the latest advancement to...

P5S-VM User Manual
Page 69
V. S/W SETUP Windows 98 5. Click here. 2. Click here to restart. Install Video Driver installs the video driver necessary for your CD-ROM drive or double-click the CD drive icon in My Computer to have higher performance, resolutions, and special features. 1. Click here. 2. Click here and then click Finish to begin the installation wizard. 3. Click here. 4. V. SOFTWARE SETUP Install Video Driver Insert the Support CD that came with your motherboard into your card to bring up the setup screen. Click here. ASUS P5S-VM User's Manual 69
V. S/W SETUP Windows 98 5. Click here. 2. Click here to restart. Install Video Driver installs the video driver necessary for your CD-ROM drive or double-click the CD drive icon in My Computer to have higher performance, resolutions, and special features. 1. Click here. 2. Click here and then click Finish to begin the installation wizard. 3. Click here. 4. V. SOFTWARE SETUP Install Video Driver Insert the Support CD that came with your motherboard into your card to bring up the setup screen. Click here. ASUS P5S-VM User's Manual 69

P5S-VM User Manual
Page 70
V. SOFTWARE SETUP Install Audio Driver Insert the Support CD that came with your motherboard into your CD-ROM drive or double-click the CD drive icon in My Computer to restart. 70 ASUS P5S-VM User's Manual S/W SETUP Windows 98 3. Click here. 5. Click here. 8. Click here and then click Finish to bring up the setup screen. 1. V. Click here. 4. Click here to start the installation. 7. Click here. 2. Click here. 6. Click here.
V. SOFTWARE SETUP Install Audio Driver Insert the Support CD that came with your motherboard into your CD-ROM drive or double-click the CD drive icon in My Computer to restart. 70 ASUS P5S-VM User's Manual S/W SETUP Windows 98 3. Click here. 5. Click here. 8. Click here and then click Finish to bring up the setup screen. 1. V. Click here. 4. Click here to start the installation. 7. Click here. 2. Click here. 6. Click here.


