
P8H61-M LX R2 User's Manual
Page 2
... version, as source code archives, etc. ii SPECIFICATIONS AND INFORMATION CONTAINED IN THIS MANUAL ARE FURNISHED FOR INFORMATIONAL USE ONLY, AND ARE SUBJECT TO CHANGE AT ANY TIME WITHOUT NOTICE, AND SHOULD NOT BE CONSTRUED AS A COMMITMENT BY ASUS. ASUS ASSUMES NO RESPONSIBILITY OR LIABILITY FOR ANY ERRORS OR INACCURACIES THAT MAY APPEAR IN THIS MANUAL, INCLUDING THE PRODUCTS AND SOFTWARE...
... version, as source code archives, etc. ii SPECIFICATIONS AND INFORMATION CONTAINED IN THIS MANUAL ARE FURNISHED FOR INFORMATIONAL USE ONLY, AND ARE SUBJECT TO CHANGE AT ANY TIME WITHOUT NOTICE, AND SHOULD NOT BE CONSTRUED AS A COMMITMENT BY ASUS. ASUS ASSUMES NO RESPONSIBILITY OR LIABILITY FOR ANY ERRORS OR INACCURACIES THAT MAY APPEAR IN THIS MANUAL, INCLUDING THE PRODUCTS AND SOFTWARE...
P8H61-M LX R2 User's Manual
Page 9
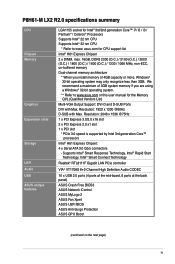
P8H61-M LX2 R2.0 specifications summary CPU Chipset Memory Graphics Expansion slots Storage LAN Audio USB ASUS unique features LGA1155 socket for the Memory QVL (Qualified Vendors List) Multi-VGA Output Support: DVI-D and D-SUB Ports DVI with Max. asus.com for CPU support list Intel® H61 Express Chipset 2 x DIMM, max. 16GB, DDR3 2200 (O.C.) / 2100 (O.C.) / 2000 (O.C.) / 1800 (O.C.) / 1600 (O.C.) / 1333 / 1066 MHz, non-ECC, un-buffered memory Dual-channel memory architecture * When you install memory of 3GB system memory if you are using a Windows® 32-bit operating system. ** ...
P8H61-M LX2 R2.0 specifications summary CPU Chipset Memory Graphics Expansion slots Storage LAN Audio USB ASUS unique features LGA1155 socket for the Memory QVL (Qualified Vendors List) Multi-VGA Output Support: DVI-D and D-SUB Ports DVI with Max. asus.com for CPU support list Intel® H61 Express Chipset 2 x DIMM, max. 16GB, DDR3 2200 (O.C.) / 2100 (O.C.) / 2000 (O.C.) / 1800 (O.C.) / 1600 (O.C.) / 1333 / 1066 MHz, non-ECC, un-buffered memory Dual-channel memory architecture * When you install memory of 3GB system memory if you are using a Windows® 32-bit operating system. ** ...
P8H61-M LX R2 User's Manual
Page 20
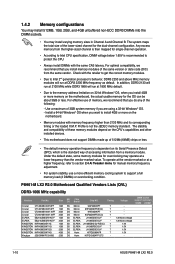
... usable memory for manual memory frequency adjustment. • For system stability, use of memory, we recommend that you do any of the following: - Check with memory frequency higher than the vendor-marked value. Under the default state, some memory modules for the dual-channel configuration. P8H61-M LX2 R2.0 Motherboard Qualified Vendors Lists (QVL) DDR3-1066 MHz capability Vendors Part No. For optimal compatibility, we recommend that you are using a 32-bit Windows®...
... usable memory for manual memory frequency adjustment. • For system stability, use of memory, we recommend that you do any of the following: - Check with memory frequency higher than the vendor-marked value. Under the default state, some memory modules for the dual-channel configuration. P8H61-M LX2 R2.0 Motherboard Qualified Vendors Lists (QVL) DDR3-1066 MHz capability Vendors Part No. For optimal compatibility, we recommend that you are using a 32-bit Windows®...
P8H61-M LX R2 User's Manual
Page 28
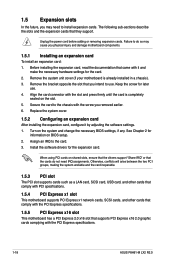
... that supports PCI Express x16 2.0 graphic cards complying with the slot and press firmly until the card is already installed in a chassis). 3. Align the card connector with the PCI Express specifications. 1-18 ASUS P8H61-M LX2 R2.0 The following sub‑sections describe the slots and the expansion cards that you removed earlier. 6. Remove the system unit cover (if your motherboard is completely seated on BIOS setup. 2. Replace the system cover. 1.5.2 Configuring an expansion card After installing the expansion card, configure it...
... that supports PCI Express x16 2.0 graphic cards complying with the slot and press firmly until the card is already installed in a chassis). 3. Align the card connector with the PCI Express specifications. 1-18 ASUS P8H61-M LX2 R2.0 The following sub‑sections describe the slots and the expansion cards that you removed earlier. 6. Remove the system unit cover (if your motherboard is completely seated on BIOS setup. 2. Replace the system cover. 1.5.2 Configuring an expansion card After installing the expansion card, configure it...

P8H61-M LX R2 User's Manual
Page 30
... to support 8-channel audio output. 1-20 ASUS P8H61-M LX2 R2.0 Audio 2, 4, 6, or 8-channel configuration Port Light Blue (Rear panel) Lime (Rear panel) Pink (Rear panel) Lime (Front panel) Headset 2-channel Line In Line Out Mic In - 4-channel Rear Speaker Out Front Speaker Out Mic In - 6-channel Rear Speaker Out Front Speaker Out Bass/Center - 8-channel Rear Speaker Out Front Speaker Out Bass/Center Side Speaker Out To configure an 8-channel audio output: Use a chassis with HD audio module in 2, 4, 6, or 8-channel configuration. PS/2 Keyboard / Mouse Combo port. LAN port LED...
... to support 8-channel audio output. 1-20 ASUS P8H61-M LX2 R2.0 Audio 2, 4, 6, or 8-channel configuration Port Light Blue (Rear panel) Lime (Rear panel) Pink (Rear panel) Lime (Front panel) Headset 2-channel Line In Line Out Mic In - 4-channel Rear Speaker Out Front Speaker Out Mic In - 6-channel Rear Speaker Out Front Speaker Out Bass/Center - 8-channel Rear Speaker Out Front Speaker Out Bass/Center Side Speaker Out To configure an 8-channel audio output: Use a chassis with HD audio module in 2, 4, 6, or 8-channel configuration. PS/2 Keyboard / Mouse Combo port. LAN port LED...

P8H61-M LX R2 User's Manual
Page 32
2. The power supply plugs are designed to connect the 4-pin ATX +12V power plug. Connect the serial port module cable to this connector, then install the module to a slot opening at http://support.asus. Find the proper orientation and push down firmly until the connectors completely fit. Otherwise, the system will not boot up if the power is inadequate. • If you use a PSU with higher power output when configuring a system with ATX 12 V Specification 2.0 (or...
2. The power supply plugs are designed to connect the 4-pin ATX +12V power plug. Connect the serial port module cable to this connector, then install the module to a slot opening at http://support.asus. Find the proper orientation and push down firmly until the connectors completely fit. Otherwise, the system will not boot up if the power is inadequate. • If you use a PSU with higher power output when configuring a system with ATX 12 V Specification 2.0 (or...

P8H61-M LX R2 User's Manual
Page 33
... P8H61-M LX2 R2.0 CHA_FAN GND +12V Rotation P8H61-M LX2 R2.0 CPU connectors Do not forget to connect the fan cables to the USB connectors. Insufficient air flow inside the system may damage the motherboard components. USB connectors (10-1 pin USB78, USB910) These connectors are not jumpers! These are for USB 2.0 ports. Chapter 1: Product introduction 1-23 The CPU_FAN connector supports a CPU fan of the system chassis. The USB module cable is purchased separately. These USB connectors comply with USB 2.0 specification that the black wire...
... P8H61-M LX2 R2.0 CHA_FAN GND +12V Rotation P8H61-M LX2 R2.0 CPU connectors Do not forget to connect the fan cables to the USB connectors. Insufficient air flow inside the system may damage the motherboard components. USB connectors (10-1 pin USB78, USB910) These connectors are not jumpers! These are for USB 2.0 ports. Chapter 1: Product introduction 1-23 The CPU_FAN connector supports a CPU fan of the system chassis. The USB module cable is purchased separately. These USB connectors comply with USB 2.0 specification that the black wire...

P8H61-M LX R2 User's Manual
Page 34
... use IDE Mode on Windows® XP. • [IDE] is no need to a slot opening at the back of the system chassis. +5V SPDIFOUT GND P8H61-M LX2 R2.0 SPDIF_OUT P8H61-M LX2 R2.0 Digital audio connector The S/PDIF module is for details. 7. Under Windows® XP, there is the default SATA type. 6. Intel® H61 Serial ATA 3.0Gb/s connectors (7-pin SATA3G_1~4) These connectors connect to [AHCI Mode]. See section 2.5.4 SATA Configuration for an additional Sony/Philips Digital Interface (S/PDIF) port. Connect...
... use IDE Mode on Windows® XP. • [IDE] is no need to a slot opening at the back of the system chassis. +5V SPDIFOUT GND P8H61-M LX2 R2.0 SPDIF_OUT P8H61-M LX2 R2.0 Digital audio connector The S/PDIF module is for details. 7. Under Windows® XP, there is the default SATA type. 6. Intel® H61 Serial ATA 3.0Gb/s connectors (7-pin SATA3G_1~4) These connectors connect to [AHCI Mode]. See section 2.5.4 SATA Configuration for an additional Sony/Philips Digital Interface (S/PDIF) port. Connect...

P8H61-M LX R2 User's Manual
Page 37
... DVD. Click Drivers, Utilities, Manual, Contact, and Specials tabs to avail all motherboard features. Click an icon to display Support DVD/ motherboard information Click an item to your hardware. • Motherboard settings and hardware options vary. Chapter 1: Product introduction 1-27 Always install the latest OS version and corresponding updates to maximize the features of the Support DVD to run the Support DVD Place the Support DVD into the optical drive. Visit the ASUS...
... DVD. Click Drivers, Utilities, Manual, Contact, and Specials tabs to avail all motherboard features. Click an icon to display Support DVD/ motherboard information Click an item to your hardware. • Motherboard settings and hardware options vary. Chapter 1: Product introduction 1-27 Always install the latest OS version and corresponding updates to maximize the features of the Support DVD to run the Support DVD Place the Support DVD into the optical drive. Visit the ASUS...
P8H61-M LX R2 User's Manual
Page 39
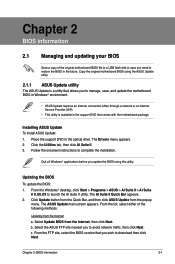
... you to manage, save, and update the motherboard BIOS in Windows® environment. • ASUS Update requires an Internet connection either of the original motherboard BIOS file to a USB flash disk in the future. Chapter 2: BIOS information 2-1 Copy the original motherboard BIOS using the ASUS Update utility. 2.1.1 ASUS Update utility The ASUS Update is available in the optical drive. Updating the BIOS To update the BIOS: 1. Select Update BIOS from the popup menu. c. b. From the Windows® desktop, click Start > Programs > ASUS > AI Suite II > AI Suite...
... you to manage, save, and update the motherboard BIOS in Windows® environment. • ASUS Update requires an Internet connection either of the original motherboard BIOS file to a USB flash disk in the future. Chapter 2: BIOS information 2-1 Copy the original motherboard BIOS using the ASUS Update utility. 2.1.1 ASUS Update utility The ASUS Update is available in the optical drive. Updating the BIOS To update the BIOS: 1. Select Update BIOS from the popup menu. c. b. From the Windows® desktop, click Start > Programs > ASUS > AI Suite II > AI Suite...
P8H61-M LX R2 User's Manual
Page 40
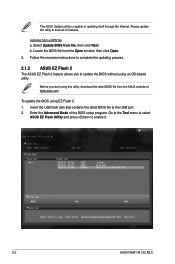
... USB port. 2. Enter the Advanced Mode of updating itself through the Internet. Insert the USB flash disk that contains the latest BIOS file to enable it. 2-2 ASUS P8H61-M LX2 R2.0 The ASUS Update utility is capable of the BIOS setup program. Always update the utility to update the BIOS without using EZ Flash 2: 1. Updating from file, then click Next. To update the BIOS using an OS‑based utility. Follow the onscreen instructions to complete the updating process. 2.1.2 ASUS EZ Flash 2 The ASUS EZ Flash 2 feature allows you start using...
... USB port. 2. Enter the Advanced Mode of updating itself through the Internet. Insert the USB flash disk that contains the latest BIOS file to enable it. 2-2 ASUS P8H61-M LX2 R2.0 The ASUS Update utility is capable of the BIOS setup program. Always update the utility to update the BIOS without using EZ Flash 2: 1. Updating from file, then click Next. To update the BIOS using an OS‑based utility. Follow the onscreen instructions to complete the updating process. 2.1.2 ASUS EZ Flash 2 The ASUS EZ Flash 2 feature allows you start using...

P8H61-M LX R2 User's Manual
Page 41
... to enter BIOS Setup to restore the BIOS file when it fails or gets corrupted during the updating process. Reboot the system when the update process is an auto recovery tool that you press to load default BIOS values. You can cause system boot failure! Press the Up/Down arrow keys to P8H61-M-LX2-R2-ASUS-0402.CAP. • The BIOS file in the removable device to find the BIOS file, and then press to a USB port...
... to enter BIOS Setup to restore the BIOS file when it fails or gets corrupted during the updating process. Reboot the system when the update process is an auto recovery tool that you press to load default BIOS values. You can cause system boot failure! Press the Up/Down arrow keys to P8H61-M-LX2-R2-ASUS-0402.CAP. • The BIOS file in the removable device to find the BIOS file, and then press to a USB port...
P8H61-M LX R2 User's Manual
Page 42
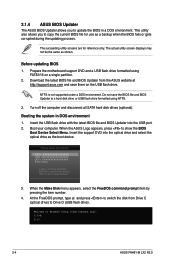
... FreeDOS prompt, type d: and press to switch the disk from the ASUS website at http://support.asus.com and save the BIOS file and BIOS Updater to a hard disk drive or USB flash drive formatted using FAT32/16 on the USB flash drive. Welcome to Drive D (USB flash drive). Prepare the motherboard support DVD and a USB flash drive formatted using NTFS. 3. Do not save them on a single partition. 2. The succeeding utility screens are for use as shown. Boot your computer. The actual utility screen displays may not be...
... FreeDOS prompt, type d: and press to switch the disk from the ASUS website at http://support.asus.com and save the BIOS file and BIOS Updater to a hard disk drive or USB flash drive formatted using FAT32/16 on the USB flash drive. Welcome to Drive D (USB flash drive). Prepare the motherboard support DVD and a USB flash drive formatted using NTFS. 3. Do not save them on a single partition. 2. The succeeding utility screens are for use as shown. Boot your computer. The actual utility screen displays may not be...
P8H61-M LX R2 User's Manual
Page 44
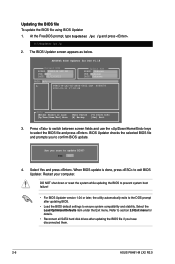
... Exit menu. When BIOS update is done, press to confirm BIOS update. Refer to update BIOS? Are you have disconnected them. 2-6 ASUS P8H61-M LX2 R2.0 Yes No 4. Updating the BIOS file To update the BIOS file using BIOS Updater 1. ASUSTek BIOS Updater for details. • Reconnect all SATA hard disk drives after updating BIOS. • Load the BIOS default settings to select the BIOS file and press . BIOS Updater checks the selected BIOS file and prompts you to exit BIOS Updater. Press to switch between screen fields and use the keys to ensure system compatibility...
... Exit menu. When BIOS update is done, press to confirm BIOS update. Refer to update BIOS? Are you have disconnected them. 2-6 ASUS P8H61-M LX2 R2.0 Yes No 4. Updating the BIOS file To update the BIOS file using BIOS Updater 1. ASUSTek BIOS Updater for details. • Reconnect all SATA hard disk drives after updating BIOS. • Load the BIOS default settings to select the BIOS file and press . BIOS Updater checks the selected BIOS file and prompts you to exit BIOS Updater. Press to switch between screen fields and use the keys to ensure system compatibility...

P8H61-M LX R2 User's Manual
Page 48
... show the values for that item. To display the submenu, select the item and press . Pop-up window Select a menu item and press to display a list of options. 2-10 ASUS P8H61-M LX2 R2.0 Menu items The highlighted item on the screen. Press the Up/Down arrow keys or / keys to the previous menu screen. A configurable field is a brief description of the menu screen is highlighted when selected. General help...
... show the values for that item. To display the submenu, select the item and press . Pop-up window Select a menu item and press to display a list of options. 2-10 ASUS P8H61-M LX2 R2.0 Menu items The highlighted item on the screen. Press the Up/Down arrow keys or / keys to the previous menu screen. A configurable field is a brief description of the menu screen is highlighted when selected. General help...

P8H61-M LX R2 User's Manual
Page 52
...the current DRAM speed. 2.4.1 ASUS MultiCore Enhancement [Enabled] Allows you to set the memory frequency mode under XMP/Manual/User for this happens, revert to malfunction. Configuration options: [Enabled] [Disabled] 2.4.2 Memory Frequency [Auto] Allows you to become unstable! 2.4 Ai Tweaker menu The Ai Tweaker menu items allow you installed on the motherboard. Target CPU Turbo-Mode Speed : xxxxMHz Displays the current CPU Turbo-Mode speed. The configuration options for maximum performance. Memory frequency options would depend on installed CPU. 2-14 ASUS P8H61-M LX2 R2.0
...the current DRAM speed. 2.4.1 ASUS MultiCore Enhancement [Enabled] Allows you to set the memory frequency mode under XMP/Manual/User for this happens, revert to malfunction. Configuration options: [Enabled] [Disabled] 2.4.2 Memory Frequency [Auto] Allows you to become unstable! 2.4 Ai Tweaker menu The Ai Tweaker menu items allow you installed on the motherboard. Target CPU Turbo-Mode Speed : xxxxMHz Displays the current CPU Turbo-Mode speed. The configuration options for maximum performance. Memory frequency options would depend on installed CPU. 2-14 ASUS P8H61-M LX2 R2.0

P8H61-M LX R2 User's Manual
Page 56
... set the ratio between the CPU Core Clock and the BCLK Frequency. This item should be enabled in specific condition. [Disabled] Disables this function. 2-18 ASUS P8H61-M LX2 R2.0 Hardware Prefetcher [Enabled] [Enabled] Allows a hardware platform to run multiple operating systems separately and simultaneously, enabling one system to virtually function as several systems. [Disabled] Disables this function. Enhanced Intel SpeedStep Technology [Enabled] Allows you to enable or disable the Intel® Turbo Mode Technology. [Enabled] Allows processor cores...
... set the ratio between the CPU Core Clock and the BCLK Frequency. This item should be enabled in specific condition. [Disabled] Disables this function. 2-18 ASUS P8H61-M LX2 R2.0 Hardware Prefetcher [Enabled] [Enabled] Allows a hardware platform to run multiple operating systems separately and simultaneously, enabling one system to virtually function as several systems. [Disabled] Disables this function. Enhanced Intel SpeedStep Technology [Enabled] Allows you to enable or disable the Intel® Turbo Mode Technology. [Enabled] Allows processor cores...

P8H61-M LX R2 User's Manual
Page 58
... upon S3 RTC wake. Key in the desired value using the numeric keypad. Configuration options: [Enabled] [Disabled] 2-20 ASUS P8H61-M LX2 R2.0 SATA Mode Selection [IDE Mode] Allows you to set the SATA configuration. [Disabled] Disables the SATA function. [IDE Mode] Set to [IDE Mode] when you want the SATA hard disk drives to use the Serial ATA hard disk drives as Parallel ATA physical storage devices. [AHCI Mode] Set to [AHCI Mode] when you to set the Active Memory Threshold. When read/write of commands. Configuration options: [Enabled] [Disabled] Active Memory Threshold...
... upon S3 RTC wake. Key in the desired value using the numeric keypad. Configuration options: [Enabled] [Disabled] 2-20 ASUS P8H61-M LX2 R2.0 SATA Mode Selection [IDE Mode] Allows you to set the SATA configuration. [Disabled] Disables the SATA function. [IDE Mode] Set to [IDE Mode] when you want the SATA hard disk drives to use the Serial ATA hard disk drives as Parallel ATA physical storage devices. [AHCI Mode] Set to [AHCI Mode] when you to set the Active Memory Threshold. When read/write of commands. Configuration options: [Enabled] [Disabled] Active Memory Threshold...

P8H61-M LX R2 User's Manual
Page 59
... Chipset limitation, AHCI Mode only works on Windows® XP. • [IDE] is detected, the item shows None. Under Windows® XP, there is no USB device is the default SATA type. And the memory size for add-on VGA devices. PCIEX16 Link Speed [Auto] Allows you to configure the NB PCI Express settings. Please use as the primary boot device. Graphics Configuration Primary Display [Auto] Allows you to configure the PCIE X16 link speed. Configuration options: [Disabled] [Enabled] NB PCIe Configuration Allows you to decide which graphics controller to enable...
... Chipset limitation, AHCI Mode only works on Windows® XP. • [IDE] is detected, the item shows None. Under Windows® XP, there is no USB device is the default SATA type. And the memory size for add-on VGA devices. PCIEX16 Link Speed [Auto] Allows you to configure the NB PCI Express settings. Please use as the primary boot device. Graphics Configuration Primary Display [Auto] Allows you to configure the PCIE X16 link speed. Configuration options: [Disabled] [Enabled] NB PCIe Configuration Allows you to decide which graphics controller to enable...

P8H61-M LX R2 User's Manual
Page 60
... [Enabled] [Enabled] Enables the High Definition Audio Controller. [Disabled] Disables the controller. IRQ=4] [IO=2F8h; IRQ=3] 2-22 ASUS P8H61-M LX2 R2.0 IRQ=4] Allows you to set the HD Audio Controller item to [Enabled]. If no USB device is detected, the legacy USB support is enabled. Front Panel Type [HD] Allows you to select the Serial Port base address. Serial Port [Enabled] Allows you set the front panel audio connector (AAFP) mode to legacy AC'97 or highdefinition audio depending on legacy operating systems (OS). [Disabled] The USB devices can be used only...
... [Enabled] [Enabled] Enables the High Definition Audio Controller. [Disabled] Disables the controller. IRQ=4] [IO=2F8h; IRQ=3] 2-22 ASUS P8H61-M LX2 R2.0 IRQ=4] Allows you to set the HD Audio Controller item to [Enabled]. If no USB device is detected, the legacy USB support is enabled. Front Panel Type [HD] Allows you to select the Serial Port base address. Serial Port [Enabled] Allows you set the front panel audio connector (AAFP) mode to legacy AC'97 or highdefinition audio depending on legacy operating systems (OS). [Disabled] The USB devices can be used only...


