
User Guide
Page 3
... Package contents 1-1 1.3 Monitor introduction 1-2 1.3.1 Front view 1-2 1.3.2 Back view 1-4 1.3.3 Other Function(s 1-5 Chapter 2: Setup 2.1 Assembling the monitor arm/base 2-1 2.2 Detaching the arm/base (for VESA wall mount 2-2 2.3 Adjusting the monitor 2-3 2.4 Connecting the cables 2-4 2.5 Turning on the monitor 2-5 Chapter 3: General instructions 3.1 OSD (On-Screen Display) menu 3-1 3.1.1 How to reconfigure 3-1 3.1.2 OSD function introduction 3-2 3.2 Specifications summary 3-12 3.3 Outline dimensions 3-14 3.4 Troubleshooting (FAQ 3-15 3.5 Supported operating modes 3-16 iii
... Package contents 1-1 1.3 Monitor introduction 1-2 1.3.1 Front view 1-2 1.3.2 Back view 1-4 1.3.3 Other Function(s 1-5 Chapter 2: Setup 2.1 Assembling the monitor arm/base 2-1 2.2 Detaching the arm/base (for VESA wall mount 2-2 2.3 Adjusting the monitor 2-3 2.4 Connecting the cables 2-4 2.5 Turning on the monitor 2-5 Chapter 3: General instructions 3.1 OSD (On-Screen Display) menu 3-1 3.1.1 How to reconfigure 3-1 3.1.2 OSD function introduction 3-2 3.2 Specifications summary 3-12 3.3 Outline dimensions 3-14 3.4 Troubleshooting (FAQ 3-15 3.5 Supported operating modes 3-16 iii
User Guide
Page 4
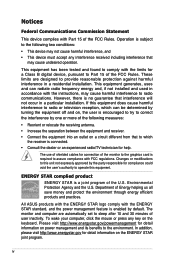
... user is encouraged to try to correct the interference by the party responsible for detail information on power management and its benefits to sleep after 10 and 30 minutes of Energy helping us all save money and protect the environment through energy efficient products and practices. The use of shielded cables for connection of the monitor to the graphics card...
... user is encouraged to try to correct the interference by the party responsible for detail information on power management and its benefits to sleep after 10 and 30 minutes of Energy helping us all save money and protect the environment through energy efficient products and practices. The use of shielded cables for connection of the monitor to the graphics card...
User Guide
Page 5
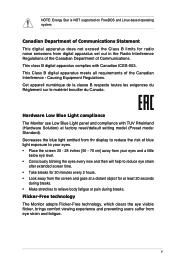
... at factory reset/default setting model (Preset mode: Standard). This Class B digital apparatus meets all requirements of Communications. Canadian Department of Communications Statement This digital apparatus does not exceed the Class B limits for radio noise emissions from digital apparatus set out in the Radio Interference Regulations of the Canadian Department of the Canadian Interference - Hardware Low Blue Light compliance The Monitor use Low Blue Light panel and...
... at factory reset/default setting model (Preset mode: Standard). This Class B digital apparatus meets all requirements of Communications. Canadian Department of Communications Statement This digital apparatus does not exceed the Class B limits for radio noise emissions from digital apparatus set out in the Radio Interference Regulations of the Canadian Department of the Canadian Interference - Hardware Low Blue Light compliance The Monitor use Low Blue Light panel and...
User Guide
Page 7
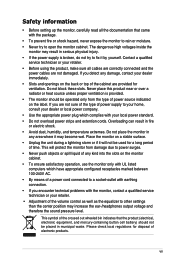
... check local regulations for ventilation. Safety information • Before setting up the monitor, carefully read all cables are correctly connected and the power cables are not sure of the type of power supply to your home, consult your dealer or local power company. • Use the appropriate power plug which have appropriate configured receptacles marked between 100-240V AC. • By means of a power cord connected...
... check local regulations for ventilation. Safety information • Before setting up the monitor, carefully read all cables are correctly connected and the power cables are not sure of the type of power supply to your home, consult your dealer or local power company. • Use the appropriate power plug which have appropriate configured receptacles marked between 100-240V AC. • By means of a power cord connected...
User Guide
Page 8
... complete a task. Turn your monitor off the Power Switch for hours. • When the screen becomes black or flashes, or cannot work anymore, contact your dealer or service center to complete a task. Use a cleaner intended for use . • When the same image is better to disconnect the cables and power cord. The screen will recover slowly or you can turn off and unplug the power cord. Conventions used in completing...
... complete a task. Turn your monitor off the Power Switch for hours. • When the screen becomes black or flashes, or cannot work anymore, contact your dealer or service center to complete a task. Use a cleaner intended for use . • When the same image is better to disconnect the cables and power cord. The screen will recover slowly or you can turn off and unplug the power cord. Conventions used in completing...

User Guide
Page 11
...for purchasing the ASUS® LCD monitor! ASUS PA279CRV Series LCD Monitor 1-1 If you need to C cable (optional) Color calibration testing report ProArt welcome card If any of features that the monitor brings to you for the following items: LCD monitor Monitor base Quick start guide Warranty card Power cord HDMI cable (optional) DisplayPort cable (optional) USB C to replace the power cord or the connection cable(s), please contact ASUS customer service. Ch1a.1ptWeerlco1m:e! The latest widescreen LCD monitor from ASUS provides a broader, brighter and crystal-clear display, plus...
...for purchasing the ASUS® LCD monitor! ASUS PA279CRV Series LCD Monitor 1-1 If you need to C cable (optional) Color calibration testing report ProArt welcome card If any of features that the monitor brings to you for the following items: LCD monitor Monitor base Quick start guide Warranty card Power cord HDMI cable (optional) DisplayPort cable (optional) USB C to replace the power cord or the connection cable(s), please contact ASUS customer service. Ch1a.1ptWeerlco1m:e! The latest widescreen LCD monitor from ASUS provides a broader, brighter and crystal-clear display, plus...
User Guide
Page 14
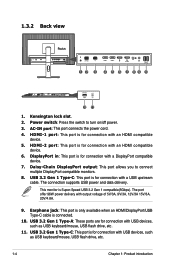
... connection with an HDMI compatible device. 5. The connection supports USB power and data delivery. The port offer 96W power delivery with a USB upstream cable. USB 3.2 Gen 1 Type-A: These ports are for connection with USB devices, such as USB keyboard/mouse, USB flash drive, etc. 1-4 Chapter 1: Product introduction AC-IN port: This port connects the power cord. 4. Earphone jack: This port is only available when an HDMI/DisplayPort/USB Type-C cable is Super-Speed USB 3.2 Gen 1 compatible(5Gbps). Kensington lock slot. 2. HDMI-1 port...
... connection with an HDMI compatible device. 5. The connection supports USB power and data delivery. The port offer 96W power delivery with a USB upstream cable. USB 3.2 Gen 1 Type-A: These ports are for connection with USB devices, such as USB keyboard/mouse, USB flash drive, etc. 1-4 Chapter 1: Product introduction AC-IN port: This port connects the power cord. 4. Earphone jack: This port is only available when an HDMI/DisplayPort/USB Type-C cable is Super-Speed USB 3.2 Gen 1 compatible(5Gbps). Kensington lock slot. 2. HDMI-1 port...
User Guide
Page 15
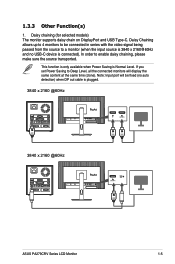
... x 2160 @60Hz 96W 96W ASUS PA279CRV Series LCD Monitor 1-5 Note: Input port will display the same content at the same time (clone). 1.3.3 Other Function(s) 1. If you set Power Saving to Deep Level, all the connected monitors will be connected in series with the video signal being passed from the source to enable daisy chaining, please make sure the source transported. In order to a monitor (when the input source is 3840 x 2160@60Hz and...
... x 2160 @60Hz 96W 96W ASUS PA279CRV Series LCD Monitor 1-5 Note: Input port will display the same content at the same time (clone). 1.3.3 Other Function(s) 1. If you set Power Saving to Deep Level, all the connected monitors will be connected in series with the video signal being passed from the source to enable daisy chaining, please make sure the source transported. In order to a monitor (when the input source is 3840 x 2160@60Hz and...

User Guide
Page 19
... is installed with plug type to the monitor's earphone jack when an HDMI/DisplayPort/USB Type-C signal is suggested to replace the power cord or the connection cable(s), please contact ASUS customer service. 2-4 Chapter 2: Setup It is fed. • To use USB cerified Type-C cable. Make sure your computer's USB Type-A jack. If you can be transmitted. • To use the earphone: connect the end with the Windows, macOS operating system. b. Connect the...
... is installed with plug type to the monitor's earphone jack when an HDMI/DisplayPort/USB Type-C signal is suggested to replace the power cord or the connection cable(s), please contact ASUS customer service. 2-4 Chapter 2: Setup It is fed. • To use USB cerified Type-C cable. Make sure your computer's USB Type-A jack. If you can be transmitted. • To use the earphone: connect the end with the Windows, macOS operating system. b. Connect the...

User Guide
Page 22
....2020 Mode: Compatible with Rec.2020 color space. • DCI-P3 Mode: Compatible with DCI-P3 color space. • DICOM Mode: Compatible with DICOM standard, best choice for your setting or return to make color adjustments in the Advanced Setting. 3-2 Chapter 3: OSD (On-Screen Display) menu Chapter 3: General instructions 3.1.2 OSD function introduction 1. Each mode has the Reset selection, allowing you need to do the following : turn off PIP/PBP. Contains three HDR modes (PQ Optimized, PQ...
....2020 Mode: Compatible with Rec.2020 color space. • DCI-P3 Mode: Compatible with DCI-P3 color space. • DICOM Mode: Compatible with DICOM standard, best choice for your setting or return to make color adjustments in the Advanced Setting. 3-2 Chapter 3: OSD (On-Screen Display) menu Chapter 3: General instructions 3.1.2 OSD function introduction 1. Each mode has the Reset selection, allowing you need to do the following : turn off PIP/PBP. Contains three HDR modes (PQ Optimized, PQ...
User Guide
Page 25
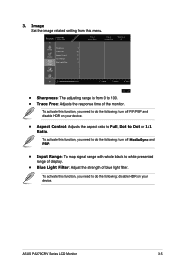
... device. ASUS PA279CRV Series LCD Monitor 3-5 Image Set the image related setting from 0 to do the following : turn off PIP/PBP and disable HDR on your device. • Aspect Control: Adjusts the aspect ratio to Full, Dot to white presented range of display. • Blue Light Filter: Adjust the strength of the monitor. To activate this menu. PA279CRV 1080 60Hz Preset Native Mode Signal DisplayPort Brightness 50 Sharpness 0 Preset Trace Free 60 Palette Aspect Control Input Range Blue Light Filter 0 Image PIP/PBP...
... device. ASUS PA279CRV Series LCD Monitor 3-5 Image Set the image related setting from 0 to do the following : turn off PIP/PBP and disable HDR on your device. • Aspect Control: Adjusts the aspect ratio to Full, Dot to white presented range of display. • Blue Light Filter: Adjust the strength of the monitor. To activate this menu. PA279CRV 1080 60Hz Preset Native Mode Signal DisplayPort Brightness 50 Sharpness 0 Preset Trace Free 60 Palette Aspect Control Input Range Blue Light Filter 0 Image PIP/PBP...
User Guide
Page 26
... 1920 x 2160 in OS display settings. (And make sure that the scaling option is below shows the input source combinations. • Color setting: Select color Preset for Main and Sub windows. • PIP Size: Adjusts the PIP size to full screen in PBP mode, set resolution settings for the PIP mode). 3-6 Chapter 3: OSD (On-Screen Display) menu PA279CRV 3840 x 2160_60Hz Preset Palette Mode Source Color Setting PIP Size Image PIP/PBP QuickFit Plus Preset Native Mode Signal DisplayPort Brightness 50 Back Enter Exit...
... 1920 x 2160 in OS display settings. (And make sure that the scaling option is below shows the input source combinations. • Color setting: Select color Preset for Main and Sub windows. • PIP Size: Adjusts the PIP size to full screen in PBP mode, set resolution settings for the PIP mode). 3-6 Chapter 3: OSD (On-Screen Display) menu PA279CRV 3840 x 2160_60Hz Preset Palette Mode Source Color Setting PIP Size Image PIP/PBP QuickFit Plus Preset Native Mode Signal DisplayPort Brightness 50 Back Enter Exit...
User Guide
Page 27
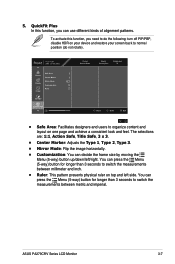
... look and feel. You can decide the frame size by moving the Menu (5-way) button up/down/left side. PA279CRV 3840 x 2160_60Hz Preset Palette Image Safe Area Center Marker Mirror Mode Customization Ruler PIP/PBP QuickFit Plus Preset Native Mode Signal DisplayPort Brightness 50 Back Enter Exit • Safe Area: Facilitates designers and users to switch the measurements between metric and imperial. 5.
... look and feel. You can decide the frame size by moving the Menu (5-way) button up/down/left side. PA279CRV 3840 x 2160_60Hz Preset Palette Image Safe Area Center Marker Mirror Mode Customization Ruler PIP/PBP QuickFit Plus Preset Native Mode Signal DisplayPort Brightness 50 Back Enter Exit • Safe Area: Facilitates designers and users to switch the measurements between metric and imperial. 5.
User Guide
Page 28
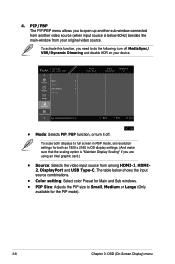
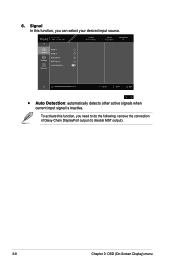
To activate this function, you need to do the following: remove the connection of Daisy-Chain DisplayPort output (to disable MST output). 3-8 Chapter 3: OSD (On-Screen Display) menu Signal In this function, you can select your desired input source. PA279CRV 3840 x 2160_60Hz Preset Native Mode Signal DisplayPort Brightness 50 Signal Settings Shortcut HDMI 1 HDMI 2 DisplayPort USB Type-C Auto Detection Back Enter Exit • Auto Detection: automatically detects other active signals when current input signal is inactive. 6.
To activate this function, you need to do the following: remove the connection of Daisy-Chain DisplayPort output (to disable MST output). 3-8 Chapter 3: OSD (On-Screen Display) menu Signal In this function, you can select your desired input source. PA279CRV 3840 x 2160_60Hz Preset Native Mode Signal DisplayPort Brightness 50 Signal Settings Shortcut HDMI 1 HDMI 2 DisplayPort USB Type-C Auto Detection Back Enter Exit • Auto Detection: automatically detects other active signals when current input signal is inactive. 6.

User Guide
Page 29
... be fixed (no auto detection) when DP out cable is plugged. ASUS PA279CRV Series LCD Monitor 3-9 7. To activate daisy chaining, you to Normal Level. Select Deep Level for power on VESA MediaSync support. * MediaSync can adjust the synchronization speed as "Fast", "Medium", "Gradual" or "Off". To activate this function, you need to execute backlight dynamic dimming. PA279CRV 3840 x 2160_60Hz Preset Native Mode Signal DisplayPort Brightness 50 Signal Settings Shortcut Media sync Dynamic Dimming Power Saving OSD Setup Sound...
... be fixed (no auto detection) when DP out cable is plugged. ASUS PA279CRV Series LCD Monitor 3-9 7. To activate daisy chaining, you to Normal Level. Select Deep Level for power on VESA MediaSync support. * MediaSync can adjust the synchronization speed as "Fast", "Medium", "Gradual" or "Off". To activate this function, you need to execute backlight dynamic dimming. PA279CRV 3840 x 2160_60Hz Preset Native Mode Signal DisplayPort Brightness 50 Signal Settings Shortcut Media sync Dynamic Dimming Power Saving OSD Setup Sound...
User Guide
Page 30
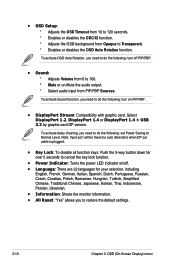
... the monitor information. • All Reset: "Yes" allows you need to do the following : turn on /off PIP/PBP. • Sound: * Adjusts Volume from 0 to restore the default settings. 3-10 Chapter 3: OSD (On-Screen Display) menu • OSD Setup: * Adjusts the OSD Timeout from 10 to 120 seconds. * Enables or disables the DDC/CI function. * Adjusts the OSD background from Opaque to cancel the key lock function. • Power Indicator: Turns the power LED indicator...
... the monitor information. • All Reset: "Yes" allows you need to do the following : turn on /off PIP/PBP. • Sound: * Adjusts Volume from 0 to restore the default settings. 3-10 Chapter 3: OSD (On-Screen Display) menu • OSD Setup: * Adjusts the OSD Timeout from 10 to 120 seconds. * Enables or disables the DDC/CI function. * Adjusts the OSD background from Opaque to cancel the key lock function. • Power Indicator: Turns the power LED indicator...

User Guide
Page 31
Available function choices for Shortcut 1 and 2 buttons. ASUS PA279CRV Series LCD Monitor 3-11 When a certain function is selected or activated, your shortcut key may not support. PA279CRV 3840 x 2160_60Hz Preset Native Mode Signal DisplayPort Brightness 50 Signal Shortcut 1 Shortcut 2 Settings Shortcut Back Enter Exit • Shortcut 1/Shortcut 2: Selects a function for shortcut: Blue Light Filter, Brightness, HDR, Contrast, PIP/PBP, Color Temp., Volume, Energy Saving, User Mode 1, User Mode 2. Shortcut Defines the functions for Shortcut 1 and 2 buttons. 8.
Available function choices for Shortcut 1 and 2 buttons. ASUS PA279CRV Series LCD Monitor 3-11 When a certain function is selected or activated, your shortcut key may not support. PA279CRV 3840 x 2160_60Hz Preset Native Mode Signal DisplayPort Brightness 50 Signal Shortcut 1 Shortcut 2 Settings Shortcut Back Enter Exit • Shortcut 1/Shortcut 2: Selects a function for shortcut: Blue Light Filter, Brightness, HDR, Contrast, PIP/PBP, Color Temp., Volume, Energy Saving, User Mode 1, User Mode 2. Shortcut Defines the functions for Shortcut 1 and 2 buttons. 8.
User Guide
Page 32
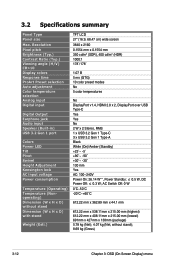
...summary Panel Type Panel size Max. Resolution Pixel pitch Brightness (Typ.) Contrast Ratio (Typ.) Viewing angle (H/V) CR>10 Display colors Response time ProArt Preset selection Auto adjustment Color temperature selection Analog input Digital input Digital Output Earphone jack Audio input Speaker (Built-in) USB 3.2 Gen 1 port Colors Power LED Tilt Pivot Swivel Height Adjustment Kensington lock AC input voltage Power consumption Temperature (Operating) Temperature (Nonoperating) Dimension (W x H x D) without stand); 8.69 kg (Gross) 3-12 Chapter 3: OSD (On-Screen Display) menu AC Switch Off...
...summary Panel Type Panel size Max. Resolution Pixel pitch Brightness (Typ.) Contrast Ratio (Typ.) Viewing angle (H/V) CR>10 Display colors Response time ProArt Preset selection Auto adjustment Color temperature selection Analog input Digital input Digital Output Earphone jack Audio input Speaker (Built-in) USB 3.2 Gen 1 port Colors Power LED Tilt Pivot Swivel Height Adjustment Kensington lock AC input voltage Power consumption Temperature (Operating) Temperature (Nonoperating) Dimension (W x H x D) without stand); 8.69 kg (Gross) 3-12 Chapter 3: OSD (On-Screen Display) menu AC Switch Off...

User Guide
Page 33
ASUS PA279CRV Series LCD Monitor 3-13 Multi-languages Accessories Compliance and Standards 22 languages (English, French, German, Italian, Spanish, Dutch, Portuguese, Russian, Czech, Croatian, Polish, Romanian, Hungarian, Turkish, Simplified Chinese, Traditional Chinese, Japanese, Korean, Thai, Indonesian, Persian, Ukrainian) Quick start guide, warranty card, power cord, HDMI cable (optional), DisplayPort cable (optional), USB C to C cable (optional), color calibration testing report, ProArt welcome card cTUVus, FCC, ICES-3, EPEAT Gold, CB, CE, ErP, WEEE, EU Energy, TUV...
ASUS PA279CRV Series LCD Monitor 3-13 Multi-languages Accessories Compliance and Standards 22 languages (English, French, German, Italian, Spanish, Dutch, Portuguese, Russian, Czech, Croatian, Polish, Romanian, Hungarian, Turkish, Simplified Chinese, Traditional Chinese, Japanese, Korean, Thai, Indonesian, Persian, Ukrainian) Quick start guide, warranty card, power cord, HDMI cable (optional), DisplayPort cable (optional), USB C to C cable (optional), color calibration testing report, ProArt welcome card cTUVus, FCC, ICES-3, EPEAT Gold, CB, CE, ErP, WEEE, EU Energy, TUV...
User Guide
Page 35
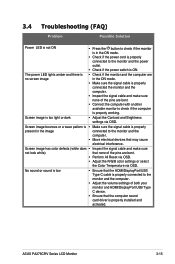
... connected to the monitor and the power outlet. • Check if the power switch is properly working. ASUS PA279CRV Series LCD Monitor 3-15 Screen image bounces or a wave pattern is • Make sure the signal cable is properly present in the image connected to check if the computer is ON. The power LED lights amber and there is no screen image • Check if the monitor and the computer are bent. • Perform All Reset via OSD. • Adjust the R/G/B color settings...
... connected to the monitor and the power outlet. • Check if the power switch is properly working. ASUS PA279CRV Series LCD Monitor 3-15 Screen image bounces or a wave pattern is • Make sure the signal cable is properly present in the image connected to check if the computer is ON. The power LED lights amber and there is no screen image • Check if the monitor and the computer are bent. • Perform All Reset via OSD. • Adjust the R/G/B color settings...

