

PA32UCX-P Series User Guide
Page 3
... 1.3 Monitor introduction 1-2 1.3.1 Front view 1-2 1.3.2 Back view 1-3 1.3.3 QuickFit Function 1-4 1.3.4 Other Functions 1-6 Chapter 2: Setup 2.1 Attaching the arm/base 2-1 2.2 Detaching the arm/base (for VESA wall mount 2-1 2.3 Adjusting the monitor 2-2 2.4 Connecting the cables 2-4 2.5 Turning on the monitor 2-5 Chapter 3: General instructions 3.1 OSD (On-Screen Display) menu 3-1 3.1.1 How to reconfigure 3-1 3.1.2 OSD function introduction 3-2 3.2 Specifications summary 3-12 3.3 Outline dimensions 3-14 3.4 Troubleshooting (FAQ 3-15 3.5 Supported operating modes 3-16...
... 1.3 Monitor introduction 1-2 1.3.1 Front view 1-2 1.3.2 Back view 1-3 1.3.3 QuickFit Function 1-4 1.3.4 Other Functions 1-6 Chapter 2: Setup 2.1 Attaching the arm/base 2-1 2.2 Detaching the arm/base (for VESA wall mount 2-1 2.3 Adjusting the monitor 2-2 2.4 Connecting the cables 2-4 2.5 Turning on the monitor 2-5 Chapter 3: General instructions 3.1 OSD (On-Screen Display) menu 3-1 3.1.1 How to reconfigure 3-1 3.1.2 OSD function introduction 3-2 3.2 Specifications summary 3-12 3.3 Outline dimensions 3-14 3.4 Troubleshooting (FAQ 3-15 3.5 Supported operating modes 3-16...

PA32UCX-P Series User Guide
Page 4
...card is no guarantee that may cause undesired operation. Causing Equipment Regulations. These limits are designed to Part 15 of the following two conditions: • This device may cause harmful interference to operate this equipment. If this unit not expressly approved by one or more of the FCC Rules. The use of shielded cables... du Canada. iv This equipment generates, uses and can be determined by turning the equipment off and on a circuit different from digital apparatus set out in a particular installation. Changes or modifications to this equipment does cause ...
...card is no guarantee that may cause undesired operation. Causing Equipment Regulations. These limits are designed to Part 15 of the following two conditions: • This device may cause harmful interference to operate this equipment. If this unit not expressly approved by one or more of the FCC Rules. The use of shielded cables... du Canada. iv This equipment generates, uses and can be determined by turning the equipment off and on a circuit different from digital apparatus set out in a particular installation. Changes or modifications to this equipment does cause ...

PA32UCX-P Series User Guide
Page 5
... of the volume control as well as the equalizer to open the monitor cabinet. Overloading can result in municipal waste. Safety information • Before setting up the monitor, carefully read all cables are correctly connected and the power cables are not sure of the type of power supply to your home, consult your dealer or local power company. • Use the appropriate power plug which have...
... of the volume control as well as the equalizer to open the monitor cabinet. Overloading can result in municipal waste. Safety information • Before setting up the monitor, carefully read all cables are correctly connected and the power cables are not sure of the type of power supply to your home, consult your dealer or local power company. • Use the appropriate power plug which have...
PA32UCX-P Series User Guide
Page 6
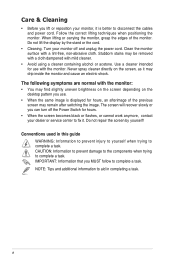
... same image is better to complete a task. Do not repair the screen by the stand or the cord. • Cleaning. Stubborn stains may be removed with a cloth dampened with the monitor: • You may find slightly uneven brightness on the screen depending on the screen, as it is displayed for hours. • When the screen becomes black or flashes, or cannot work anymore, contact your monitor off...
... same image is better to complete a task. Do not repair the screen by the stand or the cord. • Cleaning. Stubborn stains may be removed with a cloth dampened with the monitor: • You may find slightly uneven brightness on the screen depending on the screen, as it is displayed for hours. • When the screen becomes black or flashes, or cannot work anymore, contact your monitor off...
PA32UCX-P Series User Guide
Page 9
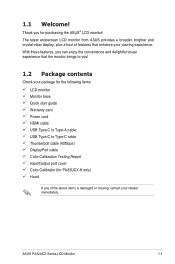
... or missing, contact your viewing experience. ASUS PA32UCX Series LCD Monitor 1-1 1.1 Welcome! With these features, you for PA32UCX-K only) Hood If any of features that the monitor brings to you! 1.2 Package contents Check your package for the following items: LCD monitor Monitor base Quick start guide Warranty card Power cord HDMI cable USB Type-C to Type-A cable USB Type-C to Type-C cable Thunderbolt cable (40Gbps) DisplayPort cable Color Calibration Testing Report Input/Output port cover Color Calibrator (for purchasing the ASUS® LCD monitor! Thank you can...
... or missing, contact your viewing experience. ASUS PA32UCX Series LCD Monitor 1-1 1.1 Welcome! With these features, you for PA32UCX-K only) Hood If any of features that the monitor brings to you! 1.2 Package contents Check your package for the following items: LCD monitor Monitor base Quick start guide Warranty card Power cord HDMI cable USB Type-C to Type-A cable USB Type-C to Type-C cable Thunderbolt cable (40Gbps) DisplayPort cable Color Calibration Testing Report Input/Output port cover Color Calibrator (for purchasing the ASUS® LCD monitor! Thank you can...

PA32UCX-P Series User Guide
Page 11
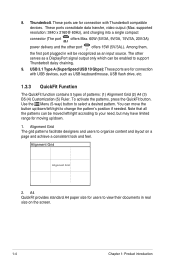
...This port connects the power cord. 3. Earphone jack. 5. HDMI-1 port specially supports few uncertain HDMI1.4 EDID devices. Status White Amber Off Description On Standby mode Off 1.3.2 Back view 1 2 34 5 67 8 9 1. Kensington lock slot. 2. Press "Input Select" key for 5 seconds for service only. This port is DisplayPort 1.2. HDMI ports. DisplayPort in the OSD menu is for connection with a DisplayPort compatible device. ASUS PA32UCX Series LCD Monitor 1-3 Power switch. These ports are for connection with an HDMI compatible device. Shortcut • Default: HDR...
...This port connects the power cord. 3. Earphone jack. 5. HDMI-1 port specially supports few uncertain HDMI1.4 EDID devices. Status White Amber Off Description On Standby mode Off 1.3.2 Back view 1 2 34 5 67 8 9 1. Kensington lock slot. 2. Press "Input Select" key for 5 seconds for service only. This port is DisplayPort 1.2. HDMI ports. DisplayPort in the OSD menu is for connection with a DisplayPort compatible device. ASUS PA32UCX Series LCD Monitor 1-3 Power switch. These ports are for connection with an HDMI compatible device. Shortcut • Default: HDR...
PA32UCX-P Series User Guide
Page 12
supported resolution: 3840 x 2160@ 60Hz), and charging into a single compact connector (The port offers Max. 60W (5V/3A, 9V/3A, 15V/3A, 20V/3A) power delivery and the other serves as a DisplayPort signal output only which can move the button up /down /left /right accroding to your need, but may have limited range for connection with USB devices, such as an input source. Alignment...
supported resolution: 3840 x 2160@ 60Hz), and charging into a single compact connector (The port offers Max. 60W (5V/3A, 9V/3A, 15V/3A, 20V/3A) power delivery and the other serves as a DisplayPort signal output only which can move the button up /down /left /right accroding to your need, but may have limited range for connection with USB devices, such as an input source. Alignment...
PA32UCX-P Series User Guide
Page 18
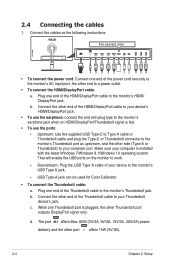
... power cord securely to the monitor's AC input port, the other end of your device to your computer is plugged, the other Thunderbolt port outputs DisplayPort signal only. That will enable the USB ports on the monitor to work. »» Downstream: Plug the USB Type A cable of the Thunderbolt cable to the monitor's USB Type A jack. »» USB Type-A jack can be used for Color Calibrator. • To connect the Thunderbolt cable: a. b. Connect...
... power cord securely to the monitor's AC input port, the other end of your device to your computer is plugged, the other Thunderbolt port outputs DisplayPort signal only. That will enable the USB ports on the monitor to work. »» Downstream: Plug the USB Type A cable of the Thunderbolt cable to the monitor's USB Type A jack. »» USB Type-A jack can be used for Color Calibrator. • To connect the Thunderbolt cable: a. b. Connect...

PA32UCX-P Series User Guide
Page 22
... white point. 3-2 Chapter 3: OSD (On-Screen Display) menu ST2084 code value with higher than display maximum will be mapped to do the following: turn off Ambient Effect and disable HDR on your preference. To activate this display with as much accuracy as with ST2084 in terms of 300 nits for your device. 3.1.2 OSD function introduction 1. Each mode has the Reset selection, allowing you need...
... white point. 3-2 Chapter 3: OSD (On-Screen Display) menu ST2084 code value with higher than display maximum will be mapped to do the following: turn off Ambient Effect and disable HDR on your preference. To activate this display with as much accuracy as with ST2084 in terms of 300 nits for your device. 3.1.2 OSD function introduction 1. Each mode has the Reset selection, allowing you need...
PA32UCX-P Series User Guide
Page 23
... also save one or two ProArt Calibration profiles as with ST2084 in the Adanced Setting. * PQ Optimized: Delivers the optimized HDR performance of this display with as much accuracy as User Mode 1/User Mode 2 after executing ProArt Calibration and then have quick access here. Please apply the following settings while performing ProArt color calibration: • Set output dynamic to full range. • Set output color format to RGB. • Set output color depth to make color adjustments in...
... also save one or two ProArt Calibration profiles as with ST2084 in the Adanced Setting. * PQ Optimized: Delivers the optimized HDR performance of this display with as much accuracy as User Mode 1/User Mode 2 after executing ProArt Calibration and then have quick access here. Please apply the following settings while performing ProArt color calibration: • Set output dynamic to full range. • Set output color format to RGB. • Set output color depth to make color adjustments in...
PA32UCX-P Series User Guide
Page 24
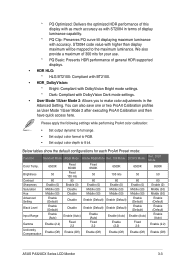
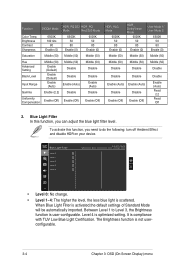
... Enable (0) Middle (50) Middle (50) Middle (50) Middle (50) Disable Disable Disable Disable Enable (Auto) Enable (Auto) Disable Disable Enable (Off) Enable (Off) Disable Enable (Auto) Fixed 2.2 Fixed Off 2. Blue Light Filter In this function, you can adjust the blue light filter level. To activate this function, you need to Level 3, the Brightness function is not userconfigurable. 3-4 Chapter 3: OSD (On-Screen Display) menu It is scattered. Function DICOM Mode HDR_PQ DCI HDR_PQ Mode Rec2020 Mode Color Temp.
... Enable (0) Middle (50) Middle (50) Middle (50) Middle (50) Disable Disable Disable Disable Enable (Auto) Enable (Auto) Disable Disable Enable (Off) Enable (Off) Disable Enable (Auto) Fixed 2.2 Fixed Off 2. Blue Light Filter In this function, you can adjust the blue light filter level. To activate this function, you need to Level 3, the Brightness function is not userconfigurable. 3-4 Chapter 3: OSD (On-Screen Display) menu It is scattered. Function DICOM Mode HDR_PQ DCI HDR_PQ Mode Rec2020 Mode Color Temp.

PA32UCX-P Series User Guide
Page 25
... P3-Theater. ASUS PA32UCX Series LCD Monitor 3-5 Blue light Filter to reduce 70% (max.) harmful blue light to 2.6, 2.4, 2.2, 2.0 or 1.8. Gamma Color Black Level Color Reset ASUS PA32UCX Standard Mode DisplayPort 3840 x 2160@ 60Hz • Brightness: The adjusting range is from 0 to 100. • Contrast: The adjusting range is from 0 to alleviate eye strains: • Users should rest the eye periodically by focusing on your device. ProArt Palette Set a desired color setting from the display if working at the computer...
... P3-Theater. ASUS PA32UCX Series LCD Monitor 3-5 Blue light Filter to reduce 70% (max.) harmful blue light to 2.6, 2.4, 2.2, 2.0 or 1.8. Gamma Color Black Level Color Reset ASUS PA32UCX Standard Mode DisplayPort 3840 x 2160@ 60Hz • Brightness: The adjusting range is from 0 to 100. • Contrast: The adjusting range is from 0 to alleviate eye strains: • Users should rest the eye periodically by focusing on your device. ProArt Palette Set a desired color setting from the display if working at the computer...

PA32UCX-P Series User Guide
Page 26
... when input source is only available for R, G, B. • Black Level: The darkest level of display. * Signal: To adjust the initialized 1st signal level of darkest gray level. * Backlight: To adjust the darkness of backlight. • Color Reset: * Current mode color reset: Resets the color settings of current color mode to the factory default value. * All modes color reset: Resets the color settings of all color modes to 100. • Trace Free: Adjusts the response time of the monitor. Image Set the image related setting from 0 to the factory default...
... when input source is only available for R, G, B. • Black Level: The darkest level of display. * Signal: To adjust the initialized 1st signal level of darkest gray level. * Backlight: To adjust the darkness of backlight. • Color Reset: * Current mode color reset: Resets the color settings of current color mode to the factory default value. * All modes color reset: Resets the color settings of all color modes to 100. • Trace Free: Adjusts the response time of the monitor. Image Set the image related setting from 0 to the factory default...
PA32UCX-P Series User Guide
Page 27
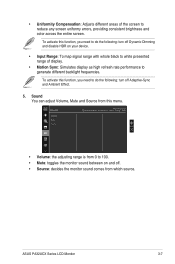
... Sync: Simulates display as high refresh rate performance to generate different backlight frequencies. To activate this function, you need to 100. • Mute: toggles the monitor sound between on your device. • Input Range: To map signal range with whole black to white presented range of the screen to reduce any screen uniformy errors, providing consistent brightness and color across the entire screen. ASUS PA32UCX Series LCD Monitor 3-7 Sound Volume Mute Source ASUS PA32UCX Standard Mode DisplayPort 3840 x 2160@ 60Hz • Volume: the adjusting range is...
... Sync: Simulates display as high refresh rate performance to generate different backlight frequencies. To activate this function, you need to 100. • Mute: toggles the monitor sound between on your device. • Input Range: To map signal range with whole black to white presented range of the screen to reduce any screen uniformy errors, providing consistent brightness and color across the entire screen. ASUS PA32UCX Series LCD Monitor 3-7 Sound Volume Mute Source ASUS PA32UCX Standard Mode DisplayPort 3840 x 2160@ 60Hz • Volume: the adjusting range is...
PA32UCX-P Series User Guide
Page 28
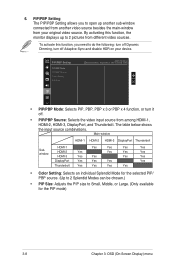
...; PIP Size: Adjusts the PIP size to do the following: turn off Dynamic Dimming, turn it off Adaptive-Sync and disable HDR on your original video source. 6. By activating this function, you to open up to 2 pictures from different video sources. The table below shows the input source combinations. To activate this function, the monitor displays up another sub-window connected from another video source besides the main-window from among HDMI-1, HDMI-2, HDMI-3, DisplayPort, and...
...; PIP Size: Adjusts the PIP size to do the following: turn off Dynamic Dimming, turn it off Adaptive-Sync and disable HDR on your original video source. 6. By activating this function, you to open up to 2 pictures from different video sources. The table below shows the input source combinations. To activate this function, the monitor displays up another sub-window connected from another video source besides the main-window from among HDMI-1, HDMI-2, HDMI-3, DisplayPort, and...

PA32UCX-P Series User Guide
Page 29
...-latency display update. * Adaptive-Sync can adjust the synchronization speed as "Fast", "Medium" or "Gradual". Input Select HDMI-1 HDMI-2 HDMI-3 DisplayPort Thunderbolt ASUS PA32UCX Standard Mode DisplayPort 3840 x 2160@ 60Hz If one outputs DisplayPort signal only. 8. You can only be activated within 40Hz ~ 60Hz. * For supported GPUs, minimum PC system and driver requirements, please contact the GPU manufactures. System Setup HDR Preview Adaptive-Sync Dynamic Dimming Power Saving OSD Setup Language Calibration Reminder ASUS PA32UCX Standard Mode...
...-latency display update. * Adaptive-Sync can adjust the synchronization speed as "Fast", "Medium" or "Gradual". Input Select HDMI-1 HDMI-2 HDMI-3 DisplayPort Thunderbolt ASUS PA32UCX Standard Mode DisplayPort 3840 x 2160@ 60Hz If one outputs DisplayPort signal only. 8. You can only be activated within 40Hz ~ 60Hz. * For supported GPUs, minimum PC system and driver requirements, please contact the GPU manufactures. System Setup HDR Preview Adaptive-Sync Dynamic Dimming Power Saving OSD Setup Language Calibration Reminder ASUS PA32UCX Standard Mode...
PA32UCX-P Series User Guide
Page 30
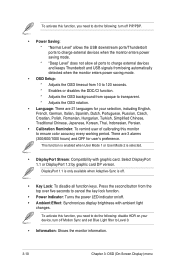
...: Compatibility with ambient light changes. Press the second button from opaque to transparent. * Adjusts the OSD rotation. • Language: There are 3 alarms (300/600/1000 hours) and OFF for your device, turn off Motion Sync and set Blue Light filter to Level 0. • Information: Shows the monitor information. 3-10 Chapter 3: OSD (On-Screen Display) menu There are 21 languages for user's preference. To activate this monitor to ensure color accuracy every working...
...: Compatibility with ambient light changes. Press the second button from opaque to transparent. * Adjusts the OSD rotation. • Language: There are 3 alarms (300/600/1000 hours) and OFF for your device, turn off Motion Sync and set Blue Light filter to Level 0. • Information: Shows the monitor information. 3-10 Chapter 3: OSD (On-Screen Display) menu There are 21 languages for user's preference. To activate this monitor to ensure color accuracy every working...

PA32UCX-P Series User Guide
Page 31
... choices for Shortcut 1 and 2 buttons. ASUS PA32UCX Series LCD Monitor 3-11 Shortcut Shortcut 1 Shortcut 2 ASUS PA32UCX Standard Mode DisplayPort 3840 x 2160@ 60Hz • Shortcut 1/Shortcut 2: selects a function for shortcut: Blue Light Filter, Brightness, HDR, Contrast, PIP/PBP Setting, Color Temp., Volume, Motion Sync, User Mode 1, User Mode 2. When a certain function is selected or activated, your shortcut key may not support. • All Reset: "Yes" allows you to restore the default settings. 9. Shortcut Defines the functions...
... choices for Shortcut 1 and 2 buttons. ASUS PA32UCX Series LCD Monitor 3-11 Shortcut Shortcut 1 Shortcut 2 ASUS PA32UCX Standard Mode DisplayPort 3840 x 2160@ 60Hz • Shortcut 1/Shortcut 2: selects a function for shortcut: Blue Light Filter, Brightness, HDR, Contrast, PIP/PBP Setting, Color Temp., Volume, Motion Sync, User Mode 1, User Mode 2. When a certain function is selected or activated, your shortcut key may not support. • All Reset: "Yes" allows you to restore the default settings. 9. Shortcut Defines the functions...

PA32UCX-P Series User Guide
Page 32
Resolution Pixel pitch Brightness Contrast Ratio (Typ.) Contrast Ratio (Max.) Viewing angle (H/V) CR>10 Display colors Color gamut Response time ProArt Preset selection Color temperature selection Digital input Earphone jack USB 3.0 port Color Power LED Tilt Swivel Pivot Height Adjustment Kensington lock AC input voltage Power consumption Temperature (Operating) Temperature (Non-operating) Dimension (W x H x D) Weight (Esti.) Multi-languages Accessories TFT LCD 32.0" (16:9, 81.28 cm) wide screen 3840 x 2160 0.1845 mm 600 cd/m2 (Typ.), 1200 cd/m2 (Max.) 1,000...
Resolution Pixel pitch Brightness Contrast Ratio (Typ.) Contrast Ratio (Max.) Viewing angle (H/V) CR>10 Display colors Color gamut Response time ProArt Preset selection Color temperature selection Digital input Earphone jack USB 3.0 port Color Power LED Tilt Swivel Pivot Height Adjustment Kensington lock AC input voltage Power consumption Temperature (Operating) Temperature (Non-operating) Dimension (W x H x D) Weight (Esti.) Multi-languages Accessories TFT LCD 32.0" (16:9, 81.28 cm) wide screen 3840 x 2160 0.1845 mm 600 cd/m2 (Typ.), 1200 cd/m2 (Max.) 1,000...

PA32UCX-P Series User Guide
Page 35
... All Reset via OSD. • Adjust the R/G/B color settings or select the Color Temperature via OSD. 3.4 Troubleshooting (FAQ) Problem Possible Solution Power LED is not ON • Press the button to check if the monitor is in the ON mode. • Check if the power cord is properly connected to the monitor and the power outlet. • Check if the power switch is properly working. The power LED lights amber and there is no screen image • Check if the monitor and...
... All Reset via OSD. • Adjust the R/G/B color settings or select the Color Temperature via OSD. 3.4 Troubleshooting (FAQ) Problem Possible Solution Power LED is not ON • Press the button to check if the monitor is in the ON mode. • Check if the power cord is properly connected to the monitor and the power outlet. • Check if the power switch is properly working. The power LED lights amber and there is no screen image • Check if the monitor and...


