
PG348 Series User Guide for English Edition
Page 2
... repair, modification of the product is authorized in any form or by any language in writing byASUS; or (2) the serial number of alteration is defaced or missing. SPECIFICATIONS AND INFORMATION CONTAINED IN THIS MANUAL ARE FURNISHED FOR INFORMATIONAL USE ONLY, AND ARE SUBJECT TO CHANGE AT ANY TIME WITHOUT NOTICE, AND SHOULD NOT BE CONSTRUED AS A COMMITMENT BY ASUS...
... repair, modification of the product is authorized in any form or by any language in writing byASUS; or (2) the serial number of alteration is defaced or missing. SPECIFICATIONS AND INFORMATION CONTAINED IN THIS MANUAL ARE FURNISHED FOR INFORMATIONAL USE ONLY, AND ARE SUBJECT TO CHANGE AT ANY TIME WITHOUT NOTICE, AND SHOULD NOT BE CONSTRUED AS A COMMITMENT BY ASUS...
PG348 Series User Guide for English Edition
Page 3
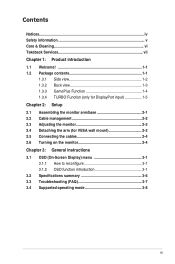
... Side view 1-2 1.3.2 Back view 1-3 1.3.3 GamePlus Function 1-4 1.3.4 TURBO Function (only for DisplayPort input 1-5 Chapter 2: Setup 2.1 2.2 2.3 2.4 2.5 2.6 Assembling the monitor arm/base 2-1 Cable management 2-2 Adjusting the monitor 2-3 Detaching the arm (for VESA wall mount 2-3 Connecting the cables 2-4 Turning on the monitor 2-4 Chapter 3: General instructions 3.1 OSD (On-Screen Display) menu 3-1 3.1.1 How to reconfigure 3-1 3.1.2 OSD function introduction 3-1 3.2 Specifications summary 3-6 3.3 Troubleshooting (FAQ 3-7 3.4 Supported operating mode 3-8 iii
... Side view 1-2 1.3.2 Back view 1-3 1.3.3 GamePlus Function 1-4 1.3.4 TURBO Function (only for DisplayPort input 1-5 Chapter 2: Setup 2.1 2.2 2.3 2.4 2.5 2.6 Assembling the monitor arm/base 2-1 Cable management 2-2 Adjusting the monitor 2-3 Detaching the arm (for VESA wall mount 2-3 Connecting the cables 2-4 Turning on the monitor 2-4 Chapter 3: General instructions 3.1 OSD (On-Screen Display) menu 3-1 3.1.1 How to reconfigure 3-1 3.1.2 OSD function introduction 3-1 3.2 Specifications summary 3-6 3.3 Troubleshooting (FAQ 3-7 3.4 Supported operating mode 3-8 iii

PG348 Series User Guide for English Edition
Page 4
... interference by the party responsible for compliance could void the user's authority to operate this equipment does cause harmful interference to radio or television reception, which can radiate radio frequency energy and, if not installed and used in a particular installation. This class B digital apparatus complies with manufacturer's instructions, may cause undesired operation. Causing Equipment Regulations. These limits...
... interference by the party responsible for compliance could void the user's authority to operate this equipment does cause harmful interference to radio or television reception, which can radiate radio frequency energy and, if not installed and used in a particular installation. This class B digital apparatus complies with manufacturer's instructions, may cause undesired operation. Causing Equipment Regulations. These limits...
PG348 Series User Guide for English Edition
Page 5
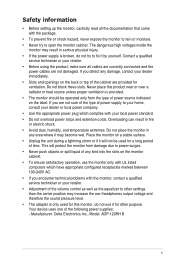
... of power supply to your home, consult your dealer or local power company. • Use the appropriate power plug which have appropriate configured receptacles marked between 100-240V AC. • If you encounter technical problems with the monitor, contact a qualified service technician or your retailer. • Adjustment of the volume control as well as the equalizer to other settings than the center position may...
... of power supply to your home, consult your dealer or local power company. • Use the appropriate power plug which have appropriate configured receptacles marked between 100-240V AC. • If you encounter technical problems with the monitor, contact a qualified service technician or your retailer. • Adjustment of the volume control as well as the equalizer to other settings than the center position may...

PG348 Series User Guide for English Edition
Page 6
... electric shock. Do not lift the display by yourself! Turn your dealer or service center to fix it is displayed for disposal of the monitor. Use a cleaner intended for hours. • When the screen becomes black or flashes, or cannot work anymore, contact your monitor off and unplug the power cord. IMPORTANT: Information that you lift or reposition your monitor, it . When lifting or carrying...
... electric shock. Do not lift the display by yourself! Turn your dealer or service center to fix it is displayed for disposal of the monitor. Use a cleaner intended for hours. • When the screen becomes black or flashes, or cannot work anymore, contact your monitor off and unplug the power cord. IMPORTANT: Information that you lift or reposition your monitor, it . When lifting or carrying...
PG348 Series User Guide for English Edition
Page 9
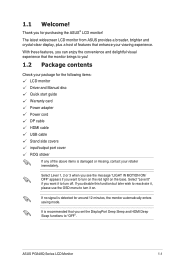
..., please use the OSD menu to turn it to turn off. If you for the following items: LCD monitor Driver and Manual disc Quick start guide Warranty card Power adapter Power cord DP cable HDMI cable USB cable Stand side covers input/output port cover ROG sticker If any of features that you want it on the base. With these features, you can enjoy the convenience and delightful visual experience that the monitor brings to "OFF". If no signal is damaged...
..., please use the OSD menu to turn it to turn off. If you for the following items: LCD monitor Driver and Manual disc Quick start guide Warranty card Power adapter Power cord DP cable HDMI cable USB cable Stand side covers input/output port cover ROG sticker If any of features that you want it on the base. With these features, you can enjoy the convenience and delightful visual experience that the monitor brings to "OFF". If no signal is damaged...

PG348 Series User Guide for English Edition
Page 10
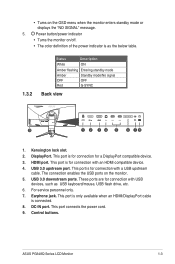
... function needed. • Turns on the OSD menu. button • TURBO hotkey. button • Exits the OSD menu item. • Toggles the Key Lock function between on the OSD menu when the monitor enters standby mode or displays the "NO SIGNAL" message. 2. Move the ( ) button up /down to select and press ( ) to select among different refresh rates. (Only for 5 seconds. • Turns on the OSD menu when the monitor enters standby mode or displays...
... function needed. • Turns on the OSD menu. button • TURBO hotkey. button • Exits the OSD menu item. • Toggles the Key Lock function between on the OSD menu when the monitor enters standby mode or displays the "NO SIGNAL" message. 2. Move the ( ) button up /down to select and press ( ) to select among different refresh rates. (Only for 5 seconds. • Turns on the OSD menu when the monitor enters standby mode or displays...
PG348 Series User Guide for English Edition
Page 11
... connection enables the USB ports on the OSD menu when the monitor enters standby mode or displays the "NO SIGNAL" message. 5. DC-IN port. USB 3.0 upstream port. Control buttons. Power button/power indicator • Turns the monitor on/off. • The color definition of the power indicator is as USB keyboard/mouse, USB flash drive, etc. 6. This port is for connection with an HDMI compatible device. 4. USB 3.0 downstream ports. This port is only available when an HDMI/DisplayPort cable is for connection with a USB upstream cable. ASUS PG348Q Series LCD Monitor...
... connection enables the USB ports on the OSD menu when the monitor enters standby mode or displays the "NO SIGNAL" message. 5. DC-IN port. USB 3.0 upstream port. Control buttons. Power button/power indicator • Turns the monitor on/off. • The color definition of the power indicator is as USB keyboard/mouse, USB flash drive, etc. 6. This port is for connection with an HDMI compatible device. 4. USB 3.0 downstream ports. This port is only available when an HDMI/DisplayPort cable is for connection with a USB upstream cable. ASUS PG348Q Series LCD Monitor...
PG348 Series User Guide for English Edition
Page 15
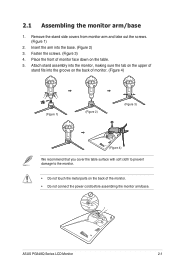
2.1 Assembling the monitor arm/base 1. Fasten the screws. (Figure 3) 4. ASUS PG348Q Series LCD Monitor 2-1 Place the front of the monitor. • Do not connect the power cord before assembling the monitor arm/base. Attach stand assembly into the monitor, making sure the tab on the upper of stand fits into the base. (Figure 2) 3. Remove the stand side covers from monitor arm and take out the screws. (Figure 1) 2. Insert the arm into the groove on the back of monitor. (Figure...
2.1 Assembling the monitor arm/base 1. Fasten the screws. (Figure 3) 4. ASUS PG348Q Series LCD Monitor 2-1 Place the front of the monitor. • Do not connect the power cord before assembling the monitor arm/base. Attach stand assembly into the monitor, making sure the tab on the upper of stand fits into the base. (Figure 2) 3. Remove the stand side covers from monitor arm and take out the screws. (Figure 1) 2. Insert the arm into the groove on the back of monitor. (Figure...

PG348 Series User Guide for English Edition
Page 17
... down on a table. 2. ASUS PG348Q Series LCD Monitor 2-3 Place the front of this monitor is normal that you adjust the viewing angle. 2.4 Detaching the arm (for VESA wall mount. To detach the arm: 1. Press the release button, and then detach the arm/base from falling when you change its angle. • The recommended adjusting angle is +20˚ to -5˚ (for tilt)/+50˚ to the...
... down on a table. 2. ASUS PG348Q Series LCD Monitor 2-3 Place the front of this monitor is normal that you adjust the viewing angle. 2.4 Detaching the arm (for VESA wall mount. To detach the arm: 1. Press the release button, and then detach the arm/base from falling when you change its angle. • The recommended adjusting angle is +20˚ to -5˚ (for tilt)/+50˚ to the...

PG348 Series User Guide for English Edition
Page 18
... the power button. 2.5 Connecting the cables Connect the cables as the following instructions: • To connect the power cord: a. That will enable the USB ports on the monitor to the monitor's DC input. The power indicator lights up in white to the monitor's earphone jack when an HDMI or DisplayPort signal is ON. 2-4 Chapter 2: Setup Plug one end of the power cord to the power adapter and the other end of the DisplayPort/HDMI cable to your computer's DisplayPort/HDMI port...
... the power button. 2.5 Connecting the cables Connect the cables as the following instructions: • To connect the power cord: a. That will enable the USB ports on the monitor to the monitor's DC input. The power indicator lights up in white to the monitor's earphone jack when an HDMI or DisplayPort signal is ON. 2-4 Chapter 2: Setup Plug one end of the power cord to the power adapter and the other end of the DisplayPort/HDMI cable to your computer's DisplayPort/HDMI port...

PG348 Series User Guide for English Edition
Page 19
... to adjust the refresh rate. To exit and save the OSD menu, press the button or move the ( ) left repeatedly until the OSD menu disappears. Normal Mode DisplayPort 3440 x 1440@ 60Hz Racing Mode ASUS ROG PG348 Over Clocking On GameVisual Blue Light Filter Color Image Input Select System Setup MOVE/ENTER BACK EXIT • Select "ON" if you to activate it . To adjust other functions, repeat steps 1-3. 3.1.2 OSD function introduction 1. 3.1 3.1.1 OSD (On-Screen Display) menu...
... to adjust the refresh rate. To exit and save the OSD menu, press the button or move the ( ) left repeatedly until the OSD menu disappears. Normal Mode DisplayPort 3440 x 1440@ 60Hz Racing Mode ASUS ROG PG348 Over Clocking On GameVisual Blue Light Filter Color Image Input Select System Setup MOVE/ENTER BACK EXIT • Select "ON" if you to activate it . To adjust other functions, repeat steps 1-3. 3.1.2 OSD function introduction 1. 3.1 3.1.1 OSD (On-Screen Display) menu...
PG348 Series User Guide for English Edition
Page 20
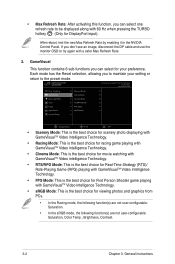
... Control Panel. Each mode has the Reset selection, allowing you to maintain your preference. If you don't see an image, disconnect the DP cable and use the monitor OSD to the preset mode. • Max Refresh Rate: After activating this function, you can select for your setting or return to try again with GameVisualTM Video intelligence Technology. • sRGB Mode: This is the best choice for viewing...
... Control Panel. Each mode has the Reset selection, allowing you to maintain your preference. If you don't see an image, disconnect the DP cable and use the monitor OSD to the preset mode. • Max Refresh Rate: After activating this function, you can select for your setting or return to try again with GameVisualTM Video intelligence Technology. • sRGB Mode: This is the best choice for viewing...
PG348 Series User Guide for English Edition
Page 21
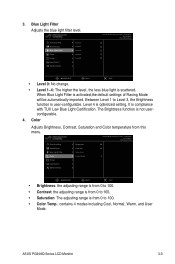
...; Contrast: the adjusting range is from 0 to 100. • Saturation: The adjusting range is scattered. Over Clocking GameVisual Blue Light Filter Color Image Input Select System Setup Level o Level 1 Level 2 Level 3 Level 4 Normal Mode DisplayPort 3440 x 1440@ 60Hz Racing Mode ASUS ROG PG348 MOVE/ENTER BACK EXIT • Level 0: No change. • Level 1~4: The higher the level, the less blue light is from this menu. Level 4 is user-configurable. ASUS PG348Q Series LCD Monitor 3-3 Between...
...; Contrast: the adjusting range is from 0 to 100. • Saturation: The adjusting range is scattered. Over Clocking GameVisual Blue Light Filter Color Image Input Select System Setup Level o Level 1 Level 2 Level 3 Level 4 Normal Mode DisplayPort 3440 x 1440@ 60Hz Racing Mode ASUS ROG PG348 MOVE/ENTER BACK EXIT • Level 0: No change. • Level 1~4: The higher the level, the less blue light is from this menu. Level 4 is user-configurable. ASUS PG348Q Series LCD Monitor 3-3 Between...
PG348 Series User Guide for English Edition
Page 22
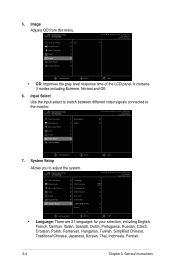
... this menu. Over Clocking OD GameVisual Blue Light Filter Color Image Input Select System Setup Normal Mode DisplayPort 3440 x 1440@ 60Hz Racing Mode ASUS ROG PG348 MOVE/ENTER BACK EXIT • OD: Improves the gray level response time of the LCD panel. Input Select Use the input select to switch between different video signals connected to adjust the system. Over Clocking GameVisual Blue Light Filter Color Image Input Select System Setup Language OSD Position Transparency OSD Timeout Key Lock Information LIGHT IN MOTION Sound...
... this menu. Over Clocking OD GameVisual Blue Light Filter Color Image Input Select System Setup Normal Mode DisplayPort 3440 x 1440@ 60Hz Racing Mode ASUS ROG PG348 MOVE/ENTER BACK EXIT • OD: Improves the gray level response time of the LCD panel. Input Select Use the input select to switch between different video signals connected to adjust the system. Over Clocking GameVisual Blue Light Filter Color Image Input Select System Setup Language OSD Position Transparency OSD Timeout Key Lock Information LIGHT IN MOTION Sound...

PG348 Series User Guide for English Edition
Page 23
... the monitor information. • LIGHT IN MOTION: Selects the brightness level of the light on and off. • All Reset: "Yes" allows you to restore the default settings. • DisplayPort Deep Sleep: puts the DisplayPort port into deep sleep. • HDMI Deep Sleep: puts the HDMI port into deep sleep, do one of the followings: - • OSD Position: Adjusts the horizontal position (H-Position)/the vertical position (V-Position) of the OSD. • Transparency: Adjusts the OSD background from...
... the monitor information. • LIGHT IN MOTION: Selects the brightness level of the light on and off. • All Reset: "Yes" allows you to restore the default settings. • DisplayPort Deep Sleep: puts the DisplayPort port into deep sleep. • HDMI Deep Sleep: puts the HDMI port into deep sleep, do one of the followings: - • OSD Position: Adjusts the horizontal position (H-Position)/the vertical position (V-Position) of the OSD. • Transparency: Adjusts the OSD background from...
PG348 Series User Guide for English Edition
Page 24
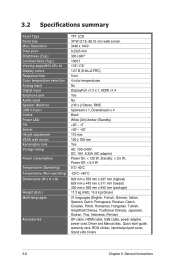
3.2 Specifications summary Panel Type Panel size Max. Resolution Pixel pitch Brightness (Typ.) Contrast Ratio (Typ.) Viewing angle(H/V) CR>10 Display colors Response time Color temperature selection Analog input Digital input Earphone jack Audio input Speaker (Built-in) USB 3.0 port Colors Power LED Tilt Swivel Height adjustment VESA wall mount Kensington lock Voltage rating Power consumption Temperature (Operating) Temperature (Non-operating) Dimensions (W x H x D) Weight (Esti.) Multi-languages Accessories TFT LCD 34"W (21:9, 86.72 cm) wide screen 3440 x 1440 0.2325 mm 300 cd/m2 1000:1 ...
3.2 Specifications summary Panel Type Panel size Max. Resolution Pixel pitch Brightness (Typ.) Contrast Ratio (Typ.) Viewing angle(H/V) CR>10 Display colors Response time Color temperature selection Analog input Digital input Earphone jack Audio input Speaker (Built-in) USB 3.0 port Colors Power LED Tilt Swivel Height adjustment VESA wall mount Kensington lock Voltage rating Power consumption Temperature (Operating) Temperature (Non-operating) Dimensions (W x H x D) Weight (Esti.) Multi-languages Accessories TFT LCD 34"W (21:9, 86.72 cm) wide screen 3440 x 1440 0.2325 mm 300 cd/m2 1000:1 ...
PG348 Series User Guide for English Edition
Page 25
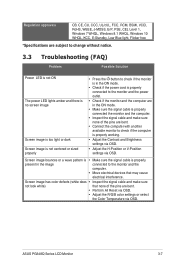
... the power outlet. • Check if the monitor and the computer are bent. • Perform All Reset via OSD. • Adjust the R/G/B color settings or select the Color Temperature via OSD. Screen image bounces or a wave pattern is • Make sure the signal cable is properly present in the ON mode. • Make sure the signal cable is properly working. • Adjust the Contrast and Brightness settings via OSD. • Adjust the H-Position or V-Position settings via OSD. ASUS PG348Q Series LCD Monitor 3-7 Screen image has color defects (white...
... the power outlet. • Check if the monitor and the computer are bent. • Perform All Reset via OSD. • Adjust the R/G/B color settings or select the Color Temperature via OSD. Screen image bounces or a wave pattern is • Make sure the signal cable is properly present in the ON mode. • Make sure the signal cable is properly working. • Adjust the Contrast and Brightness settings via OSD. • Adjust the H-Position or V-Position settings via OSD. ASUS PG348Q Series LCD Monitor 3-7 Screen image has color defects (white...

PG348 Series User Guide for English Edition
Page 26
DisplayPort input Resolution Frequency 640 x 480 800 x 600 1024 x 768 3440 x 1440 Refresh Rate 60Hz 60Hz 60Hz 60Hz Note: Do not support interlace. For other GPUs, please contact the manufactures to see if they are compatible. 3-8 Chapter 3: General Instructions G-SYNC (only for DisplayPort input) supported NVIDIA GPUs: GeForce GTX TITAN X, GeForce GTX 980 Ti, GeForce GTX 980, GeForce GTX 970, GeForce GTX...
DisplayPort input Resolution Frequency 640 x 480 800 x 600 1024 x 768 3440 x 1440 Refresh Rate 60Hz 60Hz 60Hz 60Hz Note: Do not support interlace. For other GPUs, please contact the manufactures to see if they are compatible. 3-8 Chapter 3: General Instructions G-SYNC (only for DisplayPort input) supported NVIDIA GPUs: GeForce GTX TITAN X, GeForce GTX 980 Ti, GeForce GTX 980, GeForce GTX 970, GeForce GTX...
PG348 Series User Guide for English Edition
Page 27
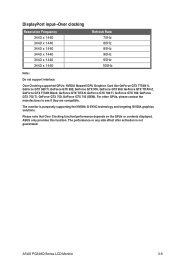
DisplayPort input--Over clocking Resolution Frequency 3440 x 1440 3440 x 1440 3440 x 1440 3440 x 1440 3440 x 1440 3440 x 1440 Refresh Rate 75Hz 80Hz 85Hz 90Hz 95Hz 100Hz Note: Do not support interlace. ASUS only provides this function. The performance or any side effect after activation is purposely supporting the NVIDIA G-SYNC technology and targeting NVIDIA graphics solutions. ASUS PG348Q Series LCD Monitor 3-9 Over Clocking supported GPUs: NVIDIA...
DisplayPort input--Over clocking Resolution Frequency 3440 x 1440 3440 x 1440 3440 x 1440 3440 x 1440 3440 x 1440 3440 x 1440 Refresh Rate 75Hz 80Hz 85Hz 90Hz 95Hz 100Hz Note: Do not support interlace. ASUS only provides this function. The performance or any side effect after activation is purposely supporting the NVIDIA G-SYNC technology and targeting NVIDIA graphics solutions. ASUS PG348Q Series LCD Monitor 3-9 Over Clocking supported GPUs: NVIDIA...


