User Guide
Page 3
... Safety information v Care & Cleaning viii 1.1 Welcome 1-1 1.2 Package Contents 1-1 1.3 Assembling the Monitor 1-2 1.4 Connect Cables 1-4 1.4.1 Rear of the LCD Monitor 1-4 1.5 Monitor Introduction 1-5 1.5.1 Using the Control Buttons 1-5 1.5.2 GamePlus Function 1-7 1.5.3 GameVisual Function 1-8 2.1 Detaching the Stand (for VESA Wall Mount 2-1 2.2 Adjusting the Monitor 2-3 3.1 OSD (On-Screen Display) Menu...... 3-1 3.1.1 How to Reconfigure 3-1 3.1.2 OSD Function Introduction 3-2 3.2 Aura 3-10 3.3 Specifications 3-11 3.4 Troubleshooting (FAQ 3-12 3.5 Supported Timing List 3-13...
... Safety information v Care & Cleaning viii 1.1 Welcome 1-1 1.2 Package Contents 1-1 1.3 Assembling the Monitor 1-2 1.4 Connect Cables 1-4 1.4.1 Rear of the LCD Monitor 1-4 1.5 Monitor Introduction 1-5 1.5.1 Using the Control Buttons 1-5 1.5.2 GamePlus Function 1-7 1.5.3 GameVisual Function 1-8 2.1 Detaching the Stand (for VESA Wall Mount 2-1 2.2 Adjusting the Monitor 2-3 3.1 OSD (On-Screen Display) Menu...... 3-1 3.1.1 How to Reconfigure 3-1 3.1.2 OSD Function Introduction 3-2 3.2 Aura 3-10 3.3 Specifications 3-11 3.4 Troubleshooting (FAQ 3-12 3.5 Supported Timing List 3-13...
User Guide
Page 6
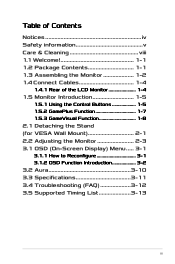
... socket-outlet shall be installed near the equipment and shall be securely attached to power surges. • Never push objects or spill liquid of the product set. Place the monitor on the monitor cabinet. • To ensure satisfactory operation, use ADP-120VH BE adapter. • If provided with a 3-pin attachment plug on the power cord, plug the cord into the slots on...
... socket-outlet shall be installed near the equipment and shall be securely attached to power surges. • Never push objects or spill liquid of the product set. Place the monitor on the monitor cabinet. • To ensure satisfactory operation, use ADP-120VH BE adapter. • If provided with a 3-pin attachment plug on the power cord, plug the cord into the slots on...

User Guide
Page 8
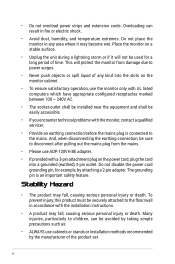
... by the stand or the cord. • Cleaning. viii Never spray cleaner directly on the screen, as it is better to disconnect the cables and power cord. Please select the suitable way to Prevent Tipping. • Please use with a lint-free, non-abrasive cloth. Turn your monitor, it may differ from falling. Prevent Tipping When using the display, fasten the LCD to a wall using a cleaner containing...
... by the stand or the cord. • Cleaning. viii Never spray cleaner directly on the screen, as it is better to disconnect the cables and power cord. Please select the suitable way to Prevent Tipping. • Please use with a lint-free, non-abrasive cloth. Turn your monitor, it may differ from falling. Prevent Tipping When using the display, fasten the LCD to a wall using a cleaner containing...
User Guide
Page 9
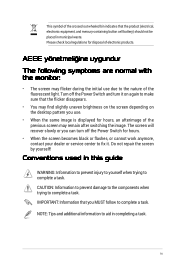
... trying to make sure that the flicker disappears. • You may remain after switching the image. ix Do not repair the screen by yourself! The screen will recover slowly or you can turn off the Power Switch and turn it . Please check local regulations for hours. • When the screen becomes black or flashes, or cannot work anymore, contact your dealer or service center to fix it on...
... trying to make sure that the flicker disappears. • You may remain after switching the image. ix Do not repair the screen by yourself! The screen will recover slowly or you can turn off the Power Switch and turn it . Please check local regulations for hours. • When the screen becomes black or flashes, or cannot work anymore, contact your dealer or service center to fix it on...
User Guide
Page 11
... the following items: LCD Monitor Monitor Stand Monitor Base Quick Start Guide Warranty Card 1x Power Cord 1x HDMI Cable 1x DP Cable 1x Power Adapter 1x USB 3.0 Cable 1x USB-C Cable ROG Sticker VESA Cover VESA Kits Color Calibration data report •• If any of features that the monitor brings to you! 1.2 Package Contents Check your package for purchasing the ASUS® LCD monitor! 1.1 Welcome! Thank you can enjoy the convenience and delightful visual experience that enhance your retailer immediately. ASUS LCD Monitor XG349C Series 1-1
... the following items: LCD Monitor Monitor Stand Monitor Base Quick Start Guide Warranty Card 1x Power Cord 1x HDMI Cable 1x DP Cable 1x Power Adapter 1x USB 3.0 Cable 1x USB-C Cable ROG Sticker VESA Cover VESA Kits Color Calibration data report •• If any of features that the monitor brings to you! 1.2 Package Contents Check your package for purchasing the ASUS® LCD monitor! 1.1 Welcome! Thank you can enjoy the convenience and delightful visual experience that enhance your retailer immediately. ASUS LCD Monitor XG349C Series 1-1

User Guide
Page 13
ASUS LCD Monitor XG349C Series 1-3 Fix the base to pick up monitor. •• Base screw size is most comfortable for you. Remove the monitor from its EPS packaging. •• Please do not hold the panel, we recommend hold the monitor stand to the arm by fastening the two (2) bundled screws. 8 7 9. Adjust the monitor to the arm. 8. 6. Align and install the base to the angle that is M6 x 15 mm. Cover the VESA cover. 6 or 5 4 7.
ASUS LCD Monitor XG349C Series 1-3 Fix the base to pick up monitor. •• Base screw size is most comfortable for you. Remove the monitor from its EPS packaging. •• Please do not hold the panel, we recommend hold the monitor stand to the arm by fastening the two (2) bundled screws. 8 7 9. Adjust the monitor to the arm. 8. 6. Align and install the base to the angle that is M6 x 15 mm. Cover the VESA cover. 6 or 5 4 7.
User Guide
Page 15
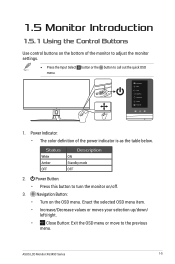
... OSD menu. ASUS LCD Monitor XG349C Series 1-5 Enact the selected OSD menu item. • Increase/Decrease values or moves your selection up/down/ left/right. • Close Button: Exit the OSD menu or move to call out the quick OSD menu. Navigation Button: • Turn on /off. 3. Status White Amber OFF Description ON Standby mode OFF 2. Power Indicator: • The color definition of the monitor to adjust the monitor settings. •• Press the Input Select button...
... OSD menu. ASUS LCD Monitor XG349C Series 1-5 Enact the selected OSD menu item. • Increase/Decrease values or moves your selection up/down/ left/right. • Close Button: Exit the OSD menu or move to call out the quick OSD menu. Navigation Button: • Turn on /off. 3. Status White Amber OFF Description ON Standby mode OFF 2. Power Indicator: • The color definition of the monitor to adjust the monitor settings. •• Press the Input Select button...
User Guide
Page 16
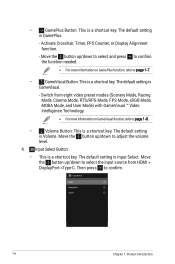
.... Switch from HDMI > DisplayPort >Type-C. Input Select Button: • This is Input Select. • GamePlus Button: This is GamePlus. - Input Select HDMI DisplayPort Type-C 1-6 Chapter 1: Product Introduction Then press to adjust the volume level. 4. The default setting is a shortcut key. Move the button up /down to select the input source from eight video preset modes (Scenery Mode, Racing Mode, Cinema Mode, RTS/RPG Mode, FPS Mode, sRGB Mode, MOBA Mode, and User Mode) with GameVisual ™ Video...
.... Switch from HDMI > DisplayPort >Type-C. Input Select Button: • This is Input Select. • GamePlus Button: This is GamePlus. - Input Select HDMI DisplayPort Type-C 1-6 Chapter 1: Product Introduction Then press to adjust the volume level. 4. The default setting is a shortcut key. Move the button up /down to select the input source from eight video preset modes (Scenery Mode, Racing Mode, Cinema Mode, RTS/RPG Mode, FPS Mode, sRGB Mode, MOBA Mode, and User Mode) with GameVisual ™ Video...
User Guide
Page 23
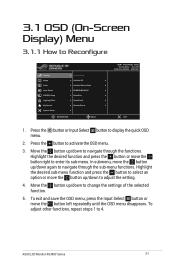
... navigate through the sub-menu functions. To adjust other functions, repeat steps 1 to Reconfigure Gaming Image Color Input Select PIP/PBP Setup Lighting Effect MyFavorite System Setup Overclocking Variable OD Variable Refresh Rate ELMB/ELMB SYNC GamePlus GameVisual Shadow Boost MOVE/ENTER BACK HDMI 3440x1440@ 100Hz Racing Mode Aura Off ROG Strix XG349C HDR OFF EXIT 1. Move the button up /down to change the settings of the selected function...
... navigate through the sub-menu functions. To adjust other functions, repeat steps 1 to Reconfigure Gaming Image Color Input Select PIP/PBP Setup Lighting Effect MyFavorite System Setup Overclocking Variable OD Variable Refresh Rate ELMB/ELMB SYNC GamePlus GameVisual Shadow Boost MOVE/ENTER BACK HDMI 3440x1440@ 100Hz Racing Mode Aura Off ROG Strix XG349C HDR OFF EXIT 1. Move the button up /down to change the settings of the selected function...

User Guide
Page 24
3.1.2 OSD Function Introduction 1. Gaming Image Color Input Select PIP/PBP Setup Lighting Effect MyFavorite System Setup Overclocking Variable OD Variable Refresh Rate ELMB/ELMB SYNC GamePlus GameVisual Shadow Boost MOVE/ENTER BACK HDMI 3440x1440@ 100Hz Racing Mode Aura Off ROG Strix XG349C HDR OFF EXIT • Overclocking: Allows to dynamically adjust display refresh rate based on -screen objects are fast moving. 3-2 Chapter 3: General Instruction Decreases motion blur and minimizes ghosting part when on typical...
3.1.2 OSD Function Introduction 1. Gaming Image Color Input Select PIP/PBP Setup Lighting Effect MyFavorite System Setup Overclocking Variable OD Variable Refresh Rate ELMB/ELMB SYNC GamePlus GameVisual Shadow Boost MOVE/ENTER BACK HDMI 3440x1440@ 100Hz Racing Mode Aura Off ROG Strix XG349C HDR OFF EXIT • Overclocking: Allows to dynamically adjust display refresh rate based on -screen objects are fast moving. 3-2 Chapter 3: General Instruction Decreases motion blur and minimizes ghosting part when on typical...
User Guide
Page 25
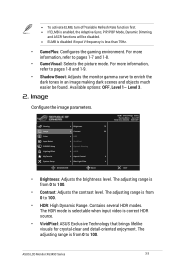
... Variable Refresh Rate function first. •• If ELMB is enabled, the Adaptive-Sync, PIP/PBP Mode, Dynamic Dimming, and ASCR functions will be found. For more information, refer to pages 1-8 and 1-9. • Shadow Boost: Adjusts the monitor gamma curve to 100. • HDR: High Dynamic Range. HDMI 3440x1440@ 100Hz Racing Mode Aura Off ROG Strix XG349C HDR OFF Gaming Image Color Input Select PIP/PBP Setup Lighting...
... Variable Refresh Rate function first. •• If ELMB is enabled, the Adaptive-Sync, PIP/PBP Mode, Dynamic Dimming, and ASCR functions will be found. For more information, refer to pages 1-8 and 1-9. • Shadow Boost: Adjusts the monitor gamma curve to 100. • HDR: High Dynamic Range. HDMI 3440x1440@ 100Hz Racing Mode Aura Off ROG Strix XG349C HDR OFF Gaming Image Color Input Select PIP/PBP Setup Lighting...
User Guide
Page 26
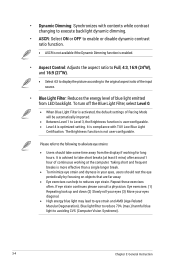
....) harmful blue light to the original aspect ratio of the input source. • Blue Light Filter: Reduces the energy level of continuous working for long hours. • Dynamic Dimming: Synchronizes with TUV Low Blue Light Certification. The Brightness function is compliance with contents while contrast changing to execute backlight dynamic dimming. • ASCR: Select ON or OFF to enable or disable dynamic contrast ratio function...
....) harmful blue light to the original aspect ratio of the input source. • Blue Light Filter: Reduces the energy level of continuous working for long hours. • Dynamic Dimming: Synchronizes with TUV Low Blue Light Certification. The Brightness function is compliance with contents while contrast changing to execute backlight dynamic dimming. • ASCR: Select ON or OFF to enable or disable dynamic contrast ratio function...
User Guide
Page 27
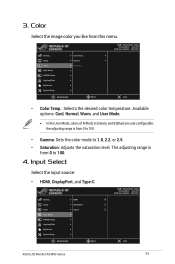
...;• In the User Mode, colors of R (Red), G (Green), and B (Blue) are user-configurable; Input Select Select the input source: • HDMI, DisplayPort, and Type-C Gaming Image Color Input Select PIP/PBP Setup Lighting Effect MyFavorite System Setup HDMI DisplayPort Type-C MOVE/ENTER BACK HDMI 3440x1440@ 100Hz Racing Mode Aura Off ROG Strix XG349C HDR OFF EXIT ASUS LCD Monitor XG349C Series 3-5 The adjusting range is from 0 to 1.8, 2.2, or 2.5. • Saturation: Adjusts the saturation level. Color Select the image color you like from this menu.
...;• In the User Mode, colors of R (Red), G (Green), and B (Blue) are user-configurable; Input Select Select the input source: • HDMI, DisplayPort, and Type-C Gaming Image Color Input Select PIP/PBP Setup Lighting Effect MyFavorite System Setup HDMI DisplayPort Type-C MOVE/ENTER BACK HDMI 3440x1440@ 100Hz Racing Mode Aura Off ROG Strix XG349C HDR OFF EXIT ASUS LCD Monitor XG349C Series 3-5 The adjusting range is from 0 to 1.8, 2.2, or 2.5. • Saturation: Adjusts the saturation level. Color Select the image color you like from this menu.
User Guide
Page 28
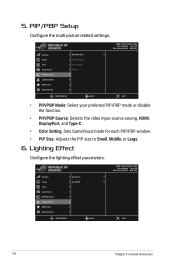
.../PBP mode or disable the function. • PIP/PBP Source: Selects the video input source among, HDMI, DisplayPort, and Type-C. • Color Setting: Sets GameVisual mode for each PIP/PBP window. • PIP Size: Adjusts the PIP size to Small, Middle, or Large. 6. Gaming Image Color Input Select PIP/PBP Setup Lighting Effect MyFavorite System Setup Aura Sync Aura RGB MOVE/ENTER BACK HDMI 3440x1440@ 100Hz Racing Mode Aura Off ROG Strix XG349C HDR OFF EXIT 3-6 Chapter 3: General Instruction
.../PBP mode or disable the function. • PIP/PBP Source: Selects the video input source among, HDMI, DisplayPort, and Type-C. • Color Setting: Sets GameVisual mode for each PIP/PBP window. • PIP Size: Adjusts the PIP size to Small, Middle, or Large. 6. Gaming Image Color Input Select PIP/PBP Setup Lighting Effect MyFavorite System Setup Aura Sync Aura RGB MOVE/ENTER BACK HDMI 3440x1440@ 100Hz Racing Mode Aura Off ROG Strix XG349C HDR OFF EXIT 3-6 Chapter 3: General Instruction
User Guide
Page 29
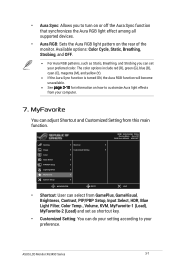
.... 7. ASUS LCD Monitor XG349C Series 3-7 The color options include red (R), green (G), blue (B), cyan (C), magenta (M), and yellow (Y). •• If the Aura Sync function is turned ON, the Aura RGB function will become unavailable. •• See page 3-10 for information on the rear of the monitor. Gaming Image Color Input Select PIP/PBP Setup Lighting Effect MyFavorite System Setup Shortcut Customized Setting MOVE/ENTER BACK HDMI 3440x1440@ 100Hz Racing Mode Aura Off ROG Strix XG349C...
.... 7. ASUS LCD Monitor XG349C Series 3-7 The color options include red (R), green (G), blue (B), cyan (C), magenta (M), and yellow (Y). •• If the Aura Sync function is turned ON, the Aura RGB function will become unavailable. •• See page 3-10 for information on the rear of the monitor. Gaming Image Color Input Select PIP/PBP Setup Lighting Effect MyFavorite System Setup Shortcut Customized Setting MOVE/ENTER BACK HDMI 3440x1440@ 100Hz Racing Mode Aura Off ROG Strix XG349C...
User Guide
Page 30
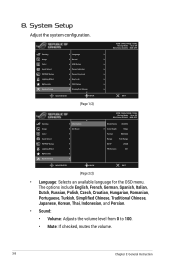
... volume. 3-8 Chapter 3: General Instruction System Setup Adjust the system configuration. Gaming Image Color Input Select PIP/PBP Setup Lighting Effect MyFavorite System Setup Language Sound USB Setup Power Indicator Power Key Lock Key Lock OSD Setup DisplayPort Stream MOVE/ENTER BACK (Page 1/2) HDMI 3440x1440@ 100Hz Racing Mode Aura Off ROG Strix XG349C HDR OFF EXIT Gaming Image Color Input Select PIP/PBP Setup Lighting Effect MyFavorite System Setup Information All Reset MOVE/ENTER BACK HDMI 3440x1440@ 100Hz Racing Mode Aura Off ROG Strix XG349C HDR OFF Model Name XG349C...
... volume. 3-8 Chapter 3: General Instruction System Setup Adjust the system configuration. Gaming Image Color Input Select PIP/PBP Setup Lighting Effect MyFavorite System Setup Language Sound USB Setup Power Indicator Power Key Lock Key Lock OSD Setup DisplayPort Stream MOVE/ENTER BACK (Page 1/2) HDMI 3440x1440@ 100Hz Racing Mode Aura Off ROG Strix XG349C HDR OFF EXIT Gaming Image Color Input Select PIP/PBP Setup Lighting Effect MyFavorite System Setup Information All Reset MOVE/ENTER BACK HDMI 3440x1440@ 100Hz Racing Mode Aura Off ROG Strix XG349C HDR OFF Model Name XG349C...

User Guide
Page 31
... A USB cable, it can be connected between upstream- ASUS LCD Monitor XG349C Series 3-9 and downstream-facing ports for USB devices such as keyboard, mouse, or flash drive. • Power Indicator: Turns the power LED indicator on the LCD monitor can be used for charging a USB device during standby) or Off During Standby (USB Type A ports cannot be used for more than five seconds to activate or deactivate the key lock function. • OSD Setup: Adjusts the OSD...
... A USB cable, it can be connected between upstream- ASUS LCD Monitor XG349C Series 3-9 and downstream-facing ports for USB devices such as keyboard, mouse, or flash drive. • Power Indicator: Turns the power LED indicator on the LCD monitor can be used for charging a USB device during standby) or Off During Standby (USB Type A ports cannot be used for more than five seconds to activate or deactivate the key lock function. • OSD Setup: Adjusts the OSD...
User Guide
Page 32
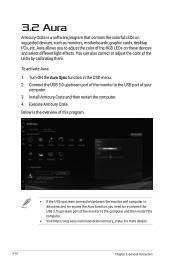
... the USB upstream connection between the monitor and computer is a software program that controls the colorful LEDs on these devices and select different light effects. Aura allows you need to re-connect the USB 3.0 upstream port of the RGB LEDs on supported devices, such as monitors, motherboards, graphic cards, desktop PCs, etc. To activate Aura: 1. Turn ON the Aura Sync function in the OSD menu. 2. Connect the USB 3.0 upstream port of the monitor to the...
... the USB upstream connection between the monitor and computer is a software program that controls the colorful LEDs on these devices and select different light effects. Aura allows you need to re-connect the USB 3.0 upstream port of the RGB LEDs on supported devices, such as monitors, motherboards, graphic cards, desktop PCs, etc. To activate Aura: 1. Turn ON the Aura Sync function in the OSD menu. 2. Connect the USB 3.0 upstream port of the monitor to the...
User Guide
Page 33
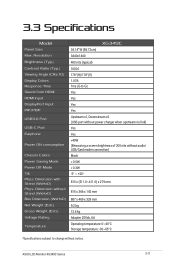
3.3 Specifications Model Panel Size Max. Dimension with Stand (WxHxD) Phys. Resolution Brightness (Typ.) Contrast Ratio (Typ.) Viewing Angle (CR≤10) Display Colors Response Time Sound from HDMI HDMI Input DisplayPort Input PIP/PBP USB3.0 Port USB-C Port Earphone Power ON consumption Chassis Colors Power Saving Mode Power Off Mode Tilt Phys. Dimension without Stand (WxHxD) Box Dimension (WxHxD) Net Weight (Esti.) Gross Weight (Esti.) Voltage Rating Temperature XG349C 34.14'' W (86.72cm) 3440x1440 400 nits (typical) 1000:1 178°(H)/178...
3.3 Specifications Model Panel Size Max. Dimension with Stand (WxHxD) Phys. Resolution Brightness (Typ.) Contrast Ratio (Typ.) Viewing Angle (CR≤10) Display Colors Response Time Sound from HDMI HDMI Input DisplayPort Input PIP/PBP USB3.0 Port USB-C Port Earphone Power ON consumption Chassis Colors Power Saving Mode Power Off Mode Tilt Phys. Dimension without Stand (WxHxD) Box Dimension (WxHxD) Net Weight (Esti.) Gross Weight (Esti.) Voltage Rating Temperature XG349C 34.14'' W (86.72cm) 3440x1440 400 nits (typical) 1000:1 178°(H)/178...
User Guide
Page 34
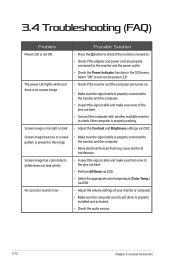
... the signal cable and make sure that none of the pins are bent. • Connect the computer with another available monitor to check if the computer is properly working. • Adjust the Contrast and Brightness settings via OSD. • Adjust the volume settings of the pins are bent. • Perform All Reset via OSD. • Select the appropriate color temperature (Color Temp.) via OSD. Select "ON" to turn on the power LED. • Check...
... the signal cable and make sure that none of the pins are bent. • Connect the computer with another available monitor to check if the computer is properly working. • Adjust the Contrast and Brightness settings via OSD. • Adjust the volume settings of the pins are bent. • Perform All Reset via OSD. • Select the appropriate color temperature (Color Temp.) via OSD. Select "ON" to turn on the power LED. • Check...


