Users Manual
Page 3
... Proper disposal...11 Chapter 1: Hardware Setup Getting to know your Notebook PC 14 Top View...14 Bottom...19 Right Side...21 Left Side...23 Chapter 2: Using your Notebook PC Getting started...26 Charge your Notebook PC 26 Lift to open the display panel 28 Press the power button 28 Using the touchpad 29 Using the keyboard...36 HotKeys...36 Function keys...37 Windows® 10 keys...37 Using the numeric keypad 38 Notebook PC E-Manual 3
... Proper disposal...11 Chapter 1: Hardware Setup Getting to know your Notebook PC 14 Top View...14 Bottom...19 Right Side...21 Left Side...23 Chapter 2: Using your Notebook PC Getting started...26 Charge your Notebook PC 26 Lift to open the display panel 28 Press the power button 28 Using the touchpad 29 Using the keyboard...36 HotKeys...36 Function keys...37 Windows® 10 keys...37 Using the numeric keypad 38 Notebook PC E-Manual 3
Users Manual
Page 4
......48 Snap hotspots...48 Action Center...50 Other keyboard shortcuts 51 Connecting to wireless networks 53 Wi-Fi...53 Bluetooth...54 Airplane mode...55 Turning your Notebook PC off 56 Putting your Notebook PC to sleep 57 Chapter 4: Power-On Self-Test (POST) The Power-On Self-Test (POST 60 Using POST to access BIOS and Troubleshoot 60 BIOS...60 Accessing BIOS...61 Recovering your system 62 Performing a recovery option 63 4 Notebook PC E-Manual
......48 Snap hotspots...48 Action Center...50 Other keyboard shortcuts 51 Connecting to wireless networks 53 Wi-Fi...53 Bluetooth...54 Airplane mode...55 Turning your Notebook PC off 56 Putting your Notebook PC to sleep 57 Chapter 4: Power-On Self-Test (POST) The Power-On Self-Test (POST 60 Using POST to access BIOS and Troubleshoot 60 BIOS...60 Accessing BIOS...61 Recovering your system 62 Performing a recovery option 63 4 Notebook PC E-Manual
Users Manual
Page 7
... This chapter provides an overview of using Windows® 10 in your Notebook PC. About this manual This manual provides information about the hardware and software features of your Notebook PC, organized through the following chapters: Chapter 1: Hardware Setup This chapter details the hardware components of your Notebook PC. Chapter 2: Using your Notebook PC This chapter shows you how to change the settings of your Notebook PC.
... This chapter provides an overview of using Windows® 10 in your Notebook PC. About this manual This manual provides information about the hardware and software features of your Notebook PC, organized through the following chapters: Chapter 1: Hardware Setup This chapter details the hardware components of your Notebook PC. Chapter 2: Using your Notebook PC This chapter shows you how to change the settings of your Notebook PC.
Users Manual
Page 10
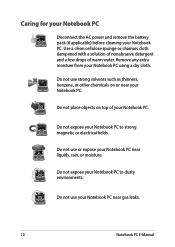
... use or expose your Notebook PC near your Notebook PC. Do not use strong solvents such as thinners, benzene, or other chemicals on top of warm water. Do not place objects on or near gas leaks. 10 Notebook PC E-Manual Caring for your Notebook PC Disconnect the AC power and remove the battery pack (if applicable) before cleaning your Notebook PC using...
... use or expose your Notebook PC near your Notebook PC. Do not use strong solvents such as thinners, benzene, or other chemicals on top of warm water. Do not place objects on or near gas leaks. 10 Notebook PC E-Manual Caring for your Notebook PC Disconnect the AC power and remove the battery pack (if applicable) before cleaning your Notebook PC using...

Users Manual
Page 13
Chapter 1: Hardware Setup Notebook PC E-Manual 13
Chapter 1: Hardware Setup Notebook PC E-Manual 13

Users Manual
Page 16
... air vents or else overheating may occur. Capital lock indicator This indicator lights up when the capital lock function is activated. NOTE: The keyboard layout differs by model or territory. 16 Notebook PC E-Manual Keyboard The keyboard provides full-sized QWERTY keys with a comfortable travel depth for typing. Using capital lock allows you to use the function keys, allows quick access to exit the Notebook PC. Ensure that paper, books, clothing, cables, or other multimedia...
... air vents or else overheating may occur. Capital lock indicator This indicator lights up when the capital lock function is activated. NOTE: The keyboard layout differs by model or territory. 16 Notebook PC E-Manual Keyboard The keyboard provides full-sized QWERTY keys with a comfortable travel depth for typing. Using capital lock allows you to use the function keys, allows quick access to exit the Notebook PC. Ensure that paper, books, clothing, cables, or other multimedia...
Users Manual
Page 17
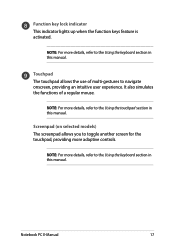
... touchpad section in this manual. Function key lock indicator This indicator lights up when the function keys feature is activated. NOTE: For more details, refer to the Using the keyboard section in this manual. It also simulates the functions of multi-gestures to the Using the keyboard section in this manual. Notebook PC E-Manual 17 Touchpad The touchpad allows the use of a regular mouse. Screenpad (on selected models) The screenpad allows you to toggle another screen...
... touchpad section in this manual. Function key lock indicator This indicator lights up when the function keys feature is activated. NOTE: For more details, refer to the Using the keyboard section in this manual. It also simulates the functions of multi-gestures to the Using the keyboard section in this manual. Notebook PC E-Manual 17 Touchpad The touchpad allows the use of a regular mouse. Screenpad (on selected models) The screenpad allows you to toggle another screen...
Users Manual
Page 21
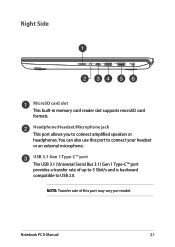
You can also use this port may vary per model. NOTE: Transfer rate of up to 5 Gbit/s and is backward compatible to USB 2.0. USB 3.1 Gen 1 Type-C™ port The USB 3.1 (Universal Serial Bus 3.1) Gen 1 Type-C™ port provides a transfer rate of this port to connect amplified speakers or headphones. Notebook PC E-Manual 21 Right Side MicroSD card slot This built-in memory card reader slot supports microSD card formats. Headphone/Headset/Microphone jack This port allows you to connect your headset or an external microphone.
You can also use this port may vary per model. NOTE: Transfer rate of up to 5 Gbit/s and is backward compatible to USB 2.0. USB 3.1 Gen 1 Type-C™ port The USB 3.1 (Universal Serial Bus 3.1) Gen 1 Type-C™ port provides a transfer rate of this port to connect amplified speakers or headphones. Notebook PC E-Manual 21 Right Side MicroSD card slot This built-in memory card reader slot supports microSD card formats. Headphone/Headset/Microphone jack This port allows you to connect your headset or an external microphone.
Users Manual
Page 27
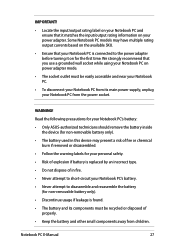
... ASUS-authorized technicians should remove the battery inside the device (for non-removable battery only). • The battery used in fire. • Never attempt to short-circuit your Notebook PC's battery. • Never attempt to the power adapter before turning it matches the input/output rating information on your power adapter. Notebook PC E-Manual 27 We strongly recommend that you use a grounded wall socket while using your Notebook PC on power adapter mode...
... ASUS-authorized technicians should remove the battery inside the device (for non-removable battery only). • The battery used in fire. • Never attempt to short-circuit your Notebook PC's battery. • Never attempt to the power adapter before turning it matches the input/output rating information on your power adapter. Notebook PC E-Manual 27 We strongly recommend that you use a grounded wall socket while using your Notebook PC on power adapter mode...

Users Manual
Page 36
Using the keyboard HotKeys The HotKeys on your Notebook PC's keyboard can trigger the following commands: Turns the speaker on or off Turns the speaker volume down Turns the speaker volume up Decreases display brightness Increases display brightness Enables or disables the touchpad/screenpad* Adjusts brightness for the backlit keyboard Toggles the display mode NOTE: Ensure that the second display is connected to your Notebook PC. * On selected models 36 Notebook PC E-Manual
Using the keyboard HotKeys The HotKeys on your Notebook PC's keyboard can trigger the following commands: Turns the speaker on or off Turns the speaker volume down Turns the speaker volume up Decreases display brightness Increases display brightness Enables or disables the touchpad/screenpad* Adjusts brightness for the backlit keyboard Toggles the display mode NOTE: Ensure that the second display is connected to your Notebook PC. * On selected models 36 Notebook PC E-Manual

Users Manual
Page 37
Windows® 10 keys There are two special Windows® keys on or off Activates screen capture tool Launches My ASUS Function keys Press to enable or disable the function keys feature. Activates the Lock screen Turns the camera on your Notebook PC's keyboard used as below: Launches the Start menu Displays the drop-down in combination with the top row keys. When the function keys feature is enabled, you can also access HotKeys by holding down menu* * On selected models Notebook PC E-Manual 37
Windows® 10 keys There are two special Windows® keys on or off Activates screen capture tool Launches My ASUS Function keys Press to enable or disable the function keys feature. Activates the Lock screen Turns the camera on your Notebook PC's keyboard used as below: Launches the Start menu Displays the drop-down in combination with the top row keys. When the function keys feature is enabled, you can also access HotKeys by holding down menu* * On selected models Notebook PC E-Manual 37
Users Manual
Page 41
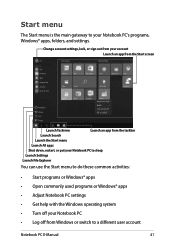
... Notebook PC to sleep Launch Settings Launch File Explorer You can use the Start menu to do these common activities: • Start programs or Windows® apps • Open commonly used programs or Windows® apps • Adjust Notebook PC settings • Get help with the Windows operating system • Turn off from Windows or switch to your Notebook PC • Log off your Notebook PC's programs, Windows® apps, folders, and settings. Start menu The Start menu...
... Notebook PC to sleep Launch Settings Launch File Explorer You can use the Start menu to do these common activities: • Start programs or Windows® apps • Open commonly used programs or Windows® apps • Adjust Notebook PC settings • Get help with the Windows operating system • Turn off from Windows or switch to your Notebook PC • Log off your Notebook PC's programs, Windows® apps, folders, and settings. Start menu The Start menu...
Users Manual
Page 60
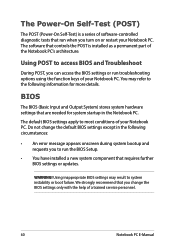
... controls the POST is a series of software-controlled diagnostic tests that requires further BIOS settings or updates. Using POST to system instability or boot failure. We strongly recommend that you can access the BIOS settings or run the BIOS Setup. • You have installed a new system component that run when you to run troubleshooting options using the function keys of your Notebook PC. You may result to access BIOS and Troubleshoot During POST, you change the default BIOS settings...
... controls the POST is a series of software-controlled diagnostic tests that requires further BIOS settings or updates. Using POST to system instability or boot failure. We strongly recommend that you can access the BIOS settings or run the BIOS Setup. • You have installed a new system component that run when you to run troubleshooting options using the function keys of your Notebook PC. You may result to access BIOS and Troubleshoot During POST, you change the default BIOS settings...

Users Manual
Page 62
... default settings and delete other installed apps. • Remove everything - This option resets your Notebook PC to help improve performance. Recovering your system Using recovery options on your Notebook PC. • Note down important customized settings such as network settings, user names, and passwords to avoid data loss. • Ensure that your Notebook PC is plugged in to a power source before resetting your system. This option allows you to its factory settings. Using this option...
... default settings and delete other installed apps. • Remove everything - This option resets your Notebook PC to help improve performance. Recovering your system Using recovery options on your Notebook PC. • Note down important customized settings such as network settings, user names, and passwords to avoid data loss. • Ensure that your Notebook PC is plugged in to a power source before resetting your system. This option allows you to its factory settings. Using this option...
Users Manual
Page 66
... settings. • Use an anti-virus software to protect your data and keep this updated too. • Unless absolutely necessary, refrain from using force shutdown to turn off your Notebook PC. • Always backup your data and make it a point to resetting your Notebook PC: - Log in an external storage drive. • Refrain from using the Notebook PC at extremely high temperatures. Internet connection information 66 Notebook PC E-Manual Backup...
... settings. • Use an anti-virus software to protect your data and keep this updated too. • Unless absolutely necessary, refrain from using force shutdown to turn off your Notebook PC. • Always backup your data and make it a point to resetting your Notebook PC: - Log in an external storage drive. • Refrain from using the Notebook PC at extremely high temperatures. Internet connection information 66 Notebook PC E-Manual Backup...
Users Manual
Page 67
... an authorized ASUS service center. 2. How can try doing any Wi-Fi connection, switch your system. You may use the function keys or the display settings in your operating system to adjust the display brightness. • If you are not using any of your Notebook PC. You can I turn on the Notebook PC. My display panel has an uneven color and brightness. What should I maximize my Notebook PC's battery life? Hardware FAQs 1. How...
... an authorized ASUS service center. 2. How can try doing any Wi-Fi connection, switch your system. You may use the function keys or the display settings in your operating system to adjust the display brightness. • If you are not using any of your Notebook PC. You can I turn on the Notebook PC. My display panel has an uneven color and brightness. What should I maximize my Notebook PC's battery life? Hardware FAQs 1. How...
Users Manual
Page 68
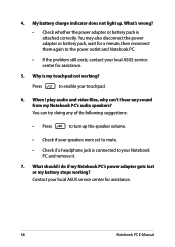
Press to your local ASUS service center for assistance. 5. Contact your Notebook PC and remove it. 7. My battery charge indicator does not light up the speaker volume. • Check if your speakers were set to mute. • Check if a headphone jack is connected to enable your local ASUS service center for assistance. 68 Notebook PC E-Manual Why is attached correctly. 4. You may also disconnect the power adapter or battery pack, wait...
Press to your local ASUS service center for assistance. 5. Contact your Notebook PC and remove it. 7. My battery charge indicator does not light up the speaker volume. • Check if your speakers were set to mute. • Check if a headphone jack is connected to enable your local ASUS service center for assistance. 68 Notebook PC E-Manual Why is attached correctly. 4. You may also disconnect the power adapter or battery pack, wait...
Users Manual
Page 70
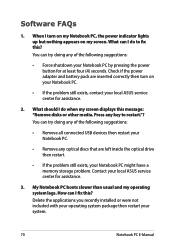
... the optical drive then restart. • If the problem still exists, your Notebook PC by pressing the power button for at least four (4) seconds. What should I fix this message: "Remove disks or other media. Delete the applications you recently installed or were not included with your operating system package then restart your local ASUS service center for assistance. 2. How can I turn on my screen. Software FAQs...
... the optical drive then restart. • If the problem still exists, your Notebook PC by pressing the power button for at least four (4) seconds. What should I fix this message: "Remove disks or other media. Delete the applications you recently installed or were not included with your operating system package then restart your local ASUS service center for assistance. 2. How can I turn on my screen. Software FAQs...
Users Manual
Page 74
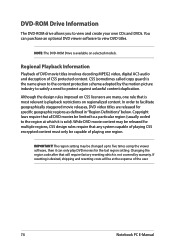
... times using the viewer software, then it is not covered by the motion picture industry to satisfy a need to facilitate geographically staggered movie releases, DVD video titles are many, one region. NOTE: The DVD-ROM Drive is desired, shipping and resetting costs will require factory resetting which it can purchase an optional DVD viewer software to view and create your own CDs and DVDs. Changing the region code after...
... times using the viewer software, then it is not covered by the motion picture industry to satisfy a need to facilitate geographically staggered movie releases, DVD video titles are many, one region. NOTE: The DVD-ROM Drive is desired, shipping and resetting costs will require factory resetting which it can purchase an optional DVD viewer software to view and create your own CDs and DVDs. Changing the region code after...
Users Manual
Page 92
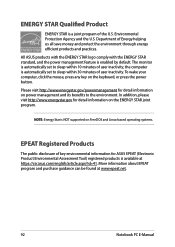
... computer, click the mouse, press any key on FreeDOS and Linux-based operating systems. EPEAT Registered Products The public disclosure of key environmental information for ASUS EPEAT (Electronic Product Environmental Assessment Tool) registered products is automatically set to sleep within 30 minutes of user inactivity. NOTE: Energy Star is NOT supported on the keyboard, or press the power button. The monitor is a joint...
... computer, click the mouse, press any key on FreeDOS and Linux-based operating systems. EPEAT Registered Products The public disclosure of key environmental information for ASUS EPEAT (Electronic Product Environmental Assessment Tool) registered products is automatically set to sleep within 30 minutes of user inactivity. NOTE: Energy Star is NOT supported on the keyboard, or press the power button. The monitor is a joint...


