User Guide
Page 8
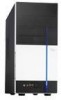
... the front and rear panel, and internal components. 2. Chapter 4: Motherboard information This chapter gives information about the ASUS Vintage V2-PH2 barebone system. viii Chapter 3: Starting up This chapter helps you power up the system and install drivers and utilities from the support CD. 4. The chapter lists the system features, including introduction on how to... the BIOS parameters. How this guide Audience This guide provides general information and installation instructions about the motherboard that comes with hardware knowledge of the ASUS Vintage V2-PH2.
... the front and rear panel, and internal components. 2. Chapter 4: Motherboard information This chapter gives information about the ASUS Vintage V2-PH2 barebone system. viii Chapter 3: Starting up This chapter helps you power up the system and install drivers and utilities from the support CD. 4. The chapter lists the system features, including introduction on how to... the BIOS parameters. How this guide Audience This guide provides general information and installation instructions about the motherboard that comes with hardware knowledge of the ASUS Vintage V2-PH2.
User Guide
Page 31
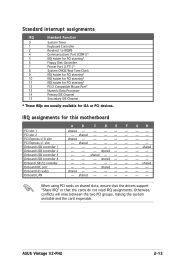
shared - - - - - - - - shared - - - shared - - - - - - When using PCI cards on shared slots, ensure that the drivers support "Share IRQ" or that the cards do not need IRQ assignments. shared - - - - - - - - - - - - - shared - - - - - - shared - - - - - - - - - - - ASUS Vintage V2-PH2 2-13 shared - - - - - - - - shared - - - - - - - - IRQ assignments for ISA or PCI devices. shared - - - shared - - - - shared - - - - - - Otherwise, conflicts will arise between the two PCI...
shared - - - - - - - - shared - - - shared - - - - - - When using PCI cards on shared slots, ensure that the drivers support "Share IRQ" or that the cards do not need IRQ assignments. shared - - - - - - - - - - - - - shared - - - - - - shared - - - - - - - - - - - ASUS Vintage V2-PH2 2-13 shared - - - - - - - - shared - - - - - - - - IRQ assignments for ISA or PCI devices. shared - - - shared - - - - shared - - - - - - Otherwise, conflicts will arise between the two PCI...
User Guide
Page 35
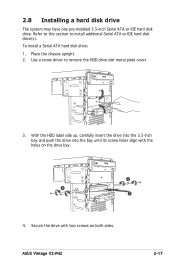
Use a screw driver to install additional Serial ATA or IDE hard disk drive(s). To install a Serial ATA hard disk drive: 1. Secure the drive with the holes on both ... the drive into the 3.5-inch bay and push the drive into the bay until its screw holes align with two screws on the drive bay. 4 4 3 4. ASUS Vintage V2-PH2 2-17 Refer to this section to remove the HDD drive slot metal plate cover. 3. 2.8 Installing a hard disk drive The system may have one pre-installed...
Use a screw driver to install additional Serial ATA or IDE hard disk drive(s). To install a Serial ATA hard disk drive: 1. Secure the drive with the holes on both ... the drive into the 3.5-inch bay and push the drive into the bay until its screw holes align with two screws on the drive bay. 4 4 3 4. ASUS Vintage V2-PH2 2-17 Refer to this section to remove the HDD drive slot metal plate cover. 3. 2.8 Installing a hard disk drive The system may have one pre-installed...
User Guide
Page 41
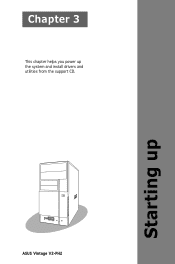
ASUS Vintage V2-PH2 Starting up the system and install drivers and utilities from the support CD. Chapter 3 This chapter helps you power up
ASUS Vintage V2-PH2 Starting up the system and install drivers and utilities from the support CD. Chapter 3 This chapter helps you power up
User Guide
Page 43
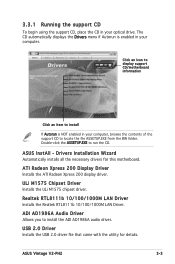
... install the ADI AD1986A audio driver. ATI Radeon Xpress 200 Display Driver Installs the ATI Radeon Xpress 200 display driver. Realtek RTL8111b 10/100/1000M LAN Driver Installs the Realtek RTL8111b 10/100/1000M LAN Driver. USB 2.0 Driver Installs the USB 2.0 driver file that came with the utility for this motherboard. ASUS Vintage V2-PH2 3-3 Drivers Installation Wizard Automatically installs all...
... install the ADI AD1986A audio driver. ATI Radeon Xpress 200 Display Driver Installs the ATI Radeon Xpress 200 display driver. Realtek RTL8111b 10/100/1000M LAN Driver Installs the Realtek RTL8111b 10/100/1000M LAN Driver. USB 2.0 Driver Installs the USB 2.0 driver file that came with the utility for this motherboard. ASUS Vintage V2-PH2 3-3 Drivers Installation Wizard Automatically installs all...
User Guide
Page 45
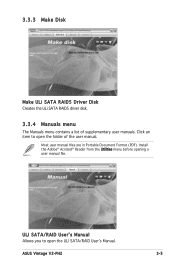
Most user manual files are in Portable Document Format (PDF). ULI SATA/RAID Userʼs Manual Allows you to open the ULI SATA/RAID Userʼs Manual. ASUS Vintage V2-PH2 3-5 Click an item to open the folder of supplementary user manuals. Install the Adobe® Acrobat® Reader from the Utilities menu before opening a user manual file. 3.3.3 Make Disk Make ULi SATA RAID5 Driver Disk Creates the ULi SATA RAID5 driver disk. 3.3.4 Manuals menu The Manuals menu contains a list of the user manual.
Most user manual files are in Portable Document Format (PDF). ULI SATA/RAID Userʼs Manual Allows you to open the ULI SATA/RAID Userʼs Manual. ASUS Vintage V2-PH2 3-5 Click an item to open the folder of supplementary user manuals. Install the Adobe® Acrobat® Reader from the Utilities menu before opening a user manual file. 3.3.3 Make Disk Make ULi SATA RAID5 Driver Disk Creates the ULi SATA RAID5 driver disk. 3.3.4 Manuals menu The Manuals menu contains a list of the user manual.

User Guide
Page 47
... can launch the PC Probe II right after installation or anytime from the Windows® desktop, click Start > All Programs > ASUS > PC Probe II. The Drivers installation tab appears if your computer: 1. Follow the screen instructions to the optical drive. The PC Probe II main window appears... in the Windows® taskbar. Click the Utilities tab, then click ASUS PC Probe II. 3. Place the support CD to complete installation. Double-click the setup.exe file to close the Preference panel ASUS Vintage V2-PH2 3-7 After launching the application, the PC Probe II icon appears in ...
... can launch the PC Probe II right after installation or anytime from the Windows® desktop, click Start > All Programs > ASUS > PC Probe II. The Drivers installation tab appears if your computer: 1. Follow the screen instructions to the optical drive. The PC Probe II main window appears... in the Windows® taskbar. Click the Utilities tab, then click ASUS PC Probe II. 3. Place the support CD to complete installation. Double-click the setup.exe file to close the Preference panel ASUS Vintage V2-PH2 3-7 After launching the application, the PC Probe II icon appears in ...


