
VA24E Series User Guide
Page 2
... 3.1.2 OSD Function Introduction 3-2 3.2 Specifications 3-10 3.3 Troubleshooting (FAQ 3-12 3.4 Supported Timing List 3-12 Copyright © 2019 ASUSTeK COMPUTER INC. Table of contents Notices...iv Care & Cleaning vii 1.1 Welcome 1-1 1.2 Package contents 1-1 1.3 Assembling the monitor 1-2 1.4 Connect cables 1-3 1.4.1 Rear of the LCD monitor 1-3 Installaion 1-5 1.4.2 Six sides figure 1-7 1.5 Monitor introduction 1-8 1.5.1 Using the Controls button 1-8 2.1 Detaching the arm/stand (for VESA wall mount 2-1 2.2 Adjusting the monitor 2-2 3.1 OSD (On-Screen Display) menu 3-1 3.1.1 How...
... 3.1.2 OSD Function Introduction 3-2 3.2 Specifications 3-10 3.3 Troubleshooting (FAQ 3-12 3.4 Supported Timing List 3-12 Copyright © 2019 ASUSTeK COMPUTER INC. Table of contents Notices...iv Care & Cleaning vii 1.1 Welcome 1-1 1.2 Package contents 1-1 1.3 Assembling the monitor 1-2 1.4 Connect cables 1-3 1.4.1 Rear of the LCD monitor 1-3 Installaion 1-5 1.4.2 Six sides figure 1-7 1.5 Monitor introduction 1-8 1.5.1 Using the Controls button 1-8 2.1 Detaching the arm/stand (for VESA wall mount 2-1 2.2 Adjusting the monitor 2-2 3.1 OSD (On-Screen Display) menu 3-1 3.1.1 How...
VA24E Series User Guide
Page 4
... in a residential installation. This equipment generates, uses and can radiate radio frequency energy and, if not installed and used in the OSD menu. However, there is subject to the following measures: • Reorient or relocate the receiving antenna. • Increase the separation between the equipment and receiver. • Connect the equipment to an outlet on , the user is connected. •...
... in a residential installation. This equipment generates, uses and can radiate radio frequency energy and, if not installed and used in the OSD menu. However, there is subject to the following measures: • Reorient or relocate the receiving antenna. • Increase the separation between the equipment and receiver. • Connect the equipment to an outlet on , the user is connected. •...

VA24E Series User Guide
Page 5
... technical problems with the monitor, contact a qualified servic er. • Provide an earthing connection before the mains plug is connected to disconnect after pulling out the mains plug from damage due to open the monitor cabinet. This will not be sure to the mains. Contact a qualified service technician or your local power standard. • Do not overload power strips and extension cords. If...
... technical problems with the monitor, contact a qualified servic er. • Provide an earthing connection before the mains plug is connected to disconnect after pulling out the mains plug from damage due to open the monitor cabinet. This will not be sure to the mains. Contact a qualified service technician or your local power standard. • Do not overload power strips and extension cords. If...
VA24E Series User Guide
Page 7
... repair the screen by the stand or the cord. • Cleaning. Care & Cleaning • Before you lift or reposition your monitor off the Power Switch for hours. • When the screen becomes black or flashes, or cannot work anymore, contact your dealer or service center to fix it. Do not lift the display by yourself! Conventions used in completing a task. Follow the correct lifting techniques when positioning the monitor...
... repair the screen by the stand or the cord. • Cleaning. Care & Cleaning • Before you lift or reposition your monitor off the Power Switch for hours. • When the screen becomes black or flashes, or cannot work anymore, contact your dealer or service center to fix it. Do not lift the display by yourself! Conventions used in completing a task. Follow the correct lifting techniques when positioning the monitor...
VA24E Series User Guide
Page 9
... Series 1-1 1.1 Welcome! Thank you ! 1.2 Package contents Check your retailer immediately. • * Also the Replaceable parts required by the TCO Certified. The latest widescreen LCD monitor from ASUS provides a crisper, broader, and brighter display, plus a host of features that the monitor brings you for the following items: LCD Monitor Monitor Base Monitor Column (For VA24EHE/VA24EHEY only) Quick Start Guide Warranty Card 1x Power Cord * 1x HDMI Cable (optional) * 1x VGA Cable (optional) * 1x DVI Cable (optional) * 1x Audio Cable...
... Series 1-1 1.1 Welcome! Thank you ! 1.2 Package contents Check your retailer immediately. • * Also the Replaceable parts required by the TCO Certified. The latest widescreen LCD monitor from ASUS provides a crisper, broader, and brighter display, plus a host of features that the monitor brings you for the following items: LCD Monitor Monitor Base Monitor Column (For VA24EHE/VA24EHEY only) Quick Start Guide Warranty Card 1x Power Cord * 1x HDMI Cable (optional) * 1x VGA Cable (optional) * 1x DVI Cable (optional) * 1x Audio Cable...

VA24E Series User Guide
Page 11
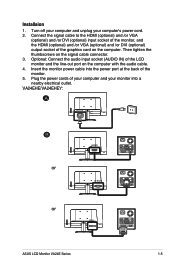
DVI Port 4. AC-IN Port 2. HDMI Port 3. Kensington Lock ASUS LCD Monitor VA24E Series 1-3 VGA Port 5. 1.4 Connect cables 1.4.1 Rear of the LCD monitor VA24EHE/VA24EHEY: 5 HDMI DVI 1 2 3 VGA VA24EHE/ VA24EHEY 4 1.
DVI Port 4. AC-IN Port 2. HDMI Port 3. Kensington Lock ASUS LCD Monitor VA24E Series 1-3 VGA Port 5. 1.4 Connect cables 1.4.1 Rear of the LCD monitor VA24EHE/VA24EHEY: 5 HDMI DVI 1 2 3 VGA VA24EHE/ VA24EHEY 4 1.
VA24E Series User Guide
Page 13
... /or VGA (optional) and /or DVI (optional) input socket of the monitor, and the HDMI (optional) and /or VGA (optional) and /or DVI (optional) output socket of the monitor. 5. Optional: Connect the audio input socket (AUDIO IN) of your computer and your computer's power cord. 2. Plug the power cords of the LCD monitor and the line-out port on the computer with the audio cable. 4. VA24EHE/VA24EHEY: A AC IN B or HDMI D-SUB or DVI ASUS LCD Monitor VA24E Series...
... /or VGA (optional) and /or DVI (optional) input socket of the monitor, and the HDMI (optional) and /or VGA (optional) and /or DVI (optional) output socket of the monitor. 5. Optional: Connect the audio input socket (AUDIO IN) of your computer and your computer's power cord. 2. Plug the power cords of the LCD monitor and the line-out port on the computer with the audio cable. 4. VA24EHE/VA24EHEY: A AC IN B or HDMI D-SUB or DVI ASUS LCD Monitor VA24E Series...
VA24E Series User Guide
Page 14
VA24EHLB/VA24EHEL/VA24EHL: A AC IN B or C HDMI DVI D-SUB • POWER CORD specifications refer to page v. • For the installation of replaceable parts, please refer to the above installation instructions. • Users may go to the local service network to replace /purchase the qualified replaceable parts. • For local service centers and service contacts, please refer to https://www.asus.com/support 1-6 Chapter 1: Product Introduction
VA24EHLB/VA24EHEL/VA24EHL: A AC IN B or C HDMI DVI D-SUB • POWER CORD specifications refer to page v. • For the installation of replaceable parts, please refer to the above installation instructions. • Users may go to the local service network to replace /purchase the qualified replaceable parts. • For local service centers and service contacts, please refer to https://www.asus.com/support 1-6 Chapter 1: Product Introduction
VA24E Series User Guide
Page 16
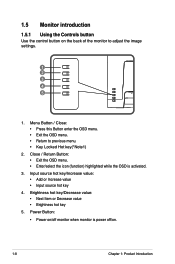
...; Brightness hot key 5. Menu Button / Close: • Press this Button enter the OSD menu. • Exit the OSD menu. • Return to adjust the image settings. 1 2 3 4 5 1. Close / Return Button: • Exit the OSD menu. • Enter/select the icon (function) highlighted while the OSD is power off/on the back of the monitor to previous menu. • Key Locked Hot key(*Note1) 2. Power Button: • Power on/off monitor when monitor is activated. 3. Input source hot...
...; Brightness hot key 5. Menu Button / Close: • Press this Button enter the OSD menu. • Exit the OSD menu. • Return to adjust the image settings. 1 2 3 4 5 1. Close / Return Button: • Exit the OSD menu. • Enter/select the icon (function) highlighted while the OSD is power off/on the back of the monitor to previous menu. • Key Locked Hot key(*Note1) 2. Power Button: • Power on/off monitor when monitor is activated. 3. Input source hot...
VA24E Series User Guide
Page 17
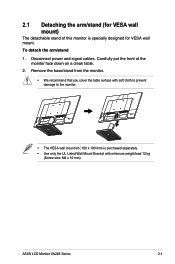
... the monitor. • The VESA wall mount kit ( 100 x 100 mm) is specially designed for VESA wall mount. Remove the base/stand from the monitor. • We recommend that you cover the table surface with minimum weight/load 12 kg (Screw size: M4 x 10 mm). Disconnect power and signal cables. ASUS LCD Monitor VA24E Series 2-1 To detach the arm/stand 1. 2.1 Detaching the arm/stand (for VESA wall mount) The detachable stand of the monitor face down on a clean table...
... the monitor. • The VESA wall mount kit ( 100 x 100 mm) is specially designed for VESA wall mount. Remove the base/stand from the monitor. • We recommend that you cover the table surface with minimum weight/load 12 kg (Screw size: M4 x 10 mm). Disconnect power and signal cables. ASUS LCD Monitor VA24E Series 2-1 To detach the arm/stand 1. 2.1 Detaching the arm/stand (for VESA wall mount) The detachable stand of the monitor face down on a clean table...
VA24E Series User Guide
Page 20
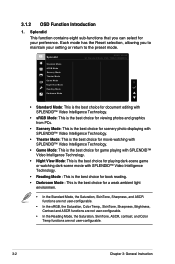
.... 3.1.2 OSD Function Introduction 1. Splendid This function contains eight sub-functions that you to the preset mode. Each mode has the Reset selection, allowing you can select for a weak ambient light environmen. • In the Standard Mode, the Saturation, SkinTone, Sharpness, and ASCR functions are not user-configurable. • In the sRGB, the Saturation, Color Temp., SkinTone, Sharpness, Brightness, Contrast and...
.... 3.1.2 OSD Function Introduction 1. Splendid This function contains eight sub-functions that you to the preset mode. Each mode has the Reset selection, allowing you can select for a weak ambient light environmen. • In the Standard Mode, the Saturation, SkinTone, Sharpness, and ASCR functions are not user-configurable. • In the sRGB, the Saturation, Color Temp., SkinTone, Sharpness, Brightness, Contrast and...

VA24E Series User Guide
Page 21
... from LED backlight. Blue Light Filter Adjust the energy level of continuous working for long hours. The Brightness function is compliance with TUV Low Blue Light Certification. It is optimized setting. Blue light filter to reduce 70% (max.) harmful blue light to eye strain and AMD (Age-Related Macular Degeneration). ASUS LCD Monitor VA24E Series 3-3 Blue Light Filter Level 0 Level 1 Level 2 Level 3 Level 4 ASUS VA24E Standard Mode VGA 1920x1080@60Hz • Level 0: No change. •...
... from LED backlight. Blue Light Filter Adjust the energy level of continuous working for long hours. The Brightness function is compliance with TUV Low Blue Light Certification. It is optimized setting. Blue light filter to reduce 70% (max.) harmful blue light to eye strain and AMD (Age-Related Macular Degeneration). ASUS LCD Monitor VA24E Series 3-3 Blue Light Filter Level 0 Level 1 Level 2 Level 3 Level 4 ASUS VA24E Standard Mode VGA 1920x1080@60Hz • Level 0: No change. •...
VA24E Series User Guide
Page 22
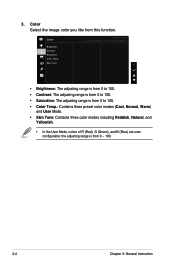
... Instruction 3. Color Select the image color you like from 0 to 100. • Color Temp.: Contains three preset color modes (Cool, Normal, Warm) and User Mode. • Skin Tone: Contains three color modes including Reddish, Natural, and Yellowish. • In the User Mode, colors of R (Red), G (Green), and B (Blue) are userconfigurable; Color Brightness Contrast Saturation Color Temp. Skin Tone ASUS VA24E Standard Mode VGA 1920x1080@60Hz • Brightness: The adjusting range is from 0 to 100. • Contrast: The adjusting range is...
... Instruction 3. Color Select the image color you like from 0 to 100. • Color Temp.: Contains three preset color modes (Cool, Normal, Warm) and User Mode. • Skin Tone: Contains three color modes including Reddish, Natural, and Yellowish. • In the User Mode, colors of R (Red), G (Green), and B (Blue) are userconfigurable; Color Brightness Contrast Saturation Color Temp. Skin Tone ASUS VA24E Standard Mode VGA 1920x1080@60Hz • Brightness: The adjusting range is from 0 to 100. • Contrast: The adjusting range is...

VA24E Series User Guide
Page 23
... power efficient, virtually stutter free and low-latency display update. • Position: Adjusts the horizontal position (H-Position) and the vertical position (V-Position) of the image by Over Drive technology. The adjusting range is from lower 0 to faster 100. • Aspect Control: Adjusts the aspect ratio to dynamically adjust display refresh rate based on typical content frame rates for VGA input). • Focus: Reduces Horizonal-line noise and Vertical-line noise of the image. Image You can allow a Adaptive-Sync supported graphics source...
... power efficient, virtually stutter free and low-latency display update. • Position: Adjusts the horizontal position (H-Position) and the vertical position (V-Position) of the image by Over Drive technology. The adjusting range is from lower 0 to faster 100. • Aspect Control: Adjusts the aspect ratio to dynamically adjust display refresh rate based on typical content frame rates for VGA input). • Focus: Reduces Horizonal-line noise and Vertical-line noise of the image. Image You can allow a Adaptive-Sync supported graphics source...

VA24E Series User Guide
Page 24
... volume. • Source: Adjusts audio source to your preference. • 4:3 is only available when input source is in 4:3 format。OverScan is not proportional. 5. With a wrong phase adjustment, the screen shows horizontal disturbances. • Clock (pixel frequency) controls the number of the pixel clock signal. If the frequency is not correct, the screen shows vertical stripes and the image is only available for HDMI input). 6. Input Select VGA DVI HDMI ASUS VA24E Standard Mode VGA 1920x1080@60Hz 3-6 Chapter 3: General Instruction Sound...
... volume. • Source: Adjusts audio source to your preference. • 4:3 is only available when input source is in 4:3 format。OverScan is not proportional. 5. With a wrong phase adjustment, the screen shows horizontal disturbances. • Clock (pixel frequency) controls the number of the pixel clock signal. If the frequency is not correct, the screen shows vertical stripes and the image is only available for HDMI input). 6. Input Select VGA DVI HDMI ASUS VA24E Standard Mode VGA 1920x1080@60Hz 3-6 Chapter 3: General Instruction Sound...
VA24E Series User Guide
Page 25
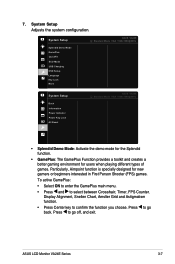
.... Press to confirm the function you choose. ASUS LCD Monitor VA24E Series 3-7 Press to go off, and exit. System Setup Splendid Demo Mode GamePlus QuickFit ECO Mode USB Charging OSD Setup Language Key Lock More ASUS VA24E Standard Mode VGA 1920x1080@60Hz System Setup Back Information Power Indicator Power Key Lock All Reset ASUS VA24E Standard Mode VGA 1920x1080@60Hz • Splendid Demo Mode: Activate the demo mode for the Splendid function. • GamePlus: The...
.... Press to confirm the function you choose. ASUS LCD Monitor VA24E Series 3-7 Press to go off, and exit. System Setup Splendid Demo Mode GamePlus QuickFit ECO Mode USB Charging OSD Setup Language Key Lock More ASUS VA24E Standard Mode VGA 1920x1080@60Hz System Setup Back Information Power Indicator Power Key Lock All Reset ASUS VA24E Standard Mode VGA 1920x1080@60Hz • Splendid Demo Mode: Activate the demo mode for the Splendid function. • GamePlus: The...

VA24E Series User Guide
Page 27
... OSD language. ASUS LCD Monitor VA24E Series 3-9 Pressing the second button on the right for more than five seconds to disable key lock function. • Back: Return the previous page of System Setting. • Information:Displays the monitor information. • Power Indicator: Turn the power LED indicator on/off. • Power Key Lock: To disable / enable power key • All Reset: Selects "Yes" to revert all settings to view their photos in real size...
... OSD language. ASUS LCD Monitor VA24E Series 3-9 Pressing the second button on the right for more than five seconds to disable key lock function. • Back: Return the previous page of System Setting. • Information:Displays the monitor information. • Power Indicator: Turn the power LED indicator on/off. • Power Key Lock: To disable / enable power key • All Reset: Selects "Yes" to revert all settings to view their photos in real size...
VA24E Series User Guide
Page 28
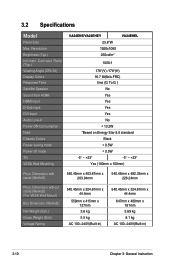
... Yes Yes Yes Yes No < 13.2W *Based on Energy Star 8.0 standard Black < 0.5W < 0.5W -5° ~ +23° -5° ~ +33° Yes (100mm x 100mm) Phys. 3.2 Specifications Model Panel Size Max. Resolution Brightness (Typ.) Intrinsic Contrast Ratio (Typ.) Viewing Angle (CR>10) Display Colors Response Time Satellite Speaker Sound from HDMI HDMI input D-Sub input DVI input Audio Line-in ) 3-10 Chapter 3: General Instruction Dimension with stand (WxHxD) 540.45mm x 403.67mm x 203.94mm...
... Yes Yes Yes Yes No < 13.2W *Based on Energy Star 8.0 standard Black < 0.5W < 0.5W -5° ~ +23° -5° ~ +33° Yes (100mm x 100mm) Phys. 3.2 Specifications Model Panel Size Max. Resolution Brightness (Typ.) Intrinsic Contrast Ratio (Typ.) Viewing Angle (CR>10) Display Colors Response Time Satellite Speaker Sound from HDMI HDMI input D-Sub input DVI input Audio Line-in ) 3-10 Chapter 3: General Instruction Dimension with stand (WxHxD) 540.45mm x 403.67mm x 203.94mm...

VA24E Series User Guide
Page 29
...) 540.45mm x 482.33mm x 226.24mm 540.45mm x 324.67mm x 44.4mm 647mm x 400mm x 181mm 5.69 kg 8.1 kg AC 100~240V(Built-in Power ON Consumption Note Chassis Colors Power saving mode Power off mode Tilt VESA Wall Mounting Phys. Model Panel Size Max. Dimension with stand (WxHxD) Phys. Resolution Brightness (Typ.) Intrinsic Contrast Ratio (Typ.) Viewing Angle (CR>10) Display Colors Response Time Satellite Speaker Sound from HDMI HDMI input D-Sub input DVI input Audio Line-in ) ASUS LCD Monitor VA24E Series 3-11
...) 540.45mm x 482.33mm x 226.24mm 540.45mm x 324.67mm x 44.4mm 647mm x 400mm x 181mm 5.69 kg 8.1 kg AC 100~240V(Built-in Power ON Consumption Note Chassis Colors Power saving mode Power off mode Tilt VESA Wall Mounting Phys. Model Panel Size Max. Dimension with stand (WxHxD) Phys. Resolution Brightness (Typ.) Intrinsic Contrast Ratio (Typ.) Viewing Angle (CR>10) Display Colors Response Time Satellite Speaker Sound from HDMI HDMI input D-Sub input DVI input Audio Line-in ) ASUS LCD Monitor VA24E Series 3-11
VA24E Series User Guide
Page 30
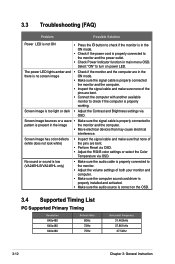
... on power LED. The power LED lights amber and • Check if the monitor and the computer are in the there is no screen image ON mode. • Make sure the signal cable is properly connected the monitor and the computer. • Inspect the signal cable and make sure that none of both your monitor and computer. • Make sure the computer sound card driver is properly installed and activated. • Make sure the audio source is...
... on power LED. The power LED lights amber and • Check if the monitor and the computer are in the there is no screen image ON mode. • Make sure the signal cable is properly connected the monitor and the computer. • Inspect the signal cable and make sure that none of both your monitor and computer. • Make sure the computer sound card driver is properly installed and activated. • Make sure the audio source is...


