
Users Manual
Page 2
...ERROR IN THIS MANUAL OR PRODUCT. Product warranty or service will not be extended if: (1) the product is repaired, modified or altered, unless such repair, modification of ASUSTeK COMPUTER INC. ("ASUS"). SPECIFICATIONS AND INFORMATION CONTAINED IN THIS MANUAL ARE FURNISHED FOR INFORMATIONAL USE ONLY, AND ARE SUBJECT TO CHANGE.... or (2) the serial number of their respective companies, and are used only for backup purposes, without intent to the owners' benefit, without the express written permission of alteration is defaced or missing. No part of this manual may or may be...
...ERROR IN THIS MANUAL OR PRODUCT. Product warranty or service will not be extended if: (1) the product is repaired, modified or altered, unless such repair, modification of ASUSTeK COMPUTER INC. ("ASUS"). SPECIFICATIONS AND INFORMATION CONTAINED IN THIS MANUAL ARE FURNISHED FOR INFORMATIONAL USE ONLY, AND ARE SUBJECT TO CHANGE.... or (2) the serial number of their respective companies, and are used only for backup purposes, without intent to the owners' benefit, without the express written permission of alteration is defaced or missing. No part of this manual may or may be...
Users Manual
Page 3
...introduction 1.1 Welcome 1-1 1.2 Package contents 1-1 1.3 Monitor introduction 1-2 1.3.1 Front view 1-2 1.3.2 Back view 1-3 Chapter 2: Setup 2.1 Assembling the monitor arm/base 2-1 2.2 Adjusting the monitor 2-1 2.3 Detaching the arm (for wall mount 2-2 2.4 Connecting the cables 2-3 2.4 Turning on the monitor 2-3 Chapter 3: General instructions 3.1 OSD (On-Screen Display) menu 3-1 3.1.1 How to reconfigure 3-1 3.1.2 OSD function introduction 3-1 3.2 Specifications summary 3-9 3.3 Outline dimensions 3-11 3.4 Troubleshooting (FAQ 3-12 3.5 Supported operating modes 3-13 iii
...introduction 1.1 Welcome 1-1 1.2 Package contents 1-1 1.3 Monitor introduction 1-2 1.3.1 Front view 1-2 1.3.2 Back view 1-3 Chapter 2: Setup 2.1 Assembling the monitor arm/base 2-1 2.2 Adjusting the monitor 2-1 2.3 Detaching the arm (for wall mount 2-2 2.4 Connecting the cables 2-3 2.4 Turning on the monitor 2-3 Chapter 3: General instructions 3.1 OSD (On-Screen Display) menu 3-1 3.1.1 How to reconfigure 3-1 3.1.2 OSD function introduction 3-1 3.2 Specifications summary 3-9 3.3 Outline dimensions 3-11 3.4 Troubleshooting (FAQ 3-12 3.5 Supported operating modes 3-13 iii
Users Manual
Page 4
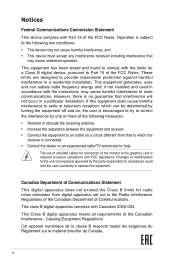
... cause harmful interference to Part 15 of the monitor to the graphics card is subject to the following measures: • Reorient or relocate the receiving antenna. • Increase the separation between the equipment and receiver. • Connect the equipment to an outlet on a circuit different from digital apparatus set out in a residential installation. This equipment has been...
... cause harmful interference to Part 15 of the monitor to the graphics card is subject to the following measures: • Reorient or relocate the receiving antenna. • Increase the separation between the equipment and receiver. • Connect the equipment to an outlet on a circuit different from digital apparatus set out in a residential installation. This equipment has been...

Users Manual
Page 5
..., make sure all the documentation that the product (electrical, electronic equipment, and mercury-containing button cell battery) should be used for other settings than the center position may increase the ear-/headphones output voltage and therefore the sound pressure level. • The adapter is only used for disposal of the following power supplies: - Please check local regulations for a long period of power source...
..., make sure all the documentation that the product (electrical, electronic equipment, and mercury-containing button cell battery) should be used for other settings than the center position may increase the ear-/headphones output voltage and therefore the sound pressure level. • The adapter is only used for disposal of the following power supplies: - Please check local regulations for a long period of power source...
Users Manual
Page 6
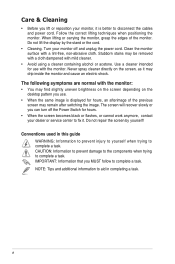
... of the monitor. Use a cleaner intended for hours. • When the screen becomes black or flashes, or cannot work anymore, contact your dealer or service center to complete a task. The screen will recover slowly or you can turn off and unplug the power cord. Do not lift the display by yourself! Do not repair the screen by the stand or the cord. • Cleaning. Conventions used in completing...
... of the monitor. Use a cleaner intended for hours. • When the screen becomes black or flashes, or cannot work anymore, contact your dealer or service center to complete a task. The screen will recover slowly or you can turn off and unplug the power cord. Do not lift the display by yourself! Do not repair the screen by the stand or the cord. • Cleaning. Conventions used in completing...
Users Manual
Page 9
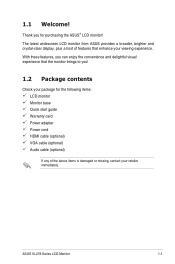
ASUS VL278 Series LCD Monitor 1-1 The latest widescreen LCD monitor from ASUS provides a broader, brighter and crystal-clear display, plus a host of features that the monitor brings to you for the following items: LCD monitor Monitor base Quick start guide Warranty card Power adapter Power cord HDMI cable (optional) VGA cable (optional) Audio cable (optional) If any of the above items is damaged or missing, contact your retailer immediately. Thank you ! 1.2 Package contents Check your viewing experience. With these features...
ASUS VL278 Series LCD Monitor 1-1 The latest widescreen LCD monitor from ASUS provides a broader, brighter and crystal-clear display, plus a host of features that the monitor brings to you for the following items: LCD monitor Monitor base Quick start guide Warranty card Power adapter Power cord HDMI cable (optional) VGA cable (optional) Audio cable (optional) If any of the above items is damaged or missing, contact your retailer immediately. Thank you ! 1.2 Package contents Check your viewing experience. With these features...

Users Manual
Page 10
... to enter the button functions menu when the OSD is as the below table. Input Select • Move the 5-way button up to power off . Status Description White Amber Off On Standby mode Off 3. Power off . 5. Press this button again to enter the OSD menu. 4. 1.3 Monitor introduction 1.3.1 Front view Main Menu Exit Power Off Input Select Blue Light Filter Main Menu 3 Exit 4 Power Off 5 Input Select 6 Blue Light Filter 7 12 1. Power button/5-way button (on the back...
... to enter the button functions menu when the OSD is as the below table. Input Select • Move the 5-way button up to power off . Status Description White Amber Off On Standby mode Off 3. Power off . 5. Press this button again to enter the OSD menu. 4. 1.3 Monitor introduction 1.3.1 Front view Main Menu Exit Power Off Input Select Blue Light Filter Main Menu 3 Exit 4 Power Off 5 Input Select 6 Blue Light Filter 7 12 1. Power button/5-way button (on the back...

Users Manual
Page 11
Audio-in port. This ports are for PC VGA connection. 4. ASUS VL278 Series LCD Monitor 1-3 7. HDMI ports. Rating label is for connection with an HDMI compatible device. 3. This port connects the power cord. 2. VGA port. Blue Light Filter • Move the 5-way button down to enter the Blue Light Filter menu. 1.3.2 Back view VL278H VL278HE 1. DC-IN port. This 15-pin port is stuck on the bottom of the LCD monitor. This port connects PC audio source by the bundled audio cable. 5. Kensington lock slot.
Audio-in port. This ports are for PC VGA connection. 4. ASUS VL278 Series LCD Monitor 1-3 7. HDMI ports. Rating label is for connection with an HDMI compatible device. 3. This port connects the power cord. 2. VGA port. Blue Light Filter • Move the 5-way button down to enter the Blue Light Filter menu. 1.3.2 Back view VL278H VL278HE 1. DC-IN port. This 15-pin port is stuck on the bottom of the LCD monitor. This port connects PC audio source by the bundled audio cable. 5. Kensington lock slot.

Users Manual
Page 13
... base. 3. Fix the base to -8.5˚. -8.5° ~ +21.5° ASUS VL278 Series LCD Monitor 2-1 Have the front of the monitor, then adjust the monitor to the angle that is most comfortable for you. • Hold the stand to prevent the monitor from falling when you change its angle. • The recommended adjusting angle is +21.5 to the arm by fastening the bundled screw. 2.1 Assembling the monitor arm/base...
... base. 3. Fix the base to -8.5˚. -8.5° ~ +21.5° ASUS VL278 Series LCD Monitor 2-1 Have the front of the monitor, then adjust the monitor to the angle that is most comfortable for you. • Hold the stand to prevent the monitor from falling when you change its angle. • The recommended adjusting angle is +21.5 to the arm by fastening the bundled screw. 2.1 Assembling the monitor arm/base...
Users Manual
Page 15
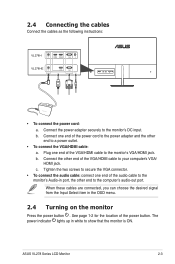
... power indicator lights up in the OSD menu. 2.4 Turning on the monitor Press the power button . Plug one end of the VGA/HDMI cable to your computer's VGA/ HDMI jack. Tighten the two screws to secure the VGA connector. • To connect the audio cable: connect one end of the audio cable to the monitor's Audio-in port, the other end to a power outlet. • To connect the VGA/HDMI cable: a. 2.4 Connecting the cables Connect the cables as the following instructions: VL278H VL278HE • To connect the power cord: a. ASUS VL278 Series LCD Monitor 2-3 Connect...
... power indicator lights up in the OSD menu. 2.4 Turning on the monitor Press the power button . Plug one end of the VGA/HDMI cable to your computer's VGA/ HDMI jack. Tighten the two screws to secure the VGA connector. • To connect the audio cable: connect one end of the audio cable to the monitor's Audio-in port, the other end to a power outlet. • To connect the VGA/HDMI cable: a. 2.4 Connecting the cables Connect the cables as the following instructions: VL278H VL278HE • To connect the power cord: a. ASUS VL278 Series LCD Monitor 2-3 Connect...
Users Manual
Page 17
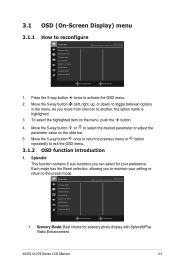
... Video Enhancement. ASUS VL278 Series LCD Monitor 3-1 Move the 5-way button or to select the desired parameter or adjust the parameter value on the menu, push the button. 4. Move the 5-way button once to return to previous menu or button repeatedly to reconfigure Splendid Scenery Mode Standard Mode Theater Mode Game Mode Night View Mode sRGB Mode Reading Mode Darkroom Mode ASUS VL278 Standard Mode HDMI 1920 x 1080 @ 60Hz MOVE/ENTER BACK/EXIT 1. 3.1 OSD (On-Screen Display) menu...
... Video Enhancement. ASUS VL278 Series LCD Monitor 3-1 Move the 5-way button or to select the desired parameter or adjust the parameter value on the menu, push the button. 4. Move the 5-way button once to return to previous menu or button repeatedly to reconfigure Splendid Scenery Mode Standard Mode Theater Mode Game Mode Night View Mode sRGB Mode Reading Mode Darkroom Mode ASUS VL278 Standard Mode HDMI 1920 x 1080 @ 60Hz MOVE/ENTER BACK/EXIT 1. 3.1 OSD (On-Screen Display) menu...
Users Manual
Page 18
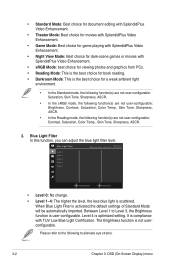
...; Darkroom Mode: This is the best choice for dark-scene games or movies with TUV Low Blue Light Certification. When Blue Light Filter is optimized setting. Please refer to the following function(s) are not user-configurable: Contrast, Saturation, Color Temp., Skin Tone, Sharpness, ASCR. 2. Blue Light Filter In this function, you can adjust the blue light filter level. Level 4 is activated,the default settings of Standard Mode will be...
...; Darkroom Mode: This is the best choice for dark-scene games or movies with TUV Low Blue Light Certification. When Blue Light Filter is optimized setting. Please refer to the following function(s) are not user-configurable: Contrast, Saturation, Color Temp., Skin Tone, Sharpness, ASCR. 2. Blue Light Filter In this function, you can adjust the blue light filter level. Level 4 is activated,the default settings of Standard Mode will be...

Users Manual
Page 19
... menu. Color Set a desired color setting from the display if working at least 5 mins) after around 1 hour of continuous working for long hours. It is more effective than a single longer break. • To minimize eye strain and dryness in your eyes diagonal. • High energy blue light may lead to avoiding CVS (Computer Vision Syndrome). 3. Color ASUS VL278 Standard Mode HDMI 1920 x 1080 @ 60Hz Brightness Contrast...
... menu. Color Set a desired color setting from the display if working at least 5 mins) after around 1 hour of continuous working for long hours. It is more effective than a single longer break. • To minimize eye strain and dryness in your eyes diagonal. • High energy blue light may lead to avoiding CVS (Computer Vision Syndrome). 3. Color ASUS VL278 Standard Mode HDMI 1920 x 1080 @ 60Hz Brightness Contrast...
Users Manual
Page 20
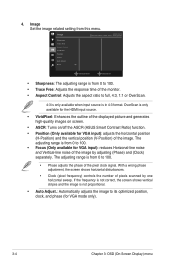
... ASCR (ASUS Smart Contrast Ratio) function. • Position (Only available for VGA input): adjusts the horizontal position (H-Position) and the vertical position (V-Position) of the image by one horizontal sweep. Image Set the image related setting from 0 to full, 4:3, 1:1 or OverScan. 4:3 is only available when input source is from 0 to 100. • Focus (Only available for VGA mode only). 3-4 Chapter 3: OSD (On-Screen Display) menu With a wrong phase adjustment, the screen shows horizontal disturbances. • Clock (pixel frequency) controls the number of the monitor...
... ASCR (ASUS Smart Contrast Ratio) function. • Position (Only available for VGA input): adjusts the horizontal position (H-Position) and the vertical position (V-Position) of the image by one horizontal sweep. Image Set the image related setting from 0 to full, 4:3, 1:1 or OverScan. 4:3 is only available when input source is from 0 to 100. • Focus (Only available for VGA mode only). 3-4 Chapter 3: OSD (On-Screen Display) menu With a wrong phase adjustment, the screen shows horizontal disturbances. • Clock (pixel frequency) controls the number of the monitor...
Users Manual
Page 21
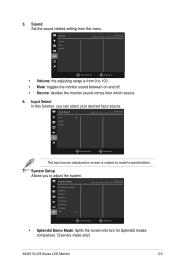
.../EXIT The input source displayed on and off. • Source: decides the monitor sound comes from this function, you to model's specifications. 7. Sound Set the sound related setting from which source. 6. System Setup Splendid Demo Mode GamePlus QuickFit EyeCheck ECO Mode OSD Setup Language More ASUS VL278 Standard Mode HDMI 1920 x 1080 @ 60Hz MOVE/ENTER BACK/EXIT • Splendid Demo Mode: Splits the screen into two for Splendid modes comparison. (Scenery mode only) ASUS VL278 Series LCD Monitor 3-5 System Setup Allows...
.../EXIT The input source displayed on and off. • Source: decides the monitor sound comes from this function, you to model's specifications. 7. Sound Set the sound related setting from which source. 6. System Setup Splendid Demo Mode GamePlus QuickFit EyeCheck ECO Mode OSD Setup Language More ASUS VL278 Standard Mode HDMI 1920 x 1080 @ 60Hz MOVE/ENTER BACK/EXIT • Splendid Demo Mode: Splits the screen into two for Splendid modes comparison. (Scenery mode only) ASUS VL278 Series LCD Monitor 3-5 System Setup Allows...
Users Manual
Page 24
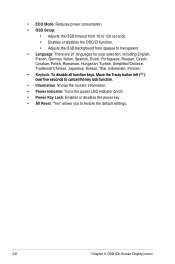
Move the 5-way button left ( ) over five seconds to cancel the key lock function. • Information: Shows the monitor information. • Power Indicator: Turns the power LED indicator on/off. • Power Key Lock: Enables or disables the power key. • All Reset: "Yes" allows you to transparent. • Language: There are 21 languages for your selection, including English, French, German, Italian, Spanish, Dutch, Portuguese, Russian...
Move the 5-way button left ( ) over five seconds to cancel the key lock function. • Information: Shows the monitor information. • Power Indicator: Turns the power LED indicator on/off. • Power Key Lock: Enables or disables the power key. • All Reset: "Yes" allows you to transparent. • Language: There are 21 languages for your selection, including English, French, German, Italian, Spanish, Dutch, Portuguese, Russian...

Users Manual
Page 25
Resolution Pixel pitch Brightness (Typ.) Contrast Ratio (Typ.) Contrast Ratio (Max.) Viewing angle (H/V) CR>10 Display colors Response time SplendidPlus Video Enhancement SplendidPlus selection Auto adjustment Color temperature selection Analog input Digital input Earphone jack Audio input Speaker (Built-in) USB 2.0 port Colors Power LED Tilt Pivot Swivel Height Adjustment Kensington lock AC input voltage Power consumption Temperature (Operating) Temperature (Non-operating) Dimension (W x H x D) without stand Dimension (W x H x D) with stand Weight (Esti.) TFT LCD 27" (16:9, 68.57 cm) wide ...
Resolution Pixel pitch Brightness (Typ.) Contrast Ratio (Typ.) Contrast Ratio (Max.) Viewing angle (H/V) CR>10 Display colors Response time SplendidPlus Video Enhancement SplendidPlus selection Auto adjustment Color temperature selection Analog input Digital input Earphone jack Audio input Speaker (Built-in) USB 2.0 port Colors Power LED Tilt Pivot Swivel Height Adjustment Kensington lock AC input voltage Power consumption Temperature (Operating) Temperature (Non-operating) Dimension (W x H x D) without stand Dimension (W x H x D) with stand Weight (Esti.) TFT LCD 27" (16:9, 68.57 cm) wide ...
Users Manual
Page 26
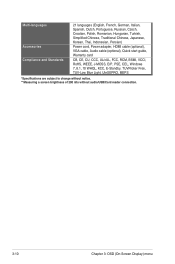
... Chinese, Traditional Chinese, Japanese, Korean, Thai, Indonesian, Persian) Power cord, Power adapter, HDMI cable (optional), VGA cable, Audio cable (optional), Quick start guide, Warranty card CB, CE, CU, CCC, UL/cUL, FCC, RCM, BSMI, VCCI, RoHS, WEEE, J-MOSS, ErP, PSE, CEL, Windows 7, 8.1, 10 WHQL, KCC, E-Standby, TUVFlicker Free, TUV-Low Blue Light, UkrSEPRO, MEPS *Specifications are subject to change without notice. **Measuring a screen brightness of 200 nits without audio/USB/Card reader connection. 3-10 Chapter 3: OSD (On-Screen Display) menu
... Chinese, Traditional Chinese, Japanese, Korean, Thai, Indonesian, Persian) Power cord, Power adapter, HDMI cable (optional), VGA cable, Audio cable (optional), Quick start guide, Warranty card CB, CE, CU, CCC, UL/cUL, FCC, RCM, BSMI, VCCI, RoHS, WEEE, J-MOSS, ErP, PSE, CEL, Windows 7, 8.1, 10 WHQL, KCC, E-Standby, TUVFlicker Free, TUV-Low Blue Light, UkrSEPRO, MEPS *Specifications are subject to change without notice. **Measuring a screen brightness of 200 nits without audio/USB/Card reader connection. 3-10 Chapter 3: OSD (On-Screen Display) menu
Users Manual
Page 28
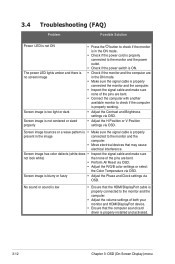
... computer sound card driver is properly installed and activated. 3-12 Chapter 3: OSD (On-Screen Display) menu 3.4 Troubleshooting (FAQ) Problem Possible Solution Power LED is not ON The power LED lights amber and there is no screen image Screen image is too light or dark Screen image is not centered or sized properly • Press the button to check if the monitor is in the ON mode. • Check if the power cord is properly connected to the monitor and the power outlet. • Check...
... computer sound card driver is properly installed and activated. 3-12 Chapter 3: OSD (On-Screen Display) menu 3.4 Troubleshooting (FAQ) Problem Possible Solution Power LED is not ON The power LED lights amber and there is no screen image Screen image is too light or dark Screen image is not centered or sized properly • Press the button to check if the monitor is in the ON mode. • Check if the power cord is properly connected to the monitor and the power outlet. • Check...
Users Manual
Page 29
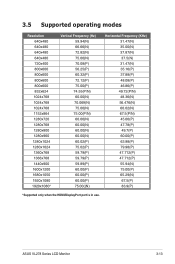
ASUS VL278 Series LCD Monitor 3-13 3.5 Supported operating modes Resolution 640x480 640x480 640x480 640x480 720x400 800x600 800x600 800x600 800x600 832x624 1024x768 1024x768 1024x768 1152x864 1280x720 1280x768 1280x800 1280x960 1280x1024 1280x1024 1360x768 1366x768 1440x900 1600x1200 1680x1050 1920x1080 1920x1080* Vertical Frequency (Hz....02(P) 59.79(P) 59.79(P) 59.89(P) 60.00(P) 60.00(P) 60.00(P) 75.00((N) Horizontal Frequency (KHz) 31.47(N) 35.00(N) 37.87(N) 37.5(N) 31.47(N) 35.16(P) 37.88(P) 48...75.00(P) 65.29(N) 67.5(P) 83.9(P) *Supported only when the HDMI/DisplayPort port is in use.
ASUS VL278 Series LCD Monitor 3-13 3.5 Supported operating modes Resolution 640x480 640x480 640x480 640x480 720x400 800x600 800x600 800x600 800x600 832x624 1024x768 1024x768 1024x768 1152x864 1280x720 1280x768 1280x800 1280x960 1280x1024 1280x1024 1360x768 1366x768 1440x900 1600x1200 1680x1050 1920x1080 1920x1080* Vertical Frequency (Hz....02(P) 59.79(P) 59.79(P) 59.89(P) 60.00(P) 60.00(P) 60.00(P) 75.00((N) Horizontal Frequency (KHz) 31.47(N) 35.00(N) 37.87(N) 37.5(N) 31.47(N) 35.16(P) 37.88(P) 48...75.00(P) 65.29(N) 67.5(P) 83.9(P) *Supported only when the HDMI/DisplayPort port is in use.


