
VS24A Series User Guide for English Edition
Page 3
... contents 1-1 1.3 Monitor introduction 1-2 1.3.1 Front view 1-2 1.3.2 Back view 1-3 1.3.3 QuickFit Function 1-4 Chapter 2: Setup 2.1 Assembling the monitor arm/base 2-1 2.2 Adjusting the monitor 2-1 2.3 Detaching the arm/base (for VESA wall mount 2-2 2.4 Connecting the cables 2-3 2.5 Turning on the monitor 2-3 Chapter 3: General instructions 3.1 OSD (On-Screen Display) menu 3-1 3.1.1 How to reconfigure 3-1 3.1.2 OSD function introduction 3-1 3.2 Specifications summary 3-4 3.3 Troubleshooting (FAQ...
... contents 1-1 1.3 Monitor introduction 1-2 1.3.1 Front view 1-2 1.3.2 Back view 1-3 1.3.3 QuickFit Function 1-4 Chapter 2: Setup 2.1 Assembling the monitor arm/base 2-1 2.2 Adjusting the monitor 2-1 2.3 Detaching the arm/base (for VESA wall mount 2-2 2.4 Connecting the cables 2-3 2.5 Turning on the monitor 2-3 Chapter 3: General instructions 3.1 OSD (On-Screen Display) menu 3-1 3.1.1 How to reconfigure 3-1 3.1.2 OSD function introduction 3-1 3.2 Specifications summary 3-4 3.3 Troubleshooting (FAQ...
VS24A Series User Guide for English Edition
Page 16
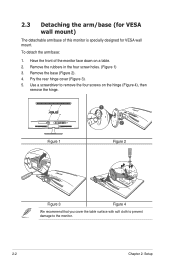
Remove the base (Figure 2). 4. Pry the rear hinge cover (Figure 3). 5. Remove the rubbers in the four screw holes. (Figure 1) 3. 2.3 Detaching the arm/base (for VESA wall mount) The detachable arm/base of the monitor face down on the hinge (Figure 4), then remove the hinge. 1 2 Figure 1 Figure 2 Figure 3 Figure 4 We recommend that you ... soft cloth to prevent damage to the monitor. 2-2 Chapter 2: Setup To detach the arm/base: 1. Have the front of this monitor is specially designed for VESA wall mount. Use a screwdriver to remove the four screws on a table. 2.
Remove the base (Figure 2). 4. Pry the rear hinge cover (Figure 3). 5. Remove the rubbers in the four screw holes. (Figure 1) 3. 2.3 Detaching the arm/base (for VESA wall mount) The detachable arm/base of the monitor face down on the hinge (Figure 4), then remove the hinge. 1 2 Figure 1 Figure 2 Figure 3 Figure 4 We recommend that you ... soft cloth to prevent damage to the monitor. 2-2 Chapter 2: Setup To detach the arm/base: 1. Have the front of this monitor is specially designed for VESA wall mount. Use a screwdriver to remove the four screws on a table. 2.
VS24A Series User Guide for English Edition
Page 22
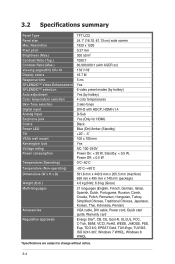
... SPLENDID™ Video Enhancement SPLENDID™ selection Auto adjustment Color temperature selection Skin-Tone selection Digital input Analog input Earphone jack Colors Power LED Tilt VESA wall mount Kensington lock Voltage rating Power consumption Temperature (Operating) Temperature (Non-operating) Dimensions (W x H x D) Weight (Esti.) Multi-languages Accessories Regulation approvals TFT LCD 24.1" (16:10...
... SPLENDID™ Video Enhancement SPLENDID™ selection Auto adjustment Color temperature selection Skin-Tone selection Digital input Analog input Earphone jack Colors Power LED Tilt VESA wall mount Kensington lock Voltage rating Power consumption Temperature (Operating) Temperature (Non-operating) Dimensions (W x H x D) Weight (Esti.) Multi-languages Accessories Regulation approvals TFT LCD 24.1" (16:10...


