

VS24A Series User Guide for English Edition
Page 2
...SPECIFICATIONS AND INFORMATION CONTAINED IN THIS MANUAL ARE FURNISHED FOR INFORMATIONAL USE ONLY, AND ARE SUBJECT TO CHANGE AT ANY TIME WITHOUT NOTICE, AND SHOULD NOT BE CONSTRUED AS A COMMITMENT BY ASUS. ii All Rights Reserved. Products and corporate names appearing in this manual, including the products and software...or (2) the serial number of this manual may or may be extended if: (1) the product is defaced or missing. No part of the product is repaired, modified or alered, unless such repair, modification of ASUSTeK COMPUTER INC. ("ASUS"). ASUS PROVIDES THIS MANUAL "AS IS"...
...SPECIFICATIONS AND INFORMATION CONTAINED IN THIS MANUAL ARE FURNISHED FOR INFORMATIONAL USE ONLY, AND ARE SUBJECT TO CHANGE AT ANY TIME WITHOUT NOTICE, AND SHOULD NOT BE CONSTRUED AS A COMMITMENT BY ASUS. ii All Rights Reserved. Products and corporate names appearing in this manual, including the products and software...or (2) the serial number of this manual may or may be extended if: (1) the product is defaced or missing. No part of the product is repaired, modified or alered, unless such repair, modification of ASUSTeK COMPUTER INC. ("ASUS"). ASUS PROVIDES THIS MANUAL "AS IS"...
VS24A Series User Guide for English Edition
Page 3
... 1.1 Welcome 1-1 1.2 Package contents 1-1 1.3 Monitor introduction 1-2 1.3.1 Front view 1-2 1.3.2 Back view 1-3 1.3.3 QuickFit Function 1-4 Chapter 2: Setup 2.1 Assembling the monitor arm/base 2-1 2.2 Adjusting the monitor 2-1 2.3 Detaching the arm/base (for VESA wall mount 2-2 2.4 Connecting the cables 2-3 2.5 Turning on the monitor 2-3 Chapter 3: General instructions 3.1 OSD (On-Screen Display) menu 3-1 3.1.1 How to reconfigure 3-1 3.1.2 OSD function introduction 3-1 3.2 Specifications summary 3-4 3.3 Troubleshooting (FAQ 3-5 3.4 Supported operating modes 3-6 iii
... 1.1 Welcome 1-1 1.2 Package contents 1-1 1.3 Monitor introduction 1-2 1.3.1 Front view 1-2 1.3.2 Back view 1-3 1.3.3 QuickFit Function 1-4 Chapter 2: Setup 2.1 Assembling the monitor arm/base 2-1 2.2 Adjusting the monitor 2-1 2.3 Detaching the arm/base (for VESA wall mount 2-2 2.4 Connecting the cables 2-3 2.5 Turning on the monitor 2-3 Chapter 3: General instructions 3.1 OSD (On-Screen Display) menu 3-1 3.1.1 How to reconfigure 3-1 3.1.2 OSD function introduction 3-1 3.2 Specifications summary 3-4 3.3 Troubleshooting (FAQ 3-5 3.4 Supported operating modes 3-6 iii
VS24A Series User Guide for English Edition
Page 4
... a circuit different from digital apparatus set out in a particular installation. The use of shielded cables for connection of the following two conditions: • This device may not cause harmful interference, and • This device must accept any interference received including interference that to which can radiate radio frequency energy and, if not installed and used in a residential installation. As an...
... a circuit different from digital apparatus set out in a particular installation. The use of shielded cables for connection of the following two conditions: • This device may not cause harmful interference, and • This device must accept any interference received including interference that to which can radiate radio frequency energy and, if not installed and used in a residential installation. As an...

VS24A Series User Guide for English Edition
Page 5
... setting up the monitor, carefully read all cables are correctly connected and the power cables are not damaged. The dangerous high voltages inside the monitor may become wet. If you encounter technical problems with the monitor, contact a qualified service technician or your retailer. • Before using the product, make sure all the documentation that the product (electrical, electronic equipment, and mercury-containing button...
... setting up the monitor, carefully read all cables are correctly connected and the power cables are not damaged. The dangerous high voltages inside the monitor may become wet. If you encounter technical problems with the monitor, contact a qualified service technician or your retailer. • Before using the product, make sure all the documentation that the product (electrical, electronic equipment, and mercury-containing button...
VS24A Series User Guide for English Edition
Page 6
.... Do not repair the screen by the stand or the cord. • Cleaning. Turn your monitor off the Power Switch for use . • When the same image is better to disconnect the cables and power cord. Never spray cleaner directly on the desktop pattern you use with the monitor: • You may find slightly uneven brightness on the screen depending on the screen, as it is displayed for hours, an...
.... Do not repair the screen by the stand or the cord. • Cleaning. Turn your monitor off the Power Switch for use . • When the same image is better to disconnect the cables and power cord. Never spray cleaner directly on the desktop pattern you use with the monitor: • You may find slightly uneven brightness on the screen depending on the screen, as it is displayed for hours, an...

VS24A Series User Guide for English Edition
Page 7
...optional documentation that may have been added by your dealer. Takeback Services ASUS recycling and takeback programs come from our commitment to http://www.asus.com 2. Refer to the highest standards for product and software updates. 1. We believe in different region. Where to find more ...information Refer to responsibly recycle our products, batteries and other components as well as the packaging materials. These documents are not part of the standard package. Please go to http://csr.asus.com/english...
...optional documentation that may have been added by your dealer. Takeback Services ASUS recycling and takeback programs come from our commitment to http://www.asus.com 2. Refer to the highest standards for product and software updates. 1. We believe in different region. Where to find more ...information Refer to responsibly recycle our products, batteries and other components as well as the packaging materials. These documents are not part of the standard package. Please go to http://csr.asus.com/english...
VS24A Series User Guide for English Edition
Page 9
... the ASUS® LCD monitor! ASUS VS24A Series LCD Monitor 1-1 The latest widescreen LCD monitor from ASUS provides a broader, brighter and crystal-clear display, plus a host of the above items is damaged or missing, contact your viewing experience. 1.1 Welcome! With these features, you can enjoy the convenience and delightful visual experience that the monitor brings to you for the following items: LCD monitor Monitor base Quick start guide Warranty card Power cord VGA cable DVI cable If...
... the ASUS® LCD monitor! ASUS VS24A Series LCD Monitor 1-1 The latest widescreen LCD monitor from ASUS provides a broader, brighter and crystal-clear display, plus a host of the above items is damaged or missing, contact your viewing experience. 1.1 Welcome! With these features, you can enjoy the convenience and delightful visual experience that the monitor brings to you for the following items: LCD monitor Monitor base Quick start guide Warranty card Power cord VGA cable DVI cable If...
VS24A Series User Guide for English Edition
Page 10
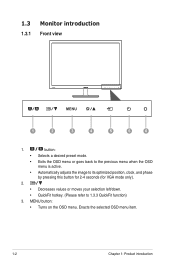
... goes back to the previous menu when the OSD menu is active. • Automatically adjusts the image to its optimized position, clock, and phase by pressing this button for 2-4 seconds (for VGA mode only). 2. • Decreases values or moves your selection left/down. • QuickFit hotkey. (Please refer to 1.3.3 QuickFit function) 3. MENU button: • Turns on the OSD menu. Enacts the selected OSD menu item. 1-2 Chapter 1: Product introduction 1.3 Monitor...
... goes back to the previous menu when the OSD menu is active. • Automatically adjusts the image to its optimized position, clock, and phase by pressing this button for 2-4 seconds (for VGA mode only). 2. • Decreases values or moves your selection left/down. • QuickFit hotkey. (Please refer to 1.3.3 QuickFit function) 3. MENU button: • Turns on the OSD menu. Enacts the selected OSD menu item. 1-2 Chapter 1: Product introduction 1.3 Monitor...
VS24A Series User Guide for English Edition
Page 11
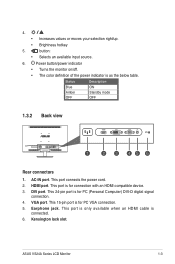
... 15-pin port is connected. 6. Kensington lock slot. Status Blue Amber OFF Description ON Standby mode OFF 1.3.2 Back view 6 Rear connectors 1. Earphone jack. 4. • Increases values or moves your selection right/up. • Brightness hotkey 5. Power button/power indicator • Turns the monitor on/off. • The color definition of the power indicator is for connection with an HDMI compatible device. 3. button: • Selects an available input source. 6. AC-IN port. VGA port. ASUS VS24A Series LCD Monitor 1-3 DVI port.
... 15-pin port is connected. 6. Kensington lock slot. Status Blue Amber OFF Description ON Standby mode OFF 1.3.2 Back view 6 Rear connectors 1. Earphone jack. 4. • Increases values or moves your selection right/up. • Brightness hotkey 5. Power button/power indicator • Turns the monitor on/off. • The color definition of the power indicator is for connection with an HDMI compatible device. 3. button: • Selects an available input source. 6. AC-IN port. VGA port. ASUS VS24A Series LCD Monitor 1-3 DVI port.
VS24A Series User Guide for English Edition
Page 12
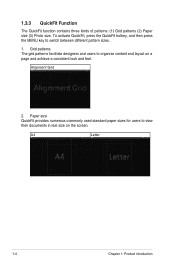
... the MENU key to view their documents in real size on a page and achieve a consistent look and feel. Alignment Grid 2. A4 Letter 1-4 Chapter 1: Product introduction Grid patterns The grid patterns facilitate designers and users to organize content and layout on the screen. Paper size QuickFit provides numerous commonly used standard paper sizes for users to switch between different pattern sizes. 1. 1.3.3 QuickFit...
... the MENU key to view their documents in real size on a page and achieve a consistent look and feel. Alignment Grid 2. A4 Letter 1-4 Chapter 1: Product introduction Grid patterns The grid patterns facilitate designers and users to organize content and layout on the screen. Paper size QuickFit provides numerous commonly used standard paper sizes for users to switch between different pattern sizes. 1. 1.3.3 QuickFit...
VS24A Series User Guide for English Edition
Page 13
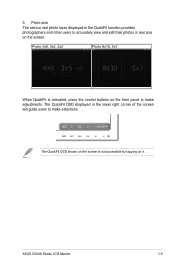
Photo size The various real photo sizes displayed in the QuickFit function provides photographers and other users to accurately view and edit their photos in the lower right corner of the screen will guide users to make selections. The QuickFit OSD shown on the screen is activated, press the control buttons on it. The QuickFit OSD displayed in real size on the screen. Photo 4x6, 3x5, 2x2 Photo 8x10, 5x7 When QuickFit is not accessible by tapping on the front panel to make adjustments. ASUS VS24A Series LCD Monitor 1-5 3.
Photo size The various real photo sizes displayed in the QuickFit function provides photographers and other users to accurately view and edit their photos in the lower right corner of the screen will guide users to make selections. The QuickFit OSD shown on the screen is activated, press the control buttons on it. The QuickFit OSD displayed in real size on the screen. Photo 4x6, 3x5, 2x2 Photo 8x10, 5x7 When QuickFit is not accessible by tapping on the front panel to make adjustments. ASUS VS24A Series LCD Monitor 1-5 3.
VS24A Series User Guide for English Edition
Page 15
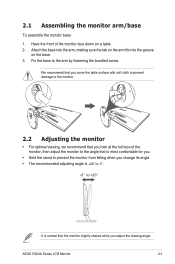
... that the monitor slightly shakes while you change its angle. • The recommended adjusting angle is most comfortable for you. • Hold the stand to prevent the monitor from falling when you adjust the viewing angle. ASUS VS24A Series LCD Monitor 2-1 Attach the base into the arm, making sure the tab on the arm fits into the groove on a table. 2. Fix the base to +20f...
... that the monitor slightly shakes while you change its angle. • The recommended adjusting angle is most comfortable for you. • Hold the stand to prevent the monitor from falling when you adjust the viewing angle. ASUS VS24A Series LCD Monitor 2-1 Attach the base into the arm, making sure the tab on the arm fits into the groove on a table. 2. Fix the base to +20f...
VS24A Series User Guide for English Edition
Page 16
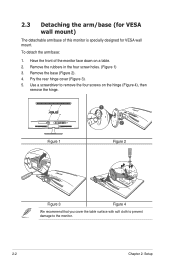
To detach the arm/base: 1. Have the front of this monitor is specially designed for VESA wall mount. Pry the rear hinge cover (Figure 3). 5. Use a screwdriver to the monitor. 2-2 Chapter 2: Setup Remove the rubbers in the four screw holes. (Figure 1) 3. Remove the base (Figure 2). 4. 2.3 Detaching the arm/base (for VESA wall mount) The detachable arm/base of the monitor face down on the hinge (Figure 4), then remove the hinge. 1 2 Figure 1 Figure...
To detach the arm/base: 1. Have the front of this monitor is specially designed for VESA wall mount. Pry the rear hinge cover (Figure 3). 5. Use a screwdriver to the monitor. 2-2 Chapter 2: Setup Remove the rubbers in the four screw holes. (Figure 1) 3. Remove the base (Figure 2). 4. 2.3 Detaching the arm/base (for VESA wall mount) The detachable arm/base of the monitor face down on the hinge (Figure 4), then remove the hinge. 1 2 Figure 1 Figure...
VS24A Series User Guide for English Edition
Page 17
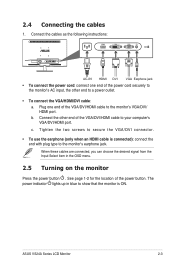
... screws to secure the VGA/DVI connector. • To use the earphone (only when an HDMI cable is ON. ASUS VS24A Series LCD Monitor 2-3 b. When these cables are connected, you can choose the desired signal from the Input Select item in blue to a power outlet. • To connect the VGA/HDMI/DVI cable: a. Connect the cables as the following instructions: HDMI DVI VGA Earphone jack • To connect the power cord: connect one end of the power button. 2.4 Connecting the cables 1. The power indicator lights up in the OSD menu. 2.5 Turning...
... screws to secure the VGA/DVI connector. • To use the earphone (only when an HDMI cable is ON. ASUS VS24A Series LCD Monitor 2-3 b. When these cables are connected, you can choose the desired signal from the Input Select item in blue to a power outlet. • To connect the VGA/HDMI/DVI cable: a. Connect the cables as the following instructions: HDMI DVI VGA Earphone jack • To connect the power cord: connect one end of the power button. 2.4 Connecting the cables 1. The power indicator lights up in the OSD menu. 2.5 Turning...
VS24A Series User Guide for English Edition
Page 19
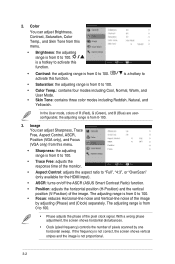
... or movies with SPLENDID™ Video Enhancement. • sRGB: best choice for your setting or return to reconfigure 1. To adjust other functions, repeat steps 1-3. 3.1.2 OSD function introduction 1. If the function selected has a sub-menu, press and again to navigate through the sub-menu functions. In the Standard Mode, the ASCR, Saturation and Sharpness functions are not user-configurable. ASUS VS24A Series LCD Monitor 3-1
... or movies with SPLENDID™ Video Enhancement. • sRGB: best choice for your setting or return to reconfigure 1. To adjust other functions, repeat steps 1-3. 3.1.2 OSD function introduction 1. If the function selected has a sub-menu, press and again to navigate through the sub-menu functions. In the Standard Mode, the ASCR, Saturation and Sharpness functions are not user-configurable. ASUS VS24A Series LCD Monitor 3-1
VS24A Series User Guide for English Edition
Page 20
... HDMI input). • ASCR: turns on/off the ASCR (ASUS Smart Contrast Ratio) function. • Position: adjusts the horizontal position (H-Position) and the vertical position (V-Position) of the monitor. • Aspect Control: adjusts the aspect ratio to 100. In the User mode, colors of the image by one horizontal sweep. Color You can adjust Sharpness, Trace Free, Aspect Control, ASCR, Position (VGA only), and Focus (VGA only) from this function. • Contrast: the adjusting range is from 0 to 100. • Trace Free: adjusts...
... HDMI input). • ASCR: turns on/off the ASCR (ASUS Smart Contrast Ratio) function. • Position: adjusts the horizontal position (H-Position) and the vertical position (V-Position) of the monitor. • Aspect Control: adjusts the aspect ratio to 100. In the User mode, colors of the image by one horizontal sweep. Color You can adjust Sharpness, Trace Free, Aspect Control, ASCR, Position (VGA only), and Focus (VGA only) from this function. • Contrast: the adjusting range is from 0 to 100. • Trace Free: adjusts...
VS24A Series User Guide for English Edition
Page 21
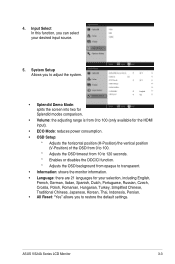
... Mode: splits the screen into two for Splendid modes comparison. • Volume: the adjusting range is from 0 to 100 (only available for the HDMI input). • ECO Mode: reduces power consumption. • OSD Setup: * Adjusts the horizontal position (H-Position)/the vertical position (V-Position) of the OSD from 0 to 100. * Adjusts the OSD timeout from 10 to 120 seconds. * Enables or disables the DDC/CI function. * Adjusts the OSD background from opaque to restore the default settings. ASUS VS24A Series LCD Monitor 3-3 Input...
... Mode: splits the screen into two for Splendid modes comparison. • Volume: the adjusting range is from 0 to 100 (only available for the HDMI input). • ECO Mode: reduces power consumption. • OSD Setup: * Adjusts the horizontal position (H-Position)/the vertical position (V-Position) of the OSD from 0 to 100. * Adjusts the OSD timeout from 10 to 120 seconds. * Enables or disables the DDC/CI function. * Adjusts the OSD background from opaque to restore the default settings. ASUS VS24A Series LCD Monitor 3-3 Input...
VS24A Series User Guide for English Edition
Page 22
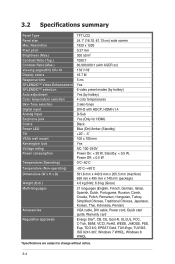
...Type Panel size Max. Resolution Pixel pitch Brightness (Max.) Contrast Ratio (Typ.) Contrast Ratio (Max.) Viewing angle(H/V) CR>10 Display colors Response time SPLENDID™ Video Enhancement SPLENDID™ selection Auto adjustment Color temperature selection Skin-Tone selection Digital input Analog input Earphone jack Colors Power LED Tilt VESA wall mount Kensington lock Voltage rating Power consumption Temperature (Operating) Temperature (Non-operating) Dimensions (W x H x D) Weight (Esti.) Multi-languages Accessories Regulation approvals TFT LCD 24.1" (16:10, 61.13 cm) wide screen 1920...
...Type Panel size Max. Resolution Pixel pitch Brightness (Max.) Contrast Ratio (Typ.) Contrast Ratio (Max.) Viewing angle(H/V) CR>10 Display colors Response time SPLENDID™ Video Enhancement SPLENDID™ selection Auto adjustment Color temperature selection Skin-Tone selection Digital input Analog input Earphone jack Colors Power LED Tilt VESA wall mount Kensington lock Voltage rating Power consumption Temperature (Operating) Temperature (Non-operating) Dimensions (W x H x D) Weight (Esti.) Multi-languages Accessories Regulation approvals TFT LCD 24.1" (16:10, 61.13 cm) wide screen 1920...

VS24A Series User Guide for English Edition
Page 23
...; Adjust the Contrast and Brightness settings via OSD. Screen image is properly connected the monitor and the computer. • Inspect the signal cable and make sure not look white) that may cause electrical interference. The power LED lights amber and there is no screen image • Check if the monitor and the computer are bent. • Perform All Reset via OSD. • Adjust the R/G/B color settings or select the Color Temperature via OSD. 3.3 Troubleshooting (FAQ) Problem Possible Solution Power LED is...
...; Adjust the Contrast and Brightness settings via OSD. Screen image is properly connected the monitor and the computer. • Inspect the signal cable and make sure not look white) that may cause electrical interference. The power LED lights amber and there is no screen image • Check if the monitor and the computer are bent. • Perform All Reset via OSD. • Adjust the R/G/B color settings or select the Color Temperature via OSD. 3.3 Troubleshooting (FAQ) Problem Possible Solution Power LED is...
VS24A Series User Guide for English Edition
Page 24
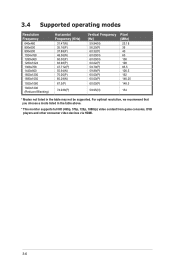
... players and other consumer video devices via HDMI. 3-6 3.4 Supported operating modes Resolution Frequency 640x480 800x600 800x600 1024x768 1280x960 1280x1024 1366x768 1440x900 1600x1200 1680x1050 1920x1080 1920x1200 (Reduced Blanking) Horizontal Frequency (KHz) 31.47(N) 35.16(P) 37.88(P) 48.36(N) 60.00(P) 63.98(P) 47.712(P) 55.94(N) 75.00(P) 65.29(N) 67.5(P) 74.038(P) Vertical Frequency . For optimal resolution, we recommend that you...
... players and other consumer video devices via HDMI. 3-6 3.4 Supported operating modes Resolution Frequency 640x480 800x600 800x600 1024x768 1280x960 1280x1024 1366x768 1440x900 1600x1200 1680x1050 1920x1080 1920x1200 (Reduced Blanking) Horizontal Frequency (KHz) 31.47(N) 35.16(P) 37.88(P) 48.36(N) 60.00(P) 63.98(P) 47.712(P) 55.94(N) 75.00(P) 65.29(N) 67.5(P) 74.038(P) Vertical Frequency . For optimal resolution, we recommend that you...


