
User Guide
Page 2
or (2) the serial number of the product is authorized in writing byASUS; ASUS ASSUMES NO RESPONSIBILITY OR LIABILITY FOR ANY ERRORS OR INACCURACIES THAT MAY APPEAR IN THIS MANUAL, INCLUDING THE PRODUCTS AND SOFTWARE DESCRIBED IN IT. All Rights Reserved. Product warranty or service will not be ...identification or explanation nd to the owners' benefit, without the express written permission of alteration is defaced or missing. SPECIFICATIONS AND INFORMATION CONTAINED IN THIS MANUAL ARE FURNISHED FOR INFORMATIONAL USE ONLY, AND ARE SUBJECT TO CHANGE AT ANY TIME WITHOUT NOTICE, AND...
or (2) the serial number of the product is authorized in writing byASUS; ASUS ASSUMES NO RESPONSIBILITY OR LIABILITY FOR ANY ERRORS OR INACCURACIES THAT MAY APPEAR IN THIS MANUAL, INCLUDING THE PRODUCTS AND SOFTWARE DESCRIBED IN IT. All Rights Reserved. Product warranty or service will not be ...identification or explanation nd to the owners' benefit, without the express written permission of alteration is defaced or missing. SPECIFICATIONS AND INFORMATION CONTAINED IN THIS MANUAL ARE FURNISHED FOR INFORMATIONAL USE ONLY, AND ARE SUBJECT TO CHANGE AT ANY TIME WITHOUT NOTICE, AND...

User Guide
Page 3
... 1.1 Welcome 1-1 1.2 Package contents 1-1 1.3 Monitor introduction 1-2 1.3.1 Front view 1-2 1.3.2 Back view 1-3 1.3.3 QuickFit Function 1-3 Chapter 2: Setup 2.1 Assembling the monitor arm/base 2-1 2.2 Adjusting the monitor 2-1 2.3 Connecting the cables 2-2 2.4 Turning on the monitor 2-2 Chapter 3: General instructions 3.1 OSD (On-Screen Display) menu 3-1 3.1.1 How to reconfigure 3-1 3.1.2 OSD function introduction 3-1 3.2 Specifications summary (VX207DE 3-5 3.2 Specifications summary (VX207NE 3-6 3.3 Troubleshooting (FAQ 3-8 3.4 Supported operating modes 3-9 iii
... 1.1 Welcome 1-1 1.2 Package contents 1-1 1.3 Monitor introduction 1-2 1.3.1 Front view 1-2 1.3.2 Back view 1-3 1.3.3 QuickFit Function 1-3 Chapter 2: Setup 2.1 Assembling the monitor arm/base 2-1 2.2 Adjusting the monitor 2-1 2.3 Connecting the cables 2-2 2.4 Turning on the monitor 2-2 Chapter 3: General instructions 3.1 OSD (On-Screen Display) menu 3-1 3.1.1 How to reconfigure 3-1 3.1.2 OSD function introduction 3-1 3.2 Specifications summary (VX207DE 3-5 3.2 Specifications summary (VX207NE 3-6 3.3 Troubleshooting (FAQ 3-8 3.4 Supported operating modes 3-9 iii

User Guide
Page 4
... unit not expressly approved by one or more of the monitor to the graphics card is no guarantee that to provide reasonable protection against harmful interference in a particular installation. iv Operation is encouraged to try to correct the interference...connected. • Consult the dealer or an experienced radio/TV technician for help. This class B digital apparatus complies with manufacturer's instructions, may cause undesired operation. This equipment generates, uses and can be determined by turning the equipment off and on a circuit different from digital apparatus set...
... unit not expressly approved by one or more of the monitor to the graphics card is no guarantee that to provide reasonable protection against harmful interference in a particular installation. iv Operation is encouraged to try to correct the interference...connected. • Consult the dealer or an experienced radio/TV technician for help. This class B digital apparatus complies with manufacturer's instructions, may cause undesired operation. This equipment generates, uses and can be determined by turning the equipment off and on a circuit different from digital apparatus set...
User Guide
Page 5
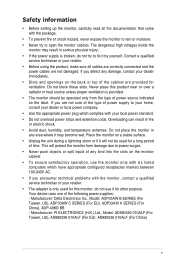
...; Before setting up the monitor, carefully read all cables are correctly connected and the power cables are provided for ventilation. If you encounter technical problems with your retailer. • The adapter is only used for other purpose. Contact a qualified service technician or your dealer immediately. • Slots and openings on the label. Never place this monitor, do not try to open the monitor cabinet.
...; Before setting up the monitor, carefully read all cables are correctly connected and the power cables are provided for ventilation. If you encounter technical problems with your retailer. • The adapter is only used for other purpose. Contact a qualified service technician or your dealer immediately. • Slots and openings on the label. Never place this monitor, do not try to open the monitor cabinet.

User Guide
Page 6
... that you can turn it is displayed for hours. • When the screen becomes black or flashes, or cannot work anymore, contact your dealer or service center to disconnect the cables and power cord. This symbol of the crossed out wheeled bin indicates that the product (electrical, electronic equipment, and mercury-containing button cell battery) should not be removed with a cloth dampened...
... that you can turn it is displayed for hours. • When the screen becomes black or flashes, or cannot work anymore, contact your dealer or service center to disconnect the cables and power cord. This symbol of the crossed out wheeled bin indicates that the product (electrical, electronic equipment, and mercury-containing button cell battery) should not be removed with a cloth dampened...

User Guide
Page 7
ASUS websites The ASUS websites worldwide provide updated information on ASUS hardware and software products. Takeback Services ASUS recycling and takeback programs come from our commitment to the highest standards for product and software updates. 1. Optional documentation Your product package may include optional documentation that may have been added by your dealer. These documents are not part of the standard package...
ASUS websites The ASUS websites worldwide provide updated information on ASUS hardware and software products. Takeback Services ASUS recycling and takeback programs come from our commitment to the highest standards for product and software updates. 1. Optional documentation Your product package may include optional documentation that may have been added by your dealer. These documents are not part of the standard package...

User Guide
Page 9
1.1 Welcome! ASUS VX207 Series LCD Monitor 1-1 With these features, you ! 1.2 Package contents Check your package for the following items: LCD monitor 1 x Adapter 1 x Power cable (for purchasing the ASUS® LCD monitor! The latest widescreen LCD monitor from ASUS provides a broader, brighter and crystal-clear display, plus a host of the above items is damaged or missing, contact your viewing experience. Thank you for selected models) 1 x VGA cable 1 x DVI cable (VX207NE) 1 x Quick start guide 1 x Warranty card If any of features...
1.1 Welcome! ASUS VX207 Series LCD Monitor 1-1 With these features, you ! 1.2 Package contents Check your package for the following items: LCD monitor 1 x Adapter 1 x Power cable (for purchasing the ASUS® LCD monitor! The latest widescreen LCD monitor from ASUS provides a broader, brighter and crystal-clear display, plus a host of the above items is damaged or missing, contact your viewing experience. Thank you for selected models) 1 x VGA cable 1 x DVI cable (VX207NE) 1 x Quick start guide 1 x Warranty card If any of features...

User Guide
Page 10
.... Brightness hotkey. 1-2 Chapter 1: Product introduction MENU Button: • Turns on the OSD menu. • Enacts the selected OSD menu item. • Toggles the Key Lock function between on and off with SPLENDIDPlus Video Intelligence Technology. • Exits the OSD menu or goes back to the previous menu when the OSD menu is active. • Automatically adjusts the image to its optimized position, clock, and phase by pressing this hotkey to switch...
.... Brightness hotkey. 1-2 Chapter 1: Product introduction MENU Button: • Turns on the OSD menu. • Enacts the selected OSD menu item. • Toggles the Key Lock function between on and off with SPLENDIDPlus Video Intelligence Technology. • Exits the OSD menu or goes back to the previous menu when the OSD menu is active. • Automatically adjusts the image to its optimized position, clock, and phase by pressing this hotkey to switch...

User Guide
Page 11
Power Button/Power Indicator • Turns the monitor ON/OFF. • The color definition of the power indicator is for PC (Personal Computer) DVI-D digital signal connection. 3. This 15-pin port is as the below table. This port connects the power cord. 2. ASUS VX207 Series LCD Monitor 1-3 This 24-pin port is for PC VGA connection. 4. VGA port. Status White Amber Off Description ON Standby mode OFF 1.3.2 Back view VX207NE VX207DE 4 1. DVI port. DC-IN port. 5. Kensington lock slot.
Power Button/Power Indicator • Turns the monitor ON/OFF. • The color definition of the power indicator is for PC (Personal Computer) DVI-D digital signal connection. 3. This 15-pin port is as the below table. This port connects the power cord. 2. ASUS VX207 Series LCD Monitor 1-3 This 24-pin port is for PC VGA connection. 4. VGA port. Status White Amber Off Description ON Standby mode OFF 1.3.2 Back view VX207NE VX207DE 4 1. DVI port. DC-IN port. 5. Kensington lock slot.

User Guide
Page 12
The QuickFit OSD displayed in real size on the screen. Press the Button again until a desired pattern is activated, press the control Buttons to make selections. Alignment Grid 2. The QuickFit OSD shown on the screen is not accessible by tapping on a page and achieve a consistent look and feel. 1.3.3 QuickFit Function The QuickFit function contains different kinds of the screen will guide users to organize...
The QuickFit OSD displayed in real size on the screen. Press the Button again until a desired pattern is activated, press the control Buttons to make selections. Alignment Grid 2. The QuickFit OSD shown on the screen is not accessible by tapping on a page and achieve a consistent look and feel. 1.3.3 QuickFit Function The QuickFit function contains different kinds of the screen will guide users to organize...

User Guide
Page 15
... shakes while you look at the full face of the monitor face down on the base. 3. Fix the base to the monitor. 2.2 Adjusting the monitor • For optimal viewing, we recommend that you cover the table surface with soft cloth to prevent damage to the arm by fastening the bundled screw. We recommend that you adjust the viewing angle. 2.1 Assembling the monitor arm/base To assemble the monitor base: 1.
... shakes while you look at the full face of the monitor face down on the base. 3. Fix the base to the monitor. 2.2 Adjusting the monitor • For optimal viewing, we recommend that you cover the table surface with soft cloth to prevent damage to the arm by fastening the bundled screw. We recommend that you adjust the viewing angle. 2.1 Assembling the monitor arm/base To assemble the monitor base: 1.

User Guide
Page 16
... the monitor's DC input port. Connect the power adapter securely to secure the VGA/DVI connector. The power indicator lights up in the OSD menu. 2.4 Turning on the monitor Press the power button . b. (1) Connect the power adapter to a power outlet. (2) Connect one end of the power button. b. c. Connect the cables as the following instructions: VX207NE VX207DE or (1) (2) DVI VGA • To connect the power cord: a. When these cables are connected, you can choose the desired signal from the Input Select item in white to the monitor's VGA/DVI port. 2.3 Connecting the...
... the monitor's DC input port. Connect the power adapter securely to secure the VGA/DVI connector. The power indicator lights up in the OSD menu. 2.4 Turning on the monitor Press the power button . b. (1) Connect the power adapter to a power outlet. (2) Connect one end of the power button. b. c. Connect the cables as the following instructions: VX207NE VX207DE or (1) (2) DVI VGA • To connect the power cord: a. When these cables are connected, you can choose the desired signal from the Input Select item in white to the monitor's VGA/DVI port. 2.3 Connecting the...

User Guide
Page 19
... with SPLENDIDPlus Video Enhancement. • Night View Mode: best choice for dark-scene games or movies with SPLENDIDPlus Video Enhancement. • Reading Mode: This is the best choice for book reading. • Darkroom Mode: This is the best choice for your setting or return to activate it . 3. ASUS VX207 Series LCD Monitor 3-1 Highlight the desired sub-menu function and press the MENU Button to change the settings of the...
... with SPLENDIDPlus Video Enhancement. • Night View Mode: best choice for dark-scene games or movies with SPLENDIDPlus Video Enhancement. • Reading Mode: This is the best choice for book reading. • Darkroom Mode: This is the best choice for your setting or return to activate it . 3. ASUS VX207 Series LCD Monitor 3-1 Highlight the desired sub-menu function and press the MENU Button to change the settings of the...

User Guide
Page 20
... Instructions In the User mode, colors of the image. Image You can adjust Brightness, Contrast, Saturation, Color Temp., Skin Tone and Smart View from this menu. • Brightness: the adjusting range is from 0 to "Full" or "4:3". • ASCR: turns on/off the ASCR (ASUS Smart Contrast Ratio) function. • Position (Only available for VGA input): reduces Horizonal-line noise and Vertical-line noise of the image by adjusting (Phase) and (Clock) separately. The adjusting range is...
... Instructions In the User mode, colors of the image. Image You can adjust Brightness, Contrast, Saturation, Color Temp., Skin Tone and Smart View from this menu. • Brightness: the adjusting range is from 0 to "Full" or "4:3". • ASCR: turns on/off the ASCR (ASUS Smart Contrast Ratio) function. • Position (Only available for VGA input): reduces Horizonal-line noise and Vertical-line noise of the image by adjusting (Phase) and (Clock) separately. The adjusting range is...

User Guide
Page 21
Press and to go back, ASUS VX207 Series LCD Monitor 3-3 If the frequency is not correct, the screen shows vertical stripes and the image is specially designed for users when playing different types of pixels scanned by one horizontal sweep. With a wrong phase adjustment, the screen shows horizontal disturbances. • Clock (pixel frequency) controls the number of games. GamePlus The GamePlus Function provides a toolkit and creates a better gaming environment...
Press and to go back, ASUS VX207 Series LCD Monitor 3-3 If the frequency is not correct, the screen shows vertical stripes and the image is specially designed for users when playing different types of pixels scanned by one horizontal sweep. With a wrong phase adjustment, the screen shows horizontal disturbances. • Clock (pixel frequency) controls the number of games. GamePlus The GamePlus Function provides a toolkit and creates a better gaming environment...

User Guide
Page 22
...; OSD Setup: * Adjusts the horizontal position (H-Position)/the vertical position (V-Position) of the OSD from 0 to 100. * Adjusts the OSD timeout from 10 to 120 seconds. * Enables or disables the DDC/CI function. * Adjusts the OSD background from opaque to transparent. • Language: there are 21 languages for 5 seconds on the MENU Button disables the key lock function. • Information: shows the monitor information. • All Reset: "Yes" allows you to restore the default settings...
...; OSD Setup: * Adjusts the horizontal position (H-Position)/the vertical position (V-Position) of the OSD from 0 to 100. * Adjusts the OSD timeout from 10 to 120 seconds. * Enables or disables the DDC/CI function. * Adjusts the OSD background from opaque to transparent. • Language: there are 21 languages for 5 seconds on the MENU Button disables the key lock function. • Information: shows the monitor information. • All Reset: "Yes" allows you to restore the default settings...
User Guide
Page 23
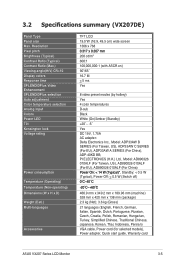
... Chinese, Traditional Chinese, Japanese, Korean, Thai, Indonesia, Persian) VGA cable, Power cord (for selected models), Power adapter, Quick start guide, Warranty card ASUS VX207 Series LCD Monitor 3-5 Resolution Pixel pitch Brightness (Typical) Contrast Ratio (Typical) Contrast Ratio (Max.) Viewing angle(H/V) CR>10 Display colors Response time SPLENDIDPlus Video Enhancement SPLENDIDPlus selection Auto adjustment Color temperature selection Analog input Colors Power LED Tilt Kensington lock Voltage rating Power consumption Temperature (Operating) Temperature (Non-operating) Dimensions...
... Chinese, Traditional Chinese, Japanese, Korean, Thai, Indonesia, Persian) VGA cable, Power cord (for selected models), Power adapter, Quick start guide, Warranty card ASUS VX207 Series LCD Monitor 3-5 Resolution Pixel pitch Brightness (Typical) Contrast Ratio (Typical) Contrast Ratio (Max.) Viewing angle(H/V) CR>10 Display colors Response time SPLENDIDPlus Video Enhancement SPLENDIDPlus selection Auto adjustment Color temperature selection Analog input Colors Power LED Tilt Kensington lock Voltage rating Power consumption Temperature (Operating) Temperature (Non-operating) Dimensions...

User Guide
Page 25
Resolution Pixel pitch Brightness (Typical) Contrast Ratio (Typical) Contrast Ratio (Max.) Viewing angle(H/V) CR>10 Display colors Response time SPLENDIDPlus Video Enhancement SPLENDIDPlus selection Auto adjustment Color temperature selection Digital input Analog input Colors Power LED Tilt Kensington lock Voltage rating Power consumption Temperature (Operating) Temperature (Non-operating) Dimensions (W x H x D) Weight (Esti.) Multi-languages Accessories TFT LCD 19.5"W (16:9, 49.5 cm) wide screen 1366 x 768 0.317 x 0.307 mm 200 cd/m2 600:1 100,000,000:1 (with ASCR on) 90˚...
Resolution Pixel pitch Brightness (Typical) Contrast Ratio (Typical) Contrast Ratio (Max.) Viewing angle(H/V) CR>10 Display colors Response time SPLENDIDPlus Video Enhancement SPLENDIDPlus selection Auto adjustment Color temperature selection Digital input Analog input Colors Power LED Tilt Kensington lock Voltage rating Power consumption Temperature (Operating) Temperature (Non-operating) Dimensions (W x H x D) Weight (Esti.) Multi-languages Accessories TFT LCD 19.5"W (16:9, 49.5 cm) wide screen 1366 x 768 0.317 x 0.307 mm 200 cd/m2 600:1 100,000,000:1 (with ASCR on) 90˚...

User Guide
Page 27
... and Clock settings via OSD. Screen image is properly connected to the monitor and the power outlet. ASUS VX207 Series LCD Monitor 3-9 3.3 Troubleshooting (FAQ) Problem Possible Solution Power LED is not ON • Press the Button to check if the monitor is in the ON mode. • Check if the power cord is blurry or fuzzy • Press the Button for 2-4 seconds to automatically adjust the image (for VGA mode only). • Adjust the H-Position or V-Position settings via OSD. Screen image is properly working.
... and Clock settings via OSD. Screen image is properly connected to the monitor and the power outlet. ASUS VX207 Series LCD Monitor 3-9 3.3 Troubleshooting (FAQ) Problem Possible Solution Power LED is not ON • Press the Button to check if the monitor is in the ON mode. • Check if the power cord is blurry or fuzzy • Press the Button for 2-4 seconds to automatically adjust the image (for VGA mode only). • Adjust the H-Position or V-Position settings via OSD. Screen image is properly working.

User Guide
Page 28
3.4 Supported operating modes Resolution Frequency 640x480 640x480 640x480 640x480 720x400 800x600 800x600 800x600 800x600 832x624 1024x768 1024x768 1024x768 1366x768 Horizontal Frequency (KHz) 31.47(N) 35.00(N) 37.87(N) 37.5(N) 31.47(N) 35.16(P) 37.88(P) 48.08(P) 46.86(P) 49.72(P/N) 48.36(N) 56.476(N) 60.02(N) 47.712(P) Vertical Frequency (Hz) 59.94(N) 66.66(N) 72.82(N)....08(P) 56.25(P) 60.32(P) 72.12(P) 75.00(P) 74.55(P/N) 60.00(N) 70.069(N) 75.00(N) 59.79(P) Pixel (MHz) 25.18 30.24 31.5 31.5 28.32 36.00 40.00 50.00 49.50 57.28 65.00 75.00 78.75 85.50 3-10 Chapter 3: General Instructions
3.4 Supported operating modes Resolution Frequency 640x480 640x480 640x480 640x480 720x400 800x600 800x600 800x600 800x600 832x624 1024x768 1024x768 1024x768 1366x768 Horizontal Frequency (KHz) 31.47(N) 35.00(N) 37.87(N) 37.5(N) 31.47(N) 35.16(P) 37.88(P) 48.08(P) 46.86(P) 49.72(P/N) 48.36(N) 56.476(N) 60.02(N) 47.712(P) Vertical Frequency (Hz) 59.94(N) 66.66(N) 72.82(N)....08(P) 56.25(P) 60.32(P) 72.12(P) 75.00(P) 74.55(P/N) 60.00(N) 70.069(N) 75.00(N) 59.79(P) Pixel (MHz) 25.18 30.24 31.5 31.5 28.32 36.00 40.00 50.00 49.50 57.28 65.00 75.00 78.75 85.50 3-10 Chapter 3: General Instructions


