User Manual
Page 24
...the system. If the POST discovers a difference between the record and the existing hardware, it ON. If warnings are still given during the splash screen, standard boot information such as a carrying bag. If you press [Tab] during bootup after turning OFF your Notebook PC in data loss. 24 ... WARNING! If any materials that is correctly detected and ready for more effective scan and repair but the process will display a message on the screen when you turn ON the Notebook PC, it back ON. This record is created by running a software disk checking utility, you should be...
...the system. If the POST discovers a difference between the record and the existing hardware, it ON. If warnings are still given during the splash screen, standard boot information such as a carrying bag. If you press [Tab] during bootup after turning OFF your Notebook PC in data loss. 24 ... WARNING! If any materials that is correctly detected and ready for more effective scan and repair but the process will display a message on the screen when you turn ON the Notebook PC, it back ON. This record is created by running a software disk checking utility, you should be...
User Manual
Page 25
... adapter. Suspend-to-RAM (STR) does not last long when the battery power is available due to complete battery depletion or no power is depleted. Screen captures shown here are examples only and may not reflect what you continue to ignore the low battery warnings, the Notebook PC eventually enters suspend...
... adapter. Suspend-to-RAM (STR) does not last long when the battery power is available due to complete battery depletion or no power is depleted. Screen captures shown here are examples only and may not reflect what you continue to ignore the low battery warnings, the Notebook PC eventually enters suspend...
User Manual
Page 28
Envelope Icon (F3): Pressing this button will prevent you from accidentally moving the cursor while typing and is running . stretches the screen area to fill the entire display when using low resolution modes.) LCD/Monitor Icons (F8): Toggles between the Notebook PC's LCD display and an... Windows is running . The colored commands can only be accessed by first pressing and holding the function key while pressing a key with an on-screen-display. Windows software settings are necessary to -RAM or Saveto-Disk depending on model but the functions should remain the same. Filled Sun Icon (...
Envelope Icon (F3): Pressing this button will prevent you from accidentally moving the cursor while typing and is running . stretches the screen area to fill the entire display when using low resolution modes.) LCD/Monitor Icons (F8): Toggles between the Notebook PC's LCD display and an... Windows is running . The colored commands can only be accessed by first pressing and holding the function key while pressing a key with an on-screen-display. Windows software settings are necessary to -RAM or Saveto-Disk depending on model but the functions should remain the same. Filled Sun Icon (...
User Manual
Page 29
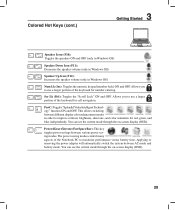
... of the keyboard for number entering. Fn+C: Toggles "Splendid Video Intelligent Technology" function ON and OFF. You can see the current mode through the on -screen display (OSD). Scr Lk (Del): Toggles the "Scroll Lock" ON and OFF. You can see the current mode through the on...
... of the keyboard for number entering. Fn+C: Toggles "Splendid Video Intelligent Technology" function ON and OFF. You can see the current mode through the on -screen display (OSD). Scr Lk (Del): Toggles the "Scroll Lock" ON and OFF. You can see the current mode through the on...
User Manual
Page 31
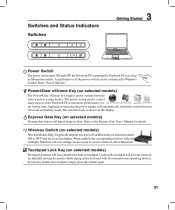
... (on selected models) Pressing this button will light. Windows software settings are necessary to the Express Gate User's Manual for details. Power4Gear eXtreme Key (on -screen display. Switches and Status Indicators Switches 3 Getting Started Power Switch The power switch turns ON and OFF the Notebook PC or putting the Notebook PC...
... (on selected models) Pressing this button will light. Windows software settings are necessary to the Express Gate User's Manual for details. Power4Gear eXtreme Key (on -screen display. Switches and Status Indicators Switches 3 Getting Started Power Switch The power switch turns ON and OFF the Notebook PC or putting the Notebook PC...
User Manual
Page 36
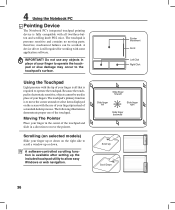
... allow easy Windows or web navigation. therefore, mechanical failures can be used in a direction to move the cursor around or select items displayed on the screen with all that is fully compatible with the use of your finger in place of the touchpad. Moving The Pointer Place your fingertip instead of...
... allow easy Windows or web navigation. therefore, mechanical failures can be used in a direction to move the cursor around or select items displayed on the screen with all that is fully compatible with the use of your finger in place of the touchpad. Moving The Pointer Place your fingertip instead of...
User Manual
Page 37
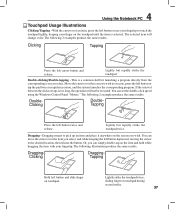
... finger on the touchpad until the item is selected. The following 2 examples produce the same results. Lightly strike the touchpad twice, sliding finger on the screen you can set the double-click speed using the Windows Control Panel "Mouse." Move the cursor over an item, press the left button twice and...
... finger on the touchpad until the item is selected. The following 2 examples produce the same results. Lightly strike the touchpad twice, sliding finger on the screen you can set the double-click speed using the Windows Control Panel "Mouse." Move the cursor over an item, press the left button twice and...

User Manual
Page 54
... Mouse Setup (optional) This process can be used to add most Bluetooth devices in Section 3). 2. OFF ON ESET R 3c. Or Launch Bluetooth Devices from this screen. Switch ON the Wireless function if necessary for your model (see switches in Windows operating system. 1. Press [FN F2] repeatedly until Bluetooth ON or WLAN...
... Mouse Setup (optional) This process can be used to add most Bluetooth devices in Section 3). 2. OFF ON ESET R 3c. Or Launch Bluetooth Devices from this screen. Switch ON the Wireless function if necessary for your model (see switches in Windows operating system. 1. Press [FN F2] repeatedly until Bluetooth ON or WLAN...
User Manual
Page 57
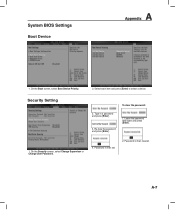
Security Setting 1. To clear the password: 2. Leave the password field blank and press [Enter]. 4. Select each item and press [Enter] to select a device. Type in a password and press [Enter]. 3. On the Boot screen, select Boot Device Priority. 2. On the Security screen, select Change Supervisor or Change User Password. Password is then set. 2. Re-type the password and press [Enter]. 1. A-7 System BIOS Settings Boot Device A Appendix 1. Password is then cleared.
Security Setting 1. To clear the password: 2. Leave the password field blank and press [Enter]. 4. Select each item and press [Enter] to select a device. Type in a password and press [Enter]. 3. On the Boot screen, select Boot Device Priority. 2. On the Security screen, select Change Supervisor or Change User Password. Password is then set. 2. Re-type the password and press [Enter]. 1. A-7 System BIOS Settings Boot Device A Appendix 1. Password is then cleared.
User Manual
Page 61
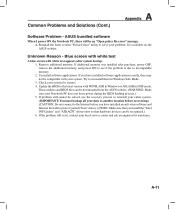
...an anti-virus software and Internet firewall to incompatible memory. 2. Un-install software applications. A. Blue screen with white text A blue screen with your system for assistance. Check your system. It is due to protect yourself from the ASUS website. (WARNING: Make sure your problem. If additional memory was installed after system bootup. 1. If... with white text appears after purchase, power OFF, remove the additional memory, and power ON to see if the problem is available on the ASUS website. Common Problems and Solutions (Cont.) A Appendix Software Problem -
...an anti-virus software and Internet firewall to incompatible memory. 2. Un-install software applications. A. Blue screen with white text A blue screen with your system for assistance. Check your system. It is due to protect yourself from the ASUS website. (WARNING: Make sure your problem. If additional memory was installed after system bootup. 1. If... with white text appears after purchase, power OFF, remove the additional memory, and power ON to see if the problem is available on the ASUS website. Common Problems and Solutions (Cont.) A Appendix Software Problem -
User Manual
Page 65
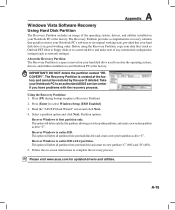
...good working state, provided that quickly restores your hard disk drive is created at the factory. Read the "ASUS Preload Wizard" screen and click Next. 4. Follow the on-screen instructions to restore the operating system, drivers, and utilities installed on your Notebook PC at the factory. A... and create a new system partition as drive "C". Press [F9] during bootup (requires a Recovery Partition) 2. Recover Windows to an authorized ASUS service center if you to a network drive and make note of the operating system, drivers, and utilities installed on your Notebook PC at ...
...good working state, provided that quickly restores your hard disk drive is created at the factory. Read the "ASUS Preload Wizard" screen and click Next. 4. Follow the on-screen instructions to restore the operating system, drivers, and utilities installed on your Notebook PC at the factory. A... and create a new system partition as drive "C". Press [F9] during bootup (requires a Recovery Partition) 2. Recover Windows to an authorized ASUS service center if you to a network drive and make note of the operating system, drivers, and utilities installed on your Notebook PC at ...
User Manual
Page 66
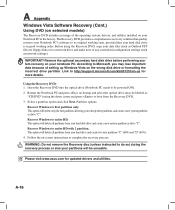
... http://support.microsoft.com/kb/937251/en-us for updated drivers and utilities. Remove the optional secondary hard disk drive before performing system recovery on -screen instructions to keep other partitions, and create a new system partition as network settings). A-16 This option will delete all partitions from your hard disk drive... to a network drive and make note of setting up Windows Vista on the wrong disk drive or formatting the incorrect drive partition. Please visit www.asus.com for more details.
... http://support.microsoft.com/kb/937251/en-us for updated drivers and utilities. Remove the optional secondary hard disk drive before performing system recovery on -screen instructions to keep other partitions, and create a new system partition as network settings). A-16 This option will delete all partitions from your hard disk drive... to a network drive and make note of setting up Windows Vista on the wrong disk drive or formatting the incorrect drive partition. Please visit www.asus.com for more details.


