
ZenFone Live L1 English Version E-manual
Page 4
... your ASUS Phone ready!...8 Starting for the first time...14 Using the touchscreen...15 2 There's no place like Home Zen Home features...18 Home screen...18 Quick settings...19 Notifications...20 Personalizing your Home screen 21 Widgets ...21 Wallpapers...22 Easy Mode...23 Kids Mode...26 Setting up the date and time...28 Setting up your ringtone and alert sounds 28 Lock Screen...29 Customizing your lock screen...29 Face Unlock...30 Setting up face unlock from Settings 30 3 Work hard, play...
... your ASUS Phone ready!...8 Starting for the first time...14 Using the touchscreen...15 2 There's no place like Home Zen Home features...18 Home screen...18 Quick settings...19 Notifications...20 Personalizing your Home screen 21 Widgets ...21 Wallpapers...22 Easy Mode...23 Kids Mode...26 Setting up the date and time...28 Setting up your ringtone and alert sounds 28 Lock Screen...29 Customizing your lock screen...29 Face Unlock...30 Setting up face unlock from Settings 30 3 Work hard, play...
ZenFone Live L1 English Version E-manual
Page 5
... your contacts 51 Send messages and more 52 Google Messenger...52 5 Fun and entertainment Using a headset...53 Connecting the audio jack...53 Google Play Music...54 6 Your precious moments Capture moments...55 Launching the Camera app...55 Advanced camera features...57 Using the Gallery...59 Viewing the photo location...59 Sharing files from the Gallery...59 Deleting files from the Gallery...59 Editing images...60 7 Staying connected Mobile network...61 Enabling the mobile network...
... your contacts 51 Send messages and more 52 Google Messenger...52 5 Fun and entertainment Using a headset...53 Connecting the audio jack...53 Google Play Music...54 6 Your precious moments Capture moments...55 Launching the Camera app...55 Advanced camera features...57 Using the Gallery...59 Viewing the photo location...59 Sharing files from the Gallery...59 Deleting files from the Gallery...59 Editing images...60 7 Staying connected Mobile network...61 Enabling the mobile network...

ZenFone Live L1 English Version E-manual
Page 7
... from the lower part of your ASUS Phone. ASUS ZenUI is a charming and intuitive interface exclusively for several apps that are integrated in vivid and high-quality photos and videos. It provides you with special apps, which are designed to check the apps available on the internal storage of your Home screen to optimize device performance, manage the phone power, storage usage and system notifications. Camera With PixelMaster technology...
... from the lower part of your ASUS Phone. ASUS ZenUI is a charming and intuitive interface exclusively for several apps that are integrated in vivid and high-quality photos and videos. It provides you with special apps, which are designed to check the apps available on the internal storage of your Home screen to optimize device performance, manage the phone power, storage usage and system notifications. Camera With PixelMaster technology...

ZenFone Live L1 English Version E-manual
Page 8
... SIM cards can cause the touch screen to FDD-LTE, and TD-LTE data service at a time. • The microSD card slot supports microSD and microSDXC card formats. If you use a screen protector, ensure that you want to use ASUS-compatible screen protectors. Audio jack Proximity sensor and light sensor Camera flash Receiver Front camera Nano SIM / microSD card slot LED indicator Touch screen display Eject hole Rear camera Camera flash Volume key Power key Micro USB port Microphone Speaker WARNING! • To avoid network connection...
... SIM cards can cause the touch screen to FDD-LTE, and TD-LTE data service at a time. • The microSD card slot supports microSD and microSDXC card formats. If you use a screen protector, ensure that you want to use ASUS-compatible screen protectors. Audio jack Proximity sensor and light sensor Camera flash Receiver Front camera Nano SIM / microSD card slot LED indicator Touch screen display Eject hole Rear camera Camera flash Volume key Power key Micro USB port Microphone Speaker WARNING! • To avoid network connection...
ZenFone Live L1 English Version E-manual
Page 9
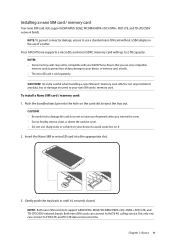
Installing a nano SIM card / memory card Your nano SIM card slots support GSM/GPRS/ EDGE, WCDMA/HSPA+/DC-HSPA+, FDD-LTE, and TD-LTE DSDV network bands. Ensure that you remove the cover. • Do not forcibly remove, shear, or distort the card slot cover. • Do not use of data, damage to your device to avoid scratches on the card slot to prevent loss of a cutter...
Installing a nano SIM card / memory card Your nano SIM card slots support GSM/GPRS/ EDGE, WCDMA/HSPA+/DC-HSPA+, FDD-LTE, and TD-LTE DSDV network bands. Ensure that you remove the cover. • Do not forcibly remove, shear, or distort the card slot cover. • Do not use of data, damage to your device to avoid scratches on the card slot to prevent loss of a cutter...
ZenFone Live L1 English Version E-manual
Page 14
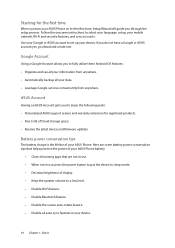
.... - Disable all auto-sync features in sleep mode. - Starting for the first time When you turn your ASUS Phone on for registered products. • Free 5 GB of Cloud storage space. • Receive the latest device and firmware updates. Disable the screen auto-rotate feature. - Follow the onscreen instructions to put the device in your mobile network, Wi-Fi and security features, and sync accounts. Close all running apps that helps preserve the power of your ASUS Phone. Google Account Using a Google Account allows...
.... - Disable all auto-sync features in sleep mode. - Starting for the first time When you turn your ASUS Phone on for registered products. • Free 5 GB of Cloud storage space. • Receive the latest device and firmware updates. Disable the screen auto-rotate feature. - Follow the onscreen instructions to put the device in your mobile network, Wi-Fi and security features, and sync accounts. Close all running apps that helps preserve the power of your ASUS Phone. Google Account Using a Google Account allows...
ZenFone Live L1 English Version E-manual
Page 28
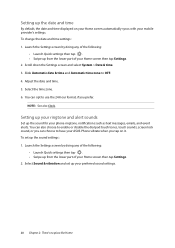
... disable the dial pad touch tones, touch sounds, screen lock sound, or you can opt to use the 24-hour format, if you tap on your Home screen automatically syncs with your mobile provider's settings. Select Sound & vibration and set up from the lower part of the following : •• Launch Quick settings then tap . •• Swipe up the sound settings: 1. Launch the Settings screen by doing any of your Home screen then tap Settings. 2. Slide Automatic date & time...
... disable the dial pad touch tones, touch sounds, screen lock sound, or you can opt to use the 24-hour format, if you tap on your Home screen automatically syncs with your mobile provider's settings. Select Sound & vibration and set up from the lower part of the following : •• Launch Quick settings then tap . •• Swipe up the sound settings: 1. Launch the Settings screen by doing any of your Home screen then tap Settings. 2. Slide Automatic date & time...
ZenFone Live L1 English Version E-manual
Page 29
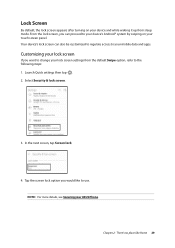
... your mobile data and apps. Select Security & lock screen. 3. In the next screen, tap Screen lock. 4. Launch Quick settings then tap . 2. Tap the screen lock option you can also be customized to regulate access to your device and while waking it up from the default Swipe option, refer to use. Lock Screen By default, the lock screen appears after turning on your touch screen panel. Your device's lock screen can proceed to change your ASUS Phone. From the lock screen, you would like Home...
... your mobile data and apps. Select Security & lock screen. 3. In the next screen, tap Screen lock. 4. Launch Quick settings then tap . 2. Tap the screen lock option you can also be customized to regulate access to your device and while waking it up from the default Swipe option, refer to use. Lock Screen By default, the lock screen appears after turning on your touch screen panel. Your device's lock screen can proceed to change your ASUS Phone. From the lock screen, you would like Home...
ZenFone Live L1 English Version E-manual
Page 41
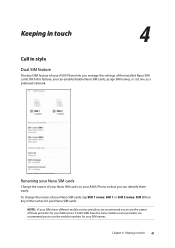
... ASUS Phone so that you can identify them easily. If both SIMs have different mobile service providers, we recommend you manage the settings of the installed Nano SIM cards. Renaming your Nano SIM cards Change the names of these providers for your SIM names. 4 Keeping in touch Keeping in touch 4 Call in the names for your Nano SIM cards. Chapter 4: Keeping in touch 41 With this feature, you can enable/disable...
... ASUS Phone so that you can identify them easily. If both SIMs have different mobile service providers, we recommend you manage the settings of the installed Nano SIM cards. Renaming your Nano SIM cards Change the names of these providers for your SIM names. 4 Keeping in touch Keeping in touch 4 Call in the names for your Nano SIM cards. Chapter 4: Keeping in touch 41 With this feature, you can enable/disable...
ZenFone Live L1 English Version E-manual
Page 42
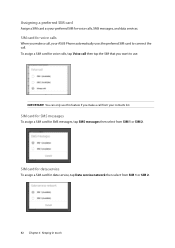
... feature if you want to connect the call. Assigning a preferred SIM card Assign a SIM card as your ASUS Phone automatically uses the preferred SIM card to use. To assign a SIM card for data service, tap Data service network then select from SIM 1 or SIM 2. 42 Chapter 4: Keeping in touch SIM card for data service To assign a SIM card for voice calls, tap Voice call from SIM 1 or SIM 2. SIM card for voice calls When you make a call then tap the SIM that you make a call, your preferred SIM for SMS messages, tap SMS messages then select from your contacts list.
... feature if you want to connect the call. Assigning a preferred SIM card Assign a SIM card as your ASUS Phone automatically uses the preferred SIM card to use. To assign a SIM card for data service, tap Data service network then select from SIM 1 or SIM 2. 42 Chapter 4: Keeping in touch SIM card for data service To assign a SIM card for voice calls, tap Voice call from SIM 1 or SIM 2. SIM card for voice calls When you make a call then tap the SIM that you make a call, your preferred SIM for SMS messages, tap SMS messages then select from your contacts list.
ZenFone Live L1 English Version E-manual
Page 47
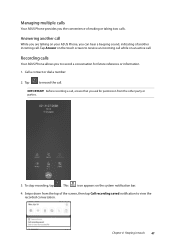
... record the call. IMPORTANT! This icon appears on an active call. Managing multiple calls Your ASUS Phone provides you the convenience of another incoming call. Before recording a call, ensure that you can hear a beeping sound, indicating of making or taking two calls. Chapter 4: Keeping in touch 47 Answering another call while on the system notification bar. 4. Tap to record a conversation for permission from the top of the screen, then tap Call recording saved notification to receive an incoming call...
... record the call. IMPORTANT! This icon appears on an active call. Managing multiple calls Your ASUS Phone provides you the convenience of another incoming call. Before recording a call, ensure that you can hear a beeping sound, indicating of making or taking two calls. Chapter 4: Keeping in touch 47 Answering another call while on the system notification bar. 4. Tap to record a conversation for permission from the top of the screen, then tap Call recording saved notification to receive an incoming call...
ZenFone Live L1 English Version E-manual
Page 48
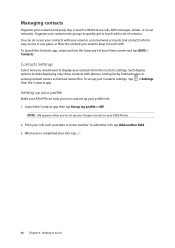
... groups to display your contacts from the Contacts settings. You can also sync your contacts with them via calls, SMS messages, emails, or social networks. To add other info, tap Add another field. 3. Managing contacts Organize your Home screen and tap ASUS > Contacts. Launch the Contacts app then tap Set up your Contacts settings, tap > Settings from the lower part of contacts. To launch the Contacts app, swipe up your profile info. 1. Setting up your profile Make your ASUS Phone truly your...
... groups to display your contacts from the Contacts settings. You can also sync your contacts with them via calls, SMS messages, emails, or social networks. To add other info, tap Add another field. 3. Managing contacts Organize your Home screen and tap ASUS > Contacts. Launch the Contacts app then tap Set up your Contacts settings, tap > Settings from the lower part of contacts. To launch the Contacts app, swipe up your profile info. 1. Setting up your profile Make your ASUS Phone truly your...
ZenFone Live L1 English Version E-manual
Page 49
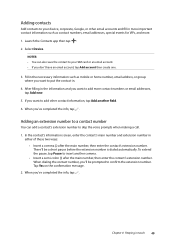
... enter the contact's extension number. If you want to add more . 1. In the contact's information screen, enter the contact's main number and extension number in touch 49 Fill in the neccessary information such as mobile or home number, email address, or group where you want to add other email accounts and fill in . 4. Adding an extension number to a contact number You can also save the contact to your device, corporate, Google, or other contact information, tap Add...
... enter the contact's extension number. If you want to add more . 1. In the contact's information screen, enter the contact's main number and extension number in touch 49 Fill in the neccessary information such as mobile or home number, email address, or group where you want to add other email accounts and fill in . 4. Adding an extension number to a contact number You can also save the contact to your device, corporate, Google, or other contact information, tap Add...

ZenFone Live L1 English Version E-manual
Page 54
... use Google Play Music. Once you've signed in to your account. Tap then tap Settings > Tap to the cloud for free. You can add to your own music library. You can also subscribe to Google Play Music for unlimited and ad-free access to millions of music files that you can also store up to 50,000 music files to choose account. 3. From the Home screen, Google > Play Music. 2. Google Play Music...
... use Google Play Music. Once you've signed in to your account. Tap then tap Settings > Tap to the cloud for free. You can add to your own music library. You can also subscribe to Google Play Music for unlimited and ad-free access to millions of music files that you can also store up to 50,000 music files to choose account. 3. From the Home screen, Google > Play Music. 2. Google Play Music...
ZenFone Live L1 English Version E-manual
Page 56
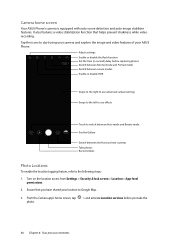
... settings Enable or disable the flash function Set the time (in second) delay before you have shared your ASUS Phone. From the Camera app's home screen, tap photo. > and activate Location services before capturing photos Switch between Normal mode and Portrait mode Switch between screen modes Enable or disable HDR Swipe to the right to use advanced camera settings Swipe to the left to use effects Touch to switch between Auto mode and Beauty mode See the Gallery Switch between the front and rear cameras Take photos Record videos Photo Locations...
... settings Enable or disable the flash function Set the time (in second) delay before you have shared your ASUS Phone. From the Camera app's home screen, tap photo. > and activate Location services before capturing photos Switch between Normal mode and Portrait mode Switch between screen modes Enable or disable HDR Swipe to the right to use advanced camera settings Swipe to the left to use effects Touch to switch between Auto mode and Beauty mode See the Gallery Switch between the front and rear cameras Take photos Record videos Photo Locations...
ZenFone Live L1 English Version E-manual
Page 61
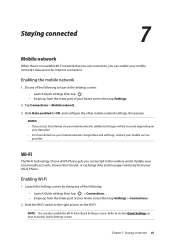
...; Launch Quick settings then tap > Connections. •• Swipe up from the lower part of your Home screen then tap Settings > Connections. 2. Chapter 7: Staying connected 61 Update your social media accounts, browse the Internet, or exchange data and messages wirelessly from your ASUS Phone gets you access the Internet via your mobile network, additional charges will be incurred depending on your data plan. • For more details on your mobile network charges/fees and setttings, contact your mobile network's data access for Internet connection...
...; Launch Quick settings then tap > Connections. •• Swipe up from the lower part of your Home screen then tap Settings > Connections. 2. Chapter 7: Staying connected 61 Update your social media accounts, browse the Internet, or exchange data and messages wirelessly from your ASUS Phone gets you access the Internet via your mobile network, additional charges will be incurred depending on your data plan. • For more details on your mobile network charges/fees and setttings, contact your mobile network's data access for Internet connection...

ZenFone Live L1 English Version E-manual
Page 64
... to help save battery power. Tethering When Wi-Fi service is not available, you can tether to your ASUS Phone for your Wi-Fi hotspot. Tap Hotspot & Tethering then slide Portable Wi-Fi hotspot to get Internet access on your laptop, tablet, and other devices. 1. IMPORTANT! Most mobile service providers may be able to use your ASUS Phone as a modem or turn it to launch the Settings screen...
... to help save battery power. Tethering When Wi-Fi service is not available, you can tether to your ASUS Phone for your Wi-Fi hotspot. Tap Hotspot & Tethering then slide Portable Wi-Fi hotspot to get Internet access on your laptop, tablet, and other devices. 1. IMPORTANT! Most mobile service providers may be able to use your ASUS Phone as a modem or turn it to launch the Settings screen...
ZenFone Live L1 English Version E-manual
Page 76
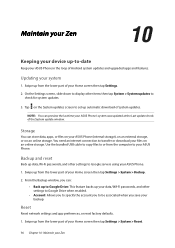
... updated at the Last update check: of your Home screen then tap Settings > System > Backup. 2. From the Backup window, you can store data, apps, or files on your ASUS Phone (internal storage), on an external storage, or on the System updates screen to your files on an online storage. You need an internet connection to be associated when you to transfer or download your ASUS Phone. Reset Reset network settings and app preferences, or reset factory defaults. 1. On the Settings screen, slide down to display other settings to check for system updates. 3. Storage...
... updated at the Last update check: of your Home screen then tap Settings > System > Backup. 2. From the Backup window, you can store data, apps, or files on your ASUS Phone (internal storage), on an external storage, or on the System updates screen to your files on an online storage. You need an internet connection to be associated when you to transfer or download your ASUS Phone. Reset Reset network settings and app preferences, or reset factory defaults. 1. On the Settings screen, slide down to display other settings to check for system updates. 3. Storage...
ZenFone Live L1 English Version E-manual
Page 85
...; 63 - camera home screen 56 - see Extension number 43 - bookmarking pages 34 - clearing the browser cache 34 - alarm clock 68 - stopwatch 69 - setting up your last-called number 46 - assigning 42 - SIM card for data service 42 - disabling 25 - dialing 43 F Face Unlock 30 Favorite contacts 45 - editing images 60 - turning on/off 13 B Backup and reset...
...; 63 - camera home screen 56 - see Extension number 43 - bookmarking pages 34 - clearing the browser cache 34 - alarm clock 68 - stopwatch 69 - setting up your last-called number 46 - assigning 42 - SIM card for data service 42 - disabling 25 - dialing 43 F Face Unlock 30 Favorite contacts 45 - editing images 60 - turning on/off 13 B Backup and reset...
ZenFone Live L1 English Version E-manual
Page 86
Editing or removing reminders 37 Google Messenger 52 - connecting 53 Home screen 18 - see also Advanced camera features 57 Touchscreen 15 - using Kids Mode 26 L Lock screen 29 - saving to messages 52 - removing 10 Notifications 20 P Panorama - adding or removing buttons 19 R Ringtone 28 - Sound & Vibration 28 S Security 77 Smart Dialing 44 Social networking 51 Sound Recorder...
Editing or removing reminders 37 Google Messenger 52 - connecting 53 Home screen 18 - see also Advanced camera features 57 Touchscreen 15 - using Kids Mode 26 L Lock screen 29 - saving to messages 52 - removing 10 Notifications 20 P Panorama - adding or removing buttons 19 R Ringtone 28 - Sound & Vibration 28 S Security 77 Smart Dialing 44 Social networking 51 Sound Recorder...


