

P4SP-MX User Manual
Page 7
...-MX specification summary* CPU Chipset Front Side Bus (FSB) Memory Expansion slots VGA Storage Audio LAN Special features Rear panel I/O Internal I/O BIOS features Socket 478 for Intel® Pentium® 4/Celeron processor Intel® Hyper-Threading technology ready New power design for next generation Intel® Prescott CPU SiS651 Northbridge SiS962L Southbridge 533/400MHz 2 x 184-pin DDR DIMM sockets for two additional USB ports CPU and chassis fan connectors 20-pin/4-pin ATX 12V power connectors CD/AUX audio connectors GAME/MIDI connector Front panel audio connector Serial...
...-MX specification summary* CPU Chipset Front Side Bus (FSB) Memory Expansion slots VGA Storage Audio LAN Special features Rear panel I/O Internal I/O BIOS features Socket 478 for Intel® Pentium® 4/Celeron processor Intel® Hyper-Threading technology ready New power design for next generation Intel® Prescott CPU SiS651 Northbridge SiS962L Southbridge 533/400MHz 2 x 184-pin DDR DIMM sockets for two additional USB ports CPU and chassis fan connectors 20-pin/4-pin ATX 12V power connectors CD/AUX audio connectors GAME/MIDI connector Front panel audio connector Serial...

P4SP-MX User Manual
Page 11
... MuTIOL® Media I /O functions including dual-channel DMA133 bus master IDE, USB 2.0/1.1, Ethernet, and audio controllers. Integrated 2D/3D graphic engine Embedded in the Northbridge is also available at speeds of -the-art DLS2 MIDI synthesizer with the onboard Realtek LAN PHY to 480 Mbps connection speed. The integrated controller works with Yamaha DLSbyXG sound set, 5.1 Virtual Theater™ and supports all major game audio technologies including Microsoft DirectX™8.0, Microsoft...
... MuTIOL® Media I /O functions including dual-channel DMA133 bus master IDE, USB 2.0/1.1, Ethernet, and audio controllers. Integrated 2D/3D graphic engine Embedded in the Northbridge is also available at speeds of -the-art DLS2 MIDI synthesizer with the onboard Realtek LAN PHY to 480 Mbps connection speed. The integrated controller works with Yamaha DLSbyXG sound set, 5.1 Virtual Theater™ and supports all major game audio technologies including Microsoft DirectX™8.0, Microsoft...

P4SP-MX User Manual
Page 16
...; Hyper-Threading Technology is recommended that should match a specific corner of the CPU socket. ® P4SP-MX P4SP-MX Socket 478 Gold Arrow Incorrect installation of the CPU into the socket may bend the pins and severely damage the CPU! This mark indicates the processor Pin 1 that you are using any other operating systems, disable the Hyper-Threading Techonology item in BIOS before installing a supported operating system...
...; Hyper-Threading Technology is recommended that should match a specific corner of the CPU socket. ® P4SP-MX P4SP-MX Socket 478 Gold Arrow Incorrect installation of the CPU into the socket may bend the pins and severely damage the CPU! This mark indicates the processor Pin 1 that you are using any other operating systems, disable the Hyper-Threading Techonology item in BIOS before installing a supported operating system...
P4SP-MX User Manual
Page 20
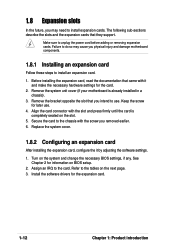
... an IRQ to the tables on the system and change the necessary BIOS settings, if any. Failure to do so may need to install expansion cards. See Chapter 2 for the card. 2. Install the software drivers for later use . Remove the bracket opposite the slot that they support. Align the card connector with it by adjusting the software settings. 1. 1.8 Expansion slots In the future, you may cause you physical injury...
... an IRQ to the tables on the system and change the necessary BIOS settings, if any. Failure to do so may need to install expansion cards. See Chapter 2 for the card. 2. Install the software drivers for later use . Remove the bracket opposite the slot that they support. Align the card connector with it by adjusting the software settings. 1. 1.8 Expansion slots In the future, you may cause you physical injury...

P4SP-MX User Manual
Page 23
... boot failure! ® P4SP-MX CLRTC1 12 23 Normal (Default) Clear CMOS P4SP-MX Clear RTC RAM Setting ASUS P4SP-MX motherboard user guide 1-15 Clear RTC RAM (CLRTC1) This jumper allows you to pins 2-3. Plug the power cord and turn ON the computer. 4. 1.9 Jumpers 1. Move the jumper cap from pins 1-2 (default) to clear the Real Time Clock (RTC) RAM in CMOS, that include system setup information such as system passwords, is powered by erasing the CMOS RTC RAM data. Except when clearing...
... boot failure! ® P4SP-MX CLRTC1 12 23 Normal (Default) Clear CMOS P4SP-MX Clear RTC RAM Setting ASUS P4SP-MX motherboard user guide 1-15 Clear RTC RAM (CLRTC1) This jumper allows you to pins 2-3. Plug the power cord and turn ON the computer. 4. 1.9 Jumpers 1. Move the jumper cap from pins 1-2 (default) to clear the Real Time Clock (RTC) RAM in CMOS, that include system setup information such as system passwords, is powered by erasing the CMOS RTC RAM data. Except when clearing...
P4SP-MX User Manual
Page 25
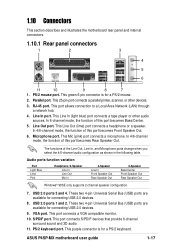
...a Local Area Network (LAN) through a network hub. 4. Line Out port. These two 4-pin Universal Serial Bus (USB) ports are available for connecting USB 2.0 devices. 8. These two 4-pin Universal Serial Bus (USB) ports are available for connecting USB 2.0 devices. 9. This port connects a VGA compatible monitor. 10. RJ-45 port. This Line In (light blue) port connects a tape player or other devices. 3. This Mic (pink) port connects a microphone. In 4/6-channel mode, the function of this port becomes Front Speaker Out. 6. Audio ports function variation Port Light Blue Lime...
...a Local Area Network (LAN) through a network hub. 4. Line Out port. These two 4-pin Universal Serial Bus (USB) ports are available for connecting USB 2.0 devices. 8. These two 4-pin Universal Serial Bus (USB) ports are available for connecting USB 2.0 devices. 9. This port connects a VGA compatible monitor. 10. RJ-45 port. This Line In (light blue) port connects a tape player or other devices. 3. This Mic (pink) port connects a microphone. In 4/6-channel mode, the function of this port becomes Front Speaker Out. 6. Audio ports function variation Port Light Blue Lime...
P4SP-MX User Manual
Page 36
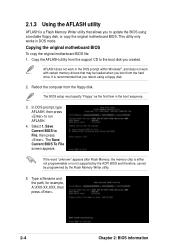
... floppy disk, or copy the original motherboard BIOS. It is not supported by the Flash Memory Writer utility. 5. In DOS prompt, type AFLASH, then press to the boot disk you created. AFLASH does not work in the DOS prompt within Windows®, and does not work with certain memory drivers that may be programmed by the ACPI BIOS and therefore, cannot be loaded when you to File, then press . The BIOS setup...
... floppy disk, or copy the original motherboard BIOS. It is not supported by the Flash Memory Writer utility. 5. In DOS prompt, type AFLASH, then press to the boot disk you created. AFLASH does not work in the DOS prompt within Windows®, and does not work with certain memory drivers that may be programmed by the ACPI BIOS and therefore, cannot be loaded when you to File, then press . The BIOS setup...

P4SP-MX User Manual
Page 38
If this happens, call the ASUS Technical Support for assistance. 2.1.4 Recovering the BIOS with CrashFree BIOS The CrashFree BIOS auto recovery tool allows you to a bootable floppy disk, you downloaded from the ASUS website has a different filename (e.g. When a corrupted BIOS is found. 2-6 Chapter 2: BIOS information Starting BIOS recovery... Checking for this motherboard, install a VGA card in case the current BIOS on this motherboard (P4SPMX.BIN). The BIOS update process continues when the P4S800MX.BIN is detected, the...
If this happens, call the ASUS Technical Support for assistance. 2.1.4 Recovering the BIOS with CrashFree BIOS The CrashFree BIOS auto recovery tool allows you to a bootable floppy disk, you downloaded from the ASUS website has a different filename (e.g. When a corrupted BIOS is found. 2-6 Chapter 2: BIOS information Starting BIOS recovery... Checking for this motherboard, install a VGA card in case the current BIOS on this motherboard (P4SPMX.BIN). The BIOS update process continues when the P4S800MX.BIN is detected, the...

P4SP-MX User Manual
Page 39
... Windows desktop by clicking Start > Programs > ASUS > ASUSUpdate > ASUSUpdate. Select your system. Bad BIOS checksum. Reading file "P4SPMX.BIN". This utility is a utility that comes with the motherboard package. Checking for the Utilities menu screen. 3. Start flashing... ASUS Update requires an Internet connection either through a network or an Internet Service Provider (ISP). Click the Utilities tab, then click Install ASUS Update VX.XX.XX. The ASUS Update initial screen appears. 2. Doing so may cause system boot failure! 4. When the BIOS update...
... Windows desktop by clicking Start > Programs > ASUS > ASUSUpdate > ASUSUpdate. Select your system. Bad BIOS checksum. Reading file "P4SPMX.BIN". This utility is a utility that comes with the motherboard package. Checking for the Utilities menu screen. 3. Start flashing... ASUS Update requires an Internet connection either through a network or an Internet Service Provider (ISP). Click the Utilities tab, then click Install ASUS Update VX.XX.XX. The ASUS Update initial screen appears. 2. Doing so may cause system boot failure! 4. When the BIOS update...
P4SP-MX User Manual
Page 41
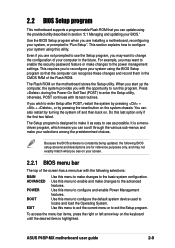
... your screen. 2.2.1 BIOS menu bar The top of the Flash ROM. This section explains how to configure your system using the BIOS Setup program so that you can scroll through the various sub-menus and make changes to the basic system configuration. Use this menu to configure the default system device used to locate and load the Operating System. ASUS P4SP-MX motherboard user guide 2-9 Even if you are installing a motherboard, reconfiguring your BIOS." Use the BIOS Setup program...
... your screen. 2.2.1 BIOS menu bar The top of the Flash ROM. This section explains how to configure your system using the BIOS Setup program so that you can scroll through the various sub-menus and make changes to the basic system configuration. Use this menu to configure the default system device used to locate and load the Operating System. ASUS P4SP-MX motherboard user guide 2-9 Even if you are installing a motherboard, reconfiguring your BIOS." Use the BIOS Setup program...

P4SP-MX User Manual
Page 44
... [Enabled]. The BIOS Setup program allows you to halt. Halt On [All Errors] This field specifies the types of 1.2MB (as above appears. To set passwords. The passwords control access to clear the RTC RAM. If you need to support older Japanese floppy drives. Refer to section "1.9 Jumpers" on a 3.5-inch diskette. Configuration options: [None] [360K, 5.25 in.] [1.2M , 5.25 in.] [720K , 3.5 in.] [1.44M, 3.5 in.] [2.88M, 3.5 in.] Floppy 3 Mode Support [Disabled] This is set...
... [Enabled]. The BIOS Setup program allows you to halt. Halt On [All Errors] This field specifies the types of 1.2MB (as above appears. To set passwords. The passwords control access to clear the RTC RAM. If you need to support older Japanese floppy drives. Refer to section "1.9 Jumpers" on a 3.5-inch diskette. Configuration options: [None] [360K, 5.25 in.] [1.2M , 5.25 in.] [720K , 3.5 in.] [1.44M, 3.5 in.] [2.88M, 3.5 in.] Floppy 3 Mode Support [Disabled] This is set...
P4SP-MX User Manual
Page 46
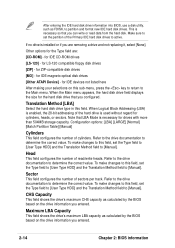
After entering the IDE hard disk drive information into BIOS, use a disk utility, such as calculated by the BIOS based on this field, set the Type field to [User Type HDD] and the Translation Method field to determine the correct value. This is necessary so that LBA Mode is enabled, the 28-bit addressing of the Primary IDE hard disk drives to set the Type field to [User Type HDD] and the Translation Method field to the Main menu. Note...
After entering the IDE hard disk drive information into BIOS, use a disk utility, such as calculated by the BIOS based on this field, set the Type field to [User Type HDD] and the Translation Method field to determine the correct value. This is necessary so that LBA Mode is enabled, the 28-bit addressing of the Primary IDE hard disk drives to set the Type field to [User Type HDD] and the Translation Method field to the Main menu. Note...

P4SP-MX User Manual
Page 47
...documentation that utilizes internal hard disk drive monitoring technology. Set to [Disabled] to enable or disable the S.M.A.R.T. (Self-Monitoring, Analysis and Reporting Technology) system that came with the hard drive to [User Type HDD]. Configuration options: [Disabled] [2 Sectors] [4 Sectors] [8 Sectors] [16 Sectors] [32 Sectors] [Maximum] SMART Monitoring [Disabled] This field allows you set value may also manually configure this field is normally disabled because the resources used in performance. Configuration options: [Disabled] [Enabled] PIO Mode [4] This option lets you...
...documentation that utilizes internal hard disk drive monitoring technology. Set to [Disabled] to enable or disable the S.M.A.R.T. (Self-Monitoring, Analysis and Reporting Technology) system that came with the hard drive to [User Type HDD]. Configuration options: [Disabled] [2 Sectors] [4 Sectors] [8 Sectors] [16 Sectors] [32 Sectors] [Maximum] SMART Monitoring [Disabled] This field allows you set value may also manually configure this field is normally disabled because the resources used in performance. Configuration options: [Disabled] [Enabled] PIO Mode [4] This option lets you...
P4SP-MX User Manual
Page 49
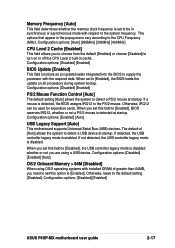
... detected, the USB controller legacy mode is disabled whether or not you are using OS/2 operating systems with installed DRAM of [Auto] allows the system to the CPU Frequency (MHz). Configuration options: [Disabled] [Enabled] ASUS P4SP-MX motherboard user guide 2-17 Configuration options: [Disabled] [Enabled] BIOS Update [Enabled] This field functions as an update loader integrated into the BIOS to supply the processor with respect to the system frequency. When set to be used for expansion cards. When you set this field to [Enabled], BIOS reserves IRQ12...
... detected, the USB controller legacy mode is disabled whether or not you are using OS/2 operating systems with installed DRAM of [Auto] allows the system to the CPU Frequency (MHz). Configuration options: [Disabled] [Enabled] ASUS P4SP-MX motherboard user guide 2-17 Configuration options: [Disabled] [Enabled] BIOS Update [Enabled] This field functions as an update loader integrated into the BIOS to supply the processor with respect to the system frequency. When set to be used for expansion cards. When you set this field to [Enabled], BIOS reserves IRQ12...
P4SP-MX User Manual
Page 51
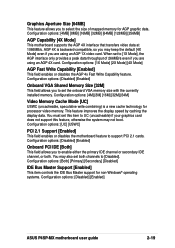
... Bus Master support for processor video memory. When set both channels to enable either the primary IDE channel or secondary IDE channel, or both. Configuration options: [1X Mode] [2X Mode] [4X Mode] AGP Fast Write Capability [Enabled] This field enables or disables the AGP 4x Fast Write Capability feature. Configuration options: [Disabled] [Enabled] Onboard PCI IDE [Both] This field allows you are using an AGP 1X video card. AGP 4X is a new cache technology for non-Windows® operating systems. Configuration options: [Disabled] [Enabled] ASUS P4SP-MX motherboard user guide...
... Bus Master support for processor video memory. When set both channels to enable either the primary IDE channel or secondary IDE channel, or both. Configuration options: [1X Mode] [2X Mode] [4X Mode] AGP Fast Write Capability [Enabled] This field enables or disables the AGP 4x Fast Write Capability feature. Configuration options: [Disabled] [Enabled] Onboard PCI IDE [Both] This field allows you are using an AGP 1X video card. AGP 4X is a new cache technology for non-Windows® operating systems. Configuration options: [Disabled] [Enabled] ASUS P4SP-MX motherboard user guide...
P4SP-MX User Manual
Page 53
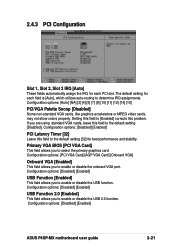
...you to enable or disable the USB 2.0 function. Configuration options: [Disabled] [Enabled] PCI Latency Timer [32] Leave this field to the default setting [32] for each PCI slot. 2.4.3 PCI Configuration Slot 1, Slot 2, Slot 3 IRQ [Auto] These fields automatically assign the IRQ for each field is [Auto], which utilizes auto-routing to determine IRQ assignments. Configuration options: [Disabled] [Enabled] USB Function 2.0 [Enabled] This field allows you to enable or disable the onboard VGA port. Configuration options: [Disabled] [Enabled] ASUS P4SP-MX motherboard user guide 2-21 The...
...you to enable or disable the USB 2.0 function. Configuration options: [Disabled] [Enabled] PCI Latency Timer [32] Leave this field to the default setting [32] for each PCI slot. 2.4.3 PCI Configuration Slot 1, Slot 2, Slot 3 IRQ [Auto] These fields automatically assign the IRQ for each field is [Auto], which utilizes auto-routing to determine IRQ assignments. Configuration options: [Disabled] [Enabled] USB Function 2.0 [Enabled] This field allows you to enable or disable the onboard VGA port. Configuration options: [Disabled] [Enabled] ASUS P4SP-MX motherboard user guide 2-21 The...
P4SP-MX User Manual
Page 54
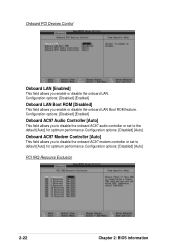
... This field allows you to disable the onboard AC97 audio controller or set to the default [Auto] for optimum performance. Configuration options: [Disabled] [Auto] PCI IRQ Resource Exclusion 2-22 Chapter 2: BIOS information Configuration options: [Disabled] [Enabled] Onboard LAN Boot ROM [Disabled] This field allows you enable or disable the onboard LAN. Onboard PCI Devices Control Onboard LAN [Enabled] This field allows you enable or disable the onboard LAN Boot ROM feature. Configuration options: [Disabled] [Enabled] Onboard AC97 Audio Controller [Auto] This field allows you to...
... This field allows you to disable the onboard AC97 audio controller or set to the default [Auto] for optimum performance. Configuration options: [Disabled] [Auto] PCI IRQ Resource Exclusion 2-22 Chapter 2: BIOS information Configuration options: [Disabled] [Enabled] Onboard LAN Boot ROM [Disabled] This field allows you enable or disable the onboard LAN. Onboard PCI Devices Control Onboard LAN [Enabled] This field allows you enable or disable the onboard LAN Boot ROM feature. Configuration options: [Disabled] [Enabled] Onboard AC97 Audio Controller [Auto] This field allows you to...
P4SP-MX User Manual
Page 59
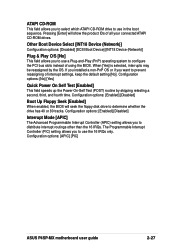
... OS or if you to use the 16 IRQs only. Configuration options: [APIC] [PIC] ASUS P4SP-MX motherboard user guide 2-27 Pressing [Enter] will seek the floppy disk drive to determine whether the drive has 40 or 80 tracks. Configuration options: [Enabled] [Disabled] Interrupt Mode [APIC] The Advanced Programmable Interrupt Controller (APIC) setting allows you to use in the boot sequence. Other Boot Device Select [INT18 Device (Network)] Configuration options: [Disabled] [SCSI Boot Device] [INT18 Device (Network)] Plug & Play O/S [No] This field allows...
... OS or if you to use the 16 IRQs only. Configuration options: [APIC] [PIC] ASUS P4SP-MX motherboard user guide 2-27 Pressing [Enter] will seek the floppy disk drive to determine whether the drive has 40 or 80 tracks. Configuration options: [Enabled] [Disabled] Interrupt Mode [APIC] The Advanced Programmable Interrupt Controller (APIC) setting allows you to use in the boot sequence. Other Boot Device Select [INT18 Device (Network)] Configuration options: [Disabled] [SCSI Boot Device] [INT18 Device (Network)] Plug & Play O/S [No] This field allows...

P4SP-MX User Manual
Page 62
... install the latest OS version and corresponding updates so you can maximize the features of the support CD to change at any time without notice. Visit the ASUS website for updates. 3.2.1 Running the support CD Place the support CD to run the CD. 3-2 Chapter 3: Software support Because motherboard settings and hardware options vary, use the setup procedures presented in your hardware. The CD automatically displays the Installation Items window...
... install the latest OS version and corresponding updates so you can maximize the features of the support CD to change at any time without notice. Visit the ASUS website for updates. 3.2.1 Running the support CD Place the support CD to run the CD. 3-2 Chapter 3: Software support Because motherboard settings and hardware options vary, use the setup procedures presented in your hardware. The CD automatically displays the Installation Items window...

P4SP-MX User Manual
Page 63
... to install the 650/651 driver for the SiS chipset. Click the button to download the latest version of the BIOS from the ASUS website. Install the necessary drivers to load the installation wizard and install the SiS AGP driver for ASUS Update installation and use. See page 2-7 for the onboard VGA. SiS Mini IDE Driver Click this motherboard supports. SiS 650/651 Display Driver Click this item to activate the devices on any detected problems. This utility helps...
... to install the 650/651 driver for the SiS chipset. Click the button to download the latest version of the BIOS from the ASUS website. Install the necessary drivers to load the installation wizard and install the SiS AGP driver for ASUS Update installation and use. See page 2-7 for the onboard VGA. SiS Mini IDE Driver Click this motherboard supports. SiS 650/651 Display Driver Click this item to activate the devices on any detected problems. This utility helps...


