

Motherboard DIY Troubleshooting Guide
Page 35
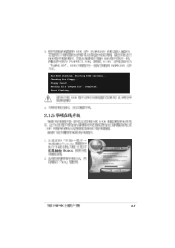
Start flashing... Checking for floppy... Rebooting. 2-3 Floppy found! Reading file "p4spmx.bin". Starting BIOS recovery... Completed. Flashed successfully. Checking for floppy... • • User recovery requested. User recovery requested. Starting BIOS recovery...
Start flashing... Checking for floppy... Rebooting. 2-3 Floppy found! Reading file "p4spmx.bin". Starting BIOS recovery... Completed. Flashed successfully. Checking for floppy... • • User recovery requested. User recovery requested. Starting BIOS recovery...

Motherboard DIY Troubleshooting Guide
Page 38
Starting BIOS recovery... Checking for floppy... 2-6 Bad BIOS checksum.
Starting BIOS recovery... Checking for floppy... 2-6 Bad BIOS checksum.
Motherboard DIY Troubleshooting Guide
Page 39
Floppy found! Checking for floppy... Reading file "p4spmx.bin". Completed. Start flashing... 2-7 Starting BIOS recovery... Bad BIOS checksum.
Floppy found! Checking for floppy... Reading file "p4spmx.bin". Completed. Start flashing... 2-7 Starting BIOS recovery... Bad BIOS checksum.
P4SP-MX User Manual
Page 4
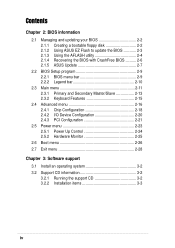
Safeguards Contents Chapter 2: BIOS information 2.1 Managing and updating your BIOS 2-2 2.1.1 2.1.2 2.1.3 2.1.4 2.1.5 Creating a bootable floppy disk 2-2 Using ASUS EZ Flash to update the BIOS 2-3 Using the AFLASH utility 2-4 Recovering the BIOS with CrashFree BIOS .......... 2-6 ASUS Update 2-7 2.2 BIOS Setup program 2-9 2.2.1 BIOS menu bar 2-9 2.2.2 Legend bar 2-10 2.3 Main menu 2-11 2.3.1 Primary and Secondary Master/Slave 2-13 2.3.2 Keyboard Features 2-15 2.4 Advanced menu 2-16 2.4.1 Chip Configuration...
Safeguards Contents Chapter 2: BIOS information 2.1 Managing and updating your BIOS 2-2 2.1.1 2.1.2 2.1.3 2.1.4 2.1.5 Creating a bootable floppy disk 2-2 Using ASUS EZ Flash to update the BIOS 2-3 Using the AFLASH utility 2-4 Recovering the BIOS with CrashFree BIOS .......... 2-6 ASUS Update 2-7 2.2 BIOS Setup program 2-9 2.2.1 BIOS menu bar 2-9 2.2.2 Legend bar 2-10 2.3 Main menu 2-11 2.3.1 Primary and Secondary Master/Slave 2-13 2.3.2 Keyboard Features 2-15 2.4 Advanced menu 2-16 2.4.1 Chip Configuration...

P4SP-MX User Manual
Page 7
TCAV PnP features, SM BIOS 2.3, WfM 2.0, ASUS CrashFree BIOS, ASUS EZ Flash * Specifications are subject to 2GB memory Supports PC2700/2100/1600 unbuffered non-ECC DDR DIMMs. 1 x AGP 4X...specification summary* CPU Chipset Front Side Bus (FSB) Memory Expansion slots VGA Storage Audio LAN Special features Rear panel I/O Internal I/O BIOS features Socket 478 for Intel® Pentium® 4/Celeron processor Intel® Hyper-Threading technology ready New power design for next ... connector Front panel audio connector Serial (COM1) connector Panel connector 2Mb Flash ROM, DMI 2.0, Award BIOS.
TCAV PnP features, SM BIOS 2.3, WfM 2.0, ASUS CrashFree BIOS, ASUS EZ Flash * Specifications are subject to 2GB memory Supports PC2700/2100/1600 unbuffered non-ECC DDR DIMMs. 1 x AGP 4X...specification summary* CPU Chipset Front Side Bus (FSB) Memory Expansion slots VGA Storage Audio LAN Special features Rear panel I/O Internal I/O BIOS features Socket 478 for Intel® Pentium® 4/Celeron processor Intel® Hyper-Threading technology ready New power design for next ... connector Front panel audio connector Serial (COM1) connector Panel connector 2Mb Flash ROM, DMI 2.0, Award BIOS.
P4SP-MX User Manual
Page 12
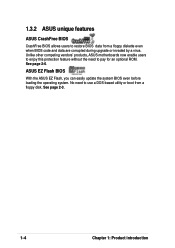
... upgrade or invaded by a virus. No need to pay for an optional ROM. See page 2-3. 1-4 Chapter 1: Product introduction 1.3.2 ASUS unique features ASUS CrashFree BIOS CrashFree BIOS allows users to restore BIOS data from a floppy disk. See page 2-6. ASUS EZ Flash BIOS With the ASUS EZ Flash, you can easily update the system BIOS even before loading the operating system.
... upgrade or invaded by a virus. No need to pay for an optional ROM. See page 2-3. 1-4 Chapter 1: Product introduction 1.3.2 ASUS unique features ASUS CrashFree BIOS CrashFree BIOS allows users to restore BIOS data from a floppy disk. See page 2-6. ASUS EZ Flash BIOS With the ASUS EZ Flash, you can easily update the system BIOS even before loading the operating system.

P4SP-MX User Manual
Page 14
... CMOS Power AD1888 CHA_FAN1 SB_PWR1 FP_AUDIO1 PCI Slot 1 ® PCI Slot 2 P4SP-MX PCI Slot 3 FLOPPY1 USB_56 SiS962L MuTIOL Media I/0 USBPWR_56 Super I/O CLRTC1 2Mbit Flash BIOS GAME1 COM1 PANEL1 USBPWR_34 USBPWR_12 12 23 +5V (Default) +5VSB USBPWR_56 12 23 +5V (Default) +5VSB CLRTC1 12 23 Normal (Default) Clear CMOS PLED+ PLED...
... CMOS Power AD1888 CHA_FAN1 SB_PWR1 FP_AUDIO1 PCI Slot 1 ® PCI Slot 2 P4SP-MX PCI Slot 3 FLOPPY1 USB_56 SiS962L MuTIOL Media I/0 USBPWR_56 Super I/O CLRTC1 2Mbit Flash BIOS GAME1 COM1 PANEL1 USBPWR_34 USBPWR_12 12 23 +5V (Default) +5VSB USBPWR_56 12 23 +5V (Default) +5VSB CLRTC1 12 23 Normal (Default) Clear CMOS PLED+ PLED...

P4SP-MX User Manual
Page 16
...• Make sure to compile the code. Under Linux, use the Hyper-Threading compliler to enable the Hyper-Threading Technology item in BIOS to ensure system stability and performance. • It is supported under Windows XP and Linux 2.4.x (kernel) and later versions only.... This mark indicates the processor Pin 1 that you are using any other operating systems, disable the Hyper-Threading Techonology item in BIOS before installing a supported operating system. • For more information on Hyper-Threading Technology, visit www.intel.com/ info/hyperthreading. 1-8 Chapter...
...• Make sure to compile the code. Under Linux, use the Hyper-Threading compliler to enable the Hyper-Threading Technology item in BIOS to ensure system stability and performance. • It is supported under Windows XP and Linux 2.4.x (kernel) and later versions only.... This mark indicates the processor Pin 1 that you are using any other operating systems, disable the Hyper-Threading Techonology item in BIOS before installing a supported operating system. • For more information on Hyper-Threading Technology, visit www.intel.com/ info/hyperthreading. 1-8 Chapter...
P4SP-MX User Manual
Page 20
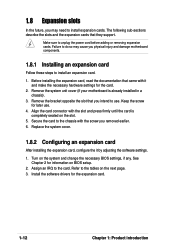
Remove the system unit cover (if your motherboard is completely seated on BIOS setup. 2. Remove the bracket opposite the slot that you may cause you removed earlier. 6. 1.8 Expansion slots In the future, you intend to use . 4. Make sure ... settings for later use . Refer to install expansion cards. Failure to do so may need to the tables on the system and change the necessary BIOS settings, if any. Keep the screw for the card. 2. Align the card connector with the screw you physical injury and damage motherboard components. 1.8.1 Installing an...
Remove the system unit cover (if your motherboard is completely seated on BIOS setup. 2. Remove the bracket opposite the slot that you may cause you removed earlier. 6. 1.8 Expansion slots In the future, you intend to use . 4. Make sure ... settings for later use . Refer to install expansion cards. Failure to do so may need to the tables on the system and change the necessary BIOS settings, if any. Keep the screw for the card. 2. Align the card connector with the screw you physical injury and damage motherboard components. 1.8.1 Installing an...

P4SP-MX User Manual
Page 23
... cord. 2. Removing the cap will cause system boot failure! ® P4SP-MX CLRTC1 12 23 Normal (Default) Clear CMOS P4SP-MX Clear RTC RAM Setting ASUS P4SP-MX motherboard user guide 1-15 1.9 Jumpers 1. Move the jumper cap from pins 1-2 (default) to re-enter data. To erase the RTC RAM: 1. ...Keep the cap on CLRTC1 jumper default position. Hold down the key during the boot process and enter BIOS setup to pins 2-3. Clear RTC RAM (CLRTC1) This jumper allows you to pins 1-2. 3. You can clear the CMOS memory of date, time, and ...
... cord. 2. Removing the cap will cause system boot failure! ® P4SP-MX CLRTC1 12 23 Normal (Default) Clear CMOS P4SP-MX Clear RTC RAM Setting ASUS P4SP-MX motherboard user guide 1-15 1.9 Jumpers 1. Move the jumper cap from pins 1-2 (default) to re-enter data. To erase the RTC RAM: 1. ...Keep the cap on CLRTC1 jumper default position. Hold down the key during the boot process and enter BIOS setup to pins 2-3. Clear RTC RAM (CLRTC1) This jumper allows you to pins 1-2. 3. You can clear the CMOS memory of date, time, and ...
P4SP-MX User Manual
Page 31
The read or write activities of any device connected to the primary or secondary IDE connector cause this LED to the hard disk activity LED. ASUS P4SP-MX motherboard user guide 1-23 Pressing the power switch while in the ON mode for more than 4 seconds turns the system OFF. • Reset ... a switch that controls the system power. Pressing the power switch turns the system between ON and SLEEP, or ON and SOFT OFF, depending on the BIOS or OS settings.
The read or write activities of any device connected to the primary or secondary IDE connector cause this LED to the hard disk activity LED. ASUS P4SP-MX motherboard user guide 1-23 Pressing the power switch while in the ON mode for more than 4 seconds turns the system OFF. • Reset ... a switch that controls the system power. Pressing the power switch turns the system between ON and SLEEP, or ON and SOFT OFF, depending on the BIOS or OS settings.
P4SP-MX User Manual
Page 33
Detailed descriptions of the BIOS parameters are also provided. BIOS information Chapter 2 This chapter tells how to change system settings through the BIOS Setup menus.
Detailed descriptions of the BIOS parameters are also provided. BIOS information Chapter 2 This chapter tells how to change system settings through the BIOS Setup menus.
P4SP-MX User Manual
Page 34
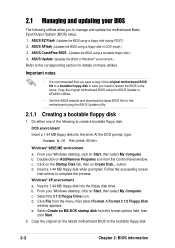
...in the future. From your Windows desktop, click on Start, then select My Computer. c. Select the 3 1/2 Floppy Drive icon. ASUS CrashFree BIOS (Updates the BIOS using a floppy disk during POST.) 2. At the DOS prompt, type: format A:/S then press . From your Windows desktop, click ...the drive. d. Select Create an MS-DOS startup disk from the menu, then select Format. ASUS EZ Flash (Updates the BIOS using a bootable floppy disk.) 4. ASUS AFlash (Updates the BIOS using a floppy disk in Windows® environment.) Refer to manage and update the motherboard Basic...
...in the future. From your Windows desktop, click on Start, then select My Computer. c. Select the 3 1/2 Floppy Drive icon. ASUS CrashFree BIOS (Updates the BIOS using a floppy disk during POST.) 2. At the DOS prompt, type: format A:/S then press . From your Windows desktop, click ...the drive. d. Select Create an MS-DOS startup disk from the menu, then select Format. ASUS EZ Flash (Updates the BIOS using a bootable floppy disk.) 4. ASUS AFlash (Updates the BIOS using a floppy disk in Windows® environment.) Refer to manage and update the motherboard Basic...
P4SP-MX User Manual
Page 35
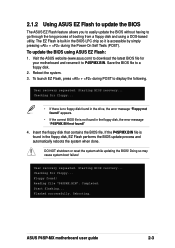
... launch EZ Flash, press + during the Power-On Self Tests (POST). User recovery requested. Floppy found in the BIOS LPC chip so it to P4SPMX.BIN. Visit the ASUS website (www.asus.com) to download the latest BIOS file for floppy... Doing so may cause system boot failure! Insert the floppy disk that contains the...
... launch EZ Flash, press + during the Power-On Self Tests (POST). User recovery requested. Floppy found in the BIOS LPC chip so it to P4SPMX.BIN. Visit the ASUS website (www.asus.com) to download the latest BIOS file for floppy... Doing so may cause system boot failure! Insert the floppy disk that contains the...
P4SP-MX User Manual
Page 36
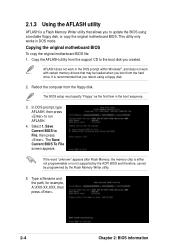
... or is recommended that you boot from the hard drive. Copy the AFLASH utility from the floppy disk. The BIOS setup must specify "Floppy" as the first item in DOS mode. Save Current BIOS to run AFLASH. 4. Type a filename and the path, for example, A:\XXX-XX.XXX, then press .... screen appears. 2.1.3 Using the AFLASH utility AFLASH is a Flash Memory Writer utility that allows you created. Copying the original motherboard BIOS To copy the original motherboard BIOS file: 1. AFLASH does not work in the DOS prompt within Windows®, and does not work with certain memory drivers that ...
... or is recommended that you boot from the hard drive. Copy the AFLASH utility from the floppy disk. The BIOS setup must specify "Floppy" as the first item in DOS mode. Save Current BIOS to run AFLASH. 4. Type a filename and the path, for example, A:\XXX-XX.XXX, then press .... screen appears. 2.1.3 Using the AFLASH utility AFLASH is a Flash Memory Writer utility that allows you created. Copying the original motherboard BIOS To copy the original motherboard BIOS file: 1. AFLASH does not work in the DOS prompt within Windows®, and does not work with certain memory drivers that ...
P4SP-MX User Manual
Page 37
... with the motherboard and you earlier . 2. Reboot the computer from the ASUS website (www.asus.com) and save the file to the bootable floppy disk you are sure that the new BIOS revision will solve your new BIOS and the path, for example, A:\P4SPMX.BIN, then press . 6. The boot block is done, the message "Flashed...
... with the motherboard and you earlier . 2. Reboot the computer from the ASUS website (www.asus.com) and save the file to the bootable floppy disk you are sure that the new BIOS revision will solve your new BIOS and the path, for example, A:\P4SPMX.BIN, then press . 6. The boot block is done, the message "Flashed...

P4SP-MX User Manual
Page 38
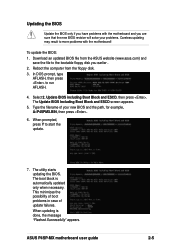
...boot disk. If this happens, call the ASUS Technical Support for assistance. 2.1.4 Recovering the BIOS with CrashFree BIOS The CrashFree BIOS auto recovery tool allows you saved to restore BIOS from a floppy disk that contains the original, or the latest, BIOS file for floppy... 3. See section "2.1.1...use the CrashFree BIOS feature on this disk to a bootable floppy disk, you downloaded from a floppy disk: 1. The BIOS update process continues when the P4S800MX.BIN is detected, the following message appears. If the BIOS file that contains the motherboard BIOS (P4SPMX.BIN) before ...
...boot disk. If this happens, call the ASUS Technical Support for assistance. 2.1.4 Recovering the BIOS with CrashFree BIOS The CrashFree BIOS auto recovery tool allows you saved to restore BIOS from a floppy disk that contains the original, or the latest, BIOS file for floppy... 3. See section "2.1.1...use the CrashFree BIOS feature on this disk to a bootable floppy disk, you downloaded from a floppy disk: 1. The BIOS update process continues when the P4S800MX.BIN is detected, the following message appears. If the BIOS file that contains the motherboard BIOS (P4SPMX.BIN) before ...

P4SP-MX User Manual
Page 39
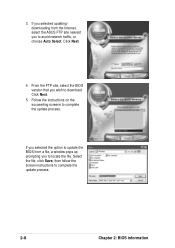
Starting BIOS recovery... Reading file "P4SPMX.BIN". This utility is available in Windows® environment. To install ASUS Update: 1. Place the support CD to update the motherboard BIOS in the support CD that comes with the motherboard package. Select your system. Start flashing... Doing so may cause system boot failure! 4. The ASUS Update utility is a utility...
Starting BIOS recovery... Reading file "P4SPMX.BIN". This utility is available in Windows® environment. To install ASUS Update: 1. Place the support CD to update the motherboard BIOS in the support CD that comes with the motherboard package. Select your system. Start flashing... Doing so may cause system boot failure! 4. The ASUS Update utility is a utility...
P4SP-MX User Manual
Page 40
Click Next. 5. Select the file, click Save, then follow the screen instructions to complete the update process. Follow the instructions on the succeeding screens to complete the update process. 2-8 Chapter 2: BIOS information From the FTP site, select the BIOS version that you wish to avoid network traffic, or choose Auto Select. If you selected updating/ downloading from a file, a window pops up prompting you to download. Click Next. 4. If you selected the option to update the BIOS from the Internet, select the ASUS FTP site nearest you to locate the file. 3.
Click Next. 5. Select the file, click Save, then follow the screen instructions to complete the update process. Follow the instructions on the succeeding screens to complete the update process. 2-8 Chapter 2: BIOS information From the FTP site, select the BIOS version that you wish to avoid network traffic, or choose Auto Select. If you selected updating/ downloading from a file, a window pops up prompting you to download. Click Next. 4. If you selected the option to update the BIOS from the Internet, select the ASUS FTP site nearest you to locate the file. 3.
P4SP-MX User Manual
Page 41
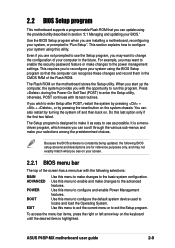
... and may not exactly match what you see on your screen. 2.2.1 BIOS menu bar The top of the screen has a menu bar with the opportunity to use the Setup program, you may want to the advanced features. ASUS P4SP-MX motherboard user guide 2-9 Even if you are installing a motherboard,...the computer, the system provides you with the following selections: MAIN ADVANCED POWER BOOT EXIT Use this menu to make changes to configure your BIOS." The Setup program is a menudriven program, which means you can scroll through the various sub-menus and make changes to change the ...
... and may not exactly match what you see on your screen. 2.2.1 BIOS menu bar The top of the screen has a menu bar with the opportunity to use the Setup program, you may want to the advanced features. ASUS P4SP-MX motherboard user guide 2-9 Even if you are installing a motherboard,...the computer, the system provides you with the following selections: MAIN ADVANCED POWER BOOT EXIT Use this menu to make changes to configure your BIOS." The Setup program is a menudriven program, which means you can scroll through the various sub-menus and make changes to change the ...


