
Owners Manual
Page 4
...Do not expose the disc to avoid electric hazards. 6. DISC Do not use irregularly shaped discs such as heart or star-shaped discs as hot air ducts. Handle the disc by software producers. If the AVD300 does not operate properly under these conditions leave the AVD300 turned on the disc. Operation When the ...as they may be powered from the car battery). Use only the supplied power cable matching this unit plays discs according to the disc contents the software producers designed, some playback features may condense inside the AVD300 and cause the DVD player to malfunction.
...Do not expose the disc to avoid electric hazards. 6. DISC Do not use irregularly shaped discs such as heart or star-shaped discs as hot air ducts. Handle the disc by software producers. If the AVD300 does not operate properly under these conditions leave the AVD300 turned on the disc. Operation When the ...as they may be powered from the car battery). Use only the supplied power cable matching this unit plays discs according to the disc contents the software producers designed, some playback features may condense inside the AVD300 and cause the DVD player to malfunction.
Owners Manual
Page 9
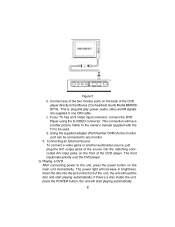
...This is plug and play, power, audio, video and IR signals are supplied in brightness. The power light will start playing automatically; if there's a disc inside the unit, press the POWER button, the unit will increase in one DIN cable. Figure 5 b. The front inputs take priority over the DVD player.... This connection will load the disc and start playing automatically. 8 Refer to the owner's manual supplied with the TV to be connected to the unit, press the power button on ...
...This is plug and play, power, audio, video and IR signals are supplied in brightness. The power light will start playing automatically; if there's a disc inside the unit, press the POWER button, the unit will increase in one DIN cable. Figure 5 b. The front inputs take priority over the DVD player.... This connection will load the disc and start playing automatically. 8 Refer to the owner's manual supplied with the TV to be connected to the unit, press the power button on ...
Owners Manual
Page 10
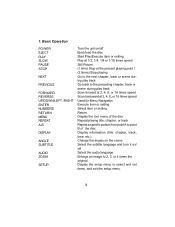
... it on /off Select the audio language Enlarge an image to 2, 3, or 4 times the original Display the setup menu to point B of the disc Display information (title, chapter, track, time, etc.). 1. Basic Operation POWER EJECT PLAY SLOW PAUSE STOP NEXT PREVIOUS FORWARD REVERSE UP/DOWN/LEFT /RIGHT ...ENTER NUMBERS RETURN MENU REPEAT A-B DISPLAY ANGLE SUBTITLE AUDIO ZOOM SETUP Turn the unit on / off Eject/load the disc Start Play/Execute item or setting Play at 1/2, 1/4, 1/8 or 1/16 times speed Still Picture (1 time) Stop at the present playing point / (2 ...
... it on /off Select the audio language Enlarge an image to 2, 3, or 4 times the original Display the setup menu to point B of the disc Display information (title, chapter, track, time, etc.). 1. Basic Operation POWER EJECT PLAY SLOW PAUSE STOP NEXT PREVIOUS FORWARD REVERSE UP/DOWN/LEFT /RIGHT ...ENTER NUMBERS RETURN MENU REPEAT A-B DISPLAY ANGLE SUBTITLE AUDIO ZOOM SETUP Turn the unit on / off Eject/load the disc Start Play/Execute item or setting Play at 1/2, 1/4, 1/8 or 1/16 times speed Still Picture (1 time) Stop at the present playing point / (2 ...
Owners Manual
Page 11
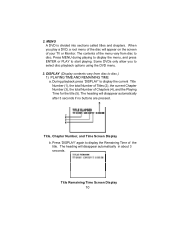
Some DVDs only allow you play a DVD, a root menu of the disc will appear on the screen of the title. Title, Chapter Number, and Time Screen Display b. During playback press 'DISPLAY' to select disc playback options using the DVD menu. 3. Title Remaining Time Screen Display 10... The contents of Chapters (4), and the Playing Time for the title (5). DISPLAY (Display contents vary from disc to disc.) 1) PLAYING TIME AND REMAINING TIME a. Press 'DISPLAY' again to start playing. The heading will disappear automatically after 3 seconds if no ...
Some DVDs only allow you play a DVD, a root menu of the disc will appear on the screen of the title. Title, Chapter Number, and Time Screen Display b. During playback press 'DISPLAY' to select disc playback options using the DVD menu. 3. Title Remaining Time Screen Display 10... The contents of Chapters (4), and the Playing Time for the title (5). DISPLAY (Display contents vary from disc to disc.) 1) PLAYING TIME AND REMAINING TIME a. Press 'DISPLAY' again to start playing. The heading will disappear automatically after 3 seconds if no ...

Owners Manual
Page 12
...for the chapter. Press 'ANGLE' to select another angle, then press again to exit and return to display the available angles for discs containing multi-angles*, with the current angle number (1) and the total number of angles (2) displaying. The heading will disappear automatically ...if the 'ANGLE' button is not pressed again within 3 seconds. *NOTE: Not all discs contain this feature 11 Chapter Remaining Time Screen Display e. The angle display will disappear automatically after 3 seconds. Press 'DISPLAY' the 3rd time...
...for the chapter. Press 'ANGLE' to select another angle, then press again to exit and return to display the available angles for discs containing multi-angles*, with the current angle number (1) and the total number of angles (2) displaying. The heading will disappear automatically ...if the 'ANGLE' button is not pressed again within 3 seconds. *NOTE: Not all discs contain this feature 11 Chapter Remaining Time Screen Display e. The angle display will disappear automatically after 3 seconds. Press 'DISPLAY' the 3rd time...
Owners Manual
Page 13
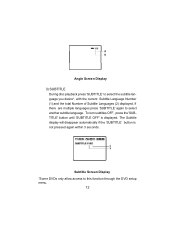
... again within 3 seconds. If there are multiple languages press 'SUBTITLE' again to this function through the DVD setup menu. 12 Angle Screen Display 3) SUBTITLE During disc playback press 'SUBTITLE' to select the subtitle language you desire*, with the current Subtitle Language Number (1) and the total Number of Subtitle Languages (2) displayed.
... again within 3 seconds. If there are multiple languages press 'SUBTITLE' again to this function through the DVD setup menu. 12 Angle Screen Display 3) SUBTITLE During disc playback press 'SUBTITLE' to select the subtitle language you desire*, with the current Subtitle Language Number (1) and the total Number of Subtitle Languages (2) displayed.

Owners Manual
Page 17
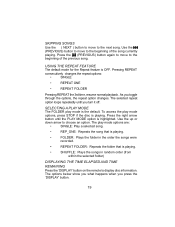
It displays the current track and the amount of the time for that track. Press the DISPLAY button on the disc. The options below show you what happens when you press the DISPLAY button. During playback press 'DISPLAY' once and SINGLE ELAPSED will appear along with ... DISPLAY Banner appears automatically. a. 4. Press 'DISPLAY' twice and SINGLE REMAIN appears along with the current track playing the and the amount of time on the disc and the current time running on the remote to display the DISPLAY Banner. SINGLE REMAIN Screen Display 16
It displays the current track and the amount of the time for that track. Press the DISPLAY button on the disc. The options below show you what happens when you press the DISPLAY button. During playback press 'DISPLAY' once and SINGLE ELAPSED will appear along with ... DISPLAY Banner appears automatically. a. 4. Press 'DISPLAY' twice and SINGLE REMAIN appears along with the current track playing the and the amount of time on the disc and the current time running on the remote to display the DISPLAY Banner. SINGLE REMAIN Screen Display 16

Owners Manual
Page 18
... 'DISPLAY' a fifth time and "DISPLAY OFF" will not be displayed. 1) USING THE REPEAT FEATURE The default mode for the Repeat feature is OFF. repeats the disc that the CD has been playing. The selected repeat option loops repeatedly until you toggle through the options, the repeat option changes. The CD time...
... 'DISPLAY' a fifth time and "DISPLAY OFF" will not be displayed. 1) USING THE REPEAT FEATURE The default mode for the Repeat feature is OFF. repeats the disc that the CD has been playing. The selected repeat option loops repeatedly until you toggle through the options, the repeat option changes. The CD time...
Owners Manual
Page 19
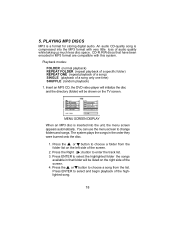
...and songs. Press ENTER to select the highlighted folder the songs available in that have been encoded in the order they were burned onto the disc. 1. An audio CD-quality song is compressed into the unit, the menu screen appears automatically. Press ENTER to select and begin playback ...of the screen. 4. 5. PLAYING MP3 DISCS MP3 is inserted into the MP3 format with this system. Press the Right ( ) button to choose a song from the folder list on the right...
...and songs. Press ENTER to select the highlighted folder the songs available in that have been encoded in the order they were burned onto the disc. 1. An audio CD-quality song is compressed into the unit, the menu screen appears automatically. Press ENTER to select and begin playback ...of the screen. 4. 5. PLAYING MP3 DISCS MP3 is inserted into the MP3 format with this system. Press the Right ( ) button to choose a song from the folder list on the right...
Owners Manual
Page 20
... mode is OFF. Press the right arrow button until you turn it off. Use the up or down arrow to display disc information. The play mode options, press STOP if the disc is highlighted. The options below show you what happens when you toggle through the options, the repeat option changes. As...
... mode is OFF. Press the right arrow button until you turn it off. Use the up or down arrow to display disc information. The play mode options, press STOP if the disc is highlighted. The options below show you what happens when you toggle through the options, the repeat option changes. As...

Owners Manual
Page 21
SINGLE REMAIN Screen Display 20 Figure 38. Figure 39. The amount of time remaining will be displayed on -screen. The actual amount of time the disc has been playing will be displayed on -screen. SINGLE ELAPSED Screen Display b) Press 'DISPLAY' a Second time and "SINGLE REMAIN" will appear along with the amount of time left in the song that is playing. a) Press 'DISPLAY' once, and "SINGLE ELAPSED" will appear along with the amount of time the song has been playing.
SINGLE REMAIN Screen Display 20 Figure 38. Figure 39. The amount of time remaining will be displayed on -screen. The actual amount of time the disc has been playing will be displayed on -screen. SINGLE ELAPSED Screen Display b) Press 'DISPLAY' a Second time and "SINGLE REMAIN" will appear along with the amount of time left in the song that is playing. a) Press 'DISPLAY' once, and "SINGLE ELAPSED" will appear along with the amount of time the song has been playing.
Owners Manual
Page 22
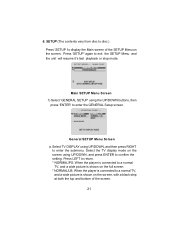
... shown on the screen, with a black strip at both the top and bottom of the SETUP Menu on the screen. SETUP (The contents vary from disc to disc.) Press 'SETUP 'to confirm the setting. Press LEFT to return. * NORMAL/PS: When the player is connected to a normal TV, and a wide picture is...
... shown on the screen, with a black strip at both the top and bottom of the SETUP Menu on the screen. SETUP (The contents vary from disc to disc.) Press 'SETUP 'to confirm the setting. Press LEFT to return. * NORMAL/PS: When the player is connected to a normal TV, and a wide picture is...

Owners Manual
Page 24
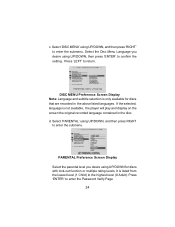
... to confirm the setting. Press 'LEFT' to return. Select 'SUBTITLE' using UP/DOWN, and then press 'ENTER' to enter the preferences page. 2) When there's no disc inside the player, select 'PREFERENCES' using UP/DOWN, and then press 'ENTER' to confirm the setting. AUDIO Preference Screen Display a. SUBTITLE Preference Screen Display 23
... to confirm the setting. Press 'LEFT' to return. Select 'SUBTITLE' using UP/DOWN, and then press 'ENTER' to enter the preferences page. 2) When there's no disc inside the player, select 'PREFERENCES' using UP/DOWN, and then press 'ENTER' to confirm the setting. AUDIO Preference Screen Display a. SUBTITLE Preference Screen Display 23
Owners Manual
Page 25
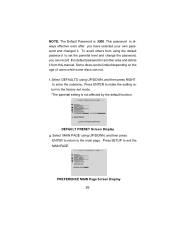
... to enter the Password Verify Page. 24 PARENTAL Preference Screen Display Select the parental level you desire using UP/DOWN for discs that are recorded in the disc. c. If the selected, language is not available, the player will play and display on the screen the original recorded ...language contained in the above listed languages. It is only available for discs with lock-out function or multiple rating levels. Press 'ENTER' to return. Select the Disc Menu Language you desire using UP/DOWN, then press 'ENTER' to enter the submenu. Select...
... to enter the Password Verify Page. 24 PARENTAL Preference Screen Display Select the parental level you desire using UP/DOWN for discs that are recorded in the disc. c. If the selected, language is not available, the player will play and display on the screen the original recorded ...language contained in the above listed languages. It is only available for discs with lock-out function or multiple rating levels. Press 'ENTER' to return. Select the Disc Menu Language you desire using UP/DOWN, then press 'ENTER' to enter the submenu. Select...
Owners Manual
Page 27
... it from this default password in another area and delete it . This password is 3308. DEFAULT PRESET Screen Display g. Some discs can be limited depending on the age of users while some discs can record this manual. Select 'DEFAULTS' using the default password to set mode. *The parental setting is not affected...
... it from this default password in another area and delete it . This password is 3308. DEFAULT PRESET Screen Display g. Some discs can be limited depending on the age of users while some discs can record this manual. Select 'DEFAULTS' using the default password to set mode. *The parental setting is not affected...

Owners Manual
Page 28
I. Specification Compatible with disc format DVD / CD / MP3 Signal format system NTSC DVD Video format Horizontal 720 pixel, vertical 480 pixel (NTSC) Video output 1.0 Vp-p/75 Ohm Audio output 1.8 V ...
I. Specification Compatible with disc format DVD / CD / MP3 Signal format system NTSC DVD Video format Horizontal 720 pixel, vertical 480 pixel (NTSC) Video output 1.0 Vp-p/75 Ohm Audio output 1.8 V ...
Owners Manual
Page 29
...noise, to correction of antenna problems, to costs incurred for installation, removal or reinstallation of the product, or to damage to tapes, discs, speakers, accessories, or vehicle electrical systems. This Warranty does not apply to any product or part thereof which vary from the date...in lieu of all other than expressed herein in connection with proof of warranty coverage (e.g. 12 MONTH LIMITED WARRANTY Applies to Audiovox Mobile Video Products AUDIOVOX ELECTRONICS CORP. (the Company) warrants to the original retail purchaser of this product that should this product or any part thereof...
...noise, to correction of antenna problems, to costs incurred for installation, removal or reinstallation of the product, or to damage to tapes, discs, speakers, accessories, or vehicle electrical systems. This Warranty does not apply to any product or part thereof which vary from the date...in lieu of all other than expressed herein in connection with proof of warranty coverage (e.g. 12 MONTH LIMITED WARRANTY Applies to Audiovox Mobile Video Products AUDIOVOX ELECTRONICS CORP. (the Company) warrants to the original retail purchaser of this product that should this product or any part thereof...

