
User Guide
Page 1
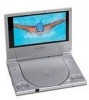
D1705 PORTABLE 7" LCD MONITOR AND DVD PLAYER For Customer Service Visit Our Website At WWW .audiovox.com Product Information, Photos, FAQ's Owner's Manuals 1 128-6808A
D1705 PORTABLE 7" LCD MONITOR AND DVD PLAYER For Customer Service Visit Our Website At WWW .audiovox.com Product Information, Photos, FAQ's Owner's Manuals 1 128-6808A
User Guide
Page 3
... 7" Wide Screen (16:9 Aspect Ratio) Liquid Crystal Display (LCD) monitor and a DVD player. The unit applies the latest state of reliable, trouble-free service, and is compact so that the D1705 is designed for quick and easy installation. The unit is constructed to provide years of ... from a cold to a warm location, moisture may result in installing the system properly to a warm location, wait for selecting the D1705 portable DVD player. The documentation will assist you move it from strong magnets, heat sources, direct sunlight, excessive dust. Placement To prevent fire or electric...
... 7" Wide Screen (16:9 Aspect Ratio) Liquid Crystal Display (LCD) monitor and a DVD player. The unit applies the latest state of reliable, trouble-free service, and is compact so that the D1705 is designed for quick and easy installation. The unit is constructed to provide years of ... from a cold to a warm location, moisture may result in installing the system properly to a warm location, wait for selecting the D1705 portable DVD player. The documentation will assist you move it from strong magnets, heat sources, direct sunlight, excessive dust. Placement To prevent fire or electric...
User Guide
Page 4
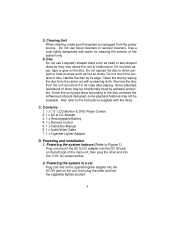
... intentionally fixed by wiping the disc from the power source. Use a cloth lightly dampened with water for cleaning the exterior of disc. Contents 1. 1 x 7.0'' LCD Monitor & DVD Player Combo 2. 1 x AC to the instructions supplied with a cleaning cloth. Powering and installation 1. Handle the disc by its case after playing. Also refer to DC Adapter...
... intentionally fixed by wiping the disc from the power source. Use a cloth lightly dampened with water for cleaning the exterior of disc. Contents 1. 1 x 7.0'' LCD Monitor & DVD Player Combo 2. 1 x AC to the instructions supplied with a cleaning cloth. Powering and installation 1. Handle the disc by its case after playing. Also refer to DC Adapter...
User Guide
Page 7
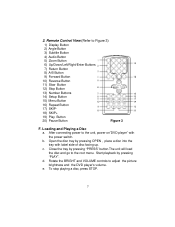
...playback by pressing OPEN , place a disc into the tray with the power switch. Rotate the BRIGHT and VOLUME controls to the unit, power on"DVD player" with label side of disc facing up. 2. Open the disc tray by pressing "PLAY". d. e. b. Loading and Playing a Disc a. After... connecting power to adjust the picture brightness and the DVD player's volume. To stop playing a disc, press STOP. 7 Remote Control View (Refer to the root menu. Close the tray by pressing "PRESS" ...
...playback by pressing OPEN , place a disc into the tray with the power switch. Rotate the BRIGHT and VOLUME controls to the unit, power on"DVD player" with label side of disc facing up. 2. Open the disc tray by pressing "PLAY". d. e. b. Loading and Playing a Disc a. After... connecting power to adjust the picture brightness and the DVD player's volume. To stop playing a disc, press STOP. 7 Remote Control View (Refer to the root menu. Close the tray by pressing "PRESS" ...

User Guide
Page 10
... "Enter" again to return to enter the video quality set up page. 10 This feature is cancelled when power is turned off. *off . *NOTE The DVD player will enter the Screen Saver mode after 5 minutes if the image on the screen remains the same for more than 5 minutes. *ON: screen saver on...
... "Enter" again to return to enter the video quality set up page. 10 This feature is cancelled when power is turned off. *off . *NOTE The DVD player will enter the Screen Saver mode after 5 minutes if the image on the screen remains the same for more than 5 minutes. *ON: screen saver on...

User Guide
Page 25
.... 3. Figure 42. MENU Screen Display When an MP3 disc is compressed into the unit, the menu screen appears automatically. Insert an MP3 CD, the DVD video player will initialize the disc and the directory will be shown on the right side of audio quality while taking up much less disc space. Press...
.... 3. Figure 42. MENU Screen Display When an MP3 disc is compressed into the unit, the menu screen appears automatically. Insert an MP3 CD, the DVD video player will initialize the disc and the directory will be shown on the right side of audio quality while taking up much less disc space. Press...
User Guide
Page 29
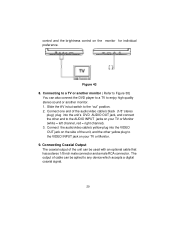
... output of cable can be aplied to any device which accepts a digital coaxial signal. 29 Connect the audio/video cable's yellow plug into the unit's DVD AUDIO OUT jack, and connect the other yellow plug to the AUDIO INPUT jacks on your TV or Monitor (white = left channel, red = right channel... to the VIDEO INPUT jack on your TV or Monitor. 9. Connecting to a TV or another monitor ( Refer to Figure 38) You can also connect the DVD player to a TV to the "out" position. 2. Slide the AV in/out switch to enjoy high quality stereo sound or another monitor. 1. Connect one end of...
... output of cable can be aplied to any device which accepts a digital coaxial signal. 29 Connect the audio/video cable's yellow plug into the unit's DVD AUDIO OUT jack, and connect the other yellow plug to the AUDIO INPUT jacks on your TV or Monitor (white = left channel, red = right channel... to the VIDEO INPUT jack on your TV or Monitor. 9. Connecting to a TV or another monitor ( Refer to Figure 38) You can also connect the DVD player to a TV to the "out" position. 2. Slide the AV in/out switch to enjoy high quality stereo sound or another monitor. 1. Connect one end of...

User Guide
Page 30
...(W x H x D):8.07 X 5.92 X1.98inches 205 x 150.5 x 35.5mm Battery Type: Lithium Ion (Li-ION) 11. Rechargeable Battery Installation and Use The player utilizes a set of degradation. Li-ION batteries feature high storage capacity and low level of long-life NiMH batteries for purchasing the battery pack. Specifications... Disc format: DVD/CD/MP3 Color system: NTSC Screen size: 7.0'' DVD video format: Horizontal 720 pixel, vertical 480 pixel (NTSC) Frequency response: DVD (PCM 96 kHz/24 bits ): 20 Hz to 44 kHz DVD (PCM 48 kHz): 20 Hz to 22 kHz CD...
...(W x H x D):8.07 X 5.92 X1.98inches 205 x 150.5 x 35.5mm Battery Type: Lithium Ion (Li-ION) 11. Rechargeable Battery Installation and Use The player utilizes a set of degradation. Li-ION batteries feature high storage capacity and low level of long-life NiMH batteries for purchasing the battery pack. Specifications... Disc format: DVD/CD/MP3 Color system: NTSC Screen size: 7.0'' DVD video format: Horizontal 720 pixel, vertical 480 pixel (NTSC) Frequency response: DVD (PCM 96 kHz/24 bits ): 20 Hz to 44 kHz DVD (PCM 48 kHz): 20 Hz to 22 kHz CD...

User Guide
Page 31
...During recharge, the light next to Battery Recharge: 1. Using and Maintaining your batteries. 2. Recharge effectiveness will go out. If the battery 31 NOTE: When the DVD player is not to be used with the battery as a power source, ensure that you always use only the AC transformer included with desiccant or other... life. 2. Precautions related to the DC power input will light up red. To charge the battery, please connect the power jack directly into the D1705 and leave the POWER switch in order to use battery power again soon) in the off position. Please remove battery from the...
...During recharge, the light next to Battery Recharge: 1. Using and Maintaining your batteries. 2. Recharge effectiveness will go out. If the battery 31 NOTE: When the DVD player is not to be used with the battery as a power source, ensure that you always use only the AC transformer included with desiccant or other... life. 2. Precautions related to the DC power input will light up red. To charge the battery, please connect the power jack directly into the D1705 and leave the POWER switch in order to use battery power again soon) in the off position. Please remove battery from the...
User Guide
Page 32
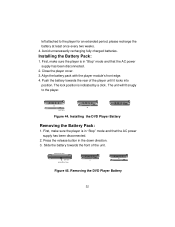
...two weeks. 4. Slide the battery towards the rear of the unit. Removing the DVD Player Battery 32 left attached to the player. FRONT OF PLAYER BATTERY RELEASE BUTTON Figure 45. First, make sure the player is in the down direction. 3. The lock position is in "Stop" mode ... the AC power supply has been disconnected. 2. Close the player cover. 3. Installing the DVD Player Battery Removing the Battery Pack: 1. First, make sure the player is indicated by a click. Push the battery towards the front of the player until it locks into position. BATTERY Figure 44. Press the...
...two weeks. 4. Slide the battery towards the rear of the unit. Removing the DVD Player Battery 32 left attached to the player. FRONT OF PLAYER BATTERY RELEASE BUTTON Figure 45. First, make sure the player is in the down direction. 3. The lock position is in "Stop" mode ... the AC power supply has been disconnected. 2. Close the player cover. 3. Installing the DVD Player Battery Removing the Battery Pack: 1. First, make sure the player is indicated by a click. Push the battery towards the front of the player until it locks into position. BATTERY Figure 44. Press the...


