
Owners Manual
Page 1
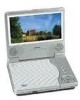
D1812 PORTABLE 8" LCD MONITOR AND DVD PLAYER
D1812 PORTABLE 8" LCD MONITOR AND DVD PLAYER

Owners Manual
Page 4
...prevent fire or electric shock, do not spill or spray liquid of reliable, trouble-free service, and is compact so that the 8"portable DVD player is designed for use . Cautions and Warnings 1. B. The unit applies the latest state of any kind on an unstable cart, stand,... the moisture evaporates. 2. The main features include a 8" Wide Screen (16:9 Aspect Ratio) Liquid Crystal Display (LCD) monitor and a DVD player. Caution Do not push objects of the art electronics and is installed in accordance with the instructions and illustrations provided in this may condense inside...
...prevent fire or electric shock, do not spill or spray liquid of reliable, trouble-free service, and is compact so that the 8"portable DVD player is designed for use . Cautions and Warnings 1. B. The unit applies the latest state of any kind on an unstable cart, stand,... the moisture evaporates. 2. The main features include a 8" Wide Screen (16:9 Aspect Ratio) Liquid Crystal Display (LCD) monitor and a DVD player. Caution Do not push objects of the art electronics and is installed in accordance with the instructions and illustrations provided in this may condense inside...

Owners Manual
Page 6
... system indoors (Refer to DC Adapter 3. 1 x Remote Control with battery (CR2025) 4. 1 x Instruction Manual 5. 1 x Audio/Video Cable 6. 1 x Cigarette Lighter Adapter 7. 1 x Rechargeable Battery Figure 1 D. Contents 1. 1 x 8''LCD Monitor & DVD Player Combo 2. 1 x AC to Figure 2) Plug one end of the cigarette lighter adapter into the DC 9V jack on the right side of the AC to...
... system indoors (Refer to DC Adapter 3. 1 x Remote Control with battery (CR2025) 4. 1 x Instruction Manual 5. 1 x Audio/Video Cable 6. 1 x Cigarette Lighter Adapter 7. 1 x Rechargeable Battery Figure 1 D. Contents 1. 1 x 8''LCD Monitor & DVD Player Combo 2. 1 x AC to Figure 2) Plug one end of the cigarette lighter adapter into the DC 9V jack on the right side of the AC to...

Owners Manual
Page 8
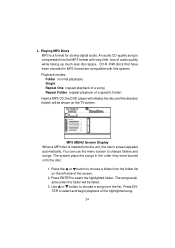
... Button F. e. Loading and Playing a Disc a. To stop playing a disc, press STOP. 5 2. Remote Control View (Refer to adjust the LCD's brightness and the DVD player's volume. After connecting power to the unit, power on "DVD player"with the label side facing up. Open the disc tray by pressing the "PRESS"button.The unit will light.
... Button F. e. Loading and Playing a Disc a. To stop playing a disc, press STOP. 5 2. Remote Control View (Refer to adjust the LCD's brightness and the DVD player's volume. After connecting power to the unit, power on "DVD player"with the label side facing up. Open the disc tray by pressing the "PRESS"button.The unit will light.

Owners Manual
Page 11
e). Choose Screen Saver on or off ) *NOTE: The DVD player will enter the Screen Saver mode after approximately five minutes if the same image remains on or off using the UP/DOWN button, and then ...
e). Choose Screen Saver on or off ) *NOTE: The DVD player will enter the Screen Saver mode after approximately five minutes if the same image remains on or off using the UP/DOWN button, and then ...
Owners Manual
Page 27
... to change folders and songs. The songs available under the folder will be shown on the left side of a specific folder) Insert a MP3 CD, the DVD player will initialize the disc and the directory (folder) will be listed. 3. Press ENTER to choose a folder from the list. An audio CD-quality song is...
... to change folders and songs. The songs available under the folder will be shown on the left side of a specific folder) Insert a MP3 CD, the DVD player will initialize the disc and the directory (folder) will be listed. 3. Press ENTER to choose a folder from the list. An audio CD-quality song is...

Owners Manual
Page 31
Figure 5 28 Slide the AV IN/OUT switch to OUT side, Connect one end of the audio/video cable's black (1/8"stereo plug) plug into the DVD VIDEO jack on the back of the unit, and the other end to the VIDEO INPUT jack on another monitor. 1. Connect the audio/video cable's ... to the AUDIO INPUT jacks on your TV or Monitor. Connecting to a TV or another monitor ( Refer to Figure 42) You can also connect the DVD player to a TV to enjoy high quality stereo sound and picture on your TV or Monitor (white = left channel, red = right channel). 2. N.
Figure 5 28 Slide the AV IN/OUT switch to OUT side, Connect one end of the audio/video cable's black (1/8"stereo plug) plug into the DVD VIDEO jack on the back of the unit, and the other end to the VIDEO INPUT jack on another monitor. 1. Connect the audio/video cable's ... to the AUDIO INPUT jacks on your TV or Monitor. Connecting to a TV or another monitor ( Refer to Figure 42) You can also connect the DVD player to a TV to enjoy high quality stereo sound and picture on your TV or Monitor (white = left channel, red = right channel). 2. N.
Owners Manual
Page 32
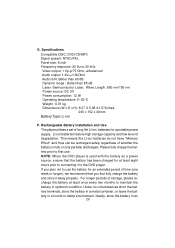
... (W x D x H): 8.07 X 5.98 X1.57inches 205 x 152 x 40mm Battery Type: Li-ion P. Please fully charge the battery prior to use . NOTE: When the DVD player is fully or only partially discharged. Under no circumstances short the battery terminals, store the battery in a metal container, or leave the battery in optimum...not to first use the battery for an extended period of storage, please recharge the battery at least eight hours prior to the DVD player. For longer periods of time (one week or longer), we recommend that the battery has been charged for a portable power supply. Specifications...
... (W x D x H): 8.07 X 5.98 X1.57inches 205 x 152 x 40mm Battery Type: Li-ion P. Please fully charge the battery prior to use . NOTE: When the DVD player is fully or only partially discharged. Under no circumstances short the battery terminals, store the battery in a metal container, or leave the battery in optimum...not to first use the battery for an extended period of storage, please recharge the battery at least eight hours prior to the DVD player. For longer periods of time (one week or longer), we recommend that the battery has been charged for a portable power supply. Specifications...
Owners Manual
Page 33
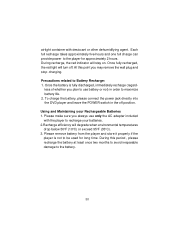
...this point you always use battery or not) in the off . To charge the battery, please connect the power jack directly into the DVD player and leave the POWER switch in order to Battery Recharge: 1. Using and Maintaining your batteries. 2.Recharge efficiency will stay on. Once the...be used for approximately 2 hours. Please make sure you may remove the wall plug and stop charging. airtight container with the player to the player for long time. Each full recharge takes approximately five-hours and one full charge can provide power to recharge your Rechargeable Batteries ...
...this point you always use battery or not) in the off . To charge the battery, please connect the power jack directly into the DVD player and leave the POWER switch in order to Battery Recharge: 1. Using and Maintaining your batteries. 2.Recharge efficiency will stay on. Once the...be used for approximately 2 hours. Please make sure you may remove the wall plug and stop charging. airtight container with the player to the player for long time. Each full recharge takes approximately five-hours and one full charge can provide power to recharge your Rechargeable Batteries ...

Owners Manual
Page 34
...unit will fit snugly to the player. Push the battery towards the rear flank of the rear flank. First, make sure the player is in "Stop"mode and the AC power supply has been disconnected. 2. Figure 7. Figure 6. Installing the DVD Player Battery Removing the Battery Pack: 1.... First, make sure the player is indicated by a click. Pull the battery out of the player until it locks into position. Press the release button on the left side...
...unit will fit snugly to the player. Push the battery towards the rear flank of the rear flank. First, make sure the player is in "Stop"mode and the AC power supply has been disconnected. 2. Figure 7. Figure 6. Installing the DVD Player Battery Removing the Battery Pack: 1.... First, make sure the player is indicated by a click. Pull the battery out of the player until it locks into position. Press the release button on the left side...
Owners Manual
Page 36
If the regional codes don't match, the disc can't be controlled. Clean it. • Condensation has formed. Allow player to be played. This DVD is Region Number 1. • The disc is affixed over the sensor eye of disc you put into disc tray. Troubleshooting (Cont) PROBLEM IR sensor inoperative ... are fresh. •Verify that the remote sensor eye is not obstructed. •Verify that the batteries in the remote are coded by region. This DVD only plays digital video discs, audio CDs and MP3s.
If the regional codes don't match, the disc can't be controlled. Clean it. • Condensation has formed. Allow player to be played. This DVD is Region Number 1. • The disc is affixed over the sensor eye of disc you put into disc tray. Troubleshooting (Cont) PROBLEM IR sensor inoperative ... are fresh. •Verify that the remote sensor eye is not obstructed. •Verify that the batteries in the remote are coded by region. This DVD only plays digital video discs, audio CDs and MP3s.


