Owners Manual
Page 1
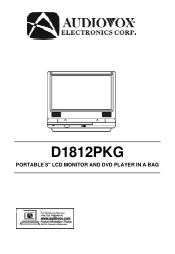
D1812PKG PORTABLE 8" LCD MONITOR AND DVD PLAYER IN A BAG
D1812PKG PORTABLE 8" LCD MONITOR AND DVD PLAYER IN A BAG

Owners Manual
Page 3
Introduction 4 B. Menu 21 K. Playing MP3 Discs 29 N. Specifications 46 Connecting to a TV or another monitor 33 P. Installation and Using 38 S. Controls, Indicators, and Connectors 9 G. Basic Operation 20 J. Playing JPEG files 31 O. Rechargeable Battery Installation and Use 34 Q. Cautions and Warnings 4 C. Powering and Installation 7 E. Troubleshooting 36 R. Game Instructions 39 T. Loading and Playing a Disc 10 H. Vehicle Installation 7 F. Content A. Display 21 L. Contents 6 D. Playing Audio CDS 27 M. Setup 11 I.
Introduction 4 B. Menu 21 K. Playing MP3 Discs 29 N. Specifications 46 Connecting to a TV or another monitor 33 P. Installation and Using 38 S. Controls, Indicators, and Connectors 9 G. Basic Operation 20 J. Playing JPEG files 31 O. Rechargeable Battery Installation and Use 34 Q. Cautions and Warnings 4 C. Powering and Installation 7 E. Troubleshooting 36 R. Game Instructions 39 T. Loading and Playing a Disc 10 H. Vehicle Installation 7 F. Content A. Display 21 L. Contents 6 D. Playing Audio CDS 27 M. Setup 11 I.

Owners Manual
Page 4
... for later use . Introduction Thank you in a fire or electric shock). Cautions and Warnings 1. The main features include a 8" Wide Screen (16:9 Aspect Ratio) Liquid Crystal Display (LCD) monitor, a DVD player and a game controller with this manual for about one hour before operating the unit, or remove the disc and leave the unit turned on or in games. Please read the entire instruction manual supplied with 30...
... for later use . Introduction Thank you in a fire or electric shock). Cautions and Warnings 1. The main features include a 8" Wide Screen (16:9 Aspect Ratio) Liquid Crystal Display (LCD) monitor, a DVD player and a game controller with this manual for about one hour before operating the unit, or remove the disc and leave the unit turned on or in games. Please read the entire instruction manual supplied with 30...

Owners Manual
Page 5
... after playing. Contact qualified service personnel if your system needs repair. 5. Do not expose the disc to play . Keep the unit away from an open flame such as they may not be available. There is unplugged from the power source. Remove the disc from the center out with water for the disc to direct sunlight or heat sources. Regional Coding Both the DVD player and disc are coded...
... after playing. Contact qualified service personnel if your system needs repair. 5. Do not expose the disc to play . Keep the unit away from an open flame such as they may not be available. There is unplugged from the power source. Remove the disc from the center out with water for the disc to direct sunlight or heat sources. Regional Coding Both the DVD player and disc are coded...
Owners Manual
Page 6
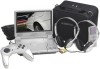
... to DC Adapter 3. 1 x Remote Control with battery (CR2025) 4. 1 x Instruction Manual 5. 1 x Audio/Video Adapter Cable 6. 1 x DC Power Adapter 7. 1 x Rechargeable Battery 8. 1 x Y Connector (for headphones) 9. 2 x Wired headphones 10. 1 x Bag W/ Straps 11. 1 x Game Controller D. Powering the system in a car (refer to Figure 1) Plug one end of the main unit, then plug the other end into the 120V AC power outlet. 2. Powering and installation 1. Figure 1 6 Contents 1. 1 x 8'' LCD Monitor & DVD Player 2. 1 x AC to DC adapter into the...
... to DC Adapter 3. 1 x Remote Control with battery (CR2025) 4. 1 x Instruction Manual 5. 1 x Audio/Video Adapter Cable 6. 1 x DC Power Adapter 7. 1 x Rechargeable Battery 8. 1 x Y Connector (for headphones) 9. 2 x Wired headphones 10. 1 x Bag W/ Straps 11. 1 x Game Controller D. Powering the system in a car (refer to Figure 1) Plug one end of the main unit, then plug the other end into the 120V AC power outlet. 2. Powering and installation 1. Figure 1 6 Contents 1. 1 x 8'' LCD Monitor & DVD Player 2. 1 x AC to DC adapter into the...

Owners Manual
Page 10
...) Subtitle Button 15) Zoom Button AUDIO OX 16) Display Button Figure 5 G. Remote Control View (Refer to the desired levels. c. The power indicator will read the disc and start playing. Open the disc tray by pressing the area marked "PRESS" on the "DVD player" with the label side facing up. Close the tray by sliding the OPEN button in the direction of the arrow and place a disc into the tray with the power switch. The unit will light. After connecting power...
...) Subtitle Button 15) Zoom Button AUDIO OX 16) Display Button Figure 5 G. Remote Control View (Refer to the desired levels. c. The power indicator will read the disc and start playing. Open the disc tray by pressing the area marked "PRESS" on the "DVD player" with the label side facing up. Close the tray by sliding the OPEN button in the direction of the arrow and place a disc into the tray with the power switch. The unit will light. After connecting power...

Owners Manual
Page 11
... enter the submenu. Main Setup Menu Screen 1) Press "SETUP", the 'General Setup Page' will resume it's last playback mode. Select the TV display mode desired using the UP/DOWN button, and then press RIGHT to confirm the setting. TV Display Screen Display 11 Setup Press 'SETUP' to display the Main screen of the screen. * Wide: When the player is connected to a wide screen TV, a wide picture is shown on the screen. Press 'SETUP' again to a normal TV...
... enter the submenu. Main Setup Menu Screen 1) Press "SETUP", the 'General Setup Page' will resume it's last playback mode. Select the TV display mode desired using the UP/DOWN button, and then press RIGHT to confirm the setting. TV Display Screen Display 11 Setup Press 'SETUP' to display the Main screen of the screen. * Wide: When the player is connected to a wide screen TV, a wide picture is shown on the screen. Press 'SETUP' again to a normal TV...

Owners Manual
Page 12
... work when the power is on the screen. Note: The Last position memory function will return to the last position on the disc. Select "Last Memory" by using the UP/DOWN button, and then press the RIGHT button to the last position on the disc. *off ) *NOTE: The DVD player will not return to enter the submenu. e. Screen Saver Screen Display *On: Enables screen saver *Off: Disables screen...
... work when the power is on the screen. Note: The Last position memory function will return to the last position on the disc. Select "Last Memory" by using the UP/DOWN button, and then press the RIGHT button to the last position on the disc. *off ) *NOTE: The DVD player will not return to enter the submenu. e. Screen Saver Screen Display *On: Enables screen saver *Off: Disables screen...
Owners Manual
Page 16
... no disc inside the player select "password" using the default password to set the parental level and change . To avoid the possibility of users while some discs cannot. 16 PASSWORD CHANGE Menu Press 'ENTER' to confirm the change the password, you have selected your own password and changed it from this manual. Press 'ENTER' to enter the Password Change Page. Input the Old Password or the Default Password, the New Password, and the Confirmed New Password. Some discs can record this default password...
... no disc inside the player select "password" using the default password to set the parental level and change . To avoid the possibility of users while some discs cannot. 16 PASSWORD CHANGE Menu Press 'ENTER' to confirm the change the password, you have selected your own password and changed it from this manual. Press 'ENTER' to enter the Password Change Page. Input the Old Password or the Default Password, the New Password, and the Confirmed New Password. Some discs can record this default password...
Owners Manual
Page 18
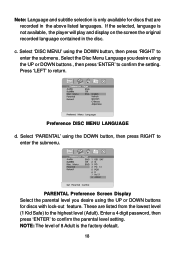
... factory default. 18 Note: Language and subtitle selection is only available for discs with lock-out feature. NOTE: The level of 8 Adult is not available, the player will play and display on the screen the original recorded language contained in the above listed languages. Select 'PARENTAL' using the DOWN button, then press 'RIGHT' to enter the submenu. Press 'LEFT' to confirm the parental level setting. Enter a 4 digit password, then press 'ENTER' to return. Select 'DISC MENU' using...
... factory default. 18 Note: Language and subtitle selection is only available for discs with lock-out feature. NOTE: The level of 8 Adult is not available, the player will play and display on the screen the original recorded language contained in the above listed languages. Select 'PARENTAL' using the DOWN button, then press 'RIGHT' to enter the submenu. Press 'LEFT' to confirm the parental level setting. Enter a 4 digit password, then press 'ENTER' to return. Select 'DISC MENU' using...
Owners Manual
Page 19
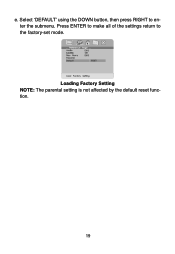
Press ENTER to make all of the settings return to enter the submenu. Loading Factory Setting NOTE: The parental setting is not affected by the default reset function. 19 Select 'DEFAULT' using the DOWN button, then press RIGHT to the factory-set mode. e.
Press ENTER to make all of the settings return to enter the submenu. Loading Factory Setting NOTE: The parental setting is not affected by the default reset function. 19 Select 'DEFAULT' using the DOWN button, then press RIGHT to the factory-set mode. e.

Owners Manual
Page 20
ANGLE Change the viewing angle of the scene SUBTITLE Select the subtitle language and turn it on /off AUDIO Select the audio language ZOOM Enlarge an image to select and set items, and exit the setup menu. 20 SETUP Display the setup menu to 2, 3, or 4 times the original size. I. Basic Operation POWER Turn the unit on /off OPEN Remove/load the disc PLAY Start Play/Execute item or setting SLOW Play at 1/2, 1/4, 1/8 or 1/16 times speed PAUSE Still Picture STOP (1 time) Stop at the present playing point / (2 times) Stop playing NEXT...
ANGLE Change the viewing angle of the scene SUBTITLE Select the subtitle language and turn it on /off AUDIO Select the audio language ZOOM Enlarge an image to select and set items, and exit the setup menu. 20 SETUP Display the setup menu to 2, 3, or 4 times the original size. I. Basic Operation POWER Turn the unit on /off OPEN Remove/load the disc PLAY Start Play/Execute item or setting SLOW Play at 1/2, 1/4, 1/8 or 1/16 times speed PAUSE Still Picture STOP (1 time) Stop at the present playing point / (2 times) Stop playing NEXT...

Owners Manual
Page 29
... select and begin playback of audio quality while taking up much less disc space. The system plays the songs in MP3 format are compatible with very little loss of the highlighted song. 29 Playback modes: FOLDER (normal playback) SINGLE REPEAT ONE (repeat playback of a song) REPEAT FOLDER (repeat playback of the screen. 2. An audio CD-quality song is a format for storing digital audio. You can use or button to choose a folder from the list...
... select and begin playback of audio quality while taking up much less disc space. The system plays the songs in MP3 format are compatible with very little loss of the highlighted song. 29 Playback modes: FOLDER (normal playback) SINGLE REPEAT ONE (repeat playback of a song) REPEAT FOLDER (repeat playback of the screen. 2. An audio CD-quality song is a format for storing digital audio. You can use or button to choose a folder from the list...

Owners Manual
Page 33
Connect the audio/video adapter cable's yellow plug into the unit's DVD AUDIO OUT jack, and connect the other yellow plug to the AUDIO INPUT jacks on your TV or Monitor. The cable is the video signal. Connect one end of the audio/video adapter cable's black (1/8" stereo plug) plug into the DVD VIDEO OUT jack on the back of an audio/video cable. O. The purchased cable can also connect the DVD player to a TV to the DVD player. 1. Connecting to a TV...
Connect the audio/video adapter cable's yellow plug into the unit's DVD AUDIO OUT jack, and connect the other yellow plug to the AUDIO INPUT jacks on your TV or Monitor. The cable is the video signal. Connect one end of the audio/video adapter cable's black (1/8" stereo plug) plug into the DVD VIDEO OUT jack on the back of an audio/video cable. O. The purchased cable can also connect the DVD player to a TV to the DVD player. 1. Connecting to a TV...
Owners Manual
Page 34
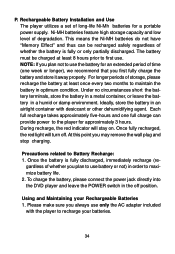
... connect the power jack directly into the DVD player and leave the POWER switch in order to recharge your Rechargeable Batteries 1. The battery must be recharged safely regardless of whether you may remove the wall plug and stop charging. During recharge, the red indicator will turn off position. Please make sure you first fully charge the battery and store it away properly. For longer periods of time...
... connect the power jack directly into the DVD player and leave the POWER switch in order to recharge your Rechargeable Batteries 1. The battery must be recharged safely regardless of whether you may remove the wall plug and stop charging. During recharge, the red indicator will turn off position. Please make sure you first fully charge the battery and store it away properly. For longer periods of time...
Owners Manual
Page 35
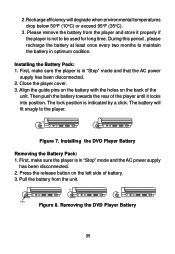
... months to maintain the battery in "Stop" mode and the AC power supply has been disconnected. 2. Installing the Battery Pack: 1. Then push the battery towards the rear of battery. 3. Figure 7. Removing the DVD Player Battery 35 Pull the battery from the player and store it locks into position. First, make sure the player is indicated by a click. Close the player cover. 3. Align the guide pins on the battery with the holes on...
... months to maintain the battery in "Stop" mode and the AC power supply has been disconnected. 2. Installing the Battery Pack: 1. Then push the battery towards the rear of battery. 3. Figure 7. Removing the DVD Player Battery 35 Pull the battery from the player and store it locks into position. First, make sure the player is indicated by a click. Close the player cover. 3. Align the guide pins on the battery with the holes on...

Owners Manual
Page 36
... the movie is connected properly. Troubleshooting PROBLEM No sound or distorted sound SOLUTION • Make sure the DVD player is often programmed to . This part of range. • The disc might be completed at the moment. 4. No forward or reverse scan • Some discs have sections that is not available at this time because: 1. The disc's software restricts it . 36 The icon ( ) appears on screen Picture is distorted...
... the movie is connected properly. Troubleshooting PROBLEM No sound or distorted sound SOLUTION • Make sure the DVD player is often programmed to . This part of range. • The disc might be completed at the moment. 4. No forward or reverse scan • Some discs have sections that is not available at this time because: 1. The disc's software restricts it . 36 The icon ( ) appears on screen Picture is distorted...
Owners Manual
Page 37
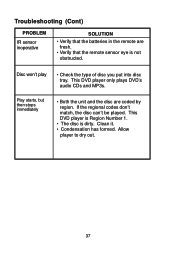
... stops immediately • Both the unit and the disc are fresh. • Verify that the batteries in the remote are coded by region. This DVD player only plays DVD's audio CDs and MP3s. Allow player to dry out. 37 Disc won't play • Check the type of disc you put into disc tray. Troubleshooting (Cont) PROBLEM IR sensor inoperative SOLUTION • Verify that the remote sensor eye is dirty. This DVD player is Region Number...
... stops immediately • Both the unit and the disc are fresh. • Verify that the batteries in the remote are coded by region. This DVD player only plays DVD's audio CDs and MP3s. Allow player to dry out. 37 Disc won't play • Check the type of disc you put into disc tray. Troubleshooting (Cont) PROBLEM IR sensor inoperative SOLUTION • Verify that the remote sensor eye is dirty. This DVD player is Region Number...
Owners Manual
Page 38
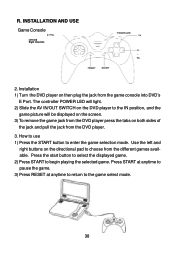
... displayed on the screen. 3) To remove the game jack from the DVD player press the tabs on the DVD player to the game select mode. 38 The controller POWER LED will light. 2) Slide the AV IN/OUT SWITCH on both sides of the jack and pull the jack from the DVD player. 3. How to use 1) Press the START button to choose from the game console into DVD's E Port. INSTALLATION...
... displayed on the screen. 3) To remove the game jack from the DVD player press the tabs on the DVD player to the game select mode. 38 The controller POWER LED will light. 2) Slide the AV IN/OUT SWITCH on both sides of the jack and pull the jack from the DVD player. 3. How to use 1) Press the START button to choose from the game console into DVD's E Port. INSTALLATION...

Owners Manual
Page 46
Specifications Supported Media formats: DVD/CD/MP3 Color system: NTSC/PAL Screen size: 8'' DVD video format: Horizontal 720 pixel, vertical 480 pixel (NTSC) Frequency response: DVD (PCM 96 kHz/24 bits ): 20 Hz to 44 Hz DVD (PCM 48 kHz): 20 Hz to 22 kHz CD: 20 Hz to 20 kHz Video output: 1.0 Vp-p/75 Ohm, unbalanced Video S/N: Better than 35 dB Audio output: 2 x 0.4 W Audio S/N: Better than 35 dB Power source: DC...
Specifications Supported Media formats: DVD/CD/MP3 Color system: NTSC/PAL Screen size: 8'' DVD video format: Horizontal 720 pixel, vertical 480 pixel (NTSC) Frequency response: DVD (PCM 96 kHz/24 bits ): 20 Hz to 44 Hz DVD (PCM 48 kHz): 20 Hz to 22 kHz CD: 20 Hz to 20 kHz Video output: 1.0 Vp-p/75 Ohm, unbalanced Video S/N: Better than 35 dB Audio output: 2 x 0.4 W Audio S/N: Better than 35 dB Power source: DC...


