
User Guide
Page 1
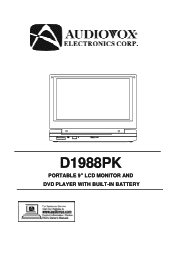
D1988PK PORTABLE 9" LCD MONITOR AND DVD PLAYER WITH BUILT-IN BATTERY
D1988PK PORTABLE 9" LCD MONITOR AND DVD PLAYER WITH BUILT-IN BATTERY

User Guide
Page 2
... other rights owners. An LCD panel and/or video monitor may be installed in "park" or when the vehicle's parking brake is applied. Use of the driver's seat where it will only function when the vehicle is intended for vehicle information, system control, rear or side observation or navigation. An LCD panel or video monitor used for home and other limited viewing uses only unless...
... other rights owners. An LCD panel and/or video monitor may be installed in "park" or when the vehicle's parking brake is applied. Use of the driver's seat where it will only function when the vehicle is intended for vehicle information, system control, rear or side observation or navigation. An LCD panel or video monitor used for home and other limited viewing uses only unless...
User Guide
Page 3
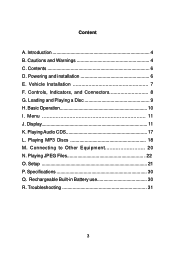
Powering and installation 6 E. Rechargeable Built-in Battery use 30 R. Contents 6 D. Vehicle Installation 7 F. Menu 11 J. Specifications 30 Q. Troubleshooting 31 3 Controls, Indicators, and Connectors 8 G. Playing MP3 Discs 18 M. Connecting to Other Equipment 20 N. Basic Operation 10 I. Content A. Playing JPEG Files 22 O. Loading and Playing a Disc 9 H. Playing Audio CDS 17 L. Display 11 K. Setup 21 P. Cautions and Warnings 4 C. Introduction 4 B.
Powering and installation 6 E. Rechargeable Built-in Battery use 30 R. Contents 6 D. Vehicle Installation 7 F. Menu 11 J. Specifications 30 Q. Troubleshooting 31 3 Controls, Indicators, and Connectors 8 G. Playing MP3 Discs 18 M. Connecting to Other Equipment 20 N. Basic Operation 10 I. Content A. Playing JPEG Files 22 O. Loading and Playing a Disc 9 H. Playing Audio CDS 17 L. Display 11 K. Setup 21 P. Cautions and Warnings 4 C. Introduction 4 B.

User Guide
Page 4
... unit turned on or in hotels, offices or your home. If the unit is used in accordance with this product prior to a warm location, wait for quick and easy installation. When you can take it with SD/MMC, MS memory cards and USB memory devices. The main features include a 9" wide Screen (16:9 Aspect Ratio) Liquid Crystal Display (LCD) monitor and a DVD player...
... unit turned on or in hotels, offices or your home. If the unit is used in accordance with this product prior to a warm location, wait for quick and easy installation. When you can take it with SD/MMC, MS memory cards and USB memory devices. The main features include a 9" wide Screen (16:9 Aspect Ratio) Liquid Crystal Display (LCD) monitor and a DVD player...

User Guide
Page 5
... disc by wiping the disc from an open flame such as they may not be intentionally fixed by software producers. Replace the battery only with a cloth or other material. Clean the disc by its case after playing. Contact qualified service personnel if your system needs repair. 5. Do not use irregularly shaped discs such as heart or star-shaped discs as fire, candle etc. Some playback operations...
... disc by wiping the disc from an open flame such as they may not be intentionally fixed by software producers. Replace the battery only with a cloth or other material. Clean the disc by its case after playing. Contact qualified service personnel if your system needs repair. 5. Do not use irregularly shaped discs such as heart or star-shaped discs as fire, candle etc. Some playback operations...
User Guide
Page 6
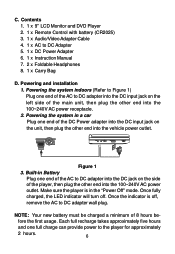
... is in the "Power Off" mode. Contents 1. 1 x 9'' LCD Monitor and DVD Player 2. 1 x Remote Control with battery (CR2025) 3. 1 x Audio/Video Adapter Cable 4. 1 x AC to DC adapter wall plug. C. Each full recharge takes approximately five hours and one end of the DC Power adapter into the DC input jack on the unit, then plug the other end into the 100~240V AC power receptacle. 2. Powering and installation 1. Powering the system in...
... is in the "Power Off" mode. Contents 1. 1 x 9'' LCD Monitor and DVD Player 2. 1 x Remote Control with battery (CR2025) 3. 1 x Audio/Video Adapter Cable 4. 1 x AC to DC adapter wall plug. C. Each full recharge takes approximately five hours and one end of the DC Power adapter into the DC input jack on the unit, then plug the other end into the 100~240V AC power receptacle. 2. Powering and installation 1. Powering the system in...

User Guide
Page 7
... place the DVD player on the bag beneath the elastic straps. E. Secure the lower portion of the carry bag to Figure 3) Carry Bag Opened Carry Bag Closed Elastic Straps Vehicle Headrest Headrest Strap Vehicle Seat Back Seat Back Strap Figure 3 1). Vehicle Installation Installing the DVD Player onto the seat back in a car (Refer to headrest support bars using the seat...
... place the DVD player on the bag beneath the elastic straps. E. Secure the lower portion of the carry bag to Figure 3) Carry Bag Opened Carry Bag Closed Elastic Straps Vehicle Headrest Headrest Strap Vehicle Seat Back Seat Back Strap Figure 3 1). Vehicle Installation Installing the DVD Player onto the seat back in a car (Refer to headrest support bars using the seat...

User Guide
Page 9
... tray by sliding the OPEN switch in the tray with the power switch. e. Button 4) Enter Button 5) Reverse/Left Keypad 6) Down Button 7) Numeric Buttons 8) Display Button 9) Zoom Button 10) DVD/SD-USB Button 11) Skip + Button 12) A-B Repeat Button 13) Forward/Right Keypad 14) 1/All Repeat Button 15) Stop Button 16) Menu Button 17) Subtitle Button 18) Audio Button 19) Play/Pause Button Figure 4 F. Loading and Playing a Disc a. The power indicator will load the disc and start playing. To turn off the DVD player, slide the POWER ON/OFF switch to the unit, power on the DVD player...
... tray by sliding the OPEN switch in the tray with the power switch. e. Button 4) Enter Button 5) Reverse/Left Keypad 6) Down Button 7) Numeric Buttons 8) Display Button 9) Zoom Button 10) DVD/SD-USB Button 11) Skip + Button 12) A-B Repeat Button 13) Forward/Right Keypad 14) 1/All Repeat Button 15) Stop Button 16) Menu Button 17) Subtitle Button 18) Audio Button 19) Play/Pause Button Figure 4 F. Loading and Playing a Disc a. The power indicator will load the disc and start playing. To turn off the DVD player, slide the POWER ON/OFF switch to the unit, power on the DVD player...

User Guide
Page 10
... confirm setting NUMBERS Select item or setting MENU Display the root menu of the disc REPEAT Repeat playing title, chapter, or track A-B Repeat a specific portion from point A to select and set items, and exit the setup menu. SUBTITLE Select the subtitle language and turn it on /off AUDIO Select the audio language SETUP Display the setup menu to point B of the disk PLAY Start Play/Execute item or setting Skip + NEXT Go to re-start play back Skip - H. Basic Operation POWER Turn the unit on /off OPEN Remove/load the disc PAUSE...
... confirm setting NUMBERS Select item or setting MENU Display the root menu of the disc REPEAT Repeat playing title, chapter, or track A-B Repeat a specific portion from point A to select and set items, and exit the setup menu. SUBTITLE Select the subtitle language and turn it on /off AUDIO Select the audio language SETUP Display the setup menu to point B of the disk PLAY Start Play/Execute item or setting Skip + NEXT Go to re-start play back Skip - H. Basic Operation POWER Turn the unit on /off OPEN Remove/load the disc PAUSE...

User Guide
Page 11
Press 'MENU' during playback to select disc playback options using the DVD root menu. I. The contents of your TV or Monitor. DISPLAY (Display contents vary from disc to disc.) 1. Title, Chapter Number and Time Screen Display b. Title Remaining Time Screen Display 11 MENU A DVD is divided into sections called titles and chapters. Some DVDs only allow you play a DVD, a root menu of the disc will appear on the screen of the menu vary from disc to disc. PLAYING TIME AND REMAINING TIME a. The heading...
Press 'MENU' during playback to select disc playback options using the DVD root menu. I. The contents of your TV or Monitor. DISPLAY (Display contents vary from disc to disc.) 1. Title, Chapter Number and Time Screen Display b. Title Remaining Time Screen Display 11 MENU A DVD is divided into sections called titles and chapters. Some DVDs only allow you play a DVD, a root menu of the disc will appear on the screen of the menu vary from disc to disc. PLAYING TIME AND REMAINING TIME a. The heading...

User Guide
Page 18
... part between Point A and Point B. An audio CD-quality song is a format for the Repeat feature is playing. • Repeat Folder- Menu Screen Display 18 During playback press "" to scan foward at 2x, 4x, 8x,16x, 32x and normal speed. A-B REPEAT a. During playback press !! 1. Press 'A-B' a second time to scan foward at 2x, 4x, 8x,16x, 32x and normal speed. FORWARD/REVERSE SCAN a. to set the Starting Point A. PLAYING MP3 DISCS...
... part between Point A and Point B. An audio CD-quality song is a format for the Repeat feature is playing. • Repeat Folder- Menu Screen Display 18 During playback press "" to scan foward at 2x, 4x, 8x,16x, 32x and normal speed. A-B REPEAT a. During playback press !! 1. Press 'A-B' a second time to scan foward at 2x, 4x, 8x,16x, 32x and normal speed. FORWARD/REVERSE SCAN a. to set the Starting Point A. PLAYING MP3 DISCS...

User Guide
Page 19
... an MP3 file. The songs available under the folder will repeatedly play the part between Point A and Point B. Press ENTER to change folders and songs. USING THE REPEAT FEATURE The default mode for the Repeat feature is inserted into the unit, the Menu Screen appears automatically. The selected repeat option loops repeatedly until you toggle through the options, the repeat option changes. Press 'A-B' a second time to set the Ending...
... an MP3 file. The songs available under the folder will repeatedly play the part between Point A and Point B. Press ENTER to change folders and songs. USING THE REPEAT FEATURE The default mode for the Repeat feature is inserted into the unit, the Menu Screen appears automatically. The selected repeat option loops repeatedly until you toggle through the options, the repeat option changes. Press 'A-B' a second time to set the Ending...

User Guide
Page 20
... the audio/video cable's black (1/8" plug) plug into the unit's DVD AV jack and connect the other end to the AUDIO Output jacks on the right side of the audio/video cable's black (1/8" plug) plug into the unit's DVD AV jack and connect the other end to the AUDIO INPUT jacks on your Camcorder or other DVD using the AV adapter cable (white = left audio channel, red = right audio channel, yellow = video). Set the AV In/Out Switch...
... the audio/video cable's black (1/8" plug) plug into the unit's DVD AV jack and connect the other end to the AUDIO Output jacks on the right side of the audio/video cable's black (1/8" plug) plug into the unit's DVD AV jack and connect the other end to the AUDIO INPUT jacks on your Camcorder or other DVD using the AV adapter cable (white = left audio channel, red = right audio channel, yellow = video). Set the AV In/Out Switch...

User Guide
Page 21
Playing JPEG Files 1) Load the JPEG Disc into tray. 2) The pictures contained will be displayed automaticaly after loading. 3) You can view the pricture you may use the navigation buttons to view blocked parts of the picture. 6) While previewing the file, pressing "SUBTITLE", "AUDIO" or "AB", will result in the unit, insert either an SD/MMC/MS card, Thumb Drive, or digital camera with JPEG or MP3 files into the appropriate input. 1) Insert...
Playing JPEG Files 1) Load the JPEG Disc into tray. 2) The pictures contained will be displayed automaticaly after loading. 3) You can view the pricture you may use the navigation buttons to view blocked parts of the picture. 6) While previewing the file, pressing "SUBTITLE", "AUDIO" or "AB", will result in the unit, insert either an SD/MMC/MS card, Thumb Drive, or digital camera with JPEG or MP3 files into the appropriate input. 1) Insert...
User Guide
Page 22
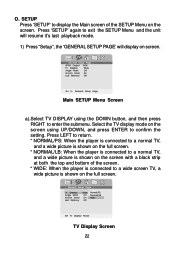
... shown on the full screen. * NORMAL/LB: When the player is connected to a wide screen TV, a wide picture is shown on the screen. Press 'SETUP' again to exit the SETUP Menu and the unit will resume it's last playback mode. 1) Press "Setup", the 'GENERAL SETUP PAGE' will display on the screen using the DOWN button, and then press RIGHT to confirm the setting. Main SETUP Menu Screen a).Select TV DISPLAY using UP/DOWN, and...
... shown on the full screen. * NORMAL/LB: When the player is connected to a wide screen TV, a wide picture is shown on the screen. Press 'SETUP' again to exit the SETUP Menu and the unit will resume it's last playback mode. 1) Press "Setup", the 'GENERAL SETUP PAGE' will display on the screen using the DOWN button, and then press RIGHT to confirm the setting. Main SETUP Menu Screen a).Select TV DISPLAY using UP/DOWN, and...
User Guide
Page 24
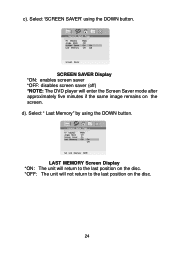
d). Select 'SCREEN SAVER' using the DOWN button. LAST MEMORY Screen Display *ON: The unit will return to the last position on the disc. *OFF: The unit will enter the Screen Saver mode after approximately five minutes if the same image remains on the disc. 24 Select " Last Memory" by using the DOWN button. SCREEN SAVER Display *ON: enables screen saver *OFF: disables screen saver (off) *NOTE: The DVD player will not return to the last position on the screen. c).
d). Select 'SCREEN SAVER' using the DOWN button. LAST MEMORY Screen Display *ON: The unit will return to the last position on the disc. *OFF: The unit will enter the Screen Saver mode after approximately five minutes if the same image remains on the disc. 24 Select " Last Memory" by using the DOWN button. SCREEN SAVER Display *ON: enables screen saver *OFF: disables screen saver (off) *NOTE: The DVD player will not return to the last position on the screen. c).
User Guide
Page 26
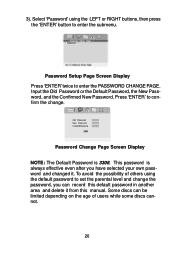
... manual. Select 'Password' using the default password to enter the PASSWORD CHANGE PAGE. Password Change Page Screen Display NOTE: The Default Password is always effective even after you can record this default password in another area and delete it . Press 'ENTER' to enter the submenu. This password is 3308. To avoid the possibility of users while some discs cannot. 26 Password Setup Page Screen Display Press 'ENTER' twice to set the parental level and change . Input the Old Password...
... manual. Select 'Password' using the default password to enter the PASSWORD CHANGE PAGE. Password Change Page Screen Display NOTE: The Default Password is always effective even after you can record this default password in another area and delete it . Press 'ENTER' to enter the submenu. This password is 3308. To avoid the possibility of users while some discs cannot. 26 Password Setup Page Screen Display Press 'ENTER' twice to set the parental level and change . Input the Old Password...
User Guide
Page 30
... storage capacity and low level of whether the battery is used with the battery as a power source, ensure that the battery has been charged for at least eight hours prior to connecting it to change for product improvement without notice. P. Q. Please fully charge the battery prior to provide portability. Rechargeable Built-in Li-polymer Design and Specifications are subject to the DVD player. 30
... storage capacity and low level of whether the battery is used with the battery as a power source, ensure that the battery has been charged for at least eight hours prior to connecting it to change for product improvement without notice. P. Q. Please fully charge the battery prior to provide portability. Rechargeable Built-in Li-polymer Design and Specifications are subject to the DVD player. 30
User Guide
Page 33
This DVD only plays digital video discs, audio CDs and MP3s. This DVD is dirty. Disc won't play • Insert a disc with other region codes cannot be played. Play starts, but then stops immediately • Both the unit and the disc are fresh. • Verify that the remote sensor eye is not obstructed. Clean it. • Condensation has formed. Allow player to dry out. 33 If the regional codes don't match...
This DVD only plays digital video discs, audio CDs and MP3s. This DVD is dirty. Disc won't play • Insert a disc with other region codes cannot be played. Play starts, but then stops immediately • Both the unit and the disc are fresh. • Verify that the remote sensor eye is not obstructed. Clean it. • Condensation has formed. Allow player to dry out. 33 If the regional codes don't match...

User Guide
Page 34
... in connection with reconditioned product (at the address shown below. No person or representative is in lieu of all other rights which , in the opinion of the Company, has suffered or been damaged through alteration, improper installation, mishandling, misuse, neglect, accident, or by removal or defacement of the factory serial number/ bar code label(s). To obtain repair or replacement...
... in connection with reconditioned product (at the address shown below. No person or representative is in lieu of all other rights which , in the opinion of the Company, has suffered or been damaged through alteration, improper installation, mishandling, misuse, neglect, accident, or by removal or defacement of the factory serial number/ bar code label(s). To obtain repair or replacement...


