
User Guide
Page 1
D1988PK PORTABLE 9" LCD MONITOR AND DVD PLAYER WITH BUILT-IN BATTERY
D1988PK PORTABLE 9" LCD MONITOR AND DVD PLAYER WITH BUILT-IN BATTERY

User Guide
Page 2
If the LCD panel or video monitor is used for television reception, video or DVD play that is not applied must be authorized by Macrovision Corporation, and is prohibited. 2 Notice: This Product incorporates copyright protection technology that operates when the ...vehicle is in "park" or when the vehicle's parking brake is used for television reception, video or DVD play , the LCD panel or video monitor must be installed so that these features will not be visible, directly or indirectly, to the operator of...
If the LCD panel or video monitor is used for television reception, video or DVD play that is not applied must be authorized by Macrovision Corporation, and is prohibited. 2 Notice: This Product incorporates copyright protection technology that operates when the ...vehicle is in "park" or when the vehicle's parking brake is used for television reception, video or DVD play , the LCD panel or video monitor must be installed so that these features will not be visible, directly or indirectly, to the operator of...

User Guide
Page 4
The main features include a 9" wide Screen (16:9 Aspect Ratio) Liquid Crystal Display (LCD) monitor and a DVD player. A. The documentation will assist you anywhere and is designed for about one hour before operating the unit, or remove the disc ...to rain or moisture. Caution Do not push objects of reliable, trouble-free service and is compact so that the 9" portable DVD player is designed for choosing the D1988 portable DVD player. Please read the entire instruction manual supplied with the instructions and illustrations provided in 1 card reader and a USB port. ...
The main features include a 9" wide Screen (16:9 Aspect Ratio) Liquid Crystal Display (LCD) monitor and a DVD player. A. The documentation will assist you anywhere and is designed for about one hour before operating the unit, or remove the disc ...to rain or moisture. Caution Do not push objects of reliable, trouble-free service and is compact so that the 9" portable DVD player is designed for choosing the D1988 portable DVD player. Please read the entire instruction manual supplied with the instructions and illustrations provided in 1 card reader and a USB port. ...
User Guide
Page 6
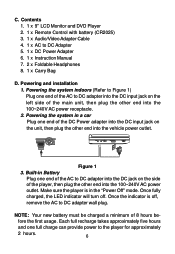
...Once the indicator is in the "Power Off" mode. fore the first usage. C. Make sure the player is off . NOTE: Your new battery must be charged a minimum of the player, then plug the other end into the 100~240V AC power outlet. Each full recharge takes approximately five...into the DC input jack on the side of 8 hours be- Contents 1. 1 x 9'' LCD Monitor and DVD Player 2. 1 x Remote Control with battery (CR2025) 3. 1 x Audio/Video Adapter Cable 4. 1 x AC to the player for approximately 2 hours. 6 Once fully charged, the LED indicator will turn off , remove the AC to...
...Once the indicator is in the "Power Off" mode. fore the first usage. C. Make sure the player is off . NOTE: Your new battery must be charged a minimum of the player, then plug the other end into the 100~240V AC power outlet. Each full recharge takes approximately five...into the DC input jack on the side of 8 hours be- Contents 1. 1 x 9'' LCD Monitor and DVD Player 2. 1 x Remote Control with battery (CR2025) 3. 1 x Audio/Video Adapter Cable 4. 1 x AC to the player for approximately 2 hours. 6 Once fully charged, the LED indicator will turn off , remove the AC to...

User Guide
Page 7
...bag to the vehicle seat back using the headrest strap. Adjust the headrest strap until the bag is firmly secured. 3). E. Vehicle Installation Installing the DVD Player onto the seat back in a car (Refer to headrest support bars using the seat back strap. Adjust the seat back strap until the bag ...is firmly secured. 7 Unfold the carry bag, and place the DVD player on the bag beneath the elastic straps. Secure the lower portion of the carry bag to Figure 3) Carry Bag Opened Carry Bag Closed Elastic ...
...bag to the vehicle seat back using the headrest strap. Adjust the headrest strap until the bag is firmly secured. 3). E. Vehicle Installation Installing the DVD Player onto the seat back in a car (Refer to headrest support bars using the seat back strap. Adjust the seat back strap until the bag ...is firmly secured. 7 Unfold the carry bag, and place the DVD player on the bag beneath the elastic straps. Secure the lower portion of the carry bag to Figure 3) Carry Bag Opened Carry Bag Closed Elastic ...

User Guide
Page 9
..." . Rotate BRIGHTNESS and VOLUME to Figure 4) 1) Setup Button 2) Up Button 3) Skip - Remote Control (Refer to adjust the LCD's brightness and the DVD player's volume. Place a disc in the direction of the arrow. e. Button 4) Enter Button 5) Reverse/Left Keypad 6) Down Button 7) Numeric Buttons 8) Display Button ...4 F. The unit will light. To stop playing a disc, press STOP. 2. To turn off the DVD player, slide the POWER ON/OFF switch to the unit, power on the DVD player with label side facing up. Loading and Playing a Disc a. Close the tray by sliding the OPEN switch...
..." . Rotate BRIGHTNESS and VOLUME to Figure 4) 1) Setup Button 2) Up Button 3) Skip - Remote Control (Refer to adjust the LCD's brightness and the DVD player's volume. Place a disc in the direction of the arrow. e. Button 4) Enter Button 5) Reverse/Left Keypad 6) Down Button 7) Numeric Buttons 8) Display Button ...4 F. The unit will light. To stop playing a disc, press STOP. 2. To turn off the DVD player, slide the POWER ON/OFF switch to the unit, power on the DVD player with label side facing up. Loading and Playing a Disc a. Close the tray by sliding the OPEN switch...

User Guide
Page 10
... the subtitle language and turn it on /off AUDIO Select the audio language SETUP Display the setup menu to re-start play. WIDE On the DVD player only: change between wide screen and 4:3 picture aspect ratio. 10 Basic Operation POWER Turn the unit on /off OPEN Remove/load the disc PAUSE Press...
... the subtitle language and turn it on /off AUDIO Select the audio language SETUP Display the setup menu to re-start play. WIDE On the DVD player only: change between wide screen and 4:3 picture aspect ratio. 10 Basic Operation POWER Turn the unit on /off OPEN Remove/load the disc PAUSE Press...

User Guide
Page 11
... of your TV or Monitor. The heading will appear on the screen of Chapters (4), and the elapsed playing Time for the title (5). MENU A DVD is divided into sections called titles and chapters. I. Press 'MENU' during playback to select disc playback options using the... DVD root menu. Some DVDs only allow you play a DVD, a root menu of the menu vary from disc to disc. PLAYING TIME AND REMAINING TIME a. The heading will disappear automatically after 3 seconds if...
... of your TV or Monitor. The heading will appear on the screen of Chapters (4), and the elapsed playing Time for the title (5). MENU A DVD is divided into sections called titles and chapters. I. Press 'MENU' during playback to select disc playback options using the... DVD root menu. Some DVDs only allow you play a DVD, a root menu of the menu vary from disc to disc. PLAYING TIME AND REMAINING TIME a. The heading will disappear automatically after 3 seconds if...

User Guide
Page 13
2. To turn subtitles OFF, press the 'SUB' button until 'SUB OFF' is not pressed again within 3 seconds. If there are multiple languages press 'SUB' again to this function through the DVD menu. 13 The Subtitle display will disappear automatically if the 'SUB' button is displayed. Subtitle 01/ 02 Subtitle Screen Display * Some DVDs only allow access to select another subtitle language. SUBTITLE During disc playback press 'SUB' to select the subtitle language you desire*, with the current Subtitle Language Number (1) and the total Number of Subtitle Languages (2) displayed.
2. To turn subtitles OFF, press the 'SUB' button until 'SUB OFF' is not pressed again within 3 seconds. If there are multiple languages press 'SUB' again to this function through the DVD menu. 13 The Subtitle display will disappear automatically if the 'SUB' button is displayed. Subtitle 01/ 02 Subtitle Screen Display * Some DVDs only allow access to select another subtitle language. SUBTITLE During disc playback press 'SUB' to select the subtitle language you desire*, with the current Subtitle Language Number (1) and the total Number of Subtitle Languages (2) displayed.

User Guide
Page 14
... will be enlarged 4X. (4) Press "zoom" a fourth time, the picture will return to select another audio language. Audio 1/ 2: Ac3 5. 1ch Audio Language Screen Display * Some DVDs only allow access to press the 'ZOOM' button will disappear automatically if the 'AUDIO' button is not pressed within 3 seconds. The audio display will reduce... by 2x, 3x or 4X with the current Audio Channel Number (1) and the total number of Audio Channels (2) displayed. Continuing to this function through the DVD menu. 4. ZOOM Screen Display 14
... will be enlarged 4X. (4) Press "zoom" a fourth time, the picture will return to select another audio language. Audio 1/ 2: Ac3 5. 1ch Audio Language Screen Display * Some DVDs only allow access to press the 'ZOOM' button will disappear automatically if the 'AUDIO' button is not pressed within 3 seconds. The audio display will reduce... by 2x, 3x or 4X with the current Audio Channel Number (1) and the total number of Audio Channels (2) displayed. Continuing to this function through the DVD menu. 4. ZOOM Screen Display 14

User Guide
Page 20
b. Simply plug in the headphones to either Headphone 1 jack* or Headphone 2 jack on the right side of the DVD player ( Refer to Figure 5) a. Connecting to a TV or another monitor ( Refer to Figure 6.) 20 NOT INCLUDED NOT INCLUDED Figure 5 2. Note: Do not connect an AV signal ...source with the unit. M. b. Connect one end of the audio/video cable's black (1/8" plug) plug into the unit's DVD AV jack and connect the other end to Figure 5) a. Connecting to a Game or Camcorder (Refer to the AUDIO Output jacks on your Camcorder or other...
b. Simply plug in the headphones to either Headphone 1 jack* or Headphone 2 jack on the right side of the DVD player ( Refer to Figure 5) a. Connecting to a TV or another monitor ( Refer to Figure 6.) 20 NOT INCLUDED NOT INCLUDED Figure 5 2. Note: Do not connect an AV signal ...source with the unit. M. b. Connect one end of the audio/video cable's black (1/8" plug) plug into the unit's DVD AV jack and connect the other end to Figure 5) a. Connecting to a Game or Camcorder (Refer to the AUDIO Output jacks on your Camcorder or other...

User Guide
Page 21
... files into the appropriate input. 1) Insert an SD/MMC/MS Card into the SD/MMC/MS Slot on the front of the unit. 3) Press the DVD/SD-USB Button. SD/MMC/MS Card and Thumb Drive/Digital Cameras With no disc in an icon will enlarge picture 125%,150%,200% or...
... files into the appropriate input. 1) Insert an SD/MMC/MS Card into the SD/MMC/MS Slot on the front of the unit. 3) Press the DVD/SD-USB Button. SD/MMC/MS Card and Thumb Drive/Digital Cameras With no disc in an icon will enlarge picture 125%,150%,200% or...
User Guide
Page 24
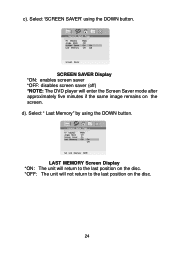
Select 'SCREEN SAVER' using the DOWN button. c). Select " Last Memory" by using the DOWN button. SCREEN SAVER Display *ON: enables screen saver *OFF: disables screen saver (off) *NOTE: The DVD player will not return to the last position on the disc. *OFF: The unit will enter the Screen Saver mode after approximately five minutes if the same image remains on the disc. 24 LAST MEMORY Screen Display *ON: The unit will return to the last position on the screen. d).
Select 'SCREEN SAVER' using the DOWN button. c). Select " Last Memory" by using the DOWN button. SCREEN SAVER Display *ON: enables screen saver *OFF: disables screen saver (off) *NOTE: The DVD player will not return to the last position on the disc. *OFF: The unit will enter the Screen Saver mode after approximately five minutes if the same image remains on the disc. 24 LAST MEMORY Screen Display *ON: The unit will return to the last position on the screen. d).
User Guide
Page 30
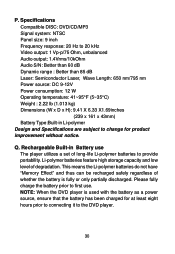
...the battery has been charged for product improvement without notice. Please fully charge the battery prior to provide portability. P. NOTE: When the DVD player is fully or only partially discharged. Q. This means the Li-polymer batteries do not have "Memory Effect" and thus can be recharged ... Weight : 2.22 lb (1.013 kg) Dimensions (W x D x H): 9.41 X 6.33 X1.69inches (239 x 161 x 43mm) Battery Type:Built-in Battery use The player utilizes a set of long-life Li-polymer batteries to first use. Rechargeable Built-in Li-polymer Design and Specifications are subject to change for at...
...the battery has been charged for product improvement without notice. Please fully charge the battery prior to provide portability. P. NOTE: When the DVD player is fully or only partially discharged. Q. This means the Li-polymer batteries do not have "Memory Effect" and thus can be recharged ... Weight : 2.22 lb (1.013 kg) Dimensions (W x D x H): 9.41 X 6.33 X1.69inches (239 x 161 x 43mm) Battery Type:Built-in Battery use The player utilizes a set of long-life Li-polymer batteries to first use. Rechargeable Built-in Li-polymer Design and Specifications are subject to change for at...
User Guide
Page 32
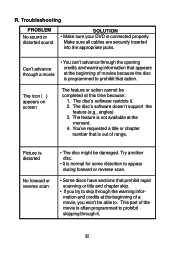
... feature (e.g., angles) 3. You've requested a title or chapter number that is connected properly. Troubleshooting PROBLEM No sound or distorted sound SOLUTION • Make sure your DVD is out of a movie, you won't be able to prohibit that prohibit rapid scanning or title and chapter skip. • If you try to skip...
... feature (e.g., angles) 3. You've requested a title or chapter number that is connected properly. Troubleshooting PROBLEM No sound or distorted sound SOLUTION • Make sure your DVD is out of a movie, you won't be able to prohibit that prohibit rapid scanning or title and chapter skip. • If you try to skip...
User Guide
Page 33
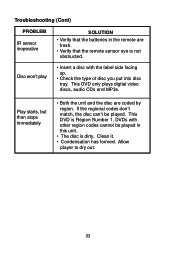
... • Both the unit and the disc are fresh. • Verify that the batteries in this unit. • The disc is dirty. This DVD is Region Number 1. Allow player to dry out. 33 Disc won't play • Insert a disc with other region codes cannot be played. If the regional codes don't match... played in the remote are coded by region. Troubleshooting (Cont) PROBLEM IR sensor inoperative SOLUTION • Verify that the remote sensor eye is not obstructed. DVDs with the label side facing up. • Check the type of disc you put into disc tray.
... • Both the unit and the disc are fresh. • Verify that the batteries in this unit. • The disc is dirty. This DVD is Region Number 1. Allow player to dry out. 33 Disc won't play • Insert a disc with other region codes cannot be played. If the regional codes don't match... played in the remote are coded by region. Troubleshooting (Cont) PROBLEM IR sensor inoperative SOLUTION • Verify that the remote sensor eye is not obstructed. DVDs with the label side facing up. • Check the type of disc you put into disc tray.


