Operation Manual
Page 1
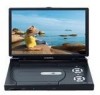
D2017PK PORTABLE 10.2" LCD MONITOR AND DVD PLAYER
D2017PK PORTABLE 10.2" LCD MONITOR AND DVD PLAYER

Operation Manual
Page 2
... installed so that operates when the vehicle is in gear or when the parking brake is not applied must be authorized by Macrovision Corporation, and is intended for television reception, video or DVD play that these features will not be visible, directly or indirectly, to the driver if the LCD panel or video monitor is used for home and other limited viewing uses...
... installed so that operates when the vehicle is in gear or when the parking brake is not applied must be authorized by Macrovision Corporation, and is intended for television reception, video or DVD play that these features will not be visible, directly or indirectly, to the driver if the LCD panel or video monitor is used for home and other limited viewing uses...

Operation Manual
Page 3
Content A. Vehicle Installation 7 F. Controls, Indicators and Connectors 8 G. Basic Operation 10 I. Display 11 K. Playing MP3 Discs 15 M. Cautions and Warnings 4 C. Specifications 23 Q Rechargeable Battery Installation and Use 23 R. Troubleshooting 26 3 Introduction 4 B. Menu 11 J. Loading and Playing a Disc 9 H. Setup 20 P. Playing Audio CDS 14 L. Connecting to Other Electronic Equipment 18 O. Contents 6 D. Powering and Installation 6 E. Playing JPEG file 17 N.
Content A. Vehicle Installation 7 F. Controls, Indicators and Connectors 8 G. Basic Operation 10 I. Display 11 K. Playing MP3 Discs 15 M. Cautions and Warnings 4 C. Specifications 23 Q Rechargeable Battery Installation and Use 23 R. Troubleshooting 26 3 Introduction 4 B. Menu 11 J. Loading and Playing a Disc 9 H. Setup 20 P. Playing Audio CDS 14 L. Connecting to Other Electronic Equipment 18 O. Contents 6 D. Powering and Installation 6 E. Playing JPEG file 17 N.

Operation Manual
Page 4
..., trouble-free service, and is compact so that the D2017PK portable DVD player is brought directly from strong magnets, heat sources, direct sunlight, excessive dust. Please save this manual for quick and easy installation. Keep the unit away from a cold to a warm location, moisture may result in vehicles, hotels, offices or your home. If the unit is used in accordance with the instructions and...
..., trouble-free service, and is compact so that the D2017PK portable DVD player is brought directly from strong magnets, heat sources, direct sunlight, excessive dust. Please save this manual for quick and easy installation. Keep the unit away from a cold to a warm location, moisture may result in vehicles, hotels, offices or your home. If the unit is used in accordance with the instructions and...

Operation Manual
Page 5
... unit plays discs according to the instructions supplied with the same or equivalent type. Contact qualified service personnel if your system needs repair. 5. Do not use the unit in its edge. Discs Do not use liquid cleaners or aerosol cleaners. Replace the battery only with the discs. 5 Clean the disc by its case after playing. Also refer to the disc contents the software producers designed, some playback...
... unit plays discs according to the instructions supplied with the same or equivalent type. Contact qualified service personnel if your system needs repair. 5. Do not use the unit in its edge. Discs Do not use liquid cleaners or aerosol cleaners. Replace the battery only with the discs. 5 Clean the disc by its case after playing. Also refer to the disc contents the software producers designed, some playback...
Operation Manual
Page 6
... Power adapter into the DC input jack on the unit, then plug the other end into the vehicle power outlet. Powering the system in a car Plug one end of the AC to DC Adapter 5. 1 x DC Power Adapter 6. 1 x Instruction Manual 7. 1 x Rechargeable Battery 8. 1 x Carry Bag With Straps 9. 2 x Foldable Headphones D. Powering and Installation 1. This unit's code is region 1. Powering the system indoors (Refer to play . Contents 1. 1 x 10.2'' LCD Monitor & DVD Player 2. 1 x Remote Control with other regional codes...
... Power adapter into the DC input jack on the unit, then plug the other end into the vehicle power outlet. Powering the system in a car Plug one end of the AC to DC Adapter 5. 1 x DC Power Adapter 6. 1 x Instruction Manual 7. 1 x Rechargeable Battery 8. 1 x Carry Bag With Straps 9. 2 x Foldable Headphones D. Powering and Installation 1. This unit's code is region 1. Powering the system indoors (Refer to play . Contents 1. 1 x 10.2'' LCD Monitor & DVD Player 2. 1 x Remote Control with other regional codes...

Operation Manual
Page 7
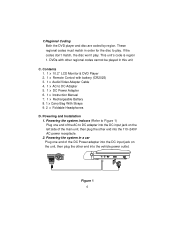
... 2) Carry Bag Opened Carry Bag Closed Elastic Straps Vehicle Headrest Vehicle Seat Back Headrest Strap Seat Back Strap Figure 2 1). Adjust the seat back strap until the bag is firmly secured. 7 Adjust the headrest strap until the bag is firmly secured. 3). Vehicle Installation Installing the DVD Player onto the seat back in a car (Refer to headrest support bars using the seat...
... 2) Carry Bag Opened Carry Bag Closed Elastic Straps Vehicle Headrest Vehicle Seat Back Headrest Strap Seat Back Strap Figure 2 1). Adjust the seat back strap until the bag is firmly secured. 7 Adjust the headrest strap until the bag is firmly secured. 3). Vehicle Installation Installing the DVD Player onto the seat back in a car (Refer to headrest support bars using the seat...

Operation Manual
Page 8
... Battery 2) DC 9-12V Input Jack 3) AV Jack 4) AV In/Out SW 5) USB Port 6) Power On/Off SW 7) SD/MMC/MS Slot 8) Power LED 9) Remote Control Sensor 10) Cover Open Switch 11) Charge Indicator 12) Headphone Jack 1* 13) Headphone Jack 2 14)Volume Control 15) LCD Panel shut off 16) Wide Button 17) Previous/Next/Pause/Stop/Play 18) Menu Button 19) Up/Down/Left/Right/OK Button * Connecting to headphone jack number 1 will disable...
... Battery 2) DC 9-12V Input Jack 3) AV Jack 4) AV In/Out SW 5) USB Port 6) Power On/Off SW 7) SD/MMC/MS Slot 8) Power LED 9) Remote Control Sensor 10) Cover Open Switch 11) Charge Indicator 12) Headphone Jack 1* 13) Headphone Jack 2 14)Volume Control 15) LCD Panel shut off 16) Wide Button 17) Previous/Next/Pause/Stop/Play 18) Menu Button 19) Up/Down/Left/Right/OK Button * Connecting to headphone jack number 1 will disable...
Operation Manual
Page 9
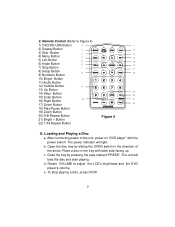
...Place a disc in the direction of the arrow. c. Open the disc tray by pressing the area marked "PRESS" .The unit will light. Rotate VOLUME to Figure 4) 1) DVD/SD-USB Button 2) Display Button 3) Skip -Button 4) Menu Button 5) Left Button 6) Angle Button 7) Stop Button 8) Setup Button 9) Numbers Button 10) Bright- To stop playing a disc, press STOP. 9 The power indicator will load the disc and start playing. e. 2. After connecting power to the unit, power on "DVD player" with label side facing up. Button 11) Audio Button 12) Subtitle Button 13) Up Button 14) Skip+ Button 15...
...Place a disc in the direction of the arrow. c. Open the disc tray by pressing the area marked "PRESS" .The unit will light. Rotate VOLUME to Figure 4) 1) DVD/SD-USB Button 2) Display Button 3) Skip -Button 4) Menu Button 5) Left Button 6) Angle Button 7) Stop Button 8) Setup Button 9) Numbers Button 10) Bright- To stop playing a disc, press STOP. 9 The power indicator will load the disc and start playing. e. 2. After connecting power to the unit, power on "DVD player" with label side facing up. Button 11) Audio Button 12) Subtitle Button 13) Up Button 14) Skip+ Button 15...
Operation Manual
Page 10
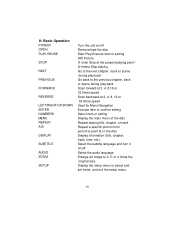
Select the subtitle language and turn it on /off Select the audio language Enlarge an image to point B of the disc Repeat playing title, chapter, or track Repeat a specific portion from point A to 2, 3, or 4 times the original size. Basic Operation POWER OPEN PLAY /PAUSE STOP NEXT PREVIOUS FORWARD REVERSE LEFT/RIGHT/UP/DOWN ENTER NUMBERS MENU REPEAT A-B DISPLAY SUBTITLE AUDIO ZOOM SETUP Turn the unit on /off Remove/load the disc Start Play/Execute item or setting Still Picture (1 time) Stop at the present playing point / (2 times) Stop playing Go...
Select the subtitle language and turn it on /off Select the audio language Enlarge an image to point B of the disc Repeat playing title, chapter, or track Repeat a specific portion from point A to 2, 3, or 4 times the original size. Basic Operation POWER OPEN PLAY /PAUSE STOP NEXT PREVIOUS FORWARD REVERSE LEFT/RIGHT/UP/DOWN ENTER NUMBERS MENU REPEAT A-B DISPLAY SUBTITLE AUDIO ZOOM SETUP Turn the unit on /off Remove/load the disc Start Play/Execute item or setting Still Picture (1 time) Stop at the present playing point / (2 times) Stop playing Go...

Operation Manual
Page 15
... discs that the CD has been playing. USING THE1/ALL REPEAT FEATURE The default mode for storing digital audio. Press ENTER to choose a song from the folder list on the CD. You can use the menu screen to select your desired folders and songs or the system plays the songs in MP3 format are compatible with very little loss of the screen. 2. The CD time Information will be displayed...
... discs that the CD has been playing. USING THE1/ALL REPEAT FEATURE The default mode for storing digital audio. Press ENTER to choose a song from the folder list on the CD. You can use the menu screen to select your desired folders and songs or the system plays the songs in MP3 format are compatible with very little loss of the screen. 2. The CD time Information will be displayed...

Operation Manual
Page 18
... of the audio/video adapter cable's black 1/8" plug into the unit's AV jack using a standard A/V cable (not supplied), and connect the other Electronic Equipment 1. Position the AV In/Out Switch to the AUDIO/VIDEO Input jacks on your TV or Monitor (white = left audio channel, red = right audio channel, yellow = video). Using a standard A/V cable (not supplied), connect the other end to "In" Position. b. Note: Please do not connect an AV signal source to...
... of the audio/video adapter cable's black 1/8" plug into the unit's AV jack using a standard A/V cable (not supplied), and connect the other Electronic Equipment 1. Position the AV In/Out Switch to the AUDIO/VIDEO Input jacks on your TV or Monitor (white = left audio channel, red = right audio channel, yellow = video). Using a standard A/V cable (not supplied), connect the other end to "In" Position. b. Note: Please do not connect an AV signal source to...

Operation Manual
Page 19
... the unit. 3) Connect the USB cable (not supplied) from a camera into the appropriate input. Press the DVD/SD-USB button the appropriate position. SD Card and Thumb Drive/Digital Cameras With no disc in the headphones to Figure 6.) * * Figure 6 Plugging into Headphone jack 1 disables the internal speakers. 4. Headphones Wired headphones may be used with JPEG or MP3 files into the USB port on the...
... the unit. 3) Connect the USB cable (not supplied) from a camera into the appropriate input. Press the DVD/SD-USB button the appropriate position. SD Card and Thumb Drive/Digital Cameras With no disc in the headphones to Figure 6.) * * Figure 6 Plugging into Headphone jack 1 disables the internal speakers. 4. Headphones Wired headphones may be used with JPEG or MP3 files into the USB port on the...
Operation Manual
Page 20
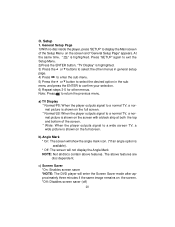
... screen with a black strip at both the top and bottom of the Setup Menu on the screen. *Off: Disables screen saver (off) 20 Press 'SETUP' again to confirm your selection. 6) Repeat steps 3-5 for other menus. b).Angle Mark * On: The screen will show the angle mark icon. (*If an angle option is highlighted. a) TV Display * Normal/PS: When the player outputs signal to a normal TV, a normal picture...
... screen with a black strip at both the top and bottom of the Setup Menu on the screen. *Off: Disables screen saver (off) 20 Press 'SETUP' again to confirm your selection. 6) Repeat steps 3-5 for other menus. b).Angle Mark * On: The screen will show the angle mark icon. (*If an angle option is highlighted. a) TV Display * Normal/PS: When the player outputs signal to a normal TV, a normal picture...
Operation Manual
Page 22
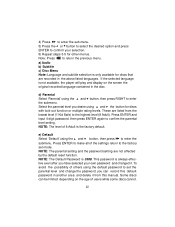
... the factory set the parental level and change the password, you desire using the default password to confirm the parental level setting. This password is only available for discs with lock-out function or multiple rating levels. Some discs can record this manual. Select the parental level you can be limited depending on the screen the original recorded language contained in the disc. a) Audio b) Subtitle c) Disc Menu Note: Language and subtitle selection is always effec- NOTE: The parental setting and the password setting are listed...
... the factory set the parental level and change the password, you desire using the default password to confirm the parental level setting. This password is only available for discs with lock-out function or multiple rating levels. Some discs can record this manual. Select the parental level you can be limited depending on the screen the original recorded language contained in the disc. a) Audio b) Subtitle c) Disc Menu Note: Language and subtitle selection is always effec- NOTE: The parental setting and the password setting are listed...
Operation Manual
Page 23
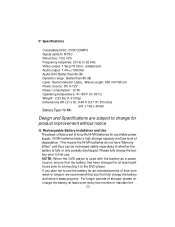
Specifications Compatible DISC: DVD/CD/MP3 Signal system: NTSC Panel size: 10.2 inch Frequency response: 20 Hz to 20 kHz Video output: 1 Vp-p/75 Ohm, unbalanced Audio output: 1.4Vrms/10kOhm Audio S/N: Better than 60 dB Dynamic range : Better than 85 dB Laser: Semiconductor Laser, Wave Length: 650 nm/795 nm Power source: DC 9-12V Power consumption: 12 W Operating temperature: 41~95°F (5~35°C) Weight : 2.23...
Specifications Compatible DISC: DVD/CD/MP3 Signal system: NTSC Panel size: 10.2 inch Frequency response: 20 Hz to 20 kHz Video output: 1 Vp-p/75 Ohm, unbalanced Audio output: 1.4Vrms/10kOhm Audio S/N: Better than 60 dB Dynamic range : Better than 85 dB Laser: Semiconductor Laser, Wave Length: 650 nm/795 nm Power source: DC 9-12V Power consumption: 12 W Operating temperature: 41~95°F (5~35°C) Weight : 2.23...
Operation Manual
Page 24
... you may remove the wall plug and stop charging. At this period, please recharge the battery at least 8 hours. The DC Power Adapter cannot be used to recharge the batteries. 2. Note: when charging for the 1st time, allow the unit to the player for at least once two months to avoid irreparable damage to recharge your Rechargeable Batteries 1. The red charge indicator light on...
... you may remove the wall plug and stop charging. At this period, please recharge the battery at least 8 hours. The DC Power Adapter cannot be used to recharge the batteries. 2. Note: when charging for the 1st time, allow the unit to the player for at least once two months to avoid irreparable damage to recharge your Rechargeable Batteries 1. The red charge indicator light on...
Operation Manual
Page 26
... at this time because: 1. Picture is often programmed to . R. You've requested a title or chapter number that action. The icon ( ) appears on screen The feature or action cannot be completed at the beginning of range. Troubleshooting PROBLEM No sound or distorted sound SOLUTION • Make sure your DVD is out of a movie, you try to prohibit that is connected properly. The disc's software...
... at this time because: 1. Picture is often programmed to . R. You've requested a title or chapter number that action. The icon ( ) appears on screen The feature or action cannot be completed at the beginning of range. Troubleshooting PROBLEM No sound or distorted sound SOLUTION • Make sure your DVD is out of a movie, you try to prohibit that is connected properly. The disc's software...
Operation Manual
Page 27
... out. 27 Allow player to be played. Troubleshooting (Cont) PROBLEM IR sensor inoperative Disc won't play SOLUTION • Verify that the batteries in the remote are coded by region. Clean it. • Condensation has formed. This DVD Player is Region Number 1. • The disc is affixed over the sensor eye of disc you put into disc tray. This DVD only plays digital video discs, audio CDs and MP3s. Play starts, but then stops immediately • Both...
... out. 27 Allow player to be played. Troubleshooting (Cont) PROBLEM IR sensor inoperative Disc won't play SOLUTION • Verify that the batteries in the remote are coded by region. Clean it. • Condensation has formed. This DVD Player is Region Number 1. • The disc is affixed over the sensor eye of disc you put into disc tray. This DVD only plays digital video discs, audio CDs and MP3s. Play starts, but then stops immediately • Both...

Operation Manual
Page 28
... correction of antenna problems, to costs incurred for installation, removal or reinstallation of the product, or to damage to digital memory/media devices, gaming devices, discs, speakers, accessories, or electrical systems. This Warranty does not apply to assume for the Company any part thereof, under normal use and conditions, be proven defective in lieu of this product. U.S.A. : AUDIOVOX ELECTRONICS CORPORATION, 150...
... correction of antenna problems, to costs incurred for installation, removal or reinstallation of the product, or to damage to digital memory/media devices, gaming devices, discs, speakers, accessories, or electrical systems. This Warranty does not apply to assume for the Company any part thereof, under normal use and conditions, be proven defective in lieu of this product. U.S.A. : AUDIOVOX ELECTRONICS CORPORATION, 150...


